I usually make Chilli bajji / Milagai bajji / Mirchi bajji without any stuffing. Recently when I was talking with my friend Shalini, she told me about this Andhra style chilli bajji with a spicy stuffing. In Telugu, they call it as “Mirapakaya bajji”. The moment she told about this recipe, I started drooling and felt like tasting it right away. Without any delay, I bought the bajji milagai on the same day and made it for our evening tea time snacks.
By getting an idea from Shalini, I googled some Andhra style stuffed chilli bajji recipes with tamarind, roasted gram dal or roatsed peanuts. I watched few you tube videos for the stuffing part. But I followed my usual bajji batter recipe for the outer cover. I was completely happy and satisfied with the outcome.
You can use either homemade bajji mix as I did or store bought instant bajji/bonda mix. What more to pen down, spicy stuffed chilli bajji along with hot ginger tea tasted divine for us. Friends, do try this chilli bajji in this weekend and share your feedback with me. Serve hot hot bajji topped with finely chopped onions and coriander leaves drizzled with lemon juice. I am sure your family will enjoy it to the core. Lets see how to prepare this spicy, hot Andhra style stuffed mirchi bajji recipe with stepwise pictures.
Andhra Mirapakaya bajji recipe / Mirchi bajji
Andhra style mirchi bajji recipe for evening tea time !
Cuisine:Indian
Category:Snacks
Yields:10 nos
Prep time:10 Minutes
Cook time:5 Minutes
Total time:15 Minutes
INGREDIENTS
Long Chilli / Bajji milagai - 5 nos
Oil - to deep fry
For the stuffing
Fried gram dal/Pottukadalai OR roasted peanuts - 1/2 cup
Red chilli powder - 1.5 tsp
Ajwain/Omam- 1/2 tsp
Cumin powder - 1/4 tsp
Hing - 1/8 tsp
Chat masala powder - 1/2 tsp
Tamarind - small gooseberry size
Salt & water - as needed
For the bajji batter
Besan flour - 1 cup
Rice flour - 1/3 cup
Cooking soda / Baking soda - 1/8 tsp
Red chilli powder - 1 tsp
Food color - a pinch ( optional)
Hing - 3 pinches
Omam/Ajwain - 1/2 tsp
Salt & water - as needed
METHOD - HOW TO MAKE ANDHRA MIRCHI BAJJI
To make Andhra michi bajji, take all the ingredients given under “for stuffing” and grind them to a paste. Check for taste and add more chilli powder if you need.
Wash and cut the chillies into two vertically. Remove the seeds partially or completely based on the spiciness you need. Keep it aside.
Stuff the chilli as you like and arrange in a plate.
In a wide bowl,take the flours, baking soda, salt and mix well to a paste adding little water. Now add more water and bring it to dosa batter consistency. Make sure there are no lumps in the bajji batter. The chilli should be well coated with the batter. So make the batter slightly thick. Too thick batter gives you hard bajji and too thin batter makes tails in the bajji. So consistency of batter is very important.
Now take a stuffed chilli and dip in the batter. Heat oil to deep fry. To check the heat of oil, put a pinch of batter and if it rises immediately, batter is just right.simmer the flame and drop the chilli coated with bajji batter by holding its stem.
Deep fry both the sides till golden brown and crispy. Enjoy eating hot with tea/coffee !
Chop the onions & coriander leaves finely. Sprinkle some salt and add few drops of lemon juice. Mix well. Sprinkle them on top & serve the bajji.
You don’t need any chutney or side dish for this. But kids may like it with tomato sauce. So serve accordingly !
Note
The consistency of batter is very important.To check the right consistency, just dip your finger in batter. If its coated well, the consistency is correct. If the batter is too thin, finger won’t be coated completely. In that case, add some besan and rice flour to adjust the consistency. Check for salt and proceed.
For variations, you can powder & grind roasted peanuts and sesame seeds instead of gram dal.
Adding ajwain to the bajji batter helps for easy digestion. So do not avoid it. If you don’t have ajwain in hand, use jeera/cumin seeds.
Enjoy this hot, Andhra mirapakaya bajji with your evening tea/coffee !
Palakura pappu/Spinach dal is an Andhra based, simple and easy one pot recipe. It can be made under 15 minutes and its a super healthy dish packed with the nutrition of dal & palak leaves. I had tasted this once in Jayanagar, Nagarjuna restaurant. Long back, I shared this Palakoora pappu recipe tried from Sailu’s food in my Andhra Lunch Menu post.
This time I tried it by getting the recipe from my friend Megha & I modified it slightly as per our taste. As her in-laws belong to Andhra, she makes this palak dal very often. Nowadays I make this for Sendhil’s lunch box whenever I don’t have enough time to prepare in busy mornings. Its a great recipe for Bachelors and working women. You can prepare this recipe at least once in a week and have a simple and healthy lunch.
My friend made it spicy but I had reduced the chillies as per my family’s taste. Also Megha told me to add little tamarind extract at the end but I used tomato here. But I read in readers comments in Vahchef's site that palak & tomato should be not be used together. I don't know the actual reason for it. So I am planning to use tamarind extract or lemon juice in place of tomato from next time. Please enlighten me if you know the correct reason. Try this easy palak dal recipe for rice and enjoy !
Palakura pappu recipe
Andhra style dal palak - Palakura pappu
Cuisine:Indian
Category:Lunch
Serves:Serves 4
Prep time:5 Minutes
Cook time:10 Minutes
Total time:15 Minutes
INGREDIENTS
1 cup - 250ml
Palak/Spinach - 2 cups ( 1 big bunch)
Toor dal - 1/2 cup
Tamarind or Tomato OR lemon juice - Berry size or 1 no (Do not chop the tomato)/ few drops
Salt & water - as needed
Big onion - 1 no
Green chillies – 4 nos ( I used 2)
Ginger - 1 inch (finely chopped)
Turmeric powder - 1/4 tsp
Sugar – a pinch
Oil - a drop
To temper
Cooking oil or ghee - 1 tbsp
Mustard seeds - 1/2 tsp
Urad dal - 1 tsp
Garlic cloves - 5 nos ( crushed with skin)
Red chillies - 2 nos ( I used guntur chilli)
Cumin seeds - 1/2 tsp
Curry leaves - few
Hing/Asafetida - a big pinch
METHOD
Wash and chop the palak leaves finely.In a pressure cooker base, take the toor dal and add 1.5 to 2 cups of water. Add turmeric powder,roughly chopped big onion, one full tomato(optional) slitted green chillies ginger, ,salt, sugar and chopped palak leaves.{Here I used one tomato.But I read its not good to add palak & tomato together. So If uou don’t want to use tomato, use 1 tsp tamarind extract after cooking the dal and boil well}
Let it pressure cook in low flame for one whistle.After the steam is released,open the cooker and mash everything well using a thick ladle or whisk. Boil it to bring its right consistency.( If you don’t want to use tomato, add tamarind extract after opening the cooker now and boil the mixture for a minute)
In a kadai, heat ghee or oil and splutter mustard seeds, urad dal, cumin seeds, red chilli and crushed garlic cloves. Saute well for a minute and add them to the boiling dal.
Add tamarind extract if uing. Boil for a minute. After the dal becomes slightly thick and pourable, remove it and serve hot with rice adding a drop of ghee. Enjoy ! (Note : You can also add few drops of lemon juice instead of tomato or tamarind).
Note
I read in Vahchef’s site by readers that palak & tomato should not be cooked together. I am not sure about the reason. So if you want to skip tomato, add thick tamarind extract only after cooking the dal palak mixture. You can also use lemon juice instead of tomato or tamarind.
If using tomato, do not chop it and add to dal. Dal won’t be cooked well n mushy. So add it as whole tomato.
Make sure the dal is mashed well after cooking else the mixture will look watery and separate.
You can replace toor dal with moong dal too.
This palakura pappu can be done in another way.ie. Heat oil in a cooker. Temper all the spices given above and then add onions, green chillies, ginger. Saute them for a while and now add the moong dal and washed palak leaves. Add required water and salt. Pressure cook everything for one whistle in low flame.
Easy, healthy Palakura Pappu is ready to relish with hot rice n ghee !
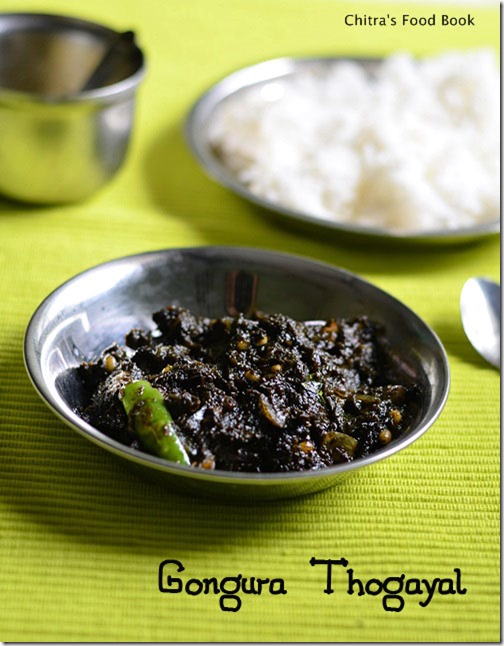
Gongura/Red Sorrel leaves in English,Ambadi in Gujrati,Marathi,Pitwa in Hindi,Pundi in Kannada & Pulichai Keerai in Tamil,Mestapat in bengali and Nalita in other languages is a very famous green variety in Andhra.Most of you would have heard about gongura pickle.But i tried thogayal with it years ago.Yes,this was the first & foremost recipe i tried after marriage from this websiteviagoogle search.Recently a reader asked me to post gongura recipes and especially thogayal recipes.So after a long time,i referred that blog again and made this thogayal yesterday for rice.It was spicy,tangy n yummy when we had with hot rice and ghee.In the original recipe,it was titled as gongura pachadi/gongura chutney but i named it as thogayal because of its thick texture.Its very simple to make and you can store this thogayal for more than a week too.Even bachelor’s can try this and use it for 2-3 days without refrigeration.Soon i will share more gongura recipes like gongura sambar,gongura pappu in my blog and now lets see how to make this yummy Andhra style gongura thogayal for rice.
Gongura thogayal recipe
Andhra style gongura thogayal recipe- Tastes yum with hot rice n ghee !
Cuisine:Indian
Category:Thogayal
Serves:Serves 3
Prep time:10 Minutes
Cook time:10 Minutes
Total time:20 Minutes
INGREDIENTS
To pressure cook
Gongura leaves - Half bunch ( say 3 handful)
Green chillies - 5 nos ( big finger size)
To temper & saute
Sesame oil/Gingely oil OR cooking oil - 2 tbsp
Mustard seeds - 1/2 tsp
Urad dal - 1 tsp
Red chillies - 1 no
Green chillies - 1 no ( slitted)
Curry leaves - few
Hing/Asafetida - A big pinch
Small onions – 5 nos ( whole)
Big onion – 1 no ( small,finely chopped)
METHOD
Wash the gongura leaves,drain the water and take in a pressure cooker base.Add green chillies,salt to it along with little water(Leaves will leave some water.So add little water) Pressure cook in high flame for 2 whistles.Open the lid and let it cool.
Take out 2 green chillies & reserve.Grind the cooked mixture to a smooth paste.Check for taste and add the reserved chillies,grind again. In a kadai,heat oil and splutter mustard seeds,uradl dal,hing,curry leaves,red chillies & green chillies.Add finely chopped big onions and whole,peeled small onions and saute till transparent.
Then add the ground paste and mix will till the mixture thickens and oil leaves from it.If needed add a tbsp of oil in the middle.Remove and let it cool.Store in a box and refrigerate.
Mix with hot rice adding few drops of ghee. Enjoy !
Enjoy !
Note
Adjust the quantity of green chillies as per your spice level.
Add a small piece of jaggery while grinding the leaves.
You should saute till oil leaves from the paste and becomes thick.Else this thogayal will spoil soon.
This thogayal stays good for more than a week if stored properly in refrigerator.Use a clean spoon while you handle.
Enjoy mixing this yummy thogayal with plain hot rice adding few drops of ghee !
Peanut chutney also known as groundnut chutney/ Kadlekai chutney/ Verkadalai chutney/ Palli chutney was in my try list for long time. Though I am not a big fan of it, I wanted to try it for Sendhil. I know he loves peanut a lot. So I got this recipe from my friend Megha who is an expert in cooking Andhra & Karnataka dishes.
I learnt ragi mudde and so many typical Andhra , Karnataka recipes from her. I will share them one by one in future. And coming to this chutney, I have tried many times in my kitchen. Like Sendhil, I too started loving this chutney a lot. I am not sure whether this chutney is of Andhra style because I found different types of Andhra style peanut chutney recipes on net. Whatever be its origin, it tastes great !
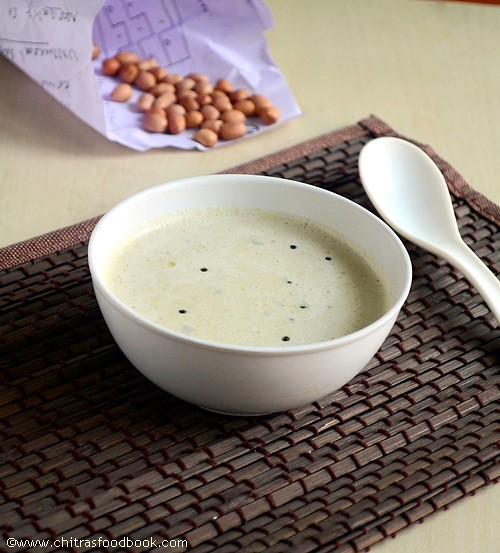
Sometimes I use little milk along with water to make the chutney super white in color & it tastes more like the chutney that is served in road side hotels. It is a best side dish for idli, dosa. U can make “N” number of variations in this chutney. I have shared them in “Notes” section. So if you are a peanut lover, do try this easy groundnut chutney recipe. I am sure,u’ll make it more often like me.
Easy peanut chutney recipe
Peanut chutney for idli,dosa - Easy and tasty side dish!!
Cuisine:Indian
Category:Chutney
Serves:Serves 3
Prep time:5 Minutes
Cook time:10 Minutes
Total time:15 Minutes
INGREDIENTS
1 cup -250ml
Peanuts/Groundnut - 1/2 cup
Green chillies - 3 to 4
Garlic cloves - 4 ( small sized)
Cumin seeds - 1/4 tsp
Coconut – 1 tbsp ( 1 big finger size,optional)
Salt - as needed
Boiled,cooled Milk – 1/4 cup (optional)
Water - as needed
To temper
Cooking oil – 2 tsp
Mustard seeds – 1/2 tsp
Urad dal – 1/2 tsp
Red chillies – 1 no
Curry leaves - few
METHOD
Heat a kadai well for a minute. Simmer the flame and dry roast the peanuts till it turns golden brown. It crackles as soon as it is roasted. Switch off the flame and leave it in hot kadai to become crispy. After it is cooled down, take a handful of peanuts and rub them between your palms to remove its skin. Do in batches and set aside.
Now heat 1 tsp of oil in a kadai and saute the green chillies.
In a mixie jar, add cumin seeds, coconut, green chillies, peanuts, garlic cloves, salt and grind it once to crumble them. Then add little milk + water . Grind it to a smooth paste. Do not use milk if you want to use this chutney for 2 to 3 days storing in refrigerator.
Temper and add to the chutney ! Adjust its consistency by adding water.
Serve with idli, dosa. Enjoy !
Note
For variations
U can use red chillies in place of green chillies
Add 1-2 small onions to the above recipe.
Using coconut is optional.
U can also add few stalks of coriander leaves while grinding.
Roast 1 tbsp of chana dal in little oil and add while grinding.
Adding milk is also optional. But it gives white color to the chutney.
I wish all my friends a very happy Ugadi. Though we don’t celebrate this festival at home , I love Ugadi pachadi and poli with coconut stuffing.. We tamilians celebrate Tamil new year which falls on 14th of this month. We prepare Mango pachadi and rice payasamalong with other lunch recipes. My friends here and in Andhra celebrate this festival in a grand manner. I asked them about their lunch menu for ugadi and they gave me a big list. But I thought of trying this famous ugadi pachadi and obbatu recipe among them. I got these recipes from my friend Megha. She said obattu and ugadi pachadi will be in their menu for sure.. Other than this they prepare Mango rice / puliohara , Vada, sambar , Sundal ,chitranna( Variety rice) and it goes on.
I’ll start with Ugadi pachadi. Its the easiest pachadi I’ve ever made. We too make mango pachadi on Tamil new year day but its a bit time consuming process. But this recipe needs no cooking. Its a mixture of 6 tastes that signifies all kinds of emotions in life i.e sweet , salt , spice , sour, tangy and bitter.. I liked it very much. Adjust the quantity of ingredients based on your liking. I have also shared bobbatlu / obbattu recipe with step by step pictures. Do try these recipes and enjoy the Ugadi festival !
INGREDIENTS 1 cup -250ml
Raw mango – 1/4 cup
Grated jaggery – 3 tbsp
Tamarind – Big gooseberry size or 2 tsp extract
Red chilli powder – 1 tsp
Crushed Neem flower – 1 tbsp (I used dried one, fresh would be fine)
Coconut bits – 1 tbsp (optional)
Water – as needed
Salt – little
HOW TO MAKE UGADI PACHADI - METHOD
Wash and chop the raw mango pieces finely. Soak tamarind in water and take the extract ..
In a bowl , take the raw mango pieces , tamarind extract , red chilli powder , grated jaggery , salt, neem flower and mix well.
Add little water to adjust the consistency based on your liking..
Some like it to have it thick and some likes to be thin. Please add water accordingly.
OBBATU / BOLI / PURAN POLI/BOBATTU Click here to see my latest detailed post on Obbattu
Usually I make poli using the left over channa dal puran. Yesterday when I went for shopping I saw a newly opened stall for selling obbattu and other snacks for Ugadi especially.. I bought some to taste. It was very nice. The thing is they make obbattu in front of us and they serve it really hot. So I was able to see how they rolled , the consistency of dough , puran etc. With that help, I tried it. It was very tasty ..We loved it a lot. It came out soft and thin.
Oil is the most important ingredient here. The more oil you add, the more tasty poli.. Use sesame oil / Gingely oil to get a nice taste. So no need to worry about adding more oil as it is is good for health. Also the consistency of dough should be loose.. It should not be sticky, adding more oil make it non sticky. I have tried to give the quantity of water and oil what I used. Try and adjust if more quantity is needed. Keep the dough covered for 1 hour minimum which also helps to get soft poli. I used obbattu sheet to roll them. In india, you can get in all stores. It costs just 2 rs.. If you don’t get it , you can use either banana leaf , ziplock cover or good quality polythene sheet. Grease it with oil and make the shape.
INGREDIENTS Click here to see my latest detailed post on Obbattu
For dough
Maida / All purpose flour – 1 cup
Gingely oil/Cooking oil – 1/4 cup + 3 tbsp
Water – 1/2 cup (little less , may be 1 tbsp)
Salt – 1/4 tsp
Turmeric powder – 1/4 tsp
Cooking soda – a pinch (optional)
For stuffing / Puran
Grated coconut – 1 cup
Grated jaggery – 3/4 – 1 cup
Cardamom powder – 1/4 tsp
Water – Very little
Poli / Obattu sheet - 1 no ( cut into round shape)
Ghee – 1 tbsp ( for greasing the poli , optional)
METHOD Click here to see my latest detailed post on Obbattu
In a wide bowl , take the flour , salt , turmeric powder , soda , oil and mix well.Add water and make a sticky dough. Then add 1 tbsp of oil over the dough and knead well for 5 minutes to make the dough non-sticky. Add one more tbsp of oil if necessary. Lastly add 3 tbsp of oil and cover the dough. Keep it covered for minimum of 2 hours to maximum 8 hours. The more time you keep the dough the more soft it would be. Click here to see my latest detailed post on Obbattu
Start making puran now. Grate coconut and jaggery. Grind the coconut in Mixie to make it a fine powder. In a non-stick pan, melt the jaggery adding little water just to cover it.. Strain the impurities using a metal strainer if necessary.
Again boil the syrup till it becomes frothy and raw smell of jaggery leaves it. It will take 5-8 mins in low flame.. Then add the grated coconut and mix well till it becomes thick.
Switch off the flame and add the cardamom powder. Mix well and allow it to cool..
Now take the dough, knead well for 10 minutes. The dough should be loose , elastic and pliable. Add more oil if it sticks..
Take a small lemon sized ball of dough and equal sized ball of puran. Pat the dough to make a thick small circle and keep the puran in the middle.
Bring all the corners to the middle and close the ball. Roll it well.
Cut the obbattu sheet into round shape and grease it with oil. Place the ball and press it with your hands to make it very thin. Press it to make it round as per the size of the sheet.
Heat dosa tawa , drizzle little oil and put the obbattu along with the sheet and remove the sheet alone in a second . Cook the poli for few seconds , flip it and again cook for another few seconds. Make sure you don’t over cook it. It will be roasted and becomes like an papad. Cooking has to be done very fastly.
After removing from the tawa , grease it with ghee for additional taste and flavour.. Enjoy !
Note : After it cools down , you can store them in a box for 2-3 days.
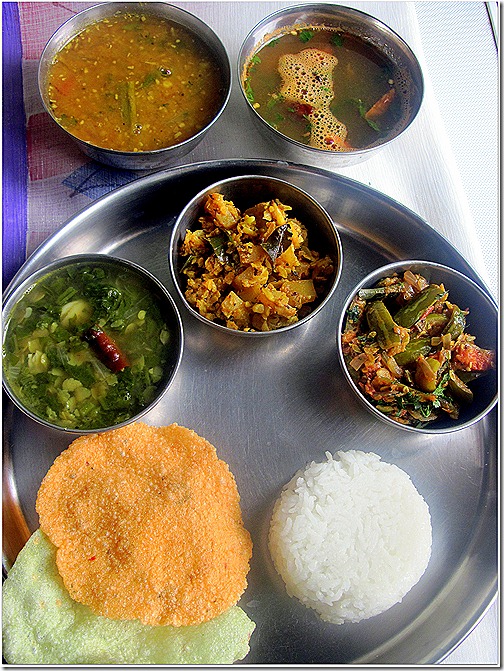
Its been my long time wish to try other state foods. I really got bored of making my usual sambar, vathakulambu etc.. So with my hubby’s acceptance and guidance, I tried Andhra meals / Andhra lunch menu as a first step. He had tasted andhra food in some restaurants like Nandini, Nagarjuna. So he told me the names of dishes they serve in the platter. I googled and found good recipes from some of the blogs. They came out very well.
My hubby thoroughly enjoyed all the dishes I made. I too loved it. My daughter who is a fussy eater loved the food. I was very happy that my first attempt in andhra food was a big success at home. While cooking I found some ingredients, they use commonly in almost all the recipes. They use Red chillies , Ginger & Garlic paste , Hing and ajwain. I think these ingredients gives the aroma and spiciness in their food. My house was filled with nice aroma when I prepare all these dishes. People who love spicy foods must try Andhra food. Ok, coming to the platter.
My hubby told this recipe tasted exactly like the one he had in restaurants. Thanks a lot sailu’s food .
INGREDIENTS 1 cup - 200ml
Toor dal/red gram dal/kandi pappu – 2 handfuls or 1/4 cup
Palakura/palak/spinach leaves –2 small bunches ( washed and finely chopped)
Big onion – 1 no ( chopped)
Turmeric powder - a pinch
Green chillies – 2-3 nos ( slit lengthwise)
Ginger – 1/2 inch piece ( chopped)
Thick Tamarind extract – a tsp ( soak berry sized tamarind and add the extract)
Salt & water – as needed
For seasoning (Use a tsp of ghee)
Mustard seeds – 1/2 tsp
Cumin seeds/jeera – 1/2 tsp
Urad dal- 1/2 tsp
Garlic cloves, crushed – 3-4
Red chillies – 2 nos (pinched )
Curry leaves – few
METHOD
In a pressure cooker, place dal, washed and finely chopped palak leaves, onions, green chillies, ginger and turmeric powder. Add 1 to 2 cups of water and pressure cook upto 2 whistles.
Heat ghee in a kadai, add mustards seeds and after they start to dance , add cumin seeds, urad dal, crushed garlic, pinched red chillies and curry leaves and fry for half a minute.
Add this to the pressure cooked dal along with salt and combine. Add the tamarind extract and cook on slow to medium flame for 5-7 mts without lid or till you get the consistency of your choice.Add water if necessary
Enjoy mixing with plain white rice and ghee !!
NOTE
For variations u can try sauting the onions , green chilles , palak leaves in little oil before pressure cooking with dal.
Always do the seasoning in the end.
If you want, you can do the seasoning using oil and add little ghee on top of the dal.
Give a standing time of at least half an hour before serving for all the tastes to blend.
ANDHRA SAMBAR
I got the following recipes from here. If you want to try varieties of Andhra thali, you must visit this blog to get a good idea. She has given a nice collection of recipes. Thanks Srinithya.
INGREDIENTS
Carrot,potato – 1 no each
Drumstick- 1 no
Tomato - 1 no (chopped)
Big onion –1 no ( chopped)
Toordal- 1/2 cup
Gooseberry sized tamarind – soak in warm water.
Red chilli powder – 1/2 tsp
Madras sambar masala / any sambhar powder – 1 tsp
Poppy seeds/gasalu-1 tsp
Coconut dry / kobbari –2tsp
Ginger garlic paste- 3/4 tsp
Oil-2 tbsp
To temper
Mustard seeds -1 tsp
Jeera / cumin seeds –1 tsp
Hing -2 pinches
Red chillies – 1 no ( pinched to two)
coriander leaves – to garnish.
METHOD
Pressure cook toor dal and the vegetables . Set aside.
Dry roast poppy seeds, grated coconut and grind it to make a paste along with sambhar powder. keep aside.
In a wide mouthed kadai , add oil and temper the mustard seeds , jeera , hing and turmeric.
Add the G&G paste and saute well. Add the chopped onion and tomato pieces.
Saute till tomato turns mushy. Add the tamarind extract and salt , few curry leaves.Allow it to boil for few mins.
Now add the cooked dal and veggies along with ground poppy seeds paste.
Boil for 10 mins in medium flame. Remove and add coriander leaves.
Serve with hot , plain white rice adding little ghee !!
NOTE
The vegetables should not be over cooked.
As per the original recipe , madras sambar masala is used . But I used my home made sambar powder.
I also used red chillies while tempering and i tempered at the end.
MAMDIKAYA CAULIFLOWER PACHADI | RAW MANGO CAULIFLOWER PACHADI
Thought she has given varieties of pachadi in her blog, I chose this one just becoz of this combination. I wanted to try this combo and as it sounded unique and different. I’ve got an yummy raw mango dish to add in my mango recipes list.
INGREDIENTS
Green Raw mango pieces - 1 no ( medium sized)
Grated cauliflower florets -1/2 cup
Garlic cloves – 5-6 nos ( chopped)
Red chilli powder – 1 to 2 tsp
Roasted cumin fenugreek powder - 1/8 tsp
Turmeric powder -1/8 tsp
Chopped garlic pods-3 tbsp
Salt- to taste
Water – As needed.
To temper
Oil-1 tbsp
Mustard seeds-1 tsp
Jeera – 1/2 tsp
Curry leaves chopped – few
Hing-2 pinches
METHOD
Peel the skin of raw mango and chop it finely. (Its better if you grate it )
Remove the cauliflower florets and add in boiling water along with little turmeric powder and salt.
Remove and grate it. Set aside.
Heat oil in a pan add mustard, jeera , curry leaves and hing
Add garlic and fry till brown.Now add veggies and fry for 2 seconds and close lid and cook till soft,stir in middle to avoid burning. Add little water if necessary.
Add chilli powder , turmeric powder and salt.
Mix and cook for sometime.
Serve with rice as a side dish !!
TINDORA TOMATO CURRY | IVYGOURD TOMATO STIR FRY
I have never used tindora in my cooking. For a change, I tried this curry . My husband who hates tindora loved this a lot.
INGREDIENTS
Dondakaya/ivy guard chopped length wise-1 cup
Chopped tomato –1 no
Chopped big onion – 1no
G&G paste – 1/2 tsp
Red chilli powder- 2 tsp
Salt-to taste
Curry powder-2 tsp ( i used garam masala powder)
Dry coconut powder-1tsp ( i used grated coconut)
Turmeric-1/8 tsp
Oil-3 tbsp
To temper
Mustard seeds-1 tsp
Jeera - 1/2 tsp
Curry leaves- few
Coriander leaves- few to garnish
METHOD
Pressure cook ivy guard pieces till done, drain excess water and set aside.
Fry the pieces in 1 tbsp of oil until crisp and set a side
Heat oil in a pan and temper all the above ingredients. Add onion , ginger garlic paste and fry for 5 minutes till raw smell emanates.
Then add tomatoes and cook till soft.
Add all the powders, salt and ivy guard pieces. Fry for 5 more minutes.
Add coriander leaves and serve.
It smells and tastes gr8 with rice as well as roti. !!
NOTE
I dint deep fry the tindora pieces instead I shallow fried it for sometime and proceeded the recipe.
Make sure the tindora is not overcooked while pressure cooking.
TOMATO DAL RASAM
I made slight changes in the actual recipe to suit my hubby’s taste. It tasted excellent and flavourful the next day. I reheated the rasam and used the same for two days.
INGREDIENTS
Finely chopped tomatoes-3 nos
Berry sized Tamarind
Cooked tuvar dal -1/4 cup
Ajwain/vamu /carom seeds/omam-1/2 tsp
Hing-2 pinches
Crushed garlic- 4 cloves
salt-to taste
Red chillies-2 nos
Turmeric powder -2 pinches
Black pepper powder – 1 tsp
To temper
Mustard seeds – 1/2 tsp
Jeera – 1 tsp
Curry leaves – few
Coriander leaves – to garnish.
METHOD
Pressure cook toor dal with little turmeric powder till mushy and set aside.
In a cooking bowl, add water, tomatoes and tamarind.
Cook till soft and reserve the boiled water.
Grind the tomatoes and tamarind to make a paste.
Crush ajwain with hands and set a side.
Heat oil in a pan add cumin, mustard, hing, ajwain and dry chillies.
Fry well and add garlic pieces.saute till golden brown.
Now add mashed dal, tomato paste, water, crushed ajwain, pinched red chillies, salt and pepper powder.
Boil for sometime. I added little sugar while boiling.


 Andhra style mirchi bajji recipe for evening tea time !