Poosanikai rasavangi / pumpkin kootu for rice is a healthy and tasty side dish for rice. I learnt this vellai poosanikai rasavangi also known as poosanikai kootu from my MIL. Usually we make Kathirikai rasavangi and very rarely vellai poosanikai rasavangi. Whenever we buy white pumpkin, we make juice with it. But this time I wanted to try some other interesting recipes with it. So I asked my MIL for this rasavangi recipe and prepared for our lunch along with coriander leaves thogayal.
Tamil brahmins also make rasavangi but slightly in a different way. They add toor dal or chana dal along with pumpkin. But we add dals only for making rasavangi powder. My MIL makes this gravy in an open pan and cook the pumpkin in tamarind extract. But I make it directly in a pressure cooker. Its an easy one pot kuzhambu for me. This method helps me to cook faster during busy mornings.
When I make this pumpkin gravy, I don’t make any specific side dish. I just make some thogayal or podi to accompany this dish. We mix this gravy with rice adding ghee. Tastes great with simple roasted papad as side dish. We do make a gravy with yellow pumpkin for rice. We call it as Parangikai chutney. Its procedure is completely different from this. I have given the link below. Ok, Lets see how to make white pumpkin kootu/ Vellai poosanikai rasavangi with step by step pictures. Do try this easy poosanikai rasavangi in a pressure cooker. Share your feedback with me.
Splutter mustard, urad dal, curry leaves.Add pumpkin pieces and saute it.
Add turmeric powder, tamarind extract, salt and mix well.
In a kadai,heat oil, roast the ingredients except coconut given under"roast & grind".
Add coconut and grind to smooth powder.
Add this powder to the cooker. Mix well.
Cook in low flame for 2 whistles.
Remove and garnish with coriander leaves.Serve with rice.
Poosanikai rasavangi- Step by step photos
Wash and cut the pumpkin into two halves. Slice them into big pieces and remove the seeds in the middle. Chop into big cubes and slice the skin. Set aside. Soak tamarind in water, take 1 cup extract and keep aside.
In a small kadai, heat oil and roast the dhania, urad dal, chana dal, red chillies, hing and roast till golden. Remove and grind with coconut to a smooth powder.
Heat coconut oil in a cooker base. Splutter mustard seeds, urad dal, curry leaves. Add chopped pumpkin pieces, turmeric powder & saute for a minute.
Add tamarind extract, salt and 1 cup of water. Add the ground powder. Pressure cook in low flame for one whistle.
Open the cooker after steam is released. Garnish with coriander leaves and mix well. Serve hot with rice.
Notes
Adjust the quantity of red chillies as per your taste.
Do not add more tamarind because pumpkin will absorb all the tangy taste.
Usually my MIL cooks the pumpkin separately and add to the gravy. But I make everything in a cooker for ease.
Adding chana dal, urad dal, coconut gives thickness to the gravy.
We usually mix this gravy with rice. You can make it thick and serve as kootu for vathakuzhambu rice.
Try this easy, vellai poosanikai rasavangi recipe for rice and enjoy !
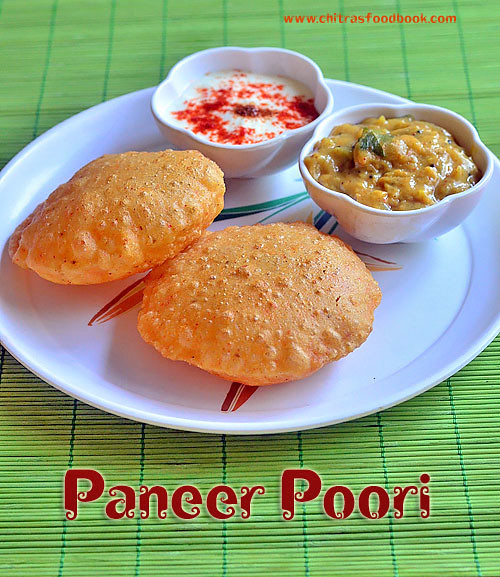
During weekends, I am making varieties of poori for our breakfast and I have been sharing the same in my blog. Last Sunday I prepared this paneer poori (Indian cottage cheese in English) for our breakfast with the leftover paneer cubes. Its a stuffed paneer puri recipe. So you just have to add grated paneer to the wheat flour and make dough with it. Its so simple.
When I was searching for different types of puri recipes, I saw this one in Ramki’s one page cookbook. I liked the idea of paneer stuffed poori and tried this recipe in my own way. It came out really well, puffy and soft. Even though it tastes like masala poori, Paneer gives an additional softness to it and make it healthy too. Semolina/ Rava helps to keep the poori puffy and hold its shape for long time. So kids would love it for sure.
Do try this different type of poori during this vacation for your kids and family. Enjoy the breakfast ! I made masala raita and onion masala as side dish for this poori. It was a good combination. You can make tomato bhaji, potato masala or even chana masala as a side dish. Ok, Lets see how to make yummy, soft paneer poori with step by step photos and a video !
Paneer Poori Recipe - Poori varieties
How to make masala poori with paneer - Paneer puri recipe
Grate the paneer using a grater and measure 3/4 cup from it. Keep it aside.
In a wide bowl or plate, take the wheat flour, besan flour, rava, salt, red chilli powder, garam masala powder, ajwain/Omam OR cumin seeds and grated paneer. Mix everything well without adding water. Mixture looks crumbly.
Now add water gradually and make a smooth dough. Dough should not be too hard or too sticky. Knead it for 5 minutes. Make poori immediately. Keep the remaining dough covered while rolling the poori. Take a portion of dough and make uniform sized balls.
Dust the ball in wheat flour and roll into small thick poori. Remember thin poori won’t puff up. So roll it thick. Refer picture below for thickness.
Heat oil in a kadai to deep fry. Check its temperature by dropping a pinch of dough. If it rises to the top immediately, oil heat is just right. If the heat of oil is less, poori won’t puff up. So check it before deep frying. Reduce the flame to medium and take one rolled poori. Pat it between your palm to remove the excess flour. Drop the poori in oil. When it starts to come up, press the poori with a ladle gently. It puffs up well. Now flip the poori and cook for a minute till bubbles cease. Remove & drain in a tissue paper. Serve hot with masala raita and some bhaji/Poori masala.
TIPS: Increase the flame to high till you drop the next poori. Reduce the flame to medium as soon as u drop it. You can follow this to maintain the heat throughout deep frying. If oil becomes smoky hot, switch off the flame for few minutes. After the oil comes to desired temperature, fry the poori.
Enjoy !
Note
Do not make the dough too sticky or soft. No need to rest the dough. Make poori immediately to prevent oil absorption.
Thickness of poori is very important to puff up. So roll it small and thick.
Heat of oil is also an important factor for puffy poori. Check its temperature.
Oil should not be smoky hot.
Try this yummy paneer poori at home for your weekend breakfast and enjoy !
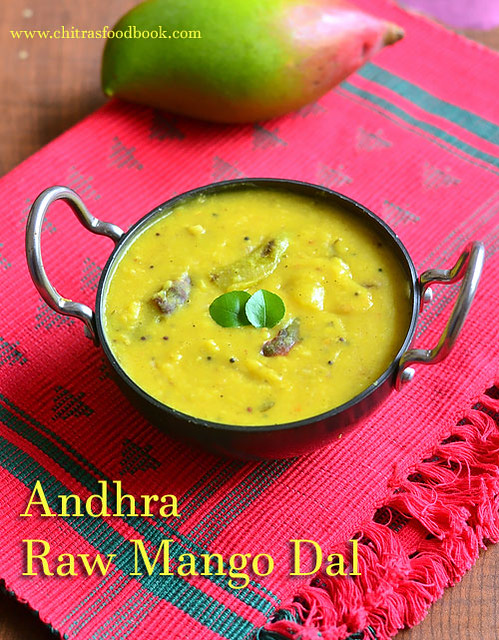
I have heard about this Andhra Raw Mango Dal (Pachi Mamidikaya pappu in Telugu) from my friends. It is nothing but toor dal cooked with raw mango and seasoned with spices. Basically I am a big fan of raw mango recipes. So every year I wait for the mango season to explore new recipes with raw mango and ripe mango as well. This year, I wanted to start my mango recipes with this super easy and quick Andhra style raw mango dal recipe. I got this recipe from my Telugu Brahmin friend Sandhya in my apartment. She taught me this no onion no garlic Andhra style mango pappu. After getting the recipe from her, I browsed & found many recipes with variations. But I blindly followed Sandhya’s recipe as this is my first try. It came out really well. Dal is known to be the best comfort food for rice. This mango dal with a mild tangy and spicy taste is no exception. Sendhil & myself enjoyed this dal by mixing with plain rice adding ghee! I am happy that I learnt an easy and delicious raw mango recipe. Thank u so much Sandhya . As Ugadi festival is fast approaching, most of you must be buying raw mangoes to make Ugadi pachadi. Do try this dal recipe too. You will love it. Ok, Now lets see how to make Andhra mango dal recipe with step by step photos. I will try to share a video recipe soon !
Dry roast 1 tbsp of methi seeds/Fenugreek seeds till it starts to splutter and turn light golden brown in color. Do not burn the seeds while roasting. Remove it when golden and let it cool. Powder it nicely. You can add 1/2 tsp of this powder in this mango dal. Store the remaining powder in a box and use it while making pickles, tamarind rice, vatha kuzhambu etc. My MIL adds a pinch of this powder while making filter coffee decoction. It lends a great flavor and mild bitterness to the coffee.
In a pressure cooker base, take the toor dal and add 2 cups of water. Cook in low flame for 2 whistles.In the mean time, wash and peel the skin of raw mango. ( For variations, you can add chopped mango amd slit green chillies along with toor dal in pressure cooker).
Chop into small pieces and set aside.Discard the seed. In a kadai, heat oil + ghee and splutter mustard seeds, cumin seeds, curry leaves, pinched red chillies, slit green chillies.Saute for few seconds. Add hing and roasted fenugreek seeds powder. Mix well and add the chopped raw mango pieces.
Saute the mango pieces for few minutes till it turns soft. Now add 1cup of water and add the required salt. Cover the kadai with a lid and cook for few minutes till mango pieces are completely cooked and mushy.Now take a masher and mash the mango pieces roughly.
Remove the cooked toor dal and mash it with a whisk.Add this dal to the cooked mango mixture. Mix well and add 1/2 cup of water if its too thick. Add turmeric powder, required salt and 1/4 tsp chilli powder ( optional). Mix well and boil the dal for few minutes. This dal thickens when it cools down.So adjust its consistency accordingly. Transfer the dal to a bowl and serve hot with rice. Add a tsp of ghee while serving. Tastes yum !!
Enjoy !
Note
Adding methi seeds powder gives a nice flavor to this dal.
I have added more turmeric powder.So mine looked more yellow in color. Please reduce it for mild color.
Try this easy mango recipe in this season and enjoy with rice & roti !
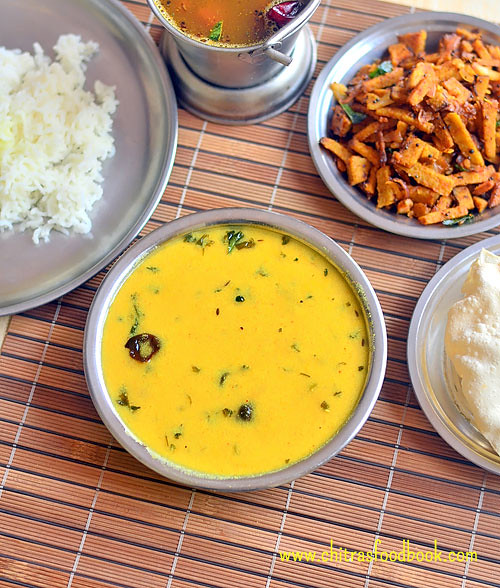
Mor kuzhambu ( Vegetarian buttermilk gravy in English) is our family favorite kuzhambu varieties for rice. Usually I follow my MIL’s or MOM’s recipe. But sometimes I make this easy mor kuzhambu recipe when I have to cook for myself and Raksha as Sendhil is not fond of this version. Its a very simple, no grind mor kuzhambu recipe without coconut. I started making this by following Revathy Shanmugam mam’s recipe from Aval vikatan supplementary issue. But then I made some changes and making it in my own way! I won’t say this one tastes so good like authentic more kuzhambu. But this recipe is surely a quick fix for bachelors & working women who wants to whip up a gravy within 10 minutes for lunch or dinner after coming back from office. It tastes great with fried papad and potato fry or brinjal roast. I served it with yam fry. The taste of this kuzhambu reminds me North Indian style Dahi kadhi slightly. This kulambu can be prepared with or without vegetables.Sometimes I add fried manathakkali or sundakkai vathal too. If you wish to add vegetables, you can add cooked lady’s finger (Vendakkai) or pumpkin( Poosanikai in Tamil). Do try this easy, Instant mor kuzhambu recipe and let me know your feedback ! Lets see how to make South Indian style Mor Kuzhambu with step by step photos.
Gujarati special snack Khaman Dhokla recipe was in my try list for years. Once I had tried steamed dhokla recipe using my pressure cooker but it was not up to the mark. Then I left the idea of trying dhokla at home.
Recently my friend Shalini took me to a chat shop in BDA complex, Banashankari where Khaman dhokla is very popular. After tasting there, I got tempted to try it again. But this time, I tried an easy Instant dhokla in microwave. Yes, I watched this 4 minutes microwave dhokla recipe in a YouTube video and prepared it for our teatime snack yesterday. I made green chutney as well.
Actually I halved the original recipe, made a slight change and tried it. Its so easy to make. It came out soft, porous, spongy and fluffy. This is really a good recipe for instant. Microwave dhokla under 5 minutes. I am very happy with the result.
In this recipe, ENO fruit salt is used to bring the softness. You can replace it with equal quantity of baking powder and baking soda if you want to make it without ENO. Friends do try this easy, microwave dhokla recipe at home and share your feedback with me. Ok, Now lets see microwave dhokla recipe with step by step photos and a detailed video!
Chilli+Ginger paste - 1 tsp OR Green chilli -1 no ( finely chopped) + Ginger - 1/2 inch piece ( finely chopped)
Plain ENO - 1/2 tsp (Use fresh, active ENO)
To Temper
Cooking oil - 1/2 tbsp
Mustard seeds - 1/2 tsp
Green chilli - 1 no ( small, finely chopped)
Curry leaves - few
Coriander leaves - 1 sprig
Sugar - 1 tsp
Water - 1/2 cup
Grated coconut - to garnish
METHOD
Keep all the ingredients ready before you start making. Take a microwave safe bowl ( Preferably square pan to make pieces) and grease it with oil. I used a thermal foil box as shown in the picture. Make sure the sides of box doesn’t touch the walls of microwave oven while cooking. Sparks may appear. So use any microwave safe dish if you have it or follow as I did.
In a wide bowl, add besan flour, curd, water, turmeric powder, chilli+ginger paste or finely chopped green chilli and ginger, salt, sugar and cooking oil. Mix everything well using a whisk. Batter should be of bajji batter consistency. So If needed add 1 tbsp water extra. Do not make the batter runny or too watery. Dhokla won’t cook properly. So add only the mentioned quantity of ingredients.
To the dhokla batter, add ENO fruit salt and mix well. Batter will become fluffy and becomes almost double in quantity. Pour the batter immediately to the greased microwave bowl. Microwave in high powder ( I Kept in 800W) for 4 minutes.(Check it once at 3 minutes). After 4 minutes, remove the dhokla and insert the back of a spoon. If it comes out clean, dhokla is done else keep it for another 30 seconds or 1 minute. Run a knife in the corners and invert the dhokla in a plate after it becomes warm. Cut into pieces.
Heat oil in a kadai and splutter mustard seeds, curry leaves and finely chopped green chillies and coriander leaves. Add water, sugar. Boil for 2 minutes. Add this water over the dhokla pieces and serve with green chutney. Garnish with grated coconut if you like !
For Green chutney : Grind a handful of coriander leaves, 1-2 green chilli, 3 garlic cloves, 1/2 tsp sugar, few drops of lemon juice and required salt to a smooth paste. You can add a tbsp of grated coconut of you wish. Make this chutney and serve it as a side dish for dhokla. Enjoy ! ( Once you get this recipe perfect, you can double the quantity of ingredients and try it. Please follow the mentioned quantity if you are a beginner)
Note
Use all the ingredients of mentioned quantity not less than that. It will give you perfect result.
Do not skip ENO. If you don’t have ENO, add 1/4 tsp baking powder + 1/4 tsp baking soda. Mix the batter and cook immediately.
Do not rest the batter for long time after adding ENO.
The quantity of water may vary slightly as per the thickness of curd. I used semi solid curd not thick.
You can use vinegar instead of lemon juice. But do not avoid it.
If your microwave high power is more than 800w, reduce the cooking time.
Try this easy, instant microwave dhokla recipe at home and enjoy your teatime ! In the chat shop, Dhokla with green chutney was served in a paper plate. So I too did the same.
For this Navratri, I din’t try any new sundal variety. As I have kept Golu in my house, I was busy in inviting guest, giving thamboolam and other household works. So I prepared Green gram sweet sundal, Green gram masala sundal, Badam burfi, Black chana sundal, sweet corn sundal, Rava kesari and Sweet pongal in these 7 days. This morning I prepared Kadalai paruppu Sundal keeping Saraswathi Pooja/Ayudha poojai celebration in mind.
My MIL usually makes Chana sundal i.e Konda Kadalai sundal (In Tamil) along with 5 rice varieties and Vada whereas my mom makes Kadalai paruppu sundal / Bengal gram sundal adding more coconut. As my dad is not fond of chickpeas sundal, mom makes either Kadala paruppu sundal or paasi paruppu sundal(Moong dal sundal) for neivedyam. Its a very easy, quick and no soaking sundal variety. When we forget to soak the legumes, this kadala paruppu sundal will come to rescue. Its healthy as well.You can use the cooked dal water to make rasam or drink it as a soup. Fine, lets see how to make South Indian style Kadalai paruppu sundal / Bengal gram sundal with coconut.
Do check out my other Sundal varieties in this link !
Kadalai paruppu sundal / Bengal gram dal sundal recipe
How to make Kadalai paruppu/ Bengal gram dal sundal recipe - Easy, no soaking sundal variety for Navrarti !
Green chillies - 1 no ( slitted or finely chopped)
HOW TO MAKE KADALAI PARUPPU SUNDAL - METHOD
Wash and take the dal in the cooker base. Add enough water ( I used 2 cups) and pressure cook for 2-3 whistles in very low flame. Kadalai paruppu won’t become mushy very easily. So It would be perfectly cooked in low flame in just 2 whistles. Remove the lid after the steam is released. Check whether it mashes in your finger. Drain the excess water if any and use it for making rasam or dal soup. Make sure you keep 1 tbsp of water in the dal.
In a kadai, heat oil and splutter mustard seeds, urad dal, cumin seeds. Add slitted or finely chopped green chillies, curry leaves & hing. Saute for a minute. Add the cooked dal along with the little water in the cooker. Add the required salt, Mix well & boil till all the water evaporates. Mix it gently without mashing the dal. Lastly add the grated coconut, give a quick stir & switch off the flame. Remove from the kadai & transfer it to a vessel. Offer to God & serve ! This sundal will become grainy once it starts to cool down. So do not panic if it looks slightly mushy while hot.
Enjoy !
Do check out my other Sundal varieties in this link !
Note
Use finely chopped chillies for spicy taste. I use slit chillies.
You can also use finely chopped ginger if you like its flavor.
Optionally, you can garnish this sundal with coriander leaves.
Add more coconut for rich taste.
Easy, quick and healthy Kadalai paruppu sundal is ready to offer GOD and serve !
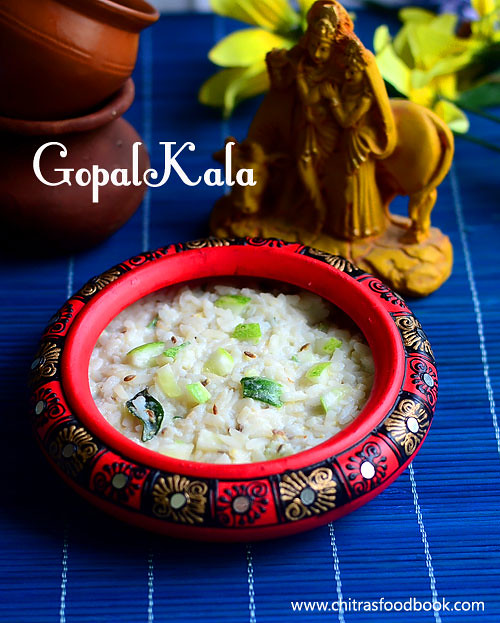
If you are looking for an easy Janmashtami recipe, Gopalkala is the best choice. It is a most popular dish prepared on the occasion of Janmashtami/Krishna jayanthi in North India. It is prepared in temples, offered to Lord Krishna and served as prasad during the festival for the devotees. When Lord Krishna was young, he used to mix all his Cowherd friend’s lunch recipes with his favorite curd, butter, milk, made this dish and served his friends. 'Gopal' is the name of Lord Sri Krishna. 'Kala' means the mixture. So this dish is named as Gopalkala. It is is a mix of beaten rice/ poha, curd,milk, ghee, green chilli, sugar, salt and cucumber.This is also called as Dahi poha. I followed the recipe from this space. There is no hard and fast rule to make this dish. This salty and sumptuous dish is prepared in every home in North India where the festival of Janmashtami is observed. It is extremely easy to prepare and hardly takes few minutes to prepare. Try this easy Janmashtami recipe and have a great celebration !
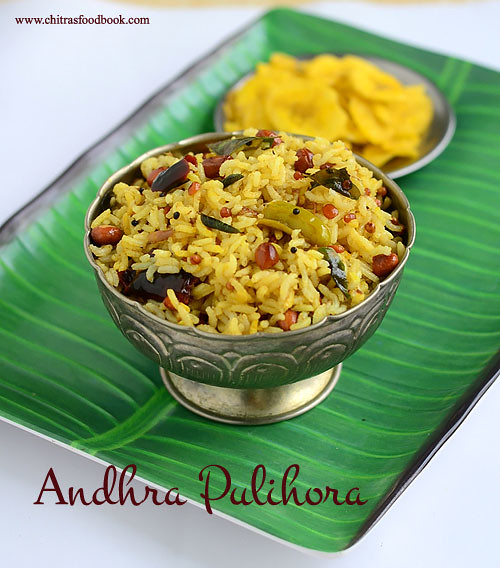
Andhra Pulihora also known as Chintapandu Pulihora in Telugu is a must try recipe during festival time. As Varalakshmi Vratham is fast approaching, I thought of sharing some Andhra style neivedyam recipes for this festival. This morning, I was asking my friend Megha about Varalakshmi Vratham special recipes as her MIL belongs to Andhra. She suggested recipes like Boorelu, appalu, Garelu and Pulihora. As our family is a big fan of tamarind rice, I started with this recipe. The ingredients and preparation of Andhra Pulihora is completely different from our Tamil nadu style Puliodharai. Its a very simple recipe without any grinding job. In the traditional temple style pulihora recipe, they add sesame seeds powder or mustard powder. But I made the basic version as told by Megha and watched Attammaa TV YouTube video recipe too for more reference. This Puliogare paste i.e. Pulihora Pulusu can be quickly made in minutes if you have readymade tamarind paste in hand. Its an ideal choice for quick lunch box recipe. Raksha loved it a lot and asked me for second serving as well. But this pulihora needs a standing time of minimum 2 hours for all its flavors to blend well. So friends do prepare this rice at least two hours before serving to relish its actual taste and flavor. Now lets see the step by step recipe of how to prepare Andhra Pulihora / Chintapandu pulihora in detail.
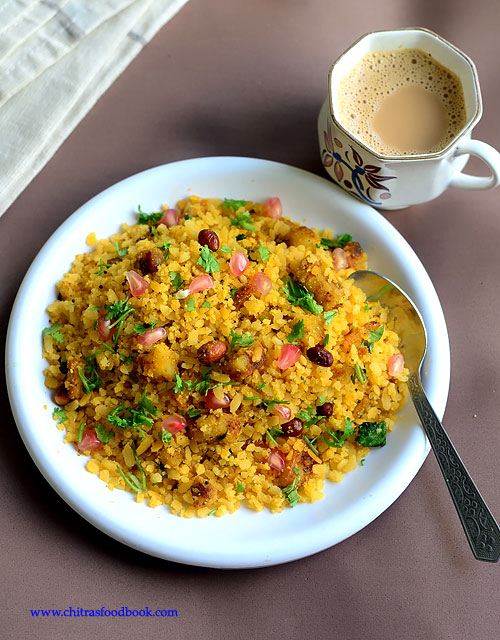
Batata poha ( Batata – Potato, Poha – Rice flakes in English, Aloo Poha in Hindi) is a quick breakfast and teatime snacks recipe which is very popular in Gujarat and Maharashtra. Recently I posted Maharashtrian Kanda pohe recipe( Onion poha). Following that, I tried this Gujarati style Batata poha recipe without onion and garlic for our breakfast.There is no much difference between ingredients of Gujarati & Maharashtrian style batata Poha recipes. So I don’t want to follow the same recipe with slight variations instead I tried this recipe in which spice powders and Garam masala powder were used. I am really not sure whether this is the authentic Gujarati version but it came out very flavorful and definitely tastier than our usual Kanda batata poha. Working women and bachelors can try this for making quick breakfast or dinner and enjoy it with a hot chai. You will find it tummy filling and healthy too ! Lets see how to prepare Gujarati Batata poha/ Aloo Poha recipe without onion with step by step photos !
Raw onion - finely chopped ( optional, I din't use)
METHOD
Wash the thick poha at least twice to remove the dust. Soak it in enough water. i.e the level of water should be just 1/2 inch above poha. Close the bowl with a lid and let it sit for 10 to 15 minutes. In the mean time, wash & peel the skin of potato. Chop it into thin slices as shown in the picture so that it can cook quickly.
Heat 1 tbsp oil in a kadai and roast the raw peanuts first. In the same kadai, add another 2 tbsp of oil and splutter mustard seeds, cumin seeds and turmeric powder along with roasted peanuts.
Add the chopped potato pieces, curry leaves and mix well ( If using boiled potato cubes, add it at the end along with Poha, no need to saute it).Add turmeric powder and salt for the potato to saute & cook quickly. Cover the kadai for sometime, simmer the flame and let the potato pieces cook till soft. Now add the red chilli powder, dhania powder, garam masala powder , sugar and if needed some turmeric powder. Mix well till all the spices well blend with cooked potato.
Lastly add the soaked poha and mix well till all the masala coat well. Check for taste and add more salt or spice powders as per your need.
After the poha is heated well, switch off the flame and garnish with finely chopped coriander leaves, sprinkle some lemon juice. Add some pomegranate seeds if you wish. Serve hot with a cup of Chai/Tea. Enjoy !!
Note
You can saute finely chopped onions along with potato pieces if you wish.It is known as Kanda batata poha in Hindi i.e Onion Potato Poha
Do not reduce the quantity of oil. Oil is more important to make a tasty poha. It doesn’t look dry !
Adjust the quantity of spices as per your taste
Adding sugar gives a mild sweetness to the dish. So skip it if you don’t like.
Using thin poha is also OK but soak it adding correct amount of water else the dish will become mushy.
Try this easy, yummy Gujarati breakfast dish at home and enjoy with a cup of chai !