Pazham pori @ Ethakka appam – Kerala special Nendram pazham bajji ( Ripe banana fritters in English) was in my try list for years. Crispy and hot Pazham pori with tea/Chai is one of the most popular and classic combo in Kerala. People love to have this pazham pori with hot tea as an evening snack. I have tasted this bajji only once in Bangalore - Ernakulum intercity express train pantry car. I loved it very much and I decided to blog this recipe at that instance. But I couldn’t find nendram pazham/etha pazham in my area.
Recently I got few ripen nendram pazham from my neighbor. My neighbors from Kerala used to buy this nendram pazham regularly and feed their toddlers for breakfast as it has lots of health benefits. As soon as I got the ripen banana, this pazham pori recipe flashed in my mind. I browsed for few recipes and videos to make a crispy pazham pori just like the ones I tasted in train. I came across many pazham pori recipes with eggs, besan flour and even with wheat flour. But I wanted to try the traditional, authentic ones with Maida and rice flour.
Finally I got this recipe from my neighbor and tried it for our evening snacks. This sweet bajji is of my kind. I loved it a lot more than Raksha & Sendhil. We are planning to visit Kerala during this summer vacation. I have a big list of dishes to taste in Kerala hotels. This pazham pori is also one among them. I will try to update this post and share a picture in my Instagram feed from Kerala tea shop. Now lets see how to make Kerala special Pazham pori recipe with step by step pictures and video !
Pazham Pori Recipe - Kerala Ethakka Appam
Pazham Pori Recipe - Kerala Ethakka Appam - Kerala Nendram Pazham Bajji Recipe
Sugar – 1 to 2 tbsp ( based on the sweetness of banana)
Turmeric powder – 1/8 tsp
Cooking Soda – a pinch (optional)
Jeera / Cumin seeds – 1/4 tsp
Crushed Cardamom seeds – 1 no ( optional)
Water – 1 cup ( approx)
Cooking oil or coconut oil - to deep fry
HOW TO MAKE PAZHAM PORI - METHOD
Take the ripen banana and peel the skin. Cut into long, thin or thick strips as you wish. Set aside. Taste a small piece of banana to know the sweetness. Mine looked over ripen and black as u see in the picture. But It was mildly sweet. So I had to add more sugar in the batter. The quantity of sugar in the batter depends on the sweetness of banana.
In a wide bowl,take the maida, rice flour, sugar, turmeric powder, cumin seeds, cardamom powder and a small pinch of cooking soda. Adding soda is optional. Mix well.
Add water little by little and make a smooth, lump free batter. Batter should not be too thin or too thick. Its consistency should be like bajji batter.It should fall like a thin ribbon. Batter should coat the banana well. So make it accordingly. Please watch the video for reference. I used approx 1 to 1.25 cups of water.
Heat oil in a kadai and when it gets heated ,drop a pinch of batter to check oil temperature. If it rises to the top immediately, oil heat is just right.
Now take one banana strip and coat well on both the sides in the batter. Drop in hot oil. Deep fry 2-3 pazham pori for one batch. Flip & Cook in medium flame on fry both the sides till golden. Remove in a tissue paper. Serve hot to enjoy its best taste.Tea with pazham pori is a classic combo in Kerala. You too give a try and enjoy !
Note
Rice flour is not used in many recipes. But I added it to make crispy pazham pori.
Cardamom powder is also optional. If you want the flavor of banana to be dominant, skip it.
Adjust the quantity of sugar based on the sweetness of banana.
Adding cooking soda is optional. If you don’t add pazham pori looks flat and thin. But mine looked slightly bulgy because of soda. Its your choice of how you want it.
Try this Kerala special snack – Pazham pori at home for your tea time and enjoy !!
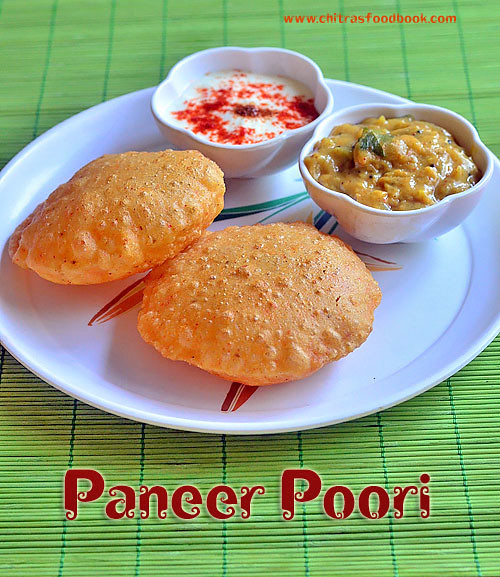
During weekends, I am making varieties of poori for our breakfast and I have been sharing the same in my blog. Last Sunday I prepared this paneer poori (Indian cottage cheese in English) for our breakfast with the leftover paneer cubes. Its a stuffed paneer puri recipe. So you just have to add grated paneer to the wheat flour and make dough with it. Its so simple.
When I was searching for different types of puri recipes, I saw this one in Ramki’s one page cookbook. I liked the idea of paneer stuffed poori and tried this recipe in my own way. It came out really well, puffy and soft. Even though it tastes like masala poori, Paneer gives an additional softness to it and make it healthy too. Semolina/ Rava helps to keep the poori puffy and hold its shape for long time. So kids would love it for sure.
Do try this different type of poori during this vacation for your kids and family. Enjoy the breakfast ! I made masala raita and onion masala as side dish for this poori. It was a good combination. You can make tomato bhaji, potato masala or even chana masala as a side dish. Ok, Lets see how to make yummy, soft paneer poori with step by step photos and a video !
Paneer Poori Recipe - Poori varieties
How to make masala poori with paneer - Paneer puri recipe
Grate the paneer using a grater and measure 3/4 cup from it. Keep it aside.
In a wide bowl or plate, take the wheat flour, besan flour, rava, salt, red chilli powder, garam masala powder, ajwain/Omam OR cumin seeds and grated paneer. Mix everything well without adding water. Mixture looks crumbly.
Now add water gradually and make a smooth dough. Dough should not be too hard or too sticky. Knead it for 5 minutes. Make poori immediately. Keep the remaining dough covered while rolling the poori. Take a portion of dough and make uniform sized balls.
Dust the ball in wheat flour and roll into small thick poori. Remember thin poori won’t puff up. So roll it thick. Refer picture below for thickness.
Heat oil in a kadai to deep fry. Check its temperature by dropping a pinch of dough. If it rises to the top immediately, oil heat is just right. If the heat of oil is less, poori won’t puff up. So check it before deep frying. Reduce the flame to medium and take one rolled poori. Pat it between your palm to remove the excess flour. Drop the poori in oil. When it starts to come up, press the poori with a ladle gently. It puffs up well. Now flip the poori and cook for a minute till bubbles cease. Remove & drain in a tissue paper. Serve hot with masala raita and some bhaji/Poori masala.
TIPS: Increase the flame to high till you drop the next poori. Reduce the flame to medium as soon as u drop it. You can follow this to maintain the heat throughout deep frying. If oil becomes smoky hot, switch off the flame for few minutes. After the oil comes to desired temperature, fry the poori.
Enjoy !
Note
Do not make the dough too sticky or soft. No need to rest the dough. Make poori immediately to prevent oil absorption.
Thickness of poori is very important to puff up. So roll it small and thick.
Heat of oil is also an important factor for puffy poori. Check its temperature.
Oil should not be smoky hot.
Try this yummy paneer poori at home for your weekend breakfast and enjoy !
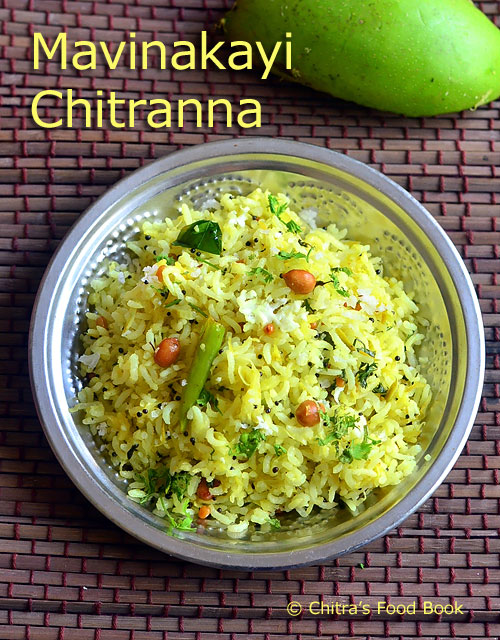
Ugadi festival is around the corner. This year for Ugadi, I am sharing a Karnataka special delicacy Mavinakayi Chitranna recipe. Its nothing but raw mango rice recipe ( Mangai sadam) prepared in Karnataka style. I learnt this recipe from my School momsfriend Archana.
When I was asking her about Ugadi special recipes of Karnataka other than holige/Obbattu, she told me that they make Mavinakayi chitranna , Mavinakayi chutney, kosambari, obbattu saaru and some palya for the festival. As I had already shared Holige recipe and easy obbattu saaru recipe,I wanted to try Kosambari and mango chitranna this year.
Actually our friend Tara told me another recipe for Mavinakayi chitranna adding onion and roasted methi seeds powder. I will post that version later. I found many variations for this particular recipe on net. As I am sharing a festival recipe, I wanted to make a simple no onion, no garlic green mango rice and I followed my friend's recipe blindly :) So here you go, Ugadi special Karnataka style mango rice recipe – Mavinakayi chitranna with step by step photos and a video !
Cooked rice – 2 cups ( Raw rice or steamed rice – 1/2 cup)
Grated raw mango – 1/2 to 3/4 cup ( Based on sourness of mango)
Grated coconut - 1 tbsp
Turmeric powder - 1/4 tsp
Salt - as needed
To temper
Cooking oil - 2 tbsp
Mustard seeds - 1/2 tsp
Urad dal - 1 tsp
Chana dal - 1.5 tsp
Raw Peanut - 1 tbsp
Green chillies - 3 nos ( Slit)
Curry leaves - Few
Coriander leaves - 1.5 tbsp
METHOD
Wash and pressure cook 1/2 cup of rice ( you can use raw rice or steamed rice) adding 1.25 cups of water and few drops of cooking oil. I used steamed rice/ Boiled rice. I used 1:3 ratio of rice and water. After the rice is cooked, spread it in a plate and add a tsp of oil around. Let it cool down. Measure 1.5 cups of cooked rice and keep aside.
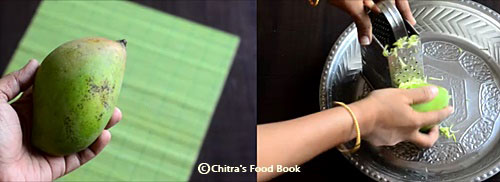
Wash and grated a medium sized raw mango. Taste it to check its sourness. After grating measure 3/4th cup of it and set aside. Pls refer the pic above. Adjust the quantity of raw mango based on its tanginess.
Heat oil in a kadai.Splutter mustard seeds.Add urad dal, chana dal and peanuts. Roast till peanuts are done and dal turns golden brown in color. Roast it in medium flame. Now add the slit green chillies, curry leaves and half of the chopped coriander leaves. Saute for a minute.
Now add the required salt and turmeric powder.Mix well. Some people add raw mango,saute for a minute and then add the rice. But I added the cooked rice first and tossed well for a minute then added the raw mango as the sourness of my mango was less. My friend also told me to do the same. You can saute the raw mango before adding the rice if its too sour. It can be done in either ways.
Lastly add the grated mango and mix well for a minute. Check for taste. If the taste is too sour, add some more cooked rice, some red chilli powder or slit green chillies to balance the sour taste. You can add more rice or grated mango based on your taste. Mix well and cook for a minute.Switch off the flame and garnish with coriander leaves and grated coconut. Serve hot or warm as u wish.
Enjoy !
Note
For variations, you can make the raw mango paste without coconut seperately, refrigerate it for a week and then mix with cooked rice whenever needed.For this, add the grated raw mango after the tempering is done. Allow it to cook for a minute and switch off the flame. Let it cool down and then store in a box. Use clean spoon to handle.
Adjust the quantity of green chillies based on the sourness of mango.
I have used steamed rice ( Puzhungal arisi). Generally raw rice is used. You can add basmati rice as well.
The quantity of rice may vary based on the sourness of raw mango. My mango was not too sour.
It is optional to peel the skin of mango. As we are grating the mango, it is not necessary to peel the skin.
Some recipes call for grinding mango, coconut, green chillies and add to cooked rice. You can try this method for variation.
Do not avoid coriander leaves. It lends a nice flavor to the rice. Add half of the coriander leave while tempering and the remaining to garnish.
Try this simple and yummy raw mango rice at home, enjoy your lunch !
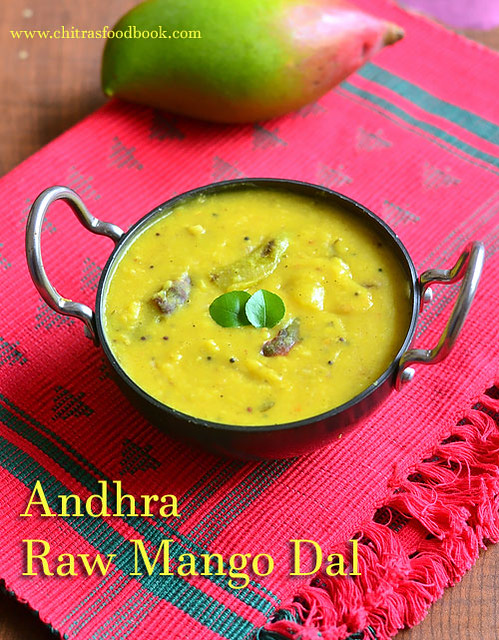
I have heard about this Andhra Raw Mango Dal (Pachi Mamidikaya pappu in Telugu) from my friends. It is nothing but toor dal cooked with raw mango and seasoned with spices. Basically I am a big fan of raw mango recipes. So every year I wait for the mango season to explore new recipes with raw mango and ripe mango as well. This year, I wanted to start my mango recipes with this super easy and quick Andhra style raw mango dal recipe. I got this recipe from my Telugu Brahmin friend Sandhya in my apartment. She taught me this no onion no garlic Andhra style mango pappu. After getting the recipe from her, I browsed & found many recipes with variations. But I blindly followed Sandhya’s recipe as this is my first try. It came out really well. Dal is known to be the best comfort food for rice. This mango dal with a mild tangy and spicy taste is no exception. Sendhil & myself enjoyed this dal by mixing with plain rice adding ghee! I am happy that I learnt an easy and delicious raw mango recipe. Thank u so much Sandhya . As Ugadi festival is fast approaching, most of you must be buying raw mangoes to make Ugadi pachadi. Do try this dal recipe too. You will love it. Ok, Now lets see how to make Andhra mango dal recipe with step by step photos. I will try to share a video recipe soon !
Dry roast 1 tbsp of methi seeds/Fenugreek seeds till it starts to splutter and turn light golden brown in color. Do not burn the seeds while roasting. Remove it when golden and let it cool. Powder it nicely. You can add 1/2 tsp of this powder in this mango dal. Store the remaining powder in a box and use it while making pickles, tamarind rice, vatha kuzhambu etc. My MIL adds a pinch of this powder while making filter coffee decoction. It lends a great flavor and mild bitterness to the coffee.
In a pressure cooker base, take the toor dal and add 2 cups of water. Cook in low flame for 2 whistles.In the mean time, wash and peel the skin of raw mango. ( For variations, you can add chopped mango amd slit green chillies along with toor dal in pressure cooker).
Chop into small pieces and set aside.Discard the seed. In a kadai, heat oil + ghee and splutter mustard seeds, cumin seeds, curry leaves, pinched red chillies, slit green chillies.Saute for few seconds. Add hing and roasted fenugreek seeds powder. Mix well and add the chopped raw mango pieces.
Saute the mango pieces for few minutes till it turns soft. Now add 1cup of water and add the required salt. Cover the kadai with a lid and cook for few minutes till mango pieces are completely cooked and mushy.Now take a masher and mash the mango pieces roughly.
Remove the cooked toor dal and mash it with a whisk.Add this dal to the cooked mango mixture. Mix well and add 1/2 cup of water if its too thick. Add turmeric powder, required salt and 1/4 tsp chilli powder ( optional). Mix well and boil the dal for few minutes. This dal thickens when it cools down.So adjust its consistency accordingly. Transfer the dal to a bowl and serve hot with rice. Add a tsp of ghee while serving. Tastes yum !!
Enjoy !
Note
Adding methi seeds powder gives a nice flavor to this dal.
I have added more turmeric powder.So mine looked more yellow in color. Please reduce it for mild color.
Try this easy mango recipe in this season and enjoy with rice & roti !
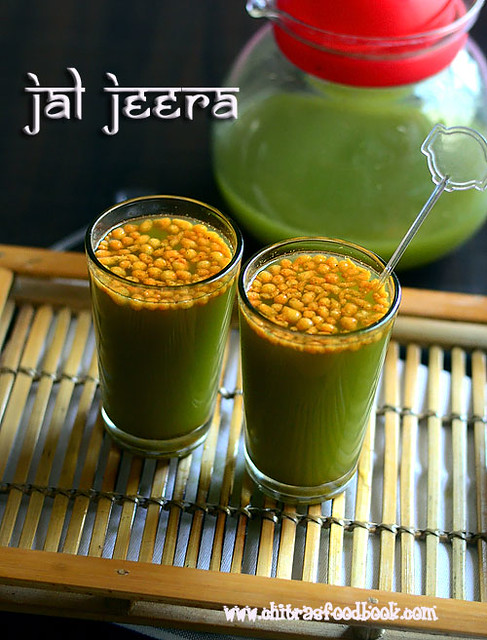
Jal Jeera / Jaljira is a healthy summer drink that is most popular in North India. In Hindi, Jal means water and Jeera means cumin seeds. This drink is prepared with special spice mix masala powder that is mixed with water or soda. Jal jeera spice powder is made of roasted cumin, pepper, mint leaves, black salt, ginger, amchoor powder and lemon juice. So it has lots of health benefits. Basically it helps to improve digestion and aids for weight loss too. I have tasted this jaljira several times in “The Village” restaurant and in some other hotels as well. Mostly it is served as an appetizer in restaurants whereas I like to have this drink after a heavy meal. I love this drink very much and I don’t mind drinking at any time or any season of the year. So I bought a packet of jaljeera powder from the shop and prepared this drink at home for the first time. We loved it very much. Then I started serving this to my guests as a welcome drink. Everybody liked it so much and asked me the recipe too. Even though I make it with store bought powder, I used to tell the ingredients roughly and ask them to buy this jal jeera powder from the market. Yesterday I was thinking to start summer recipes in my blog. The most refreshing summer drink jaljeera flashed in my mind. I tried it this morning by watching Sanjeev Kapoor’s YouTube video and made it from scratch. I altered the recipe slightly by looking at the ingredients list of store bought jaljira packet. It came out very well and tasty. Traditionally tamarind is used in jaljeera but have used lemon juice instead. So lets check how to make this refreshing, fresh, yummy, healthy, easy Indian drink for this summer – Jal jeera recipe with step by step pictures and a video. Do try it and enjoy !
Check out my other summer recipes in THIS LINK
Jal jeera Recipe - Jaljira - How to make Jal jeera at home
Jal jeera Recipe - Jaljira - How to make Jal jeera at home
Dry roast cumin seeds in a hot kadai for one minute. Do not burn the jeera. It tastes bitter and spoils the taste of jaljeera.
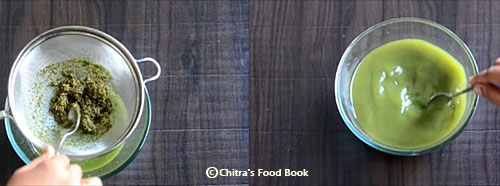
Take all the ingredients given in the list in a mixie jar. Add the roasted cumin seeds. Grind to a smooth paste adding required water. I used 1/2 cup water to grind it.
Transfer the ground paste to a bowl and wash the mixie jar with one cup of water. Add the washed water to the paste. Place another bowl, keep a metal strainer and filter the drink. Press it with a spoon to filter well and discard the residue.
Add 1.5 - 2 cups more water and mix well. Check for taste and add more salt, sugar or lemon juice if needed. If you need more cumin flavor, add 1/2 tsp readymade cumin powder if u have in hand.
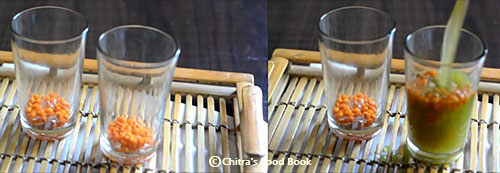
To serve : Take a tall glass, add some crushed ice or ice cubes, top it with 2 tsp of kara boondhi and pour the jaljeera till the rim. sprinkle a pinch of cumin powder if u wish. Serve immediately. Refrigerate the remaining drink for later use. Stays fresh for 2-3 days in refrigerator.
Enjoy !
Note
You can add more black salt, amchoor powder , sugar and lemon juice at anytime after making the drink. Adjust them based on your taste.
Jaljeera tastes the best when its served chilled. So always use ice cold water for preparation or refrigerate it / add ice cubes while serving !
Never try this recipe without black salt and chat masala or amchoor powder.It adds a unique taste to this drink.
Try this easy drink at home and have it after or before a heavy meal. It helps to improve digestion and increases appetite !


 Pazham Pori Recipe - Kerala Ethakka Appam - Kerala Nendram Pazham Bajji Recipe


 . So I bought a packet of jaljeera powder from the shop and prepared this drink at home for the first time. We loved it very much. Then I started serving this to my guests as a welcome drink. Everybody liked it so much and asked me the recipe too
 . Yesterday I was thinking to start summer recipes in my blog. The most refreshing summer drink jaljeera flashed in my mind. I tried it this morning by watching Sanjeev Kapoor’s YouTube video and made it from scratch. I altered the recipe slightly by looking at the ingredients list of store bought jaljira packet. It came out very well and tasty. Traditionally tamarind is used in jaljeera but have used lemon juice instead. So lets check how to make this refreshing, fresh, yummy, healthy, easy Indian drink for this summer – Jal jeera recipe with step by step pictures and a video. Do try it and enjoy !