Search Chitra's Food Book

Showing posts with label SWEETS RECIPES. Show all posts

March 4, 2017

Easy Atta Halwa – Atta Ka Sheera Recipe – Instant Wheat Flour Halwa - Gurudwara Style

atta halwa recipe
Atta halwa also known as Atta ka sheera is one of the most popular sweet/ dessert recipe in North India. This is an Instant halwa made with whole wheat flour( atta in Hindi). This atte ka halwa is served as Kadah prasad ( Karah prashad) to all the visitors of Gurudwara ( A place of worship for Sikhs ) in Punjab.

Traditionally, it is prepared with equal quantity of Whole wheat flour, Sugar and Butter/ghee to emphasize everyone are equal. Some people make this halwa adding equal quantity of wheat flour and sooji. For variations, this halwa can be made with milk or jaggery instead of sugar. I never thought making this North Indian style wheat flour halwa is so easy.

 South Indian style Godhumai halwa/wheat flour halwa ( Tirunelveli halwa) is in no way related to this atta halwa in preparation and cooking procedure. Both has its own variations and taste. This sweet can be prepared easily and instantly for surprise guest and to celebrate special occasions at home. I am sure this ghee dripping halwa gets a big applause from your family members and friends. I followed the recipe from HERE and watched some You tube video recipes too.

 Even though its my first attempt, making this halwa was a breeze for me. You can easily find the correct stage of removing the halwa. Its 100% a beginners recipe. This halwa tastes very soft and it slides in your mouth. I made in very less quantity just to serve 2 people as the quantity of ghee is more . Holi festival is fast approaching. Include this easy, rich atta ka halwa in your menu and enjoy the festival ! This atta halwa can also be prepared for babies but its made without ghee. I will share that recipe later.

Now lets see how to make Instant, easy wheat flour halwa/ atta halwa with step by step pictures and a video !

Check out my Sooji halwa and Bread halwa recipes too.


atta halwa recipe

Atta halwa recipe - Atta Ka Sheera


Atta halwa recipe - Atta Ka Sheera Easy Atta halwa recipe - Atta Ka Sheera - Gurudwara Karah Prasad
Cuisine: North Indian
Category: Sweet
Serves: 2
Prep time: 2 Minutes
Cook time: 10 Minutes
Total time: 12 Minutes


INGREDIENTS
1 cup - 240ml
  • Whole wheat flour - 1/4 cup ( I used Aashirvad atta)
  • Sugar - 1/4 cup ( I used 1/4 cup heaped, add 1/2 cup for more sweetness)
  • Melted Ghee - 1/4 cup
  • Water - 1/2 cup
  • Cardamom powder - a pinch ( Optional, Its not used traditionally)
  • Cashews & sliced almonds - To garnish
HOW TO MAKE INSTANT WHEAT FLOUR HALWA - METHOD

  • Heat 1/4 cup of ghee in a wide, non-sticky kadai. Add wheat flour and roast till it turns golden brown in color with nice aroma. Keep the flame low to medium  while roasting and keep mixing to prevent burnt bottom. It takes 3- 5 minutes to roast well based on the quantity you use.
    atta halwa recipe
  • Boil 1/2 cup of water in a bowl and add the hot water carefully to the roasted wheat flour. It splashes. Add 1/4 cup (heaped) sugar, cardamom powder ( I din’t use) and mix well without any lumps. All the water would be absorbed by the wheat flour and gets cooked.
    atta halwa recipe
  • Mix well till halwa leaves the sides completely, becomes a whole mass. Do not switch off the stove. Keep mixing till ghee starts to ooze out in the sides of kadai. It will turn glossy too. Do the whole procedure in medium flame. It takes just 3-5 minutes to release the ghee. Switch off the flame and remove in a plate or bowl. Serve warm or cold as you wish. Please watch the video for clear understanding !
    atta halwa recipe
  • For variations, you can add milk instead of water. You can also use grated jaggery in place of sugar. Enjoy !

Note
  • Traditionally this halwa is prepared with equal quantity of wheat flour, sugar and ghee. But I used little more sugar ( 1.25 cups) as we are sweet toothed.
  • If you don’t want to use equal quantity of ghee, you can use half the quantity mentioned. But texture may slightly vary.
  • Cardamom powder is not used in the traditional atta halwa. If you wish, u can add it along with sugar.
  • If you feel the sweetness is less, you can add it even at the end. Heat the halwa till the sugar melts and ghee oozes out. Serve it warm.
  • I read people have this halwa as a side dish for poori too just like suji ka halwa.


Try and enjoy this easy, yummy, rich wheat flour halwa at home !
  wheat flour halwa


Continue Reading...


February 3, 2017

Easy Peanut Ladoo Recipe With Skin |Groundnut Laddu Recipe – Ladoo Varieties

Peanut laddu
Peanut ladoo recipe with skin adding jaggery / sugar. Last year I tried Kadalai urundai( Kadalai mittai/Peanut chikki) for Karthigai deepam festival. But it wasn’t up to the mark.When I was telling about this to my friend Shalini, she suggested me to try this easy peanut ladoo which was her favorite childhood snack. She shared her recipe with me and told it is called as “Palli laddu / Verusenega pappu ladoo” in Telugu. In other languages, it is Nilakadalai/Verkadalai laddu or kadalai podi urundai in Tamil, Kadalekai unde in Kannada, Shengdana ladoo in Hindi (Marathi).This is an easy ladoo recipe with just 2 ingredients and amazing health benefits.If you have roasted peanuts in hand, you can prepare this ladoo in the next 5 minutes.Ghee is not used in this recipe. So its a low calorie ladoo when compared with other ladoo varieties. Roasted peanuts with Jaggery is a good source of protein & iron. Kids would love this very much. It can be packed for their school snack box. If your kids don't like jaggery, you can add sugar too. Generally this laddu is made by removing the skin of roasted peanuts but I ground the peanuts with skin. So my job has become even more easy. I din’t find much difference in taste or flavor. Sendhil is a big fan of peanut recipes. So he loved this ladoo very much. The same procedure can be used to make till ladoo/Sesame seeds laddu( ellu urundai) as well. Do try this easy, healthy peanut ladoo for your husband and kids evening snacks, reap its health benefits during this winter season.Ok,  Lets see how to make easy peanut laddu with step by step photos !
Continue Reading...


October 26, 2016

Kaju Pista Roll Recipe – Kaju Roll Recipe – Cashew Pista Roll

Kaju pista roll recipe
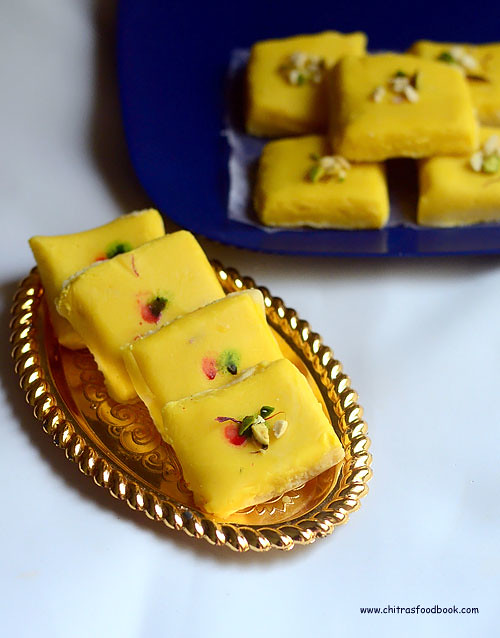
Kaju pista roll recipe with step by step. Kaju sweets are one of the costliest sweets in sweet stalls. No matter about its price or calories, we never say no to sweets made with cashews. Its our family favorite. So I used to make kaju katli for all the special occasions like birthday, anniversary. When I asked Raksha about her choice for Diwali sweets, her first reply was “Kaju Katli”. Then came gulab jamun, Badam halwa etc etc. So this morning, I made kaju katli for her, Kaju roll for my blog posting, kaju strawberry, kaju flower and kaju apple just for myself . Yes, I used the same cashew dough for all these varieties. 

Basically the ingredients & the method of cooking Kaju katli and Kaju roll are almost the same. Additionally, pista stuffing is to be made and rolled in cashew dough for Kaju pista roll. If you can make a perfect cashew dough, all these sweets can be made in no time. Making Kaju dough is not so difficult. Troubleshooting is also easy.This is a no-fail recipe. I am sure anyone can get it right. For variations, badam or dates can be used for the filling and prepared as Kaju badam roll or Kaju khajur roll. In general, Kaju roll is really a good alternative for Kaju katli or kaju burfi If you are bored with it.So try this easy, interesting sweet for Diwali and have a great celebration.

Generally kaju pista rolls are wrapped with silver varaq in sweet stalls. As i din’t have it, I just kept a colored dot and made a simple presentation by seeing the picture of Nestle Milk Maid Kaju roll recipe. It looked really attractive. Try this decoration if you don’t have silver varaq.Ok, Lets see how to prepare perfect Kaju roll recipe with step by step images along with some tips for trouble shooting.
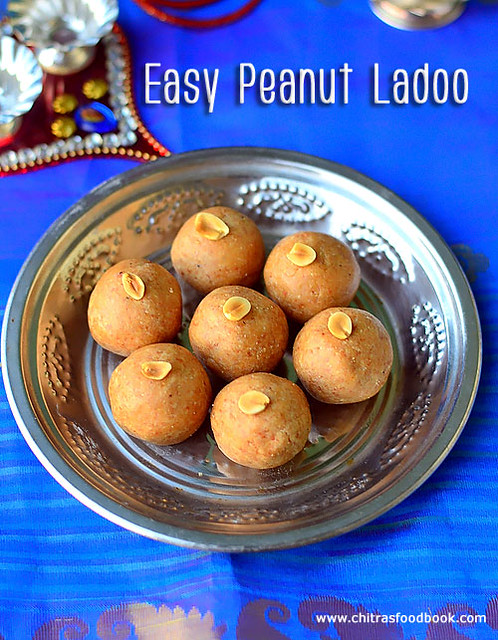
Here is the picture of all the Kaju sweets I made for this Diwali.

Check out my Kaju katli recipe with video.

Kaju sweets

Kaju pista roll recipe


Kaju pista roll recipe How to prepare kaju pista roll - Easy kaju sweets for diwali
Cuisine: Indian
Category: Sweet
Serves: 15
Prep time: 5 Minutes
Cook time: 15 Minutes
Total time: 20 Minutes


INGREDIENTS
1 cup - 250ml
  • Cashew nuts/Kaju - 1 cup
  • Sugar - 1/2 cup
  • Water - 1/4 cup
  • Ghee - for greasing the hands
  • Milk or water - 1 -2 tsp ( for troubleshooting)
For pista dough
  • Pista - 1/2 cup
  • Powdered sugar - 1/4 cup
  • Cardamom essence or rose water - few drops
  • Water - as needed ( Use few drops)
HOW TO MAKE KAJU PISTA ROLL - METHOD

  • If you have kept the cashews in refrigerator, take it out and let it dry completely. Powder the dry cashews in a suitable mixer. For this, grind the cashews continuously for a minute till it becomes smooth powder. Do not grind for long time because cashews release oil and it becomes a paste. You can also grind it by using pulse option. i.e grind for few seconds, wipe the sides and repeat until it becomes a powder. Both the method works well. After grinding the powder, sieve with a wire mesh if needed. Keep the powder aside.

    Kaju pista roll recipe
  • In a kadai, heat sugar + water and melt it. Boil till it reaches one string consistency. String should be thin. To this, add the powdered cashews and mix well. It will become watery at first. Keep mixing in medium flame by staying nearby.
    Kaju pista roll recipe
  • The mixture will thicken and start to leave the sides of pan. At that time, simmer the flame completely. Take a pinch of cashew dough by greasing your fingers. Try to make a soft, smooth ball. If you are able to do it, cashew dough is done. Immediately transfer it to a greased plate.

    Kaju pista roll recipe
  • Using a spoon, just mix the cashew dough to turn thick and warm. Once its heat is enough to handle,  grease your hands with ghee and keep kneading for few minutes. It will turn soft, smooth like  a dough ball.
  • For Making kaju katli : Place a  butter paper and keep the kneaded cashew dough over the butter paper. Cover it with another butter sheet and start rolling it with a rolling pin. Roll the thickness you desire. Now make diamond shapes and remove after its cool down.
    Kaju pista roll recipe
  • For making Kaju Pista roll : Cover the kneaded cashew dough with a dry cloth and set aside.
  • Powder the pista to a smooth powder. Follow the method of making cashew powder. Do not grind for long time . To the pista powder, add powdered sugar, green food color, cardamom essence and mix it.
    Kaju pista roll recipe
  • Add few drops of water and make a smooth dough.Grease your hands with ghee and make a dough. Do not add more water, pista dough would become very sticky. If its too sticky, add a tbsp of maida and mix it in a kadai in very low flame to make it non-sticky and thick.
    Kaju pista roll recipe
  • Grease your hands with ghee and knead it soft. Divide the dough into 2 parts and make two logs/ cylinder shaped by rolling with your palm on a plate or counter top. Keep it aside.
  • Now take the cashew dough and place it in between the butter paper. Roll it thin with a  rolling pin/chapati roller. Cut the circle into 2 parts as shown in the pic.
    Kaju pista roll recipe
    Kaju pista roll recipe
  • Take one half of the circle, place one of the pista log in the center.The size of pista log and the cashew dough circle should be the same. Fold it once from above and below the log. It will resemble a log. Now roll the log gently. The more you roll, it will elongate and becomes a perfect log.It will stretch double, triple in size. Cut both the ends and taste it ; ))
    Kaju pista roll recipe
    Kaju pista roll recipe
  • Cut the log into small cylinders by keeping your finger as reference size.Then take one roll and press both the ends gently on a plate or counter top to get perfect round shape.Refer the pictures for clear understanding. Repeat the same with the other half of cashew dough and pista dough. Arrange the kaju pista roll in a plate and let it set for an hour. Enjoy it !
    Kaju roll recipe
Enjoy !

Note
Trouble shooting tips
In case, You missed the right consistency and if the dough becomes crumbly and hard, just break them into pieces. Grind in a big mixie jar adding little water or milk and make a smooth paste. Transfer the mixture to the kadai and again cook it till you attain the correct stage. You can easily identify the right stage as you know where you went wrong. So do it patiently and remove it at the right stage.

Note
  • Cashews should be completely dry before grinding. While powdering the cashews please be careful in running the mixie. Over doing it makes the cashews sticky & wet. U wont get the perfect smooth powder.
  • One string consistency is very important. If sugar reaches more than one string consistency, katli will become hard. U have to add more milk to make it soft. Adding more than the required milk makes the dough wet & sticky. It reduces the shelf life of the sweet.
  • U can check the consistency of dough by making a small ball out of it. The ball should be non-sticky. Suppose if u over mix the dough and if it becomes hard, no worries. Just keep the dough in a plate and let it warm. Add few tsp of little milk to it and knead it well by greasing your hands with ghee. It will become soft. Then you can roll it and make pieces as mentioned above.

Delicious Kaju Pista Roll is ready to enjoy !!
Kaju pista roll recipe
Continue Reading...


October 25, 2016

Kesar Burfi Recipe With Milk Powder – Milk Powder Burfi Recipe

Milk powder burfi recipe
Last year during diwali, I posted double layered chocolate burfi with khoya. So this year I wanted to attempt some sweets with milk powder. I tried Kesar burfi recipe with milk powder as my reader friend Harini requested me to share some burfi recipes with milk powder. I followed the recipe from Mullai’s blog and referred Nisha madhulika ji’s youtube video as well. 

Actually I made a two layered burfi just like the original recipe but simplified the cooking procedure. Instead of making the layers separately, I made the dough once, divided them into two parts, applied kesar milk with yellow color to one part and kept the other one as plain. This helped to make the burfi very quickly. But this kesar burfi takes one day time to set completely. It tastes chewy if you eat it on the same day. But it sets perfectly the next day and melts in your mouth. I have tried kesar burfi with khoya and the setting time is the same for khoya as well. 

Friends, if you don’t get khoya in your place, you can opt for this milk powder burfi. There will be no compromise in taste or flavor. Lets see how to make this colorful kesar burfi with milk powder with step by step photos !
Kesar burfi recipe

Kesar burfi recipe with milk powder


Kesar burfi recipe with milk powder How to make kesar burfi with milk powder
Cuisine: Indian
Category: Sweet
Serves: 12
Prep time: 5 Minutes
Cook time: 15 Minutes
Total time: 20 Minutes


INGREDIENTS
1 cup - 250ml
  • Milk powder - 1.5 cups
  • Powdered sugar - 3/4 cup
  • Unmelted butter - 1/2 cup
  • Boiled milk - 1/3 cup
  • Cardamom powder or rose essence or kewra water - few drops
  • Kesar/saffron threads - few
  • Milk - 1 tbsp ( to soak saffron)
  • Yellow food color - few drops ( optional)
METHOD

  • Heat 1 tbsp milk and add saffron threads, few drops of yellow food color to  it. Grease a pan with ghee & grease a flat bottomed bowl with ghee for levelling the dough. Keep it ready. Refer picture below for the idea.
    Kesar burfi recipe
  • In a small non-stick kadai , pour the saffron milk and set aside. We need it for later use.
  • Heat unmelted butter in another big non-stick kadai in low flame. When its melting, add the milk. Mix well. When the milk and butter are mixed well, add the milk powder and stir it without lumps. Milk powder will absorb all the milk & butter and it looks like a thick paste/ khoya.Stir the mixture to become smooth.
    Kesar burfi recipe
    Kesar burfi recipe
  • Now add the powdered sugar and stir well. Sugar gets melted and the paste becomes thin. Keep mixing in low to medium flame. Never increase the flame and do not go away. Stay nearby and keep mixing else the bottom layer gets burnt very quickly. Add the rose water or cardamom powder and keep mixing for 5-6 minutes. The burfi mixture starts to thicken and leaves the sides of kadai.
    Kesar burfi recipe
  • When it starts to leaves the sides and becomes semi thick, take a small portion in plate. It will be very sticky. Grease your fingers with ghee and try to make a ball out of it. If you are able to do make a soft, non sticky ball, its the right consistency. Immediately switch off the flame and stir for few seconds. The heat of kadai is sufficient to thicken the burfi mixture.Mixture will be very sticky and tastes slightly chewy too. But don’t worry.
    Kesar burfi recipe
  • Remove 1/3rd portion of burfi mixture using a ladle and add it to the kesar milk we kept in the kadai earlier. Transfer the remaining mixture to the greased plate, it will fall like a ribbon. Spread it well with the bottom of greased bowl. Let it cool down.
    Kesar burfi recipe
  • In my burfi, two layers were not clearly visible. So its better to add the yellow layer less than half the quantity of white layer.
  • Now take the dough mixed with kesar milk. Keep mixing till all the milk is absorbed by the burfi dough and its color changes to yellow. If you wish, add more yellow color if needed. Switch on the flame and mix it for one minute in very low flame. This is to absorb the extra moisture in the burfi. Transfer it to the greased tray and spread it over the plain white layer. Use the greased bowl and spread it well to cover the white layer. Set it to become warm for 2-3 hours.
    Kesar burfi recipe
  • Grease a knife with ghee and make shapes once the mixture becomes warm. Do not remove the pieces now.This burfi tastes chewy if consumed hot. So Let it rest over night or at least 8 hours by covering with a plastic sheet. The next day, run a knife in the corners and invert the plate. All the pieces will fall easily. Remove and stack it. Store in a box and enjoy for a week. No need to refrigerate. Melt in mouth kesar burfi with milk powder is ready !
    Kesar burfi recipe

Note
  • Remember this burfi tastes mildly chewy when hot. It tastes great only the next day.
  • Do not forget to add rose essence or cardamom powder to the burfi mixture else it will taste like eating milk powder.
  • Troubleshooting : If you feel, the mixture is not set even after its warm, don’t panic. Again heat the mixture for a minute and spread it OR Just add a tbsp of milk powder to the mixture, knead well to make a smooth dough and spread in a plate. Make shapes and allow it to set for 8 hours .
  • If you have over done the mixture and made it very hard or chewy, add more milk to the mixture, make a paste and again stir it to reach right consistency. But it will take more time to cook.
Try this colorful, kesar burfi with milk powder and celebrate the occasions !
Kesar burfi recipe
Continue Reading...


October 22, 2016

Tirunelveli Manoharam Recipe – Sweet Murukku Recipe - Manoharam Recipe

Manoharam recipe - Tirunelveli
Manoharam is a traditional South Indian sweet dish kept in marriages, Seemandham and naming ceremony as seer bakshanam. It is popularly known as Paruppu thengai among Tamil Brahmins. Paruppu thengai koodu is very well decorated and kept for display in most of the occasions.Paruppu thengai koodu is basically a pair of conical shaped containers filled with a variety of nuts like ground nuts, cashew nuts or fried gram dal/ pottukadalai rolled in jaggery syrup or its filled with this Manoharam sweet. I still remember my MIL made this paruppu thengai with pottukadalai for my valaikaapu function. 


Manoharam is made with fried murukku/thenkuzhal rolled in thick jaggery syrup (Vella paagu) flavored with cardamom powder or Dry ginger powder (Sukku podi). Many people make it as manoharam balls during Karthigai deepam festival. In Tirunelveli, apart from Iruttukadai Halwa, Manoharam is also a very popular sweet dish. We call it as “Manavalam” colloquially. Last year a reader asked me to share Tirunelveli manoharam recipe during Diwali. As I had completely forgotten its taste, I couldn’t try and post it. 

Recently I told my Appa to get a pack of Manoharam from Tirunelveli. After tasting it, I got an idea about it and tried at home by watching the Youtube video by Ponna mami. It came out very well with a nice flavor of dry ginger powder. Its an addictive snack. I can much it all through the day !! I found varieties like Kerala Manoharam and Chettinad Manoharam recipes which are different in ingredients and procedure as well. Soon I must try them too. Today lets see how to make Tirunelveli Manoharam recipe with step by step photos !

Check out my other Tirunelveli special recipes HERE

Manoharam recipe

Tirunelveli Manoharam recipe


Tirunelveli Manoharam recipe How to make Tirunelveli Manoharam recipe - a most popular snack !
Cuisine: Indian
Category: Sweet
Serves: 1 cup
Prep time: 10 Minutes
Cook time: 20 Minutes
Total time: 30 Minutes


INGREDIENTS

  • Besan flour - 1 cup
  • Rice flour - 1/2 cup
  • Hot oil - 1 tbsp
  • Ghee or soft butter - 2 tsp
  • Water & Salt - as needed
  • Cooking oil - to deep fry
For sugar syrup
  • Grated jaggery - 1 cup
  • Sugar - 2 tsp
  • Water - 1/2 cup
  • Dry ginger powder/sukku podi - 1 tsp
  • Cardamom powder - If needed
METHOD

  • First lets prepare the murukku.For this, sieve besan and rice flour in a wide bowl.
  • Add salt, hot oil and ghee to the flour. Mix well. Then add water little by little and make a dough. I made the dough very sticky as shown in the original recipe. So it was very easy to squeeze.
    Manoharam recipe
    Manoharam recipe
  • Take the murukku press and use a single hole or three holed mould. Grease the press with oil. Fill the dough and set aside.
    Manoharam recipe
  • Now heat oil to deep fry and drop a pinch of dough.If it rises to the top immediately, oil is hot. Now simmer the flame and squeeze the murukku either in a circular manner or as a straight line. Don’t worry about the shape because we are going to break them into pieces. Cook both the sides till bubbles cease. Do not fry in high flame, murukku will turn dark. So fry it patiently. Remove in a paper towel. Deep fry all the batches. Let it cool down completely.
    Manoharam recipe
  • Take the powdered jaggery, sugar and water in a kadai. Mix & melt it. Strain the syrup if needed. Let the syrup roll boil and reaches soft ball consistency. To check this, take some syrup and pour it in a plate with water. Gather the syrup and try to make a soft ball. It is called soft ball consistency. Switch off the flame. Add dry ginger powder and mix well.
    Manoharam recipe
    Manoharam recipe
  • Now break the cooled murukku into pieces ( make small pieces if you are making balls,else break them roughly) and add them to the jaggery syrup. Mix well. Make sure all murukku pieces are coated with the syrup. Make balls when it becomes warm enough Or Remove in a plate and let it cool. They look cluttered, remove them carefully and keep it in a plate. Serve & enjoy !
    Manoharam recipe
    Manoharam recipe

Note
  • The consistency of jaggery syrup is more important.It should be in soft ball consistency or even slight hard ball is fine else the syrup won’t coat well.
  • Dry ginger powder adds a nice flavor. It aids digestion too. So don’t skip it.
  • You can use soft butter instead of ghee.

Try this yummy, addictive Manoharam snack at home and enjoy !
Tirunelveli manoharam recipe
Continue Reading...


October 19, 2016

Tirunelveli Halwa Recipe - Wheat Flour Halwa - Godhumai Halwa - Easy Version

Tirunelveli halwa recipe
Tirunelveli halwa using wheat flour / Godhumai halwa with step by step photos and video. My mom & dad are basically from Tirunelveli, Tamil nadu but settled in Salem. But all our relatives are in & around Tirunelveli. Right from my childhood, we used to travel there at least once in 6 months to my thatha aachi’s house. Most of my summer vacations are spent there. My thatha used to buy the most popular Iruttukadai Halwa and Oma podi from Shanthi sweets for teatime without fail. Having tasted this Halwa for N number of times, I have never imagined myself trying it at home. 

In 2010, I watched few video recipes and tried Tirunelveli halwa recipe for the first time. Though it tasted the same like TVL halwa, I used food color to bring its brown color. At that time, I was not aware of certain tips and tricks to make a perfect Tirunelveli halwa without adding food color. And now after seeing so many websites and video recipes, I came to know its technique. So I wanted to make it again and post it in my blog for this Diwali.


Authentic Tirunelveli halwa calls for soaking and grinding Samba Godhumai ( Whole wheat grains), extracting the milk ( Godhumai paal) and fermenting it overnight. I followed this method for my earlier recipe. But this time, I simplified its procedure by combining the methods of easy wheat flour halwa recipe in Jeyashri's blog & traditional Tirunelveli halwa recipe from Dosa to pizza youtube video recipe. I altered the quantity of ingredients and changed the procedure accordingly. I made it using instant wheat flour( Godhumai maavu), used oil + Ghee to bring its texture and added caramelized sugar to bring its color naturally. Wow, You won’t believe me, it came out very close to original Tirunelveli halwa in both color & texture. There is no compromise in taste with the authentic halwa.

 Generally Thirunelveli halwa is not made into pieces.So you don’t need to look for any sugar syrup consistency. This halwa itself will show you the correct stage to remove it. So beginners can also dare to attempt this recipe at home. But the most important thing you need is “PATIENCE”. Yes, This halwa takes around one hour for preparation & cooking time but the end result will make you forget all the pain and get credits from your family members for sure. I got tempted by the pictures of Halwa kadai online website and clicked my halwa in a leaf. I am very happy to see the ghee dripping hot halwa in the picture as I wished. So here you go, the world famous Tirunelveli halwa recipe using wheat flour in an easy way with step by step photos and a detailed video tutorial just for you all.

If you are looking to try the traditional method, do check this post !


Tirunelveli halwa recipe with wheat flour

Tirunelveli halwa / Wheat flour Halwa


Tirunelveli halwa / Wheat flour Halwa How to make Tirunelveli halwa with wheat flour/ Godhumai halwa
Cuisine: Indian
Category: Sweet
Serves: 1/4-1/2 kg
Prep time: 120 Minutes
Cook time: 60 Minutes
Total time: 180 Minutes


INGREDIENTS
1 cup - 250ml
  • Wheat flour - 1 cup ( I used Pillsburry atta)
  • Water - To make dough + 5 cups for soaking
  • Sugar – 2 to 2.25 cups + 1/4 cup to caramelize 
  • Ghee – 1 cup + 1 tbsp
  • Cooking oil - 1/3 cup  ( Use odourless oil)
  • Cashews – few
** The quantity of oil & ghee mentioned is approximate. This halwa may take more or less. Don’t worry for adding more because we are going to collect all the fat at the end !
HOW TO MAK TIRUNELVELI HALWA - METHOD

  • Take 1 cup of wheat flour, add water little by little and knead a dough like chapathi dough. Let it be thick and no need to use oil or ghee while making the dough. Place the dough in a big bowl and add 5 cups of water to it.Let it soak for 2-4 hours.
    Tirunelveli halwa recipe
    Tirunelveli halwa recipe
  • After 2 hours, take the dough with milk and mix it well with your hands. Dough dissolves in water and you will get white colored milk.Strain the milk through a cloth strainer and squeeze the fiber like part that comes from the wheat dough. Do not add more water.Use the soaked water to extract the milk. After taking all the milk, discard the residue.Set the milk aside. In a bowl, melt the required ghee and mix with oil. Set aside.
    Tirunelveli halwa recipe
    Tirunelveli halwa recipe
  • In a wide, heavy bottomed kadai ( Non-stick kadai) , heat 1 tbsp of ghee and roast the cashews. After it turns golden brown, add the wheat milk.No need to remove the roasted cashews. Start stirring. Initially the mixture looks very watery. But If you keep stirring for 15 minutes, it becomes slightly thick. Keep the flame medium and stir it well. 
  • If you want, you can keep the flame high to hasten this process. But stay nearby because it will burn at the bottom very soon. After it looks thick like porridge, add 2 cups (2.25 cups for more sweetness, I used 2.25) of sugar and keep mixing.  Keep the flame very low. Now you have to caramelize the sugar in the next step.
    Tirunelveli halwa recipe
  • Sugar Caramelization: In another gas burner, keep a small kadai and add 1 tbsp ghee. After its melted, add 1/4 cup of sugar. Mix well and caramelize it. Do the entire process in low flame because if the sugar is over caramelized, it turns bitter in taste and spoils the taste of halwa. So please be careful. Tirunelveli halwa recipe
  • Sugar will melt in ghee and its color changes to golden brown. Switch off the flame immediately and mix well in the heat. Please refer the video for clear understanding. Add the caramelized sugar to the halwa. It may splutter, so be careful while pouring it.
     Tirunelveli halwa recipe
  • Again start mixing the halwa. Keep the flame medium. After the caramelized sugar is mixed well, color of the halwa will be changed to light brown.Check the taste and add more sugar if needed at this stage itself. Then add 1tbsp of melted ghee + oil and mix well. 
  • Ghee+ oil will be absorbed by the halwa and turns glossy/shiny. Again add 1 tbsp of ghee and mix well. Continue this process at regular intervals. Color of the halwa becomes darker as it cooks. Now it resemble the original Tirunelveli halwa.
    Tirunelveli halwa recipe
  • Halwa will start to leave the sides and thickens. Do not remove at this point. Again add some ghee+Oil and keep mixing in low to medium flame. Never increase the flame because halwa may turn chewy. Halwa will become non-sticky and slide off the ladle. Keep adding ghee. It will be completely non-sticky, becomes soft & rotates with the ladle. Keep adding ghee + oil. Do not lose patience. 
  • At one stage, it will stop taking ghee and starts to ooze out the ghee+ oil in the sides first.  It happens only during the last 5 minutes. Keep mixing. Now you can find ghee oozing out all over the halwa. Collect the ghee that oozes out from the halwa in a bowl. Slide the kadai slightly and take out the ghee. Flame should be low. I collected more than 3/4 of the ghee+oil I added in the halwa. 
  • You can use this ghee for making other sweets or in your regular cooking. It won’t smell or taste sweetish. After collecting the ghee, transfer the halwa to a big bowl and allow it to become warm. Serve it hot or warm as you wish. The entire process took one hour for me.
    Tirunelveli halwa recipe
  • This halwa will release the ghee every time you reheat it.So you can reheat the halwa in microwave for 1 minute or keep it inside idli steamer till it gets heated. Remove the ghee from the halwa and serve hot. Don’t worry, the taste of this halwa will never be changed even after removing the ghee. 
  • You can store this halwa in an airtight box and keep it for more than a week and enjoy. No need to refrigerate too. This halwa will be coated with frozen ghee after its cooled down. It tastes mildly chewy just like original Tirunelveli halwa. If you wish, reheat and serve every time or enjoy as it is !!
    Tirunelveli halwa recipe


Note
  • If you want to follow the traditional method, wash and soak 1 cup of samba wheat for 5 hours. Grind in a mixie jar adding water and grind in batches. Strain and extract the milk. Let the milk ferment over night. The next day, remove the white layer that is formed on top of the milk. Make halwa as mentioned above.
  • The sugar quantity I’ve mentioned gives the required sweetness to the halwa. It won’t taste too sweet as we are adding more ghee. If you like milk sweetness, add 2 cups of sugar.
  • If you are calorie conscious, you can use ghee & oil in equal quantity OR you can use ghee alone to make super rich halwa. But in halwa kadai, they do use some oil. But never use kadalai ennai/ groundnut oil. It will spoil the flavor of halwa.
  • You may not need to use all the ghee+ oil I’ve mentioned here. Sometimes, it may take lesser too.When the halwa starts to ooze out the ghee, stop adding it.
  • Do not remove the halwa until ghee starts to come out.
  • Do not mix in high flame at the end, halwa may become more chewy.


Wheat flour halwa
Try this simplified version of Tirunelveli halwa and do share your feedback with meHappy
Tirunelveli halwa recipe
Continue Reading...