Every year we make 3 kozhukattai varieties for Ganesh chaturthi prasadam. In this post, I’ve given how to make kozhukattai dough/Kolukattai maavu along with the recipes of ellu pooranam , sweet pooranam and ulundhu kozhukattai which we make every year. I learnt all these recipes from my MIL.
Usually we make processed rice flour at home for the outer covering. This time I made the job easier with store bought idiyappam flour / kozhukattai flour . I have given some tips at the end of the post to get crack free, soft kozhukattai . Hope it will be useful for beginners. Do try these recipes , enjoy and get the blessings from Lord Ganesh !!
Ok, lets see how to make varieties of kozhukattai recipe with step by step pictures below. Before that, Happy Ganesh chathurthi to all my blogger friends and readers. Hope you all had a great celebration.. For the past one week I have seen all the blogs filled with kozhukattai recipes. I was not able to do it. And now not too late, Iam posting the recipes of kozhukattai with a picture of celebration at our home.
Do check out this video of making Kozhukattai varieties !
Now coming to recipes with the required ingredients picture,
INGREDIENTS FOR KOZHUKATTAI DOUGH 1 cup - 250ml
Processed Rice flour or Idiyappam flour or kozhuakttai flour – 1 cup
Water – 1.5 cups ( Quantity varies, so keep some excess hot water ready in hand)
Oil – 1 tsp
Salt – 1/2 tsp
METHOD
In a broad bowl , take the flour and add the salt. Mix well and set aside.
Now in a bowl, take the required water and add a tsp of sesame oil.
Let it boil for few seconds in high flame.When it starts to roll boil, switch off the flame and add the water to the flour little by little. Mix the flour with a wooden ladle.
Add more water if required. Mix well and make a whole mass like chapatti dough. (initially you need a ladle to mix but when the dough becomes warm, mix it well with ur hands to make a soft , non- sticky dough..)
Apply a tsp of sesame oil over the dough to cover it. ( this prevents the dough from drying) .Cover it with wet cloth and lid , set aside. Have a look at this VIDEO for more details
Always make the pooranam first & then make the outer covering..
In a kadai , dry roast the sesame seeds till it splutter with a nice smell.
In a bowl, take the powdered jaggery and cover it with little water.
After it melts , strain the impurities and then add the grated coconut, cardamom powder and roasted sesame seeds.
Mix till it starts to leave the sides of pan and becomes thick. Do not mix for long time. It will become hard and difficult to roll balls. Remove in a plate and divide into small portions.
After it turns warm, roll into tight balls by greasing your hands with sesame oil. If the sesame seeds crumble while rolling, add 2 tsp water, mix well and again heat for a minute. Start rolling balls when warm. It will work.
HOW TO MAKE ELLU POORANAM KOZHUKATTAI
Take a big gooseberry sized ball from the dough and roll it by greasing ur hands.
Pat it with ur palm and make it flat like a thattuvadai.
Keep the ellu poorana ball in the center and bring all the corners towards the center and make a coconut shape.( Grease ur hands with oil whenever required)
Follow the same for all the sesame seeds balls.
SWEET POORANAM | KADALAI PARUPPU POORANAM |
DAL POORANAM | THENGAI POORANAM
INGREDIENTS 1 CUP - 250ML
To make 15 to 20 kozhukattai
Chana dal \ Kadalai paruppu – 1/2 cup
Powdered jaggery – 3/4 cup
Grated coconut – 1/4 cup
Cardamom – 3 nos (powdered)
Water – 1/4 cup
Salt – a pinch (optional)
HOW TO MAKE SWEET POORANAM - METHOD
Pressure cook chana dal by adding the required water and a drop of oil. Drain the water. Grind or mix well it to make a paste without adding water and set aside.
In a bowl, take the powdered jaggery and add little water to cover it.When its melted , strain to remove impurities OR if the jaggery is pure, add it directly to the mashed dal along with grated coconut.
If using syrup, strain it. Wash the kadai and add the syrup, grated coconut and cooked dal, cardamom powder( please do not add water, the coconut itself leaves water which will be enough.)
Mix well until the mixture leaves the sides and becomes a thick whole mass. ( Do not add water while adding the dal paste because the lesser you add the water, sooner the pooranam will start to leave the sides and becomes thick.. Stuffing will be ready)
Make small balls out of the stuffing and keep ready.
The unused stuffing can be refrigerated and used for 10 to 15 days.
TO MAKE SWEET POORANAM KOZHUKATTAI
I Used a ready made kozhukattai mould to make a good shape.
U can also try the shape which i mentioned under ellu kozhukattai to make coconut shape. I’ve explained using mould here. Take the mould, open it and grease it with gingely oil. Take a small ball from the Kozhukattai dough and keep it inside the mould. Just spread it all the sides till 3/4 of the mould by keeping the center empty. Now close the mould and press it with your left hand fingers.
Now place the dal pooran ball in the center. Take a small berry sized ball and place it on the top of the dal pooranam and close it well.
Now open the mould , you’ll get a nicely shaped kozhukattai.
Follow the same for the remaining .. Steam it in idly pot for 10 mins and enjoy !!
NOTE:
The same pooranam can be done using coconut alone. For that, chana dal is not needed. Just make the jaggery syrup , add the grated coconut , cardamom powder & mix till it leaves the sides.
Remove & stuff it using the above said procedure.
For thengai pooranam , jaggery can be less. i.e 1:1 would be enough.
ULUNDU KOZHUKATTAI / SPICY URAD DAL KOZHUKATTAI/UPPU KOZHUKATTAI
Ulundu pooranam
INGREDIENTS 1 cup - 250ml
Urad dal – 1/2 cup
Green chillies – 2-3 nos
Ginger – 1/2 inch piece
Grated coconut - 1/4 cup
Asafetida / hing – 1/4 tsp
Salt – as needed
to temper
Mustard seeds – 1/2 tsp
Urad dal – 1/2 tsp
Curry leaves – few
Hing –1/4 tsp
METHOD
Soak urad dal in water for 30 mins . Drain the water and grind it along with green chillies , hing , ginger and salt to a coarse paste without adding water. (just run the mixie once or twice)
In a idli pot , grease the idli plate and spread the ground urad dal mixture. Make a hole in the center for uniform cooking.. Steam it for 15 mins.
After it cools down , crumble the mixture using ur hands and run it in the mixie once or twice for easy perfect crumbling and keep it ready.
In a kadai, temper the mustard seeds, urad dal and curry leave with a pinch of hing. Then add the crumbled urad dal mixture and mix well.
Finally add the grated coconut, mix well and switch off the flame.
TO MAKE ULUNDU KOZHUKATTAI
Take a big gooseberry sized ball of outer covering and press it with your palm to flatten it.
Keep the filling in the center and fold one side to make a semi circle.
Fold the edges towards inside to decorate it or leave it as it is !
Steam in idly pot for 10 mins and remove.
TIPS FOR MAKING KOZHUKATTAI WITHOUT CRACKS
Use good quality rice flour. If you are planning to make by grinding rice, buy raw rice ( in tamil nadu we call as “maavu arisi) i.e. the rice used for making rice flour..Its a different quality , not the one we use for pongal. It is cheaper in cost too.
I use store bought rice flour - Idiyappam flour or Anil kozhukattai maavu. I always add 1.5 cups of water adding a tsp of oil for making dough. For home made rice flour , more water may be needed. i.e around 1.5-2 cups..
Always add the required water while making the dough.If the dough becomes sticky or dry , you’ll get crack.
Keep the unused dough covered with a wet cloth and then with a lid while you make modakam.
Its always better to prepare the outer covering after making pooranams/ stuffings to prevent the dough sitting for long time.
U can refrigerate the unused dough covered by wet cloth be keeping in an air tight box & use the next day or the same evening.
Pooranam can be prepared the previous day and refrigerated.
Apply sesame/gingely oil in ur hands every time when you make the shape.
Last but not the least , do not cook the kozhukattai in idli pot for long time which may lead to cracks.( maximum of 8-10 mins is enough)
Always place the idli plate filled with kozhukattai after the water in the idli pot starts roll boiling.. This helps for quick cooking and also the kozhukattai remains white in color and crack free.
U can identify the cooked kozhukattai by its shining look..
Always remove the kozhukattai after it becomes warm. Do not remove when it is hot. Kozhukattai may break.
Wish you all a very happy Ganesh Chaturthi :)
Here is the picture of our Ganesh Chaturthi celebration at home :)
In this post, I have shared how to make ghee from store bought butter easily at home. I have used unsalted butter here. You can also use salted butter if you like. Procedure is the same. Before my marriage , I was not aware of making ghee at home. My mom used to buy ghee from a milk man who gives us fresh, flavourful ghee.
When I was young, I used to eat the residued curry leaves/ Drumstick leaves which he brings specially for me. After marriage, I saw my MIL making ghee from store bought unsalted butter. I was amazed ! I learnt from her and now I can confidently make ghee on my own.
Even beginners can try this ! It tastes & smells equal to the store bought ghee. Recently I found that adding jeera & red chilli gives a flavourful ghee & I tried it too. I usually make ghee very simply without adding them. But adding them sure enhances the flavour of ghee. This ghee won’t taste salty, you can use in sweets. Follow this if you like. Let’s see how to make ghee at home using unsalted butter with stepwise pictures and video!
How to make ghee from unsalted butter
How to make ghee at home using unsalted butter with stepwise pictures..
Cuisine:Indian
Category:Indian kitchen basics
Serves:500ml
Prep time:10 Minutes
Cook time:10 Minutes
Total time:20 Minutes
INGREDIENTS
Unsalted Butter – 500 gms ( I use Nandini)
Buttermilk – 1/8 tsp / a drop
Crystal salt – 1/4 tsp
Curry leaves / Drumstick leaves – few
Methi seeds – 1/4 tsp (optional)
HOW TO MAKE GHEE FROM BUTTER - METHOD
Take the butter out and put it in a wide, big vessel .( I normally use an aluminium pan which is almost three times bigger because while melting the froth raises till the rim of the vessel). Switch on the flame and start melting the butter by placing a wooden ladle. Keep the flame high and keep on stirring till the butter melts completely .( by stirring continuously , you’ll get less residue at the end).
Now simmer the flame and mix well. It will boil and become frothy by producing big bubbles. It produces a hiss sound.
After few minutes, the bubbles will cease and the froth rises. (make sure the flame is low). Mix well and cook for sometime in low flame. It froths again and foams up. After a few seconds from rising, you’ll see tiny brown spots that appear on the top. As soon as you see a single brown spot, add little buttermilk & mix well. After you add the buttermilk, you’ll get a spluttering noise. Adding buttermilk is optional. Switch off the flame and mix well .U’ll see lot of brown spots. Remove the vessel from the stove.
Add few curry leaves/ drumstick leaves & pinch of methi seeds, jeera and red chilli if using.
After it cools down, the residue will settle down at the bottom and transfer the ghee alone to the desired bowl by straining it through a metal filter. Keep the bowl open for sometime. Then close it with a lid and use whenever required..
U can use the residue by mixing in plain rice or by adding in sambar or pongal. I usually do this.
Note
U can add jeera and one whole red chilly while making ghee. It never changes the taste of ghee. It just enhances the aroma. U can use this ghee for making sweets without any doubt. But adding them are optional. I don’t use it often.
Crystal salt is used for the residue to settle down easily.
Adding methi seeds is optional. If you wish, add along with curry leaves at the end . ie. before switching off the flame.
Drumstick leaves can also be added instead of curry leaves.
U should be more careful when the brown spots appear. Keep the lights on in your kitchen and keep watching at this stage.I add curd as soon as I see a single brown spot. I mix it and switch off the flame. But my MIL waits for more spots to come. Also she removes the vessel from the stove and keeps it in a plate of water to cool down quickly.
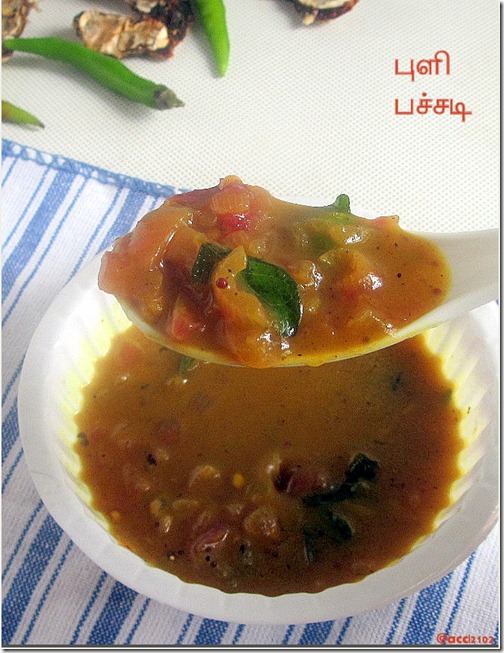
Yesterday my parents visited me after so many months. I had a great time with them.I was craving to eat my mom’s food for long time. So I told my mom to prepare this puli pachadi which is the best accompaniment for dal rice/paruppu sadam. Some people call this as Puli milagai thokku. I also had this by mixing in plain rice adding sesame oil. It tasted like puliodharai. I have tried this as a side dish for ven pongal too. Lovely combination it is!!.
When I was pregnant my mom had made this ‘n’ number of times for me as I wanted something tangy those days. Yesterday dal, pachadi , rasam & tindora fry was our lunch. It was yummy .Thank you amma. This pachadi can be stored for 3-4 days when refrigerated. Lets see Puli Milagai preparation below.
INGREDIENTS
For 2-3 people
Tamarind – Big gooseberry size
Green chillies – 3 –4 nos (increase if u want more spicy)
Sambar onion – 10 nos ( chop finely)
Hing/ asafetida – 2 generous pinches
Salt & water – as needed
To temper:
Mustard seeds – 1/2 tsp
Urad dal – 1/2 tsp
Curry leaves – a few
METHOD
Soak tamarind in water for 15 mins. Take the extract and set aside.
Slit the green chillies and chop them into pieces. Chop the onions.
In a kadai , heat oil and temper with mustard , urad dal , curry leaves.
Now add the chopped onions and green chillies.
Saute well and then add the tamarind extract.
Add the required salt & hing. Let it boil for few mins.
When it gets thicken, switch off the flame and transfer to a serving bowl.
Enjoy with dal rice !!
NOTE
As the green chillies absorb all the tanginess, we usually eat it along with onions. So I chopped them finely and used here.
If you are making for kids, just slit the chillies, cook and remove while eating.
Please add more hing as it gives the flavour for this dish.
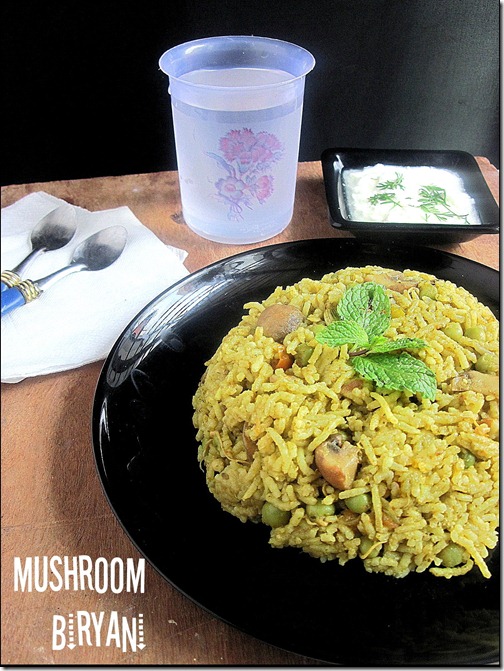
This is my first post on Indian mushroom recipes. I started with a simple and easy mushroom biryani recipe in pressure cooker. We call it as Kalan biryani in Tamil. When I was young , I used to think mushroom is a non-veg food. So I never thought of eating mushroom recipes. But after marriage , I tasted mushroom Manchurian in a vegetarian restaurant and loved it. I loved its softness. I tried the same for my daughter. She too liked it a lot. I’ll post that recipe later.
This time I wanted to try a rice variety with mushroom to pack for my husband’s lunch box. I googled so many recipes, got the idea and tried in my own way. It tasted great. My husband and his friends liked it a lot. I felt very happy that my first mushroom recipe is a huge success. Soon I will try to update this post with step by step pictures.
INGREDIENTS 1 cup - 250ml
Mushroom – 5 nos (big)
Green peas – 1/4 cup (optional)
Cinnamon – 1 piece
Cloves – 2 nos
Cardamom – 1 no
Biryani leaf – 1 small
Big onion – 1 no
Tomato – 2 nos ( very small.. if big use one)
Ginger & garlic paste – 1 tsp
Red chilli powder – 1 tsp
Salt - as needed
Basmati rice – 1/2 cup ( soak rice in required water for 10 mins)
Water – 1 cup
Cooking Oil & ghee – 1 tbsp each
To grind:
Coriander leaves – 1/8 cup
Mint leaves – 1/8 cup
Cashews – 4 nos
Fennel seeds – 1/2 tsp
Lime juice – few drops
METHOD
Wash and clean the mushroom pieces by keeping little water in a bowl.
Take the pieces out and wipe it with a clean cloth.
Cut each mushroom into 3-4 pieces of medium size. Set aside..
Wash & Soak rice in the required water till use (1:2 ratio) ( say for 10 mins).
Grind all the items given under “to grind” to make a smooth paste.
In a cooker base heat oil and add cinnamon, cloves , cardamom and biryani leaf. Then saute onions , ginger & garlic paste till its raw smell disappears..
Now add the tomato pieces and saute till it turns mushy.
Add red chilli powder , salt and turmeric powder.
Add the mushroom pieces and the ground masala paste.
Mix well and finally add the soaked rice with the required water.
Cook for 1 whistle in low flame by adding a tbsp of ghee.
Fluffy , yummy biryani is ready to serve with a simple raita !!
NOTE
For variations , lime juice can be added at the end before serving instead of adding tomatoes.
U can also fry the basmati rice in ghee before soaking in water..
For cooking basmati rice , Rice and water quantity of 1:2 would be sufficient if you don't soak the rice for 30 minutes. I used 2.25 cups which made the rice little mushy. My husband likes that way. So I used more water.
If served for guests, add more ghee while sautéing.
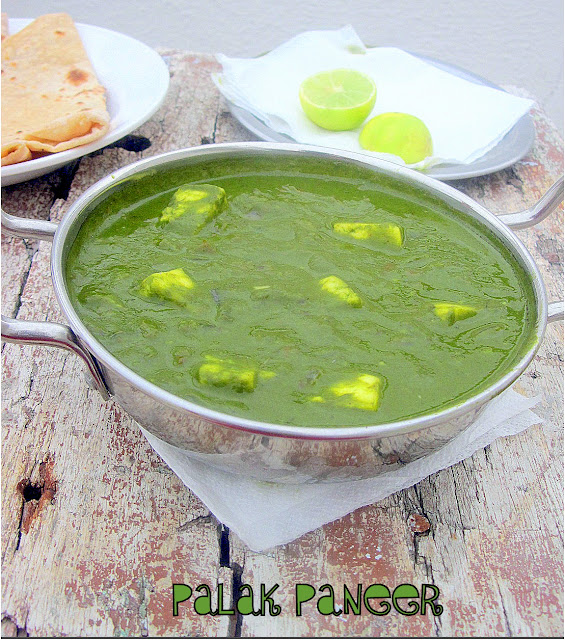
Recently I came across this Punjabi Restaurant style palak paneer recipe from HERE. I have already tried Sindhi style palak paneer long back. As my husband doesn’t like paneer I don’t buy it often. I make paneer gravies very very rarely. Even if I want to try, I first browse for some recipes which are close to restaurant taste. I can make him eat by telling “Its restaurant style “. I tried PBM which was also a restaurant style recipe.
Recently when I was browsing for punjabi restaurant style palak paneer recipe, I got this one. By seeing the comment section, I prepared this dish very confidently.
Yes, this recipe is “Truly a restaurant style recipe in 10 mins..”. My husband loved it. Me too.
Please do not attempt this recipe without kasoori methi and garam masala. They are the star ingredients. As soon as I added kasoori methi and garam masala powder , the aroma that wafted through my house was awesome. I still remember that smell. I din't have fresh cream in my hand. So I used boiled milk with its skin which was also good in taste. Do try with fresh cream for your guests. They will be amazed!!
INGREDIENTS
Spinach/Palak leaves – 2 bunches (medium sized)
Vegetable oil /Cooking oil or butter - 2 tbsp
Cumin seeds /jeera - 1 tsp
Ginger, crushed – 1 inch piece ( I used G&G paste – 1 tsp)
Garlic, crushed – 6 cloves
Big onion ( finely chopped) – 1
Finely Chopped tomatoes – 4 nos ( I used very small tomatoes, if big use 2)
Dried fenugreek leaves (or kasoori methi) – 1 tsp (crush it well before use)
Red chilli powder –3/4 - 1 tsp (adjust)
Garam masala powder – 1/2 tsp
Fresh thickened cream – 1 tbsp or Milk with skin / malai – 1.5 tbsp (less than 1/4 cup)
Salt to taste
Lemon juice – few drops ( add at the end , before serving)
HOW TO MAKE PALAK PANEER (RESTAURANT STYLE)
Remove spinach leaves from stems and wash it well.
Cook in boiling water for 3 to 4 minutes & then refresh in cold water, drain, squeeze out excess water and puree until smooth. Reserve this water and add to gravy. Alternately, you can saute the palak leaves in little oil along with one green chilli and grind to a paste.
( add a tsp of sugar while it cooks which helps to retain its green color).
Chop tomatoes and onions.
Heat oil in a heavy pan. Add cumin seeds, ginger & garlic paste and onions and fry until golden brown.
Add tomatoes, salt and cook until they become soft and mushy. Add the red chilli powder.
Saute for sometime and then add the spinach puree.
( Keep the paneer cubes immersed in hot water till use)
Add the paneer cubes.
Stir well and add kasoori methi ( crush it with your hands and add), garam masala powder. Boil for few mins. Add water if necessary. Gravy should be little thick in consistency .
Add water accordingly as we are going to add milk skin/ malai in the next step.
Add milk/ malai at the end. Mix well, leave it for a minute and switch off the flame. If you use fresh cream, add it, mix well and switch off the flame. Add few drops of lemon juice if desired & Serve hot.
NOTE
Instead of blanching the leaves, you can also try sauteing them with little oil. Add sugar while you saute.
I used red chilli powder here. Green chillies can also be used for variation and to get a greener gravy. But in the original recipe it is not mentioned.
If you plan to add green chilly, saute it with leaves and then puree it along with the leaves.
U can also try adding a pinch of fennel seeds powder while adding kasoori methi to get additional flavour.
Boil some water in a bowl, switch off and put the paneer cubes till use. This keeps the paneer soft till end. No need to fry the cubes in oil. Its completely optional.
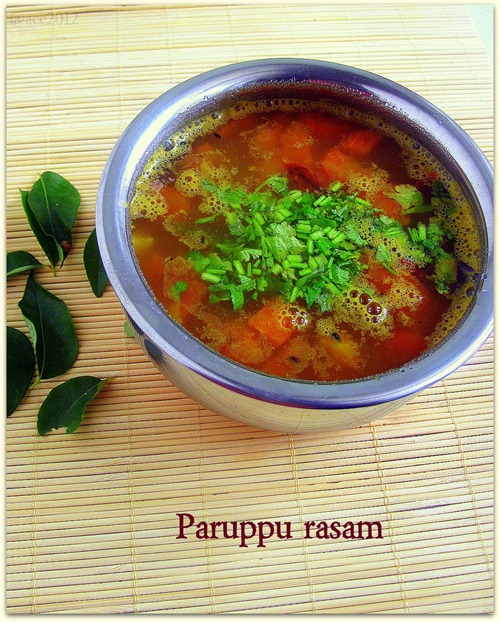
I make this Tamilnadu style paruppu rasam when I feel lazy to cook. It is different from the usual rasam in taste as well as texture. We add sambar powder instead of rasam powder and it would be thick in consistency. I add more crushed garlic which gives an excellent flavour. .I learnt this from my MIL. I make this in weekends along with a poriyal and thogayal. It makes a complete meal with a stir fry (poriyal) and appalam /papad as accompaniments..