Search Chitra's Food Book

January 16, 2013

Sweet Pongal Recipe In Pot - How To Make Sakkarai Pongal in Paanai(Traditional Method)

Sakkarai pongal

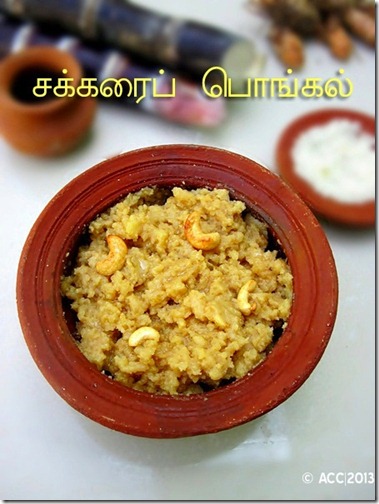
In this post, let's see how to make sakkarai pongal in a pot/ Pongal paanai. Hope you all had a great pongal celebration yesterday. I too had a good time in my in-laws house and we celebrated very well. I wanted to post our sakkarai pongal recipe in pot ( Pongal paanai) for a long time. This is our traditional method of making sweet pongal for Pongal festival. I think its is the right time to post this recipe along with some pictures of pongal celebration in my house. This year my sweet pongal turned out very tasty , flavourful and soft.. It tasted great even the next day after reheating. 

I’ve given the step by step pictures and video for making pongal traditionally in a pot / venkala paanai. U can do the pongal in pressure cooker or Mann paanai/ clay pot too. The quantity of ingredients I’ve given is the same for both except water quantity. The amount of water may vary for cooking in aluminium or brass pot and the cooking time also differs. In pressure cooker, you can make it fast.. In Tamil Nadu, we get pongal arisi and paagu vellam during this time and we used to buy that for making pongal.

 In bangalore , I buy good quality sona masoori raw rice and I make sure to buy dark colored jaggery to get a nice color of pongal. So the color of pongal may vary depending the color of jaggery you use. The water quantity may also vary depending on the quality of rice. I’ve tried to approximate the water quantity as per the rice varieties i used. Lets see the Tamil nadu traditional method of making sweet pongal in a pot !
Sweet pongal in pot


sweet pongal in pot

INGREDIENTS
1 cup - 250ml 
  • Raw rice/ Sona masoori – 1 cup
  • Yellow Moong dal – 2 tbsp 
  • Raw Milk – 1/2 cup ( Unboiled , fresh milk)
  • Water – 4-5 cups (Water quantity varies as per pot size)
  • Salt – A pinch
  • Jaggery – 1-1.25 cups (based on the sweetness)
  • Ghee – 4 tbsp
  • Cashews and dry grapes– few nos
  • Elachi/ cardamom seeds– 3-4 nos
  • Cloves – 3 nos
  • Edible camphor – A pinch
  • Jaathikai -  A pinch ( take a small piece , roast in ghee and crush it before adding)

HOW TO MAKE SWEET PONGAL IN POT - METHOD
  • In a kadai , dry roast moong dal for few minutes till you get a nice aroma and golden brown in color.Mix the rice and roasted dal. Wash , drain the water.
IMG_0039IMG_0040
  • Add milk and water to the aluminium or brass vessel/ venkala paanai. When it starts boiling over and after it raises to the rim of the pot and spills a bit, Shout out "Pongalo Pongal". Simmer the flame and add the washed rice, dal mixture & a pinch of salt. 
  • Remove the excess water and keep it in a bowl. Add this water whenever needed. Cover the vessel with a lid and cook the rice in medium flame OR if using pressure cooker, cook for 4-5 whistles till it rice is cooked well.
Sweet pongal in pot
  • In the mean time , grate the jaggery and keep it ready. After rice is cooked well, open the cooker/vessel , mash it well & add the jaggery and mix well till the jaggery melts and allow it to boil in low flame. You can also boil and melt the jaggery in water. Strain the syrup and add to pongal. Add a tbsp of ghee to avoid the pongal sticking to the bottom ..Make sure it doesn’t get burnt..Give a nice boil in low to medium flame. Keep mixing.
  • After the raw smell of jaggery emanates, switch off the flame. Please make sure the pongal has slight moisture content when you switch off the flame. ( i.e it should be slightly watery n mushy. Don’t make it very thick .) This is very important ..
  • Once it cools down , the consistency will be correct else it will  become very hard. If you feel , all the water is absorbed and if it looks dry , add little boiled milk or coconut milk , Mix well and switch off the flame.
sweet pongal in a pot
  • In a frying pan , add a tsp of ghee and roast the cloves & cardamom seeds, jaathikai. Crush it & add to pongal. Mix well. Again heat 3 tbsp of ghee in the pan and roast the cashews, dry grapes till golden brown. Add it to the pongal with ghee. Add a pinch of edible camphor powder. All these ingredients helps to give temple style sweet pongal flavor.
sweet pongal in a pot
  • Mix well before serving.Yummy , flavourful pongal is ready !!
NOTE
  • Adding milk is optional. U can make only adding water. If you want milk version, add only milk instead of water.
  • Make sure the rice and dal is cooked perfectly( should be mushy) before adding jaggery else rice will be visible and separate.
  • Adding more ghee makes it more rich n tasty.
  • Adding nutmeg & edible camphor is purely optional. But adding them enhances the flavour for sure and gives a temple touch.
Last but not the least , here are some pictures of pongal celebration in our house.

Pongal celebration

Continue Reading...


January 12, 2013

LEMON AVAL | LEMON POHA – BREAKFAST RECIPES


Aval lemon - bowl

This is a simple & healthy breakfast recipe which comes to my mind when I run short of idli/dosa batter.
I make this at least once in a week either for breakfast or for dinner. We like this very much. We usually have this topped with sesame oil. I learnt this recipe from my MIL.It can be made in jiffy..If u want to make it fluffy , please add the water quantity which I mentioned in ingredients. Add more water to make it mushy.
Poha

INGREDIENTS
  • Thick Aval / Thick poha – 2 cups
  • Lemon juice – 4 tbsp ( adjust acc to tanginess of lemon)
  • Water – 1.5 cups
  • Turmeric powder – 1/2 tsp
  • Curry leaves – few
  • Asafetida / Hing – 1/2 tsp
  • Salt – as needed
To temper
  • Sesame / gingelly oil – 2 tbsp
  • Mustard seeds – 1 tsp
  • Urad dal – 2 tsp
  • Channa dal – 2 tbsp
  • Red chillies – 2 nos
  • Green chillies – 2 nos
Coriander leaves – To garnish (optional)
METHOD
  • Wash the poha once or twice to remove the debris and drain the water.
  • In a wide bowl take the poha & add lemon juice , salt , turmeric powder , hing and curry leaves. Add the mentioned amount of water ( OR ) water to soak the poha (  i.e the level of water should be 1/2 inch above poha)..Let it soak for 30 minutes.
  • Then in a kadai , heat oil and temper with the above given ingredients in the same order.
  • Finally add the soaked poha and mix well using a fork like ladle to avoid turning mushy. Cover & cook for 5 minutes.
tILE
  • Serve hot. Add sesame oil before serving and enjoy!!
aval spoon

NOTE
  • Sesame oil is a must for this recipe as it gives a nice smell & taste to this recipe. It is also good for health.
  • U can also add roasted ground nuts for crunchy taste while tempering.
  • Please adjust the amount of lemon juice based on the tanginess of lemon. U can always add any time (even after cooking) if u require.
  • It will be initially tangy to eat but it levels down after it is warm..
  • Adding coriander leaves is completely optional.


Continue Reading...


January 9, 2013

METHI PARATHA | THEPLA


methi roti1

I rarely make stuffed chapathi for dinner. Though i know its very easy n quick to make , i am not doing this often.At least this year i should try more varieties n post here.Nowadays i make thepla often in my kitchen as it is the only dish i know with methi leaves;).I don't saute the leaves as it loses its nutrients.So i chop the leaves finely and add as it is.I use buttermilk instead of water as it gives mild tangy & softness to the thepla.Do try this recipe.It comes out very soft & tastes great with a simple onion raita !
INGREDIENTS
1 cup - 200ml
  • Wheat flour – 1 cup
  • Methi leaves – 1/2 cup
  • Buttermilk- as needed
  • Jeera OR ajwain seeds – 1/2 tsp
  • Red chilli powder – 1 tsp
  • Dhania powder – 3/4 tsp
  • Garam masala powder – 1/2 - 3/4 tsp
  • Salt – As needed
  • Cooking oil - 1 tbsp
METHOD
  • Remove the leaves , wash it and chop roughly. Set aside.Whisk 2 tbsp of curd in 1/2 cup of water to make buttermilk.
  • In a wide bowl,take the flour , leaves ,cumin seeds or ajwain , red chilli powder , dhania powder , garam masala powder & salt. Mix it well. Then add the required buttermilk and a tbsp of oil to make a soft , pliable dough. Set aside for 30 mins.Then knead again for few minutes and make small balls of even size .
methi roti tile 1
  • Roll it to make a thin roti.Dust in the flour whenever necessary.Instead of rolling it , i used to pat it thin in a polythene sheet greased with oil. I have showed both the ways in pictures.
  • Cook both sides adding little oil ..Soft n yummy theplas are ready to eat !! Serve hot with raita & pickle ..
methi roti tile 2
thepla
Note
  • For variations , we can saute the methi leaves till it shrinks in size & then add to flour.
  • Sambar powder can used instead of red chilli pwd & dhania powder. Add 2 tsp of sambar powder for the above recipe.

Continue Reading...


January 7, 2013

TOMATO CHUTNEY FOR IDLI/DOSA

I tried this recipe from jey's blog..I usually make tomato chutney using chana dal .This recipe is also similar to that but she used fried gram dal and garlic which made me to give a try. It was very nice with idli. Smile . As i had less onions in my pantry , i used more tomatoes & less onion. The actual recipe suggested to use equal number of onions & tomatoes.Try any based on ur liking.


INGREDIENTS
  • Tomato – 2 nos
  • Big onion – 1 no
  • Red chillies – 4 - 5 nos ( for less spice , use 3)
  • Fried gram dal / Pottukadalai – 2 tbsp
  • Garlic cloves – 4 nos
  • Salt & water – As needed
To temper
  • Cooking oil – 1 tsp
  • Mustard seeds – 1/2 tsp
  • Urad dal – 1/2 tsp
  • Curry leaves - few
METHOD
  • Heat 1 tbsp of oil in a kadai and add the red chillies & garlic flakes.saute well and then add the sliced onions. Saute until the onions turn transparent.Then add the chopped tomatoes.Saute till tomato turns mushy. Add salt for quick saute.
  • At last add the fried gram dal and switch off the flame. Grind to a smooth paste and temper with ingredients given above.
tomato chutney tile
  • Serve with hot idlies !!
TOMATO CHUTNEY FOR IDLI
Continue Reading...


January 2, 2013

MASALA TEA RECIPE WITH JAGGERY | INDIAN MASALA CHAI RECIPE

masala chai cup
Let me start this new year briskly with a masala tea post Winking smile. Have you ever tried a masala chai adding jaggery instead of sugar ? This is the first time i am trying this way. I got this recipe from a cookbook. I simply loved its taste & aroma with all the spices in it. If you want , you can always replace the jaggery with sugar or honey as per your choice. Some people prefer less milk in tea. Some may like with half & half milk and water. I used more water & less milk. Adjust the quantity of milk & water as per your liking.Do try this tea , you’ll love it for sure.Lets see Indian style masala chai with jaggery with step by step pictures.

INGREDIENTS
1 cup - 240ml
  • Water – 1 cup
  • Boiled milk – 1/2 cup (adjust)
  • Tea powder – 1 tsp (I used 3 roses brand)
  • Fennel seeds – 1/4 tsp
  • Cinnamon – 1 inch piece
  • Cloves – 2 nos
  • Cardamom – 2 nos ( Open it & add seeds)
  • Ginger – 1/2 tbsp OR 1/2 inch (crush it slightly)
  • Jaggery – 1 tbsp OR Sugar - 2 tsp (adjust)
  • Pepper corns -  2 nos (crushed)
METHOD
  • Boil water in a pan and when it starts boiling , add all the spices by crushing it slightly. Allow it to roll boil. After 3-4 mins, add the jaggery. When the jaggery is completely melted , add tea powder. As soon as you add the tea powder, water will rise. Simmer the flame & bring it to boil.
masala tea tile 1
  • Lower the flame completely. Then add milk and boil in very low flame till you get a nice color..Strain and enjoy with your favourite snacks !
tea tile 2

NOTE
  • For masala chai powder : Grind 1 inch cinnamon , 3 cloves , 3-4 cardamom , A pinch of nutmeg ,10 pepper corns , 1/2 tsp of dry ginger powder & 1/4 tsp of fennel seeds(if u like) to a fine powder , sieve & store in an air tight box..Use whenever required.

masala tea glass

Continue Reading...


December 24, 2012

AGATHI KEERAI PORIYAL


agathi keera poriyal

Usually this poriyal is prepared on Dwadesi day ( next day to vaikunta ekadesi) as a special food for people who did fasting on vaikunta ekadesi as it helps to reduce the body heat & acidity levels.. Before my marriage , my paati used to make this poriyal along with gooseberry pickle or gooseberry pachadi & avial for dwadesi . I love that feast. Yesterday I got the recipe from my mom and tried this poriyal. It was very nice and we loved it a lot.. We all know agathi keerai takes more time to cook. As my mom suggested , I pressure cooked the keerai after sauting and it was perfectly cooked...Usually toor dal is used in this poriyal but I used moong dal as it gives a nice smell.. Also I used onions which is not added on Dwadesi day. So please skip onion if you make for dwadesi..Otherwise, add small onions which gives a nice taste and flavour to this poriyal.

INGREDIENTS
 1 cup - 250ml
  • Agathi keerai – 1 bunch ( 1 cup )
  • Big onion / small onions – 1/2 cup ( finely chopped)
  • Moong dal – 1tbsp
  • Grated coconut – 1/4 cup
  • Sugar – A pinch
  • Salt & water – as needed
To temper
  • Mustard seeds – 1/2 tsp
  • Urad dal – 1 tsp
  • Channa dal – 1 tsp
  • Red chillies – 2-3 nos
Lime juice – few drops (optional)
METHOD
  • Remove the leaves from the stem , wash it & set aside.
agathi keerai tile
  • In a kadai, temper mustard seeds , urad dal & channa dal. When the dal turns golden brown add red chillies and saute for a second. Then add onions and saute till it turns transparent..
agathi keerai saute tile
  • Now add the washed leaves ( keerai) , a pinch of sugar & the required salt.
  • Saute well till the keerai shrinks.. After few minutes , add a tbsp of moong dal and saute well for a minute.Now add enough water (say 1/2 cup) and transfer the entire contents into a small box with lid and pressure cook it in high flame for 1 or 2 whistles. I dint pressure cook it directly .Remove the lid and check if there is any water..If there is any water , allow it to drain by boiling it for sometime. Otherwise, add the grated coconut , mix well and saute for few seconds..Check for salt. U can add few drops of lime juice at the end to get a tangy taste..
agathi keerai cooked tile
Serve with sambar sadam !!
NOTE
  • I have used more onions and dal to enhance the flavour and taste.
  • This keerai has a mild bitter taste. Adding more coconut helps to overcome that bitterness..
  • We are adding sugar while sauting the leaves to avoid discoloration..
  • If u dont want to pressure cook the leaves , u can add water directly in the kadai and cover cook it. But it takes longer time to cook .
  • U can also pressure cook the leaves first and then do the tempering and sautéing procedures.It tastes good in both the ways.


Continue Reading...


December 20, 2012

KONGU CUISINE– KONGUNADU LUNCH RECIPES

KONGU LUNCH

Kongu Nadu is the most industrialised and prosperous region in Tamil Nadu. The Kongu region comprises of places right from Ooty to Dharapuram which includes Coimbatore, Salem and its a big list.  I worked in Kongu engineering college, Perundurai before my marriage. I have tasted some of their foods during my stay in Perundurai, Erode. 

As I have an interest to try other area foods, Kongu recipes were in my try list for a long time. I have bookmarked some recipes from different blogs and I gave a try. Kongu foods has more of coconut and pulses in many dishes and most of the recipes were made using freshly ground spices.. So it has a nice aroma and taste. The best thing is they use very less oil in their recipes. 

For non-veg lovers, there are a lot more recipes to try. As a vegetarian, I found these recipes are simple to try and makes a perfect meal. The most popular recipe among these is arisi paruppu sadam. I saw different versions in many blogs and long back I tried it with just sambar powder but somehow we dint like that taste. May be their sambar powder is different from mine and I missed the aroma. So this time I tried it from valarmathi’s blog in which she suggested to use freshly ground spices. It was very nice and had a nice flavour. 

Also I tried poondu kuzhambu from her blog which is very easy to prepare. We loved its taste. In addition to this, I tried potato fry from ramya’s blog and paruppu keerai from plantain leaf. To complete the meal, I made ilaneer payasam. This time I dint add condensed milk. Still there is a big list of recipes like kollu masiyal, kootu etc to try.  I’ll make one by one and post here.

ARISI PARUPPU SADAM

My mom makes Tirunelveli special thuvaram paruppu sadam. The taste of arisi paruppu sadam reminded my mom’s recipe..We  enjoyed this rice with vadagam/vathal & potato fry..

ARISI PARUPPU SADAM

INGREDIENTS
1 cup - 200ml
  • Rice – 1/2 cup ( steamed rice/ boiled rice / puzhungal arisi)
  • Water – 1.5 cups ( add as per your rice) ( I used 1:3 ratio, please use the ratio you follow in your daily cooking )
  • Toor Dhal  - 1/8 cup i.e. 2 tbsp
  • Onion – 1 no (medium , slice cut)
  • Tomato – 1/2 no (finely chopped)
  • Coriander leaves – few ( to garnish)
  • Turmeric powder- 1/4 tsp
  • Cashew nuts - few (optional)
To temper:
  • Oil –1 tbsp
  • Mustard seeds - 1 tsp
To grind
  • Garlic - 3 cloves
  • Dry Red Chilli – 2-3 nos
  • Curry leaves – few
  • Cumin seeds – 1/2 tsp
  • Black Pepper Corns - 1/4 tsp

METHOD
  • Grind the ingredients said above to a coarse paste adding water and keep aside.
  • Wash Rice and dal. Soak for 15 mins.
  • Heat oil in a pressure cooker & add mustard seeds to it and allow it to splutter.
  • Then add the onions and fry until golden brown.
  • Now add chopped tomatoes to it and fry till the tomatoes are mushy.Then add the ground paste to it and fry till the raw smell goes. Now add rice and dal to it and add water.
  • Now add turmeric powder, coriander leaves and salt.
  • Pressure cook for 2 or 3 whistles. Fry the cashew nuts in ghee and add to the rice and serve.

As valarmathi suggested, I enjoyed this rice with vathal/appalam and potato fry.. This rice tastes good with potato chips too..

POONDU KUZHAMBU/ GARLIC GRAVY

Its very easy to prepare and a simple recipe.!! Thank you so much valar.

POONDU KUZHAMBU

INGREDIENTS
  • Garlic cloves – 1/4 cup
  • Big or small Onion, chopped – few pieces
  • Tomato – 1 no ( small, chopped )
  • Tamarind – Big gooseberry sized
  • Red Chillies – 2 nos
  • Turmeric powder - 1/4 tsp
  • Coriander powder – 1.5 tsp
  • Chilly Powder - 3/4 tsp
  • Coriander leaves – few ( optional)
  • Jaggery –a pinch (optional)
  • Oil – 2 tsp
  • Mustard seeds – 1 tsp
  • Salt & water – as needed

METHOD
  • Soak tamarind in water and extract a cup of tamarind juice from it and keep aside.
  • Heat oil in a pan, add mustard seeds to it, after it splutters add pinched red chillies to it.
  • Add the chopped onions and garlic fry till they are golden brown.
    Then add tomatoes and fry till they become soft.
  • Now add turmeric powder, chilli powder and coriander powder to it and mix well. Then add tamarind juice, water and salt to it.
    Add  jaggery if you use. Cook the gravy till it becomes thick and garlic are soft.
    Garnish with coriander leaves and serve !!

PARUPPU KEERAI

It tasted more like dal palak. It was a nice combo for poondu kuzhambu..


INGREDIENTS
  • Greens / Spinach – 1 cup chopped  ( I used arai keerai)
  • Toor dal  – 1/3 cup (you can use split pigeon peas or yellow lentils)
  • Turmeric powder – 1/4 tsp
  • Oil – a drop
  • Onion – 1 no (medium chopped)
  • Garlic --- 6 cloves ( chopped)
  • Green chillies – 2 nos (slit)
  • Pepper powder – 1/2 tsp
  • Salt to taste
For seasoning
  • Oil – 1 tsp
  • Mustard seeds – 1/2 tsp
  • Cumin seeds – 1/4 tsp
  • Asafetida – 1/8 tsp
  • Curry leaves – few


METHOD
  • Pressure cook dal adding turmeric powder & oil. Mash the dal and set aside.
  • In a kadai, temper all the ingredients and add the chopped onion, garlic cloves. green chillies and saute well.
  • Now add the washed & chopped green and saute for sometime. Add water and cover cook till the greens are cooked well. Then add pepper powder, cooked dal and required water, salt.
  • Allow it to boil for few seconds, remove & serve hot !


POTATO BRINJAL FRY

POTATO FRY

For this recipe, Ramya used brinjal & potato.  As my hubby doesn't like brinjal , I used potatoes alone. I din't use much oil , first I roasted potatoes in little oil and I added little water to cook them.. It was not much oily and was tasty too..

INGREDIENTS

  • Potato – 3 nos (medium sized , cut into pieces)
  • Brinjal - 1 (chop into small cubes)
  • Big onion – 1 no, chopped ( original recipe used small onions )
  • Sambar powder – 1-2 tsp
  • Grated coconut / dry coconut – 2 tsp
  • Salt – as per taste
To temper
  • Oil – 2 tbsp
  • Mustard seeds – 1/2 tsp
  • Channa dhal – 1 tsp
  • Green chilli - 1 no( finely chopped.)
coriander leaves for garnishing.

METHOD
  • Heat oil in a pan and once its hot, add the mustard seeds.
  • When it splutters, add the chana dal. Saute until it turns light brown in color and then add onions. Fry till transparent.
  • Add the chilli, curry leaves and turmeric powder and saute well.
  • Now add the potato pieces and sambar powder /red chilli powder and the salt needed and cook it covered until the potatoes are cooked by sprinkling little water ( If you don’t want to add water, add more oil and allow it to roast and cook in oil itself)
  • Just before turning off the flame, add the grated coconut and gently stir. Garnish with coriander leaves. Serve it hot.

Continue Reading...


December 17, 2012

EGGLESS ORANGE BISCUIT CAKE RECIPE WITHOUT BUTTER, MAIDA


I have tried this cake many times with different flavours. Its a fool proof recipe. It never went wrong. I have tried with chocolate , pine apple and orange flavours too. It tastes great. Its very easy to make with just two steps. There is no butter, no maida and no egg in this recipe. This cake comes out really soft n spongy. Do try this cake, you’ll love it for sure. 

ORANGE BISCUIT CAKE -HANDS

INGREDIENTS
  • Marie biscuit – 6 nos ( I used marie oats)
  • Orange cream biscuit – 6 nos ( I used tasty treat)
  • Sugar – 2 tsp ( adjust)
  • Baking powder – 1/2 tsp
  • Cooking soda – 1/4 tsp
  • Milk – 1/2 cup ( at room temperature, boiled & cooled milk)

METHOD
  • In a mixie jar , take the biscuits , sugar, baking powder & cooking soda. Grind well to make a smooth powder.. Then add the milk and grind it again to make a paste.The cake mixture should fall like a ribbon.
  • Line a baking pan with butter paper and pour the mixture. Preheat oven in convection mode ,180c for 10 mins and bake the cake for 15-20 mins. Check with tooth pick and remove. Allow it to cool completely and remove the butter paper. Cool the cake completely before removing the butter paper else the cake will break.Cut into pieces and enjoy !!
orange cake

ORANGE BISCUIT CAKE - BITE

NOTE
  • If you want, you can replace cooking soda & baking powder with a tsp of Eno fruit salt ( plain, blue color packet). Result will be the same.
  • U can add orange zest & orange juice for more flavour. In that case , adjust the amount of milk. The cake mixture should fall like a ribbon.
  • If you want different flavours, replace orange biscuit by pineapple  cream biscuits OR chocolate cream biscuit. The quantity would be the same. I have tried with all marie biscuit varieties. So use any.
  • Please check after 10 mins, if its not done, bake for 5 more minutes.
  • Cool the cake completely before removing the butter paper else the cake will break.

Continue Reading...


December 13, 2012

Veg Kurma For Chapathi - Hotel Style Vegetable Kurma


MIXED VEG KURMA
I got this recipe from my friend. I have tried this kurma many times with many combinations and finally hooked up with this recipe. I always love hotel kurma and when u dig it , u’ll find only some onions and vegetables and not any spices.As my friend’s recipe was similar to the one i expected , i tried it..It was very flavourful & tasty .. It is a best pair for roti, poori , parotta and idiyappam..I’ve already posted a mixed veg kurma , mom’s version..If interested click here..
INGREDIENTS
1 cup - 250ml
  • Carrot – 2 nos (small)
  • Potato – 1 no (big)
  • Beans – 8 - 10 nos
  • Peas – 1/4 cup
To temper & saute
  • Jeera – 1 tsp
  • Bayleaf –1 no (optional)
  • Big onion – 2 nos
  • Tomato – 2 nos ( small)
  • Turmeric powder – 1/4 tsp
  • Red chilli powder – 1/2 tsp ( I used 1/4 tsp)
  • Garam masala powder – 1/2 tsp
  • Kasuri methi – A pinch (optional)
To grind
  • Grated coconut – 1/4 cup
  • Fried gram dal – 2 tsp
  • Cashews – 5 nos
  • Green chillies – 2 - 3 nos ( I used 2 ) 
  • Dhania / coriander seeds – 1/2 tsp (optional)
  • Fennel – 1/2 tsp
  • Cinnamon – 1 inch piece
  • Cardamom – 1 no
  • Cloves – 2 nos
  • Ginger – 1 inch piece
  • Garlic – 6 cloves
METHOD
  • Grind all the items given under “to grind” to make a paste by adding water..Chop tomatoes finely and set aside.You can also use 1/4 cup of thin tomato puree instead.
  • Wash and chop all the vegetables , pressure cook adding little salt , 1.5 cups of water in high flame for 2 whistles and set aside..Make sure the vegetables should not be mushy.
veg kurma step 1
  • In a kadai , heat oil ,add jeera & bayleaf.. Then add the onions and saute till it turns transparent. Now add the tomato puree or tomato pieces and saute till raw smell leaves or till the pieces turns mushy.Add little salt to make it faster..
veg kurma step 2
  • Then add the ground paste and saute well .. Now add the turmeric powder , red chilli powder and garam masala powder & kasuri methi. Mix well and saute for few mins. Finally add the cooked vegetables along with the water. Add salt if necessary and some more water. Allow it to boil for sometime till u get a nice aroma. Adjust the consistency..
veg kurma step 3
Garnish with coriander leaves if u wish. Serve hot with roti/poori !

MIXED VEG KURMA PLATE

NOTE
  • I wanted the kurma less spicy , so i added less chillies. U can add more based on ur requirement..
  • Instead of cooking vegetables in prior , i have tried cooking it along with the spices .It gives a different taste and smell.Try any method based on your wish.
  • Adding red chilli powder is optional. If u want , u can avoid green chillies while grinding and add red chilli powder alone..
  • No need to use mint , curry leaves or coriander leaves for flavour. I don’t use any..
  • If u r using dried peas , soak it overnight and use ..


Continue Reading...


December 11, 2012

Corn Cheese Balls Recipe | Kids Snacks Recipes

cheese balls copy
  
I tried this corn cheese balls recipe without breadcrumbs after watching an Youtube video by chef Harpal singh. I found it easy and I prepared this for my daughter’s evening snacks. She loved it a lot. Usually cheese balls are made with white sauce and coated with bread crumbs or panko crumbs. But I followed this quick and easy method. I halved the recipe and added masala as per my need. For the last batch, I added little garam masala powder which is not in the original recipe. I loved it. It takes just 10 minutes to prepare when you have boiled sweet corn ready in hand. We all find difficult to remove the corn kernels. So  I have suggested a very simple and easy method which I saw here in road side shops. I’ve given step by step pics too. Some of you may know this already. Do try this method and let me know friends. Soon I will try to share Bangalore famous masala corn recipe :)

Check out my another version of corn cheese balls too.

cheese balls 1 copy

Corn cheese balls recipe - Masala corn cheese balls


Corn cheese balls recipe - Masala corn cheese balls How to make Indian style masala corn cheese balls recipe
Cuisine: Indian
Category: Snacks
Serves: 10
Prep time: 10 Minutes
Cook time: 20 Minutes
Total time: 30 Minutes


INGREDIENTS
1 cup - 200ml
  • Boiled Corn kernels – 1/2 cup ( GRIND COARSELY)
  • Grated Cheese – 3/4 cup ( i used mozzarella ,any cheese is ok )
  • Corn flour –1/2 tbsp
  • Maida – 1 tbsp
  • Chopped ginger bits – 1/2 tsp
  • Chopped green chillies – 1 tsp
  • Pepper powder – 1/2 tsp
  • Cooking soda – A pinch
  • Chopped coriander leaves – 1/2 Tbsp
  • Lemon juice – 1/2 – 1 tsp
  • Cumin powder – 1/4 tsp
  • Red chilli powder – 1/2 tsp
  • Garam masala powder – 1/2 tsp (optional)
  • Water – 1-2 tbsp
  • Oil – for frying + for greasing ur hands
  • Bread crumbs - as needed ( optional, I dint use it)
  • Salt – As needed
HOW TO MAKE CORN CHEESE BALLS - METHOD

  • Grate the cheese,boil the corn and remove the kernels.To remove the kernels, cut the boiled corn into two pieces. Take one piece and keep it on a plate.Hold the corn with one hand. Keep the knife on top of one side of the corn. Cut through the end. The kernels will fall down. Rotate the corn and do the next side. Repeat until all the kernels are removed.(click on the image to c a large picture)
    cheese balls step 1
  • Grind the kernels coarsely just by pulsing once or twice.
    balls step 2
  • In a bowl , take the ground kernels , cheese , flour and all the ingredients except oil and water. Mix & make a crumbly mixture. This itself forms a non sticky dough but u should add little water otherwise the mixture will separate when u deep fry. May be just 1-2 tbsp water is enough.
    balls step 3
  • Now add water to make a dough. It will be sticky. Grease your hands with oil and make small balls. Dip the balls in milk and then roll in bread crumbs(optional). I din't do this step. Cover the remaining balls while you deep fry. Do not let it dry.
  • Heat oil to deep fry and fry one for the first time. Oil should not be too hot. U should fry like gulab jamun by stirring the oil and the ball continuously for uniform frying. The ball will come up once done. Remove when golden brown
    balls step 4
Enjoy !

NOTE
  • Adding water is very important otherwise the mixture will separate while deep frying..
  • I din’t use milk or bread crumbs to roll. But still it was crispy. If you want, you can roll the balls in milk and then in bread crumbs to get more crispy balls..
  • Do not deep fry in high heat because the balls will get browned and remains uncooked inside.
  • Keep stirring the oil using a ladle when you deep fry. This helps for uniform cooking & browning.
  • Adding garam masala powder is optional.

Enjoy this crispy corn cheese balls with ketchup !cheese balls- tooth pick


Continue Reading...