Search Chitra's Food Book

November 13, 2013

KARTHIGAI KOZHUKATTAI RECIPE – KARTHIGAI DEEPAM RECIPES

Karthigai deepam kozhukattai
Thirukarthigai/Karthigai deepam falls every year on full moon day of Karthigai, tamil month. Karthigai deepam 2020 ie this year it is on 29(Sunday), November. Generally, kozhukattai is prepared for Ganesh chaturthi. U may wonder why am I posting this kozhukattai recipe for Karthigai deepam festival. In my native place(Tirunelveli ), people used to make this kozhukattai without salt on Karthigai. They make plates and lamps (agal vilakku) using this kozhukattai dough and light it along with the other lamps. The number of plates and lamps should be equal to the number of family members. Usually our people says, it is very auspicious to make this lamp on karthigai deepam for the well-being of family members.

My friend’s mom told that they keep this lamp by praying God to bless their family with health, wealth and peace. My mom also used to do this every year. Not only this lamp, mom makes finger shaped kozhukattai with the remaining dough and offer to God along with pori urundai , appam and maavilakku. As it is salt-less, we used to have this kozhukattai adding lots of grated coconut. We call this as “Neer kozhukattai, uppilla kozhukattai etc.

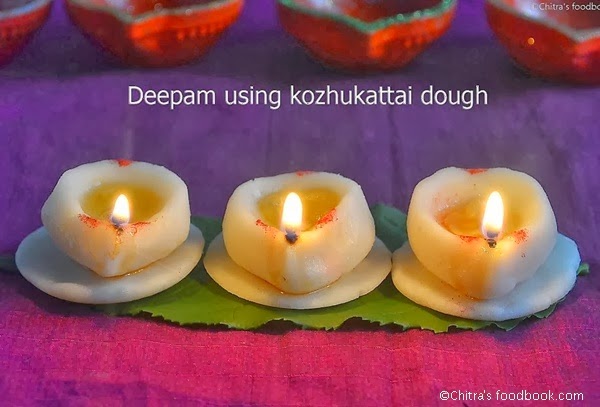
My MIL also makes this kozhukattai for avvaiyar viratham/Chevvai pillayar viratham. This kozhukattai recipe is known to all of you. But keeping this dough lamp may be new to some of you. So I wanted to share with u all :)..This year, I am going to make this dough deepam/diya for the well-being of my family. Friends, do make this for your family too and get the blessings of God :).Use ghee for lighting the lamp. After the lamp goes off, eat it as prasadam along with jaggery and grated coconut !
Karthigai deepam using dough

The dough making method I have shared here is not the authentic one. Usually my mom used to make this kozhukattai dough adding plain, cold water to the rice flour and she cooks the kozhukattai in an open pan in boiling water for few minutes.
By doing this way, kozhukattai comes out little hard and chewy. Sometimes kozhukattai may dissolve in water if the dough consistency is not correct. So my mom suggested me to follow our usual kozhukattai dough(with video) method. Thanks to my sister’s SIL Mrs.Thangam for telling this recipe with correct water measurement. Kozhukattai came out very well and soft.. Please adjust the water quantity by keeping this as reference. Do not add all the water at once. Keep adding slowly to make a perfect non sticky dough.

kozhukattai-karthigai deepam recipes

kozhukattai Recipe


kozhukattai Recipe Kozhukattai recipe for karthigai deepam.
Cuisine: South Indian Category: Festival recipesServes: 3
Prep Time: 15 Mins Cook Time: 20 Mins Total Time: 35 Minutes


INGREDIENTS
1 cup - 200ml or 250ml
To make kozhukattai dough
  • Idiyappam flour / Rice flour - 1 cup (You can use homemade or store bought idiyappam flour)
  • Water - 1.25 to 1.5 cups (Water quantity varies based on rice flour )
  • Gingely oil - 1 tsp
METHOD

  • In a wide bowl, take the rice flour. In a vessel , take the required quantity of water and add a tsp of gingely oil.
neer kozhukattai step by step
  • Let the water boil for 2-3 minutes. Add this water to the rice flour by mixing with a ladle. Rice flour gets half cooked by the heat of this water and increases in quantity. After the dough becomes slightly warm , knead it to make a soft , non-sticky dough.
neer kozhukattai step by step
  • Make plates an lamps as per the number of family members. For making plate , take a big lemon sized ball, pat it on a sheet. Seal the cracks if any. For lamp , take a small lemon sized ball. Press it in the center and make a dent to pour ghee/oil. Narrow down one edge of the ball and make like a lamp. Hope this picture helps you..
neer kozhukattai step by step 4
  • Arrange them in a greased idli plate. Keep the plate only after the water starts to roll boil. Steam it for 7-8 minutes. Deepam is ready. Remove the lamps from the plate after it becomes warm , else it may break.
  • Make finger shaped kozhukattai or small balls using the remaining dough, steam it for 6-8 minutes. Remove.
karthigai kozhukattai step by step 3

While lighting the lamps in the evening, put ghee for this rice flour lamp and light it, Once its turned off,u can have it with grated or chopped coconut pieces. As it is without salt, you should have this rice flour lamp with either grated coconut or grated jaggery.
Note
  • Do not add all the boiling water to the rice flour at once. Please add little by little by mixing with the ladle simultaneously. By this way , you can find the rice flour getting cooked and make a non-sticky dough.
  • Knead the dough well for few minutes to make a crack free lamps and plates. Grease your hands with oil whenever necessary..
  • Do not steam for long time. Keep the idli plate only after the water in the idli pot starts boiling..

Serve this kozhukattai adding lots of grated coconut. As it is salt-less, you have to eat it this way :)

kozhukattai-karthigai-deepam

This is my first attempt in clicking a lamp at night, is it looking good or at least ok ? ;)

Karthigai deepam


Continue Reading...


November 11, 2013

MANATHAKKALI VATHAL KUZHAMBU RECIPE WITHOUT ONION GARLIC

manathakkali vathal kuzhambu recipe
Manathakkali keerai, Black night shade in English has amazing health benefits. It is a good remedy for mouth & stomach ulcers especially. I try to include manathakkali vathal/sundakkai vathal in my cooking at least once in a week. I got this vathal kuzhambu recipe from my Tamil brahmin friend Sumi.. This is a no onion,no garlic recipe & it can be made in minutes. 

This recipe is apt for bachelor’s & working women to finish off their cooking quickly in busy mornings. The best thing about this recipe is it has no cutting part. No need to cut any vegetables, onion, garlic as I do for my normal kara kuzhambu recipe. All the ingredients used in this recipe are readily available in our pantry. I have tried this recipe many times in my kitchen. Raksha and Sendhil like this kuzhambu a lot. All credits goes to you Sumi. Sumi is my school friend.

 After so many years, we met each other via facebook. She used to see my recipes and shared some of her authentic brahmin style recipes as well.Thank you so much Sumi for sharing your yummy recipes with me. I am planning to post them one by one in my space. So friends , if you r looking for an easy to make, quick vathakuzhambu recipe, here it is! Do try and leave ur feedback if you try it. I have updated this recipe with a video below. Please check it.

Click this link if you are interested to know the amazing health benefits.


manathakkali vathal kuzhambu recipe

Manathakkali vathal kuzhambu recipe - Tamil Brahmin style


Manathakkali vathal kuzhambu recipe - Brahmin style Simple , easy to make , tamil brahmin style manathakkali vathal kuzhambu recipe.U can try this with sundakkai vatral/turkey berry , cluster beans vatral too..
Cuisine: Indian Category: Lunch Yields: 2
Prep Time: 5 Mins Cook Time: 15 Mins Total Time: 20 Mins


INGREDIENTS
To temper
  • Gingely oil/nalla ennai - 2 tbsp
  • Mustard seeds - 1/2 tsp
  • Methi seeds - 1/2 tsp
  • Urad dal - 1/2 tsp
  • Toor dal - 1 tsp
  • Jeera/cumin seeds - 1/2 tsp
  • Red chilli – 1 no
  • Asafetida/Hing – 1/4 tsp
  • Manathakkali vathal/Black night shade - 1tbsp
  • Curry leaves - few

To soak in water
  • Tamarind - A big gooseberry size (1/2 tbsp)
  • Turmeric powder – 1/4 tsp
  • Sambar powder - 3/4 - 1 tbsp
  • Grated jaggery – 1/2 tsp
  • Rice flour - 1 tsp (dissolve in little water)
  • Salt & water - as needed
HOW TO MAKE MANATHAKKALI VATHAL KUZHAMBU

  • Soak tamarind in a cup of warm water for sometime & take the extract. Make 2 cups  of extract in total. In a small bowl ,take the rice flour & dissolve it with little water without lumps. Set aside.
  • In a kadai, heat oil. Temper all the ingredients given above in the same order. Add manathakkali vathal and saute till it changes in color with a nice smell..
vathakuzhambu step by step recipe
  • Now add the sambar powder, saute for half a second and immediately add the tamarind extract, salt & turmeric powder.
vathakuzhambu step by step picture
  • Allow it to boil for 5 minutes till the raw smell of tamarind goes off. Add jaggery , mix well while boiling.Add diluted rice flour and boil for another 5 minutes till gravy thickens.. Boil till you get the desired consistency.
vathakuzhambu step by step recipe
Switch off the flame..


Note

  • Avoid adding rice flour if you don't like. But you should add less tamarind or more sambar powder accordingly. Otherwise gravy may taste tangy.
  • U can replace manthakkali vathal with sundakkai vathal , cluster beans vathal etc.
  • If you want , you can fry finely chopped onions and garlic pieces while tempering to make it more flavorful.

Enjoy mixing with plain rice with papad and kootu as side dish !
manathakkali vathal kuzhambu brahmin style


Continue Reading...


November 9, 2013

MURUKKU PODI – KIDS SNACK RECIPES


Murukku powder
Murukku podi/Powder is a very easy and tasty snacks recipe which can attract ur kids easily. Its just a single step process..This recipe may be known to most of u but u might have forgotten about it.This post is to refresh ur memories :)..We all would have made thenkuzhal or mullu muruuku for Diwali and i hope u have some murukku leftover in ur pantry. Some kids hesitate/don’t like to eat mullu murukku as it pricks the jaws.I have seen toothless old people getting mouth ulcers by eating murukku.So,for those people, u can try this way. They’ll love it for sure. When i was young , kittu aachi( my dad’s periamma) used to come to our house to help my mom for making thenkuzhal murukku.She was a very old toothless lady. As she couldn’t eat murukku as such , my mom make this murukku podi for her and store in a box.She used to enjoy it a lot ..As kids , we too( me & my sis) used to take it in a bowl and have it after coming from school.A glass of milk and this murukku podi was our evening snacks those days during DiwaliSmile
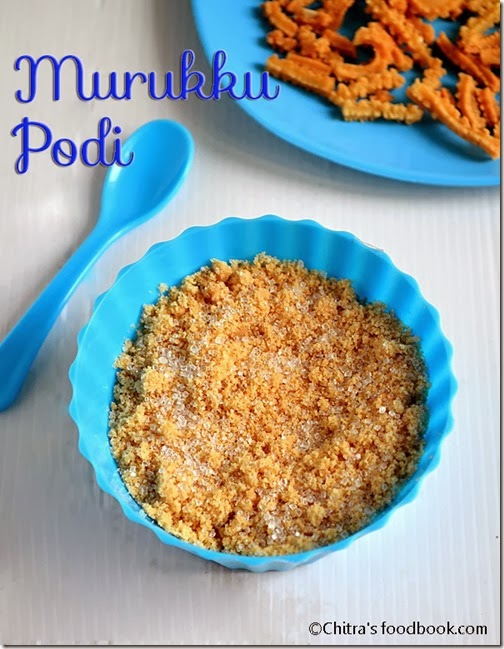
. Yesterday i tried this with leftover magizhampoo murukku for Raksha & she loved it. More than Raksha , myself and Sendhil relished a lot and we finished the bowl very quickly .Thenkuzhal murukku podi tastes the best according to me. Do try this murukku podi for a change if u have not attempted so far..U may love it like me Open-mouthed.

murukku podi recipe

Murukku podi


Murukku podi Murukku podi/powder is a very easy kids snack recipe which can be made in minutes using leftover murukku..
Cuisine: Indian Category: Sweet Yields: Serves 2
Prep Time: 1 Minute Cook Time: 2 Minutes Total Time: 3 Minutes


INGREDIENTS
To grind
  • Leftover plain murukku (thenkuzhal or mullu murukku) - 5 nos
  • Sugar –2-3 tsp (increase as per ur need)
METHOD

  • Break the murukku into pieces..In a dry mixie jar , take the murukku pieces.Grind  till it becomes a nice powder..Remove it in a bowl , add sugar. Mix well and enjoy !
Murukku podi recipe
Enjoy !


Note

  • For sugar patients , please avoid adding sugar. Just powder and give ..
  • If u have spicy murukku in hand , u can powder and have it as such.  
  • I made this recipe using leftover magizhampoo murukku. Thenkuzhal murukku tastes the best :)
My daughter had this murukku podi with complan Smile 
Murukku podi
Continue Reading...


November 7, 2013

Mango Drumstick Sambar Recipe - Tirunelveli / Nellai Sambar Recipe

Tirunelveli Sambar recipe for rice

I love to taste and try varieties of sambar recipes be it idli sambar or lunch sambar and particularly this raw mango drusmtick sambar is my most favourite among all the sambar recipes. U know why, this is my mom’s Tirunelveli style sambar for rice :) We love to have it with idli, dosa as well. My mom calls this as "Idi sambar". Its a very tasty and flavorful sambar with freshly ground sambar powder. I can have a plateful of rice anytime with this Nellai sambar. We ( me and my sis) fondly call this as "Amma sambar". 


After marriage, when I started cooking, I couldn’t make this sambar often in my kitchen as Sendhil is very much fond of his mom’s Tanjore/Kumbakonam style sambar. So whenever I go to my mom’s house(Salem), she prepares this specially for me. This sambar needs very less dal than the usual quantity. We can add any vegetables like lady’s finger, drumstick, brinjal and raw mango. But our favorite combo is drumstick and raw mango. 

In my family, everybody loves my mom’s cooking very much. She makes authentic Nellai Saiva pillai (Tirunelveli) samayal very nicely.  My amma never used store bought sambar powder in her cooking so far.  Her recipes are mostly with freshly ground powder be it sambar, puli kulambu or rasam. So preparation /cooking time takes little more than my (mil’s) usual method of cooking. So I make my mil’s and mom’s lunch recipes in alternate days and enjoy eating varieties of kuzhambu.


My mom makes Carrot puttu or avial as side dish for this sambar recipe. To me, just a papad/ appalam is enough.
If you are looking to find Tirunelveli style Sambar powder, check THIS LINK

 Nellai Sambar for lunch

Basic Tirunelveli style Sambar Recipe For Rice


Sambar recipeBasic Nellai style sambar recipe for rice using freshly ground sambar powder. U can use any vegetables like brinjal , lady’s finger , drumstick or simply onion.
Cuisine: South Indian Category: Lunch recipes Serves: 2-3 
Prep Time: 10 Minutes Cook Time: 30 Minutes Total Time: 40 Minutes 


INGREDIENTS
1 cup - 250ml
To pressure cook
  • Toor dal – 1/3 cup
  • Turmeric powder – 1/4 tsp
  • Cooking oil – a drop
To roast and grind for sambar powder ( use 1 tsp of this powder, store the excess powder for future use. My mom use this powder for idli sambar too.)
  • Oil – 1/4 tsp
  • Methi seeds - `1/2 tsp
  • Chana dal – 1 tsp
  • Coriander seeds – 1/2 tsp
  • Red chillies – 3 nos
To grind
  • Grated coconut – 1.5 tbsp
  • Small onions – 3 nos
  • Jeera/cumin seeds – 1/4 tsp
To saute
  • Cooking oil – 1 tbsp
  • Big onion – 1 no (slice cut)
  • Curry leaves – few
  • Tamarind – A big gooseberry size
  • Drumstick – 1 no (cut into finger size pieces)
  • Small Raw mango – 1/2no ( 5-6 cubes)
  • Red chilli powder – 2 tsp
  • Salt & water – as needed
To temper
  • Cooking oil – 1 tsp
  • Mustard seeds – 1/2 tsp
Coriander leaves – 2tbsp (to garnish)
HOW TO MAKE TIRUNELVELI IDI SAMBAR FOR RICE - METHOD
  • Pressure cook toor dal adding turmeric powder , salt and a drop of oil for 2 whistles. Mash the cooked dal and set aside.In a mixie jar , grind the coconut , small onions and jeera to a smooth paste adding the required water.
Nellai sambar recipe
  • In a pan , heat 1/4 tsp of oil and roast the ingredients given under “ To roast and grind”. Powder it nicely. U don’t have to use all the powder. Use only 1 tsp. Store the remaining for making idli sambar.
Nellai sambar recipe


  • Take the tamarind extract in a bowl. To this add red chilli powder, salt, turmeric powder and drumstick. Check for taste.Set apart
  • In a pan, heat 1 tbsp of oil and saute the sliced onions. To this add the tamarind extract mixture. Cover and cook till drumstick is done. After the drumstick is 3/4th cooked, add raw mango pieces. Again cover and cook for sometime. Mango takes less time to cook. So keep checking otherwise it will cook soft & dissolve in sambar.
Nellai sambar recipe
  • After the vegetables get cooked, add the mashed dal. Allow it to roll boil. Lastly add the ground coconut , mix well. Let it boil for a minute. Now add a tsp of roasted and ground sambar powder. Allow it to boil till you get a nice aroma. Switch off the stove and garnish with coriander leaves. Give a standing time of minimum 30 minutes for all the flavors to induce well.
Nellai sambar recipe
  • Temper with the ingredients given under “to temper”. Mix well.
Enjoy mixing with hot rice !!

Note

  • Adding raw mango is optional. U can add only drumstick and make this sambar. But increase the tamarind to a small lemon size.
  • Garnishing with coriander leaves gives a superb flavor for this sambar. Please don’t skip..
  • Do not use all the powder to this sambar. Use only a tsp. U can make sambar 2-3 times using this powder. As mixie doesn’t grind very small quantity , amma use this measure. She use this powder for making idli sambar too. So store the remaining powder in a box and use whenever needed.
  • Less dal is needed for sambar as we add ground coconut and channa dal which helps for thickening.

Tirunelveli style sambar


Continue Reading...


November 4, 2013

SUZHIYAN RECIPE - HOW TO MAKE SUZHIYAM RECIPE - DIWALI BREAKFAST RECIPES

suzhiyan-picture
Suzhiyan is Sendhil's most favorite sweet among all the diwali recipes. People call it by different names as suzhiyam, suyyan, susiyam, sweet seeyam, sukhiyan etc. Suzhiyan sweet recipe is very easy to make. Kadalai paruppu pooranam is used for stuffing and maida, rice flour is used for outer covering. 

We usually make it specially on Diwali Day and after ganesh chaturthi with left over channa dal pooranam / kadalai paruppu pooranam made for kozhukattai. I learnt this recipe from my MIL.

 
My mom & Sister's family makes the same with coconut pooranam. In our house, we call this as suseeyam/sugin/ suyyam. Stuffing is our choice.Some people use idli dosa batter to make the outer covering of suzhiyan. But we use maida & rice flour. So I have shared recipe for outer layer of suzhiyam and our easy method of making stuffing/pooranam.

I have shared a picture of our Diwali breakfast recipes below. Hope you all celebrated Diwali very well.. I had a great Diwali celebration in my in-laws place. I got a new saree from my in-laws and two churidhars from my husband. I was so  happy and busy in burning crackers, eating sweets and snacks(my mil's preparation), wishing friends and relatives and in taking pictures..

We usually make Medhu vadai with pepper , Suzhiyan and adhirasam along with idli, sambar for neivedyam on Diwali morning. Diwali breakfast is like a feast for us. We have all the sweets and snacks made for Diwali along with the above said recipes. We keep munching the savories and sweets the whole day. We don’t even make lunch. Our only job is to watch special programmes in TV , eat and sleep ;).

Ok, enough of my stories lets move on to Suzhiyan recipe with step by step pictures.

DIWALI BREAKFAST RECIPES-001


Suzhiyan Recipe


Suzhiyan Recipe Suzhiyan is a delicious, deep fried snack stuffed with chana dal pooran. We make this for neivedyam on Diwali and Ganesh chaturthi. 
Cuisine: South Indian Category: Sweet / Snack Yields: 30
Prep Time: 30 Minutes Cook Time: 10 Minutes Total Time: 40 Minutes


INGREDIENTS
1 cup - 250ml
For pooranam
  • Chana dal / Kadalai paruppu – 1/2 cup
  • Grated jaggery –  3/4 cup ( add 1 cup for more sweetness)
  • Grated coconut – 1/2 cup
  • Cardamom powder – 1/2 tsp
  • Water – as needed
For outer layer
  • All purpose flour /Maida – 1 cup
  • Besan flour – 1 tbsp (optional)
  • Rice flour – 1 tbsp
  • Salt – a pinch
  • Cooking soda – A pinch
Oil – to deep fry
HOW TO MAKE SUZHIYAN - METHOD

  • Prepare the stuffing first. For this, pressure cook channa dal adding required water and a tsp of oil. Cook for 2-3 whistles in low flame. After the steam is released , mash the dal well with a whisk or ladle. Set aside.
suzhiyan tile1
  • To this mashed dal , add grated coconut and jaggery. Mix till the mixture thickens and leave the sides of the pan & becomes non-sticky. Add cardamom powder. Switch off the flame and allow it to cool. Make small lemon sized balls after the stuffing becomes warm..
suzhiyan tile2
  • In a wide bowl, take the all purpose flour , besan and rice flour. Add a pinch of salt and cooking soda. Add water to make a batter of bajji batter consistency. Batter should flow like a ribbon. It should coat the stuffing well. Put the stuffing balls in the batter.
suzhiyan tile3
  • Heat oil in a kadai and when it gets heated , use a spoon and take a ball dipped in batter. Put 3 to 4 balls in oil and deep fry for few minutes. Keep turning both the sides for even cooking. Remove as soon as the outer cover gets golden brown spots in the center. Drain in a a colander and store in a box after it cools down. It stays good for 2-3 days. 
suzhiyan tile4

suzhiyan tile5
Enjoy !
Note
  • While cooking dal, if you add more water, drain the excess water and grind to a smooth paste. Also while adding jaggery and coconut, you don’t have to add water.Coconut and jaggery itself leaves water when it melts.
  • If u want to remove the impurities of jaggery, first heat & melt the jaggery adding little water and allow it to become frothy. When it is frothy, add grated coconut and mashed dal. Mix till mixture thickens and leaves the sides.
  • U can make the batter only using maida. Adding rice flour makes it slightly crispy..
  • Besan flour is completely optional. Make the batter in bajji batter consistency. Do not make it too thin or too thick. The stuffing should be coated well.
  • Suzhiyan stays soft and good for 2-3 days.


suzhiyan picture-001

Continue Reading...


November 1, 2013

INJI LEGIYAM /GINGER LEGIYAM – DIWALI MARUNTHU RECIPE

Ginger lehiyam
This year I couldn’t post many recipes for Diwali as I wished. So I thought of finishing this year Diwali recipes at least with this useful post. My mom was with me for the past one week. When I was discussing about diwali legiyam , she immediately told me about this inji legiyam / ginger legiyam recipe.

This is not the authentic Diwali legiyam reipe.But my mom makes this on the eve of Diwali and once in 3 months. We used to have this legiyam for 3 days in empty stomach from Diwali. It is one of the easiest and the best legiyam recipe which can be made with just 3 major ingredients in 10 minutes. As a kid, me & my sister used to cry literally to have this in empty stomach and the worst thing is we should not drink or eat anything for 30 minutes after having this legiyam. We should not drink water too. But now I realise how effective it is. We ( me & my sis) have no digestion & stomach upset problem till today (touchwood). 

Now I am following my mom and I make this legiyam for my family whenever they have indigestion issues. I give a big gooseberry size for my husband and a small berry size for my daughter. This legiyam is not only healthy but also very tasty with mild inji kaaram. It helps for easier digestion of oily and junk foods we have on Diwali. It also improves appetite.Some people make this legiyam for krishna jayanthi and offer to god along with seedai. Do prepare and have this simple & effective legiyam for this diwali. Enjoy sweets & snacks without feeling guilty. I'll try to the post the authentic legiyam next year.

Do refer “Points to note” before doing this legiyam. 

Inji lehiyam

Diwali marundhu recipe - Inji legiyam 


Diwali marundhu recipe Easy ginger legiyam recipe using easily available ingredients in pantry !
Cuisine: Indian Category: Health food Yields: Serves 2
Prep Time: 10 Minutes Cook Time: 15 Minutes Total Time: 25 Minutes


INGREDIENTS
1 cup - 200ml
To grind
  • Fresh ginger (thumb finger size) – 5 pieces
  • Dhania/Coriander seeds – 2 tsp
  • Dry grapes / raisins – 1/4 cup
  • Salt – a pinch
To saute
  • Grated jaggery – 2 tbsp
  • Ghee – 1.5 tbsp
  • Water – as needed
HOW TO MAKE INJI LEGIYAM - METHOD

  • Wash and chop the ginger into small pieces. Set aside.
Ginger lehiyam
  • In a mixie jar , grind the dhania seeds first to a coarse powder. Then add the chopped ginger, required water and grind it to a smooth paste. Lastly add the dry grapes and grind to smooth paste.
  • Ginger lehiyam
    Ginger lehiyam
  • In a kadai , melt jaggery adding little water ( say 2-3 tbsp). Jaggery will melt completely and becomes frothy. Now add the ginger paste and mix well till the mixture thickens. Add ghee at the end and mix till it leaves the sides of the pan. Make sure there is no water content. It spoils the shelf life of this legiyam.
  • Ginger lehiyam Ginger lehiyam
Allow it to cool completely and store in a clean, air tight box. Always use a dry, clean spoon to take it..It stays good for 4 days without refrigeration..

Note
  1. There should not be water content in this lehiyam. It will spoil this lehiyam very soon. So mix it well in high flame.
  2. Add more jaggery if you want more sweetness. But the quantity I have given is enough to compensate the ginger taste.
  3. U should have this legiyam for 3 days continuously to get its full benefits. Its better to have this in empty stomach or at night before going to bed.
  4. Most important thing is u should not eat or drink anything for 30 minutes after having this legiyam. If you eat food or drink water immediately, you may pass loose stools. Take care ..
  5. This legiyam can be had once in three months generally. It helps to keep our stomach clean and strong.
  6. Coriander seeds/dhania helps to control the bile secretion (pitham) in our body. Ginger is helpful for easy digestion and removes the waste/toxins. Dry grapes gives us good immunity. Ghee is used to subside the heat of body.
  7. Adults can have a big gooseberry size and kids( above 6 yrs) can have  a small berry size of this legiyam.
Continue Reading...