Search Chitra's Food Book

October 16, 2014

BADAM HALWA RECIPE- SOUTH INDIAN ALMOND HALWA-DIWALI SWEETS RECIPES

Badam-halwa-recipe

Badam halwa (Almond halwa) is one of the sweets I wanted to share in my space for long time. Last year, I tried making it for Sendhil’s birthday and our anniversary using stove top & microwave version but I din’t get it up to the mark. Of course it came out tasty but not perfect like in sweet stalls. Finally I watched Vahchef’s video & it helped me to make yummy,ghee dripping badam halwa. I made few changes in the method & recipe as per my convenience and I was very happy with the outcome. I have a craze for badam halwa since my childhood. Every year my dad used to buy badam halwa during Diwali just for me & my sis even though it is one of the costliest sweets those days.

As you all know, it is sold in small packets wrapped in butter paper. Nowadays each piece costs Rs.25 in which u can find only 2-3 spoons of halwa. Even now whenever I go to Salem, I tell Sendhil to buy a packet for me from Salem famous”Lakshmi sweets” and I taste each & every spoon of it guessing the ingredients and its quantity used. 

Recently I tasted a packet of badam halwa from “Anna kutteera” hotel here in Bangalore. But its color was red and it was wrapped in a polythene sheet instead of butter paper as I shown in last picture. I am so happy that I can make my favourite badam halwa myself and no need to buy from outside anymore.

  Friends, Do try this badam halwa without worrying about the quantity of ghee.It will come out great.It is no harm to have this sweet with so much of ghee once in a year and that too for Diwali, right ??. As people says,its really a sinful indulgence !! Here is my routine dialogue:To make this sweet perfect,do refer my “Notes” section before you start doing it. Ok,lets see how to make this yummy,rich Indian dessert Badam halwa with stepwise pictures below. Try it for this Diwali and treat your family.
Badam Halwa Recipe

Badam halwa recipe


Badam halwa recipe 
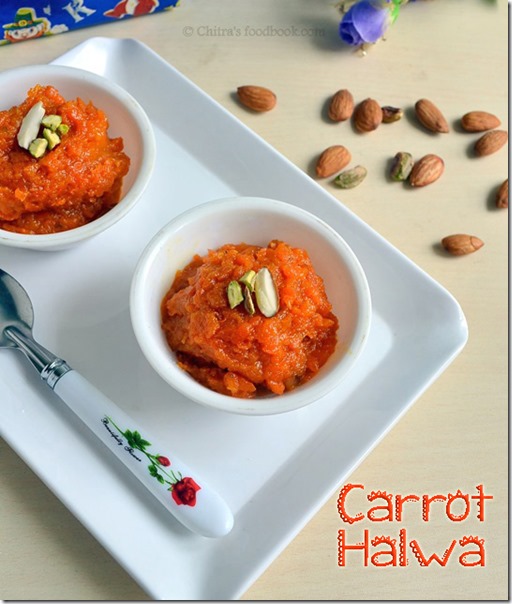
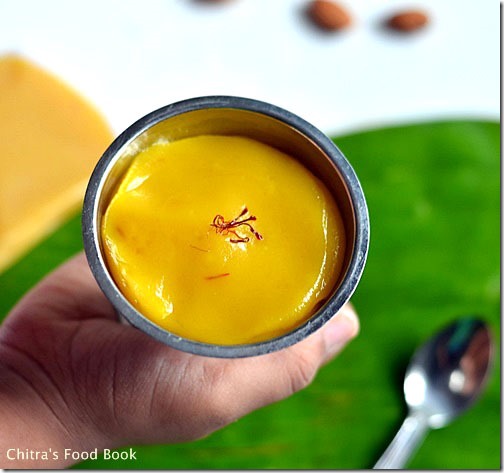
Rich n delicious Badam halwa to make your festivals/Occassions more special !
Cuisine: Indian
Category: Sweet
Serves: Serves 2-3
Prep time: 20 Minutes
Cook time: 20 Minutes
Total time: 40 Minutes


INGREDIENTS

  • Badam/Almonds - 1/2 cup (levelled)
  • Milk - 1/2 cup ( to grind badam)
  • Sugar - 1/2 cup
  • Water - 1/4 cup (to melt sugar)
  • Condensed milk - 2 tbsp
  • Melted ghee - 1/4 cup + 2 tbsp ( needs 1/2 cup maximum) 
  • Saffron threads – few
  • Cardamom powder or badam essence – A pinch ( optional)
  • Yellow food color - A big pinch
HOW TO MAKE BADAM HALWA - METHOD

  • To peel the skin of badam and to grind it thick using less milk, follow this procedure. Boil badam in water for 1-2 minutes. Leave it in hot water for 5 minutes and remove the skin. It will come off easily ELSE roll boil badam in hot water for a minute, drain the hot water and show the badam under running tap water. Skin will come off easily.
  • For grinding badam, take badam in a suitable mixie jar and grind it coarsely to the maximum without adding milk or water. Wipe the sides & lid of jar and again grind it adding less milk.wipe and add little more milk. Grind it to a slightly grainy paste. Here I used nearly 1/2 cup of milk for 1/2 cup of peeled badam.Remove the paste in a bowl and set aside.Soak saffron in a tbsp of milk.Add food color to this milk and keep aside.
Badam-halwa-step1
  • In the mean time, in another burner, melt 1/2 cup of sugar using 1/4 cup of water. No need to bring any consistency. Just stir the sugar and melt it completely.Switch off
Badam-halwa-step2
  • In a good non-stick kadai, add 1 tbsp of ghee and after its heated, simmer the flame to low completely and add the badam paste. Mix well till ghee is absorbed completely. Badam paste will absorb all the ghee and thickens. Now add saffron ,food color mixed milk to the badam paste. Mix well.
Badam-halwa-step3Badam-halwa-step4
  • After the color is well distributed with the mixture, add the sugar water. Mix well. Add condensed milk.Badam-halwa-step5
    Badam-halwa-step6
  • Mix till all the sugar is absorbed by badam and mixture turns liquid. Keep the flame low. Keep mixing else it will burn in the bottom very quickly. When the mixture starts to boil with bubbles,add 1/2 tbsp of ghee. Initially big bubbles will form in the center. The mixture may splutter, take care. Keep mixing with the ladle staying nearby. After 30 seconds, again add 1/2 tbsp of ghee and mix well. Ghee will be absorbed by halwa. Repeat this until you finish half of the ghee.
Badam-halwa-step7
  • All big bubbles will subside & Halwa will thicken leaving small air bubbles. Keep mixing in low flame. Again add 1/2 tbsp of ghee and halwa will start to leave the sides of pan. Do not switch off now. Keep adding 1/2 tbsp of ghee in regular interval and mix well.
Badam-halwa-step8
  • At one stage,say in 2 minutes, halwa will stop taking ghee & it will start to ooze out little ghee in the sides of pan.i.e. when you move the halwa all over the pan, you will see the kadai shining with ghee in the sides..U can find traces of ghee in the sides of non-stick pan. Switch off the flame now, add the remaining ghee and remove the halwa in a bowl.
Badam-halwa-step9
  • The thing is halwa should leave the sides of pan & oozes little ghee in the pan. Do not wait for more ghee to come out. Remove as soon as you see halwa turning glossy. No problem if the halwa is sticky because it will thicken after it cools down. Just remove & keep in a serving bowl. Leave it untouched for 2-3 hours until it cools down completely.
  • Suppose if you keep mixing for long time after it starts to leave the ghee, halwa will become chewy after it cools down. So be careful. This halwa may not take all the 1/2 cup of ghee. It will take around 1/4 cup + 2-3 tbsp of ghee. Keep in mind, as soon as you see traces of ghee in the sides, remove it & switch off the flame. Add the remaining ghee on top of halwa if you wish.


Enjoy !
Note

  • Do the entire process only in low flame. Though it takes more time to cook in low flame,it will be safe. Beginners please follow this tip else halwa might burn in the bottom.
  • Secondly keep stirring with the ladle without moving away. Stay nearby because the entire procedure gets over in 15 minutes based on the quantity you use.
  • Lastly remove the halwa as soon as it starts to leave ghee in sides of pan.No problem even if the halwa is slightly sticky. It will set once it cools down. If you feel, it is very sticky even after cooling down, you can heat the halwa anytime adding few spoons of ghee and bring it to right consistency. But if you over do the mixing, it will become chewy after cooling down which you cannot troubleshoot.
  • I din’t notice the time taken to reach the final stage. I will update it when I make it next time.
  • Use mentioned quantity of ghee. If you want to reduce, halwa will turn sticky. At the same time, no need to use 1/2 cup of ghee. It takes 1-2 tbsp lesser. I have given a rough measure. It may vary.
  • Color of halwa may vary slightly based on the quantity of saffron & food color you use.


Badam-halwa
Enjoy this delicious dessert for Diwali & other special occasions and treat your family. 
Badam halwa

Continue Reading...


October 15, 2014

Puzhungal Arisi Murukku, Thattai Recipe - Idli Rice Murukku Recipe - Par boiled Rice Murukku

rice murukku

After almost an year I am sharing my best friend Shalini’s recipe in my blog. Last year same time I posted Madurai masal using baby potato learning from her. After that I couldn’t post her recipes even though I keep trying. This par boiled rice murukku ( idli rice murukku / pulungal arisi murukku) cum thattuvadai recipe is one of the easy and tasty snacks recipe that is apt for this Diwali celebration.Usually we make thenkuzhal for diwali. 

This year, for a change I prepared this murukku by grinding idli rice to a smooth batter and added pottukadalai maavu/fried gram flour. I have already tried this recipe twice during Gokulashtami as kai murukku. Its easy to make spirals with this recipe compared to the raw rice kai murukkuIt tastes super crispy and  comes out white in color too. We all loved it a lot. I really don’t know how to name this murukku.You can call it as rice murukku / arisi murukku, Pottukadalai maavu murukku, butter murukku & even as kai murukku because this recipe suits all these categories. So I have just titled this post as basic “ Puzhungal Arisi/Rice Murukku recipe”. 

 I made a batch of thattai murukku using the same dough. It came out very flavorful. So this is a two-in-one recipe which is a double dhamaka for Diwali. If you are grinding rice for idli batter, you can take a portion of rice batter and try this murukku and thattai. Shalini suggested me to use star shaped mould and make shapes like Chakli/Mullu murukku. As my family is not fond of star murukku, I used my thenkuzhal mould and another small holed mould which I bought recently from Kumbakonam. Raksha loved the thin murukku a lot. 

There are certain steps to be followed carefully to make this murukku crispy and white. So check out my “Notes” section before you start this recipe. Ok, Lets see how to make crispy rice murukku recipe for Diwali using idli rice. You can easily prepare this murukku by reserving some rice batter while you grind for making idli,dosa batter.Try n let me know your feedback.


Murukku-recipe


puzhungal arisi thattai recipe

Puzhungal Arisi Murukku/thattu vadai recipe


Murukku/thattu vadai recipe Murukku and thattai recipe using idli rice & fried gram flour / pulungal arisi and pottukadalai maavu. 
Cuisine: Indian
Category: Snacks
Serves: 15 
Prep time: 2H10Min
Cook time: 20Min
Total time: 2H30Min


INGREDIENTS
1 up - 250ml
For murukku
  • Idli rice /Par Boiled rice/ Salem rice / puzhungal arisi - 1 cup
  • Fried gram flour  / Pottukadalai maavu - 1/4 cup
  • Softened butter - 1 tbsp (Levelled)
  • Hing/Asafetida - 1/4 tsp
  • Jeera/Cumin seeds - 1.5 tsp
  • Salt & water - as needed
  • Cooking oil - to deep fry
For thattuvadai
  • Red chilli powder - 1/2 - 1 tsp
  • Chana dal - 1 tbsp (Soak in water for an hour)
  • Finely chopped curry leaves - few
METHOD

  • Wash and soak the idli rice / puzhungal arisi for 2 hours. Drain all the water completely. Grind it to a smooth batter adding little water as much as possible. To use less water,first grind the rice to a coarse powder. Then add water little by little and grind for longer time to make a smooth paste. Remove the batter. If you feel the batter is watery, put it in the cotton cloth for a minute. Cloth will absorb all the excess water but be careful, batter should not become too dry. There should be some moisture.( Ground rice batter should be used immediately). 
murukku-step1
murukku-step2
  • To this batter add ground fried gram dal powder, softened butter, salt and hing. Mix well till butter incorporates well into the flour. The dough should be soft, non-sticky but not dry. Take a small portion of dough and fill the murukku mould.  Cover the remaining dough with a wet cloth to prevent drying. 

Murukku mould
  • Heat oil , simmer the flame and press the murukku directly in hot oil or drop the pressed murukku from a ladle. Deep fry both the sides till “ssh” sound and bubbles cease. Adjust the flame whenever needed. Remove and drain the oil in a tissue paper. Cover the unused dough with a wet cloth.
murukku-step4
  • If you are making thattai, take some murukku batter and add red chilli powder or pepper powder, finely chopped curry leaves and soaked chana dal. Mix well and pat it thin to make a small roundels using a tumbler base. Keep it in a cloth. Pierce it with a fork to avoid puffing. Drop them in oil and deep fry both the sides, remove and drain in a tissue.

thattuvadai-step
Enjoy !


Note


  • This murukku absorbs more oil when compared to raw rice thenkuzhal. Please keep this in mind.
  • The first & most important point is rice should be ground very smooth using as much less water as possible. So grind it for long time adding water little by little. Do not add all the water at a time. 
  • If you feel the batter has excess water, just put the batter in a cotton cloth for 1-2 minutes and remove. The cloth will absorb all the excess water. U should make murukku immediately after grinding the batter else batter may become sour and color of murukku will change. Murukku drinks more oil too.
  • Do not grind the rice batter very thick n dry because after you add butter & gram flour, murukku dough will become even more thick and murukku will break with serrated edges while cooking in oil. So dough should be wet,soft but non-sticky.
  • The butter should be soft and at room temperature. Do not use melted butter.The butter has to be well spreaded with the flour. Else murukku won’t come out crispy.
  • Do not use butter more than the mentioned quantity, murukku will become oily. Adding little lesser butter is fine but color will change slightly.
  • U can replace 1/4 cup of pottukadalai maavu by 1/8 cup of roasted urad dal flour & 1/8 cup of pottukadalai maavu/fried gram flour if  you want murukku to be more flavourful like thenkuzhal.
  • U can replace butter with ghee or hot cooking oil but iam not sure about the color of murukku.

rice-butter-murukku

Enjoy making murukku and thattuvadai using this recipe and have a fun filled Diwali celebration!

 Murukku-thattuvadai

Continue Reading...


October 13, 2014

CHOCOLATE BURFI RECIPE / KHOYA BURFI - DIWALI SWEETS RECIPES

Chocolate-khoya-burfi

Chocolate burfi recipe using khoya was in my try list for long time. Whenever I visit sweet stalls, this is one sweet that grabs my attention quickly. I love its smooth texture and I was thinking its just a double layer chocolate burfi using maida. But when I asked the sweet stall wala recently, he told its made of mawa/Khoya.

As my family loves milk sweets very much, I wanted to try this & surprise them. I referred “Nisha madhulika’s”video for this recipe and tried for the first time. It was very easy and simple to make. I finished the entire cooking process within 15 minutes. I am planning to double this recipe and try again for my daughter Raksha. I am sure your children would love this sweet a lot. Do try this easy diwali sweet for your children & family and Have a fabulous celebration.

Chocolate-burfi-recipe

Chocolate khoya burfi recipe


Chocolate khoya burfi recipe Chocolate burfi using khoya/Mawa for kids/Children
Cuisine: Indian
Category: Sweet
Serves:
Prep time: 5 Minutes
Cook time: 15 Minutes
Total time: 20 Minutes


INGREDIENTS
For white layer
  • Unsweetened khoya/Mawa - 1/2 cup (100 gms,i used milky mist khoya)
  • Powdered sugar - 3.5 tbsp
  • Cardamom seeds - 2 nos (powdered)
For chocolate layer
  • Unsweetened khoya/Mawa - 1/2 cup (100 gms)
  • Powdered sugar - 3.5 tbsp
  • Cocoa powder - 1/2 tbsp
Ghee - 1 tsp + 1 tsp ( for greasing)
HOW TO MAKE CHOCOLATE BURFI - METHOD

  • Crumble 200gms of khoya. U will get around 1 cup. Powder 1/2 cup of sugar. Grease a plate with a drop of ghee. Divide the khoya into two and take one portion(1/2 cup) in a plate. To that mix 3.5 tbsp of powdered sugar, 1/2 tbsp cocoa powder and set aside.
chocolate khoya burfi step1chocolate khoya burfi step2
  • Take the other half of crumbled khoya ( 1/2 cup) in a non-stick kadai and add 3.4 tbsp of powdered sugar, 1 tsp of ghee. Mix well and heat in very low flame.
chocolate khoya burfi step3
  • Mix till the khoya leaves the sides of pan completely. Do in low flame. It takes around 3-4 minutes. Lastly add cardamom powder, mix well, remove & Spread the mixture in a ghee greased plate, level it smooth using a butter paper or back of ghee greased spoon and set aside. Let it cool. White layer is ready !
chocolate khoya burfi step4chocolate khoya burfi step5
  • In the same kadai, heat the cocoa, khoya and sugar in low flame. Mix till it leaves the sides of pan and becomes a whole mass. Spread it over the white layer. Level it with the back of greased spoon or butter paper greased with ghee. Let it become warm. Run the knife and mark the shapes. Remove when it is cooled down completely.
chocolate khoya burfi step6chocolate khoya burfi step7

Refrigerate, store and Enjoy within a day or two. As it is a milk based sweet, do not keep it outside for more than a day.


Note

  • Do the entire process only in very low flame. I used dark chocolate powder. So my choco layer looks very dark. Its color will vary based on the choco powder u use.
  • Do not cook the khoya for long time,it will become chewy. If you cook the khoya for less time, burfi will be sticky. So remove it at the right time.
  • If you want the mixture to set quickly, freeze it for 30 minutes before cutting.
  • My khoya was soft. So I dint grate it instead I just crumbled it with fingers. If your khoya is hard, grate it using a grater and then mix powdered sugar.
  • No need to use milk. If you add milk, mixture will take more time to cook. So adding milk is your choice.


Chocolate khoya burfi

Yummy chocolate khoya burfi is ready to enjoy !
Chocolate-burfi

Continue Reading...


October 12, 2014

30 Easy Diwali Sweets For Beginners | Indian Diwali Sweets

easy diwali sweets
In this post, I have shared the collection of simple and easy South Indian and North Indian diwali sweets / deepavali sweets for beginners under one page for quick reference. For making these sweets, you don’t need expertise knowledge or worry about the consistency of sugar syrup or jaggery syrup. All these recipes are just mix n cook kind. 

I have shared few burfi recipes, halwa recipes, some ladoo recipes and few sweets using condensed milk. Hope you find it useful. Try these easy sweets for this Diwali and have a fun-filled celebration. I am sure these sweets would be loved by everyone including children/kids.

 I am yet to update few of my old easy sweets posts. So I have not included them here. I will add them once I update it. Next week, I will try to share some authentic sweets and savory recipes for Diwali & then I will make a post with good collection of Diwali recipes with our Celebration pictures. Ok, Lets see the list of easy Indian diwali sweets below.

HERE is my full collection of Diwali Recipes with celebration procedures !

I have shared the video links below. Please click to watch it.   


Check out my Indian kitchen basics post on

Easy Diwali sweets


Diwali sweets recipes collection 30 easy diwali sweets for beginners. 

cuisine: Indian
category: sweets
serves: 3
prep time: 10 min
cook time: 20 min
total time: 30 min


Corn flour halwa/Karachi HalwaDates & Nuts Roll

Easy rasmalai under 15 minutes Badam burfi recipe Maa ladoo recipe
Easy bread halwa recipe Tirunelveli halwa with wheat flour Kasi halwa recipe

Easy kalakand with condensed milk Instant wheat flour halwa Dates and nuts ladoo 

 Instant malpua Mawa ladoo Easy beetroot halwa

Carrot halwa in pressure cooker Wheat flour shakkarpara Dry jamun with instant gulab jamun mix


Click HERE to view my full collection of Diwali Recipes with celebration procedures!   


technorati tags: ,,,,,,,

Continue Reading...