Search Chitra's Food Book

February 21, 2015

Tamilnadu Style Mixed Vegetable Sambar Recipe in Pressure cooker - Bachelors Recipes

Kadamba sambar recipe
Mixed vegetable sambar recipe updated with video !
I am planning to share a collection of recipes for Indian bachelors. But before that, I wanted to share some easy one pot sambar, rasam & more kuzhambu recipes in Tamilnadu style. So I am posting this easy and quick tamil style mixed vegetable sambar recipe in pressure cooker for bachelors, spinsters, working women and for husbands who are alone in abroad leaving your family in India . Not only for these people but also for housewives who want to finish cooking quickly during busy morning hours. 

Generally in Tamil nadu, Iyers & Iyengars make Kadamba sambar by adding freshly ground masala powder. They call it as Arachuvitta sambar. But this is a quicker version using sambar powder. This recipe can be done under 15 minutes using a pressure cooker and a small container. Some people have the habit of cooking & storing the dal for a week in refrigerator. For those people, making this sambar is even more easy. I was very happy with the outcome and I had a satisfaction of eating many vegetables in one gravy. 

My daughter Raksha had this sambar along with vegetables without complaining anything as the veggies were cooked really soft n mushy. So this sambar is a good choice for making our kids to eat vegetables. I have used carrot, beans, brinjal & Lady’s finger along with onions. U can use a combination of Radish or drumstick, chayote/chow chow, potato and knol knol too. The taste & flavor of this sambar may slightly vary as per the vegetables you add but the procedure remains the same. Try this quick sambar recipe for rice and pack it for your lunch box. It tastes yum !Lets see how to make this easy sambar recipe for rice.

Check out my easy onion sambar & 30 kuzhambu recipes if interested.
Continue Reading...


February 19, 2015

Big Brinjal Fry Recipe / Eggplant Roast For Rice - South Indian Kathirikai masala fry

Brinjal fry

Last week when I went to Reliance fresh to buy vegetables, I took a big sized brinjal / Kathirikai to try Baingan bharta recipe. But I couldn’t make it. I had completely forgotten about it. Yesterday I was running short of vegetables and all I had was this brinjal. As I had already tried ennai kathirikai poriyal , Bengali begun bhaja and some more curries, I wanted to try out something new. I googled for brinjal chops and I found this brinjal fry recipe in Nalini’s blog which was similar to my expectation. Basically I love the flavor of fennel seeds in masala. So I tried this recipe by making it little more spicy for myself as I am the only person who eats brinjal in my house. I had it with mysore rasam.It was a delectable combo and I took two servings of it. After a long time, I made a spicy lunch menu and ate it happily. If you are a brinjal and fennel seeds combo lover, then this recipe is for you. Check out mysore rasam recipe too. Friends, try this spicy, South Indian brinjal fry for Rasam or More kuzhambu. It takes very less time to prepare in busy mornings and you can pack it for your lunch box as well. I am sure your friends will ask the recipe. Lets see how to make this Tamil nadu style big brinjal masala fry recipe with step by step pictures.

Check out my Ennai Kathirikai poriyalBegun BhajaBrinjal Podi curryKathirikai poriyal recipes too.

Brinjal fry

Brinjal fry/Eggplant roast recipe


Brinjal fry/Eggplant roast recipe Spicy, hot eggplant fry/Kathirikai roast recipe-An yummy side dish for rice.
Cuisine: Indian
Category: Side dish
Serves: Serves 2
Prep time: 10 Minutes
Cook time: 15 Minutes
Total time: 25 Minutes


INGREDIENTS

  • Big brinjal - 3/4 no( Use 4 if medium size)
  • Salt & water - as needed
  • Cooking oil - 2 tbsp
To grind
  • Fennel seeds – 1.5 tsp
  • Red chillies - 5 nos
  • Garlic cloves - 5 nos
  • Turmeric powder - 1/8 tsp
  • Sambar powder - 1 tsp
  • Salt – as needed
To temper
  • Mustard seeds – 1/2 tsp
  • Urad dal – 1/2 tsp
  • Cumin seeds /Jeera – 1/4 tsp
  • Curry leaves – few
Lemon juice – few drops
Coriander leaves – to garnish
METHOD

  • Take all the ingredients given under “ to grind” in a mixie jar.First grind it to a powder. Then add the required water and grind it to a smooth paste. No problem if the mixture is slightly watery but it should be a smooth paste.
  • Wash and chop the brinjals into medium thick round slices. Do not slice very thinly because they will mash it up while cooking. If you use normal purple brinjal, just slit them into 4 pieces .Immerse in water till use to prevent discoloration.
Brinjal fry
  • Now heat oil in a kadai and splutter mustard, urad dal, jeera and curry leaves. Add the brinjal and saute for few minutes. Add salt & ground masala paste. Mix well and coat the brinjals.
Brinjal fry
  • Keep the flame medium and cover cook the brinjals for 4-5 minutes. Flip it once in the middle. Check whether they are cooked properly. Add some lemon juice. Garnish with coriander leaves.
Brinjal fry
Serve hot with sambar rice, rasam or simply with dal. Tastes yum!

Enjoy !


Note

  • The brinjal should be cooked in masala paste & oil. No need to add water. If you feel the mixture is too dry, you can sprinkle little water to cook the brinjals.
  • For proper cooking of brinjals, always keep the flame medium & cover it with a lid.
  • Please reduce the quantity of sambar powder as per your taste. The quantity I have mentioned here makes a spicy brinjal fry.
  • Adding lemon juice helps to balance the spicy taste as well as helps to absorb the iron content of brinjal in the body.


Enjoy this hot n spicy brinjal masala fry with rice.Tastes gr8 !

Continue Reading...


February 17, 2015

Semiya Kesari Recipe Without Milk - Vermicelli Kesari Recipe

Semiya-kesari-recipe

Semiya kesari recipe / Vermicelli kesari is one of the easy n yummy Indian dessert recipes. Making a perfect semiya kesari without milk or condensed milk was my dream I should say. When I was a beginner in cooking kesari recipes, I have tried this many times but I ended up making vermicelli halwa or half cooked hard, chewy kesari. 

Recently I applied my rava kesari technique and used more water to cook the vermicelli. It came out perfect this time ! I was so happy with the results and it tasted great. So thought of sharing this recipe with u all. But one thing which I felt bad is the color of this kesari. I have added more food color by mistake & my kesari resembled beetroot halwa. So please be careful while adding food color. I have not used fine vermicelli here. 

I used the normal, thick roasted vermicelli( Bambino). So adjust the quantity of water based on the vermicelli. Its very to easy to make if you follow the steps carefully. Even beginners and bachelors can give a try. Ok, Lets see how to make vermicelli kesari/semiya kesari recipe with step by step photos !


Semiya kesari recipe


Semiya kesari recipe Semiya kesari recipe- Easy n yummy dessert recipe
Cuisine: Indian
Category: Sweet
Serves: Serves 2
Prep time: 5 Minutes
Cook time: 15 Minutes
Total time: 20 Minutes


INGREDIENTS
1 cup - 200ml
  • Roasted thick vermicelli - 1/2 cup
  • Water - 2.5 cups
  • Red food color - 1 pinch
  • Sugar - 1/2 cup + 2 tbsp
  • Cardamom - 2 seeds ( crushed)
  • Ghee – 1.5 tbsp
  • Cashews & Raisins - Few
METHOD

  • Heat 2 tsp ghee in a kadai. roast the cashews, raisins. Remove in a plate. Add vermicelli and roast for a minute. If you use roasted vermicelli, you can skip roasting it.
  • Heat water in a kadai and add 1 tsp ghee to it. When the water starts to roll boil, add the roasted vermicelli and a pinch of food color. 
Semiya kesari recipe

  • Mix well till all the water is absorbed by the vermicelli. Cover & cook for 10 minutes in low to medium flame. Mix once in the middle. Make sure the bottom is not burnt.
Semiya kesari recipe
  • Check whether the vermicelli is cooked properly. For this, take few strands of vermicelli and try to mash it with your fingers. If it breaks & mashes,its cooked right. Now add the sugar and mix well. The mixture will become watery as soon as you add sugar. Mix well in high flame for a minute. Mixture will thicken slightly. Bubbles will appear all over the sides.
Semiya kesari recipe
  • When you mix it, you will find the kesari becoming non-sticky and start to leave the kadai. Add the remaining ghee,cardamom powder. Mix well & switch off the flame. Transfer the mixture to a plate when the mixture is watery. Do not wait for the kesari to leave the sides of pan completely. It will become chewy when it cools down. So remove the mixture when it is wet and slightly watery. It should fall into the plate like a ribbon.This kesari will set perfectly once it cools down to room temperature. Serve once it becomes warm. If you want to serve really hot, mix it for few more seconds to drain the excess water. I guess nobody will eat it hot from the stove ;)).So its better to remove it when there is little moisture in kesari. Garnish with roasted nuts and raisins. Enjoy !
Semiya kesari recipe

Two most important things you should notice while making this kesari is : Vermicelli should be cooked properly. Do not mix for long time till kesari leaves the sides of pan completely. As soon as you see the kesari thickens and start to leave the kadai, remove it from the stove. Mixture should be slightly watery and wet. 


Note

  • I used 1:5 vermicelli and water ratio.If you use fine vermicelli, use 1:2 water.
  • If  you use fine vermicelli, add 3/4cup of sugar for 1 cup of vermicelli.
  • Check whether the vermicelli is cooked properly before adding sugar because the kesari will turn hard and chewy.
  • Semiya kesari takes less ghee than rava kesari.So use less.
  • Remove the kesari when the mixture is slightly watery. It will set well as soon as it becomes warm. Do not mix till it leaves the sides of pan completely.

Try this yummy semiya kesari for your guests.They would love it for sureLove Struck
Semiya kesari without milk
Continue Reading...


February 15, 2015

How to ferment Idli batter in Winter in Cold Countries

Idli batter fermentation in cold countries

Hi Friends,
Today’s post is a very basic post about fermentation of idli,dosa batter in winter season especially in cold countries like Canada,US etc. I have got few requests from my readers to post some tips for fermentation in cold countries and a video to make idlis. Very soon i will make a detailed video post on how to make soft idlis. My younger sister Radha is in Canada.As u all know, Canada is one of the coldest countries in the world.My sis always makes the best  & super soft idlis in spite of the cold weather. So i thought she is the best person to clear all my doubts.When i asked her to make a post,she happily accepted my request & helped me a lot by taking step by step pictures and mailed everything clearly. Thank u so much my dear.Luv u!
I hope this post will help the people who is feeling bad & worried about making non-fermented,hard idlis. The tips i have shared here will solve the fermentation problems i feel. Friends,please mail me or leave a comment here if u have any tips to share.It will help everyone. Thanks for visiting this page.

My sister grinds the batter once in a week.The quantity she had mentioned below comes for 5 days.She makes idli for the first two days for both breakfast & dinner and dosa for 3 days.She uses Thanjore idli rice & plain packet of urad dal,not any particular brand.My sister’s friend Sukanya in US also follows the same method to make idli.

One more tip from my friend Shalini : When she was in US for two years,she used to keep the batter vessel near room heater and she told the batter gets fermented like the same in India.Try this tip too.

Ok,Here is the idli batter procedure along with the quantity of ingredients mailed by my sister.

ldi batter procedure
  • Soak 9 cups idli rice + 1 tsp methi seeds.Soak 2.5 cups of urad dal separately for 3 to 6 hrs. ( Half this quantity if you are doing for first time)
  • After soaking,drain the water and grind urad dal first adding enough water.Remove in a big container.Then grind the rice,add salt and mix it thoroughly with the urad dal batter using your hands.
  • Here is the picture of batter i got before fermentation by 4pm.Keep it inside the oven and switch on the oven light. Leave the batter for one full day(24 hrs).
Idli batter fermentation in cold countries-3
  • The batter is fully fermented the next day by 4pm.
    During this process the outside temperature was -23c and the heater temperature at home was 23c.
Idli batter fermentation in cold countries-2
Check out my idli,dosa batter post for grinding with stepwise pictures.My sis does the same way.You might also like

Soft Idli,crispy dosa batter using mixie


Soft idli using idli Rava


15+ Idli varieties collection


Some general tips for fermentation of idli batter

TIPS FOR FERMENTATION

After going through some websites ,  i am giving some additional tips for batter fermentation. Hope it will work for you .
  • First recommended thing for batter fermentation is to mix the batter using ur hands..Mix the dal and rice batter thoroughly.. Uneven mixing causes failures. Mixing them by hand works best!
  • Don't forget to add the grinder washed water to the batter before'mixing it with your hands. But add very little. 
  • You can also add a handful of Poha or cooked rice while grinding the rice. It helps for quick fermentation.
  • A warm temperature is essential for fermentation. 25 to 28 °C (77 - 82.4 °F) will be ideal. If the weather is cold, keep some warm water in a large bowl and immerse the vessel containing the dough. To help maintain the temperature of the warm water bath, cover it with a blanket, or better, use a regulated heater, like a heating pad or aquarium heater. Even easier, turn on the light in the oven, and use that to keep the batter warm.
  • When u grind the batter, pre heat the oven in 90c for 10 minutes and switch off the oven.Now keep the batter covered inside the oven and turn the oven lights on.. It helps ..
  • Add 1/4 tsp of baking soda or baking powder to the ground batter and then ferment. It will help the batter to raise well in harsh cold conditions..Adding poha or cooked rice while grinding also helps for quick fermentation.
  • Allow at least 24 hours to ferment. If you don't see tiny bubbles the next morning, the dough will not rise and you have to start all over again.
  • If nothing works for u , try adding a fermentation starter like a spoonful of commercially prepared idli batter as they have live culture, it helps for fermentation..
  • Use chlorine-free water when grinding, as this will be the water that the batter will have in it when fermenting. Tap water will work, but will inhibit the ferment a little. Most modern water filters remove both chlorine and chloramine. Use non-iodized salt such as ‘Kosher salt’ and Use spring water, boiled or filtered tap water to avoid Chlorine/Fluorine.
  • I also read from Indus ladies that adding 1/2 tsp of ENO plain fruit salt for 1 cups of idli batter makes the idli soft even if its not fermented well.Please try this too but iam not sure how it works.
I hope u find this post useful . Thank you.Have a nice day !

Last but not the least,check out my
 15 Idli varieties here if interested.

Continue Reading...


February 14, 2015

Coconut Milk Veg Biryani Recipe/Thengai Paal Biryani-Sunday Lunch Recipes-6

Coconut milk veg biryani recipe

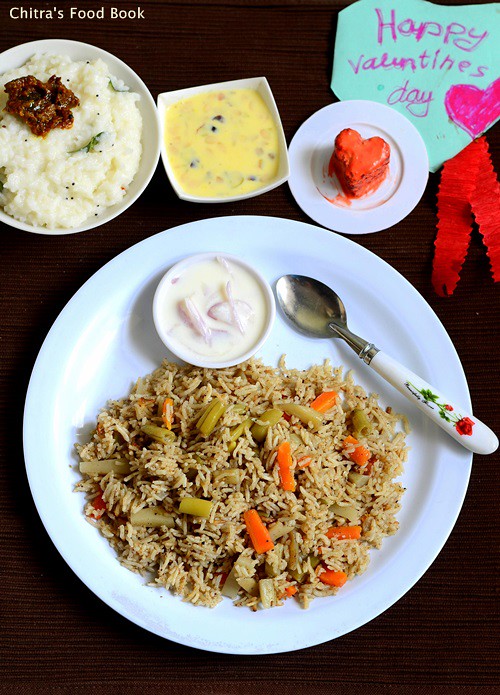
Today being Valentine’s day, I made this special coconut milk vegetable biryani for our lunch. Of course my husband is in Norway but still I made this biryani along with basundi for my daughter & in-laws. I will show this platter to my husband online in skype call. Today my daughter Raksha gifted us her own made Valentine’s day card along with heart shaped,iced Red Velvet Cake. Can you find them in the above pic ?? ;)We were really surprised and moved to see her love & affection.

Ok, coming to this recipe, generally I don’t add coconut milk in my biryani but its been my long time wish to try biryani adding coconut milk/Thengai paal. I am happy that I tried on this special occasion. I was so happy with the outcome & the addition of coconut milk made my biryani so rich & took it to the next level. Actually I thought to make white colored biryani  and din’t add spice powders but I couldn’t bring that color as I had ground all the spices in this recipe. Mine looked half white. To make white colored coconut milk biryani, you can add all the spices in oil without grinding them. Also use only coconut milk. Do not use water. I used half and half. 

You can make any variations to this recipe. It comes out well in all the ways. Try it & let me know how it turned out for you!

Check out my plain coconut milk pulao / Brinji recipe  and
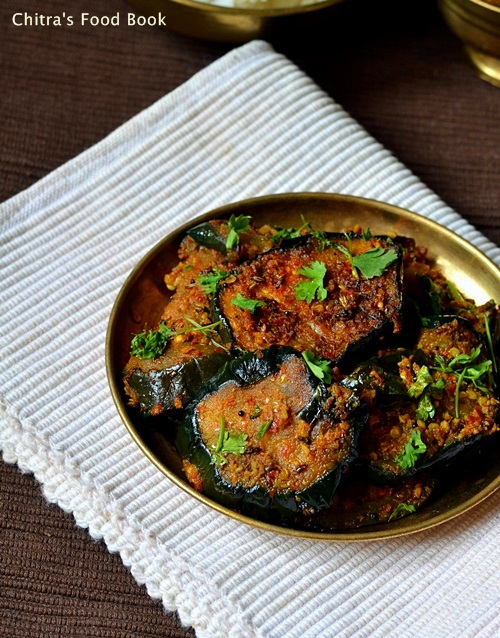
 brinjal gravy too !

Coconut milk Veg biryani

Coconut milk veg biryani recipe


Coconut milk veg biryani recipe Coconut milk veg biryani recipe- Sunday special lunch recipe
Cuisine: Indian
Category: Lunch
Serves: 3
Prep time: 30 Minutes
Cook time: 15 Minutes
Total time: 45 Minutes


INGREDIENTS

  • Basmati rice - 1 cup
  • Thick Coconut milk + water - 1 + 0.75 cups ( I used 2 cups equal measure)
  • Cooking oil + Ghee - 1 tbsp + 2 tbsp
  • Bay leaf - 1 no
  • Jhapatri - 1 no (optional)
  • Big onion - 1 no
  • Mixed vegetables - 1/2 cup ( Carrot-1,Beans-5 nos,Potato-1 no.Peas-handful)
  • Mint & coriander leaves - 2 tbsp ( finely chopped)
  • Lemon juice - 1/2 tsp
To grind
  • Cashew nuts – 5 nos
  • Green chillies - 4 nos
  • Cinnamon - 1 inch piece
  • Cloves - 3 nos
  • Cardamom - 2 nos
  • Star anise - 1 no
  • Fennel seeds - 1/2 tsp
  • Ginger - 1 inch piece
  • Garlic cloves - 5 nos
  • Kalpasi/Black stone flower - 1 no
  • Water - as needed
HOW TO MAKE COCONUT MILK VEG BIRYANI - METHOD

  • Wash and soak the basmati rice adding 1.5 cups of water for 1 hour. Grind 1 cup of grated coconut adding 1 cup of warm water and take thick milk. Keep it aside. ( If you want to add coconut milk alone, use 1.5 cups of thin coconut milk and skip water). 
  • Wash and chop the vegetables & set aside.
Coconut milk veg biryani
  • Take all the ingredients given under “ To grind” and grind them coarsely without adding water. Then add little water & make a smooth paste. Set aside.
Coconut milk veg biryani
  • Heat oil+ghee in a pressure cooker. Saute bayleaf & Jhapatri. Then add the ground paste & finely chopped mint, coriander leaves. Saute well till raw smell vanishes off.
Coconut milk veg biryani
  • Now add the chopped vegetables, mix well. Add the required salt. Drain the water from soaked rice. Add soaked rice along with water and coconut milk in equal ratio or thin coconut milk alone. Lastly add lemon juice in water & check for taste. Add salt if needed. Add slitted green chillies if you feel spice is less.
Coconut milk veg biryani
  • Cook in low flame for one whistle. It takes 10 minutes. After the steam is released, fluff the rice gently with fork & serve it hot with raita.
Coconut milk veg biryani
Enjoy !


Note
  • For variations, you can add 1/2 tsp of red chilli powder & biryani masala powder. In that case, reduce the green chillies to 3nos.
  • Soak basmati rice for minimum 30 minutes to get soft, elongated rice.
  • You can also fry the soaked rice in ghee before adding in biryani.

Coconut milk biryani, Curd rice, Basundi and a piece of Red Velvet cake for lunch. Come and join me friends. 
Coconut milk veg biryani recipe

Continue Reading...


February 13, 2015

Eggless Red Velvet Cake In A Mug(1 min microwave cake)-Valentine’s Day Recipes

Eggless red velvet cake recipe

Valentine’s day is around the corner .I am sure you all would be scratching your head about what to make something special for your loved ones. Here you go, a super easy , soft n spongy, eggless one minute red velvet cake in a mug using microwave under one minute. Last year I have shared some easy, instant microwave cake recipes( refer side bar) and I am really happy that I am getting rave reviews about those recipes from my readers. This has been a real boost which inspires me to try more microwave recipes especially one minute mug cakes.

When I was looking for Valentine’s day recipes ideas, I found home made Chocolates & Red Velvet Cake are the most wanted recipes on lover’s day. As I have already posted an easy, no cook, 3 ingredient home made chocolate recipe here, I wanted to share this easy red velvet cake recipe without using eggs & buttermilk for you all to try out on this Valentine’s day. 

Here I have used red food color as I din’t want to take chance with beetroot in my first attempt. Soon I will try and share this recipe replacing artificial color. You can make this cake in the next few minutes just after reading this recipe & surprise your sweet heart/Husband.
\
Yesterday, my Husband Sendhil had left to Norway for a short official trip. So we celebrated our Valentine’s day in advance with this yummy, super soft, romantic Red velvet cake recipe. We both enjoyed this cake with one spoon in one mug, hope you can understand what I mean here. 

Friends, do try this easy cake for your loved ones. I am sure it will be a great choice for this celebration ! And don’t forget to share your feedback about this cake with me. Lets see how to make this easy red velvet cake recipe for two on this special Valentine's day !

Easy red velvet cake recipe

Easy Red Velvet Cake in a mug using microwave


Easy Red Velvet Cake in a mug using microwave Microwave red velvet cake under 1 minute - Eggless, butterless recipe.
Cuisine: Indian
Category: Cake
Serves: 2
Prep time: 5 Minutes
Cook time: 1 Minutes
Total time: 6 Minutes


INGREDIENTS

  • All purpose flour - 4 tbsp
  • Sugar – 2.5 tbsp
  • Baking powder - 1/4 tsp
  • Salt - a pinch
  • Cocoa powder- 1 tsp
  • Red food color - 2 pinches or 2 drops
  • Vanilla essence - 1/4 tsp
  • Vinegar/Lemon juice - 1/2 tsp
  • Milk - 3 tbsp (Use  boiled milk at room temp)
  • Vegetable oil/cooking oil - 1.5 tbsp ( use odourless oil)
HOW TO MAKE EGGLESS RED VELVET MUG CAKE - METHOD

  • Take all the dry ingredients ( maida, sugar, cocoa powder, baking powder and salt) in a big mug or bowl. Mix it well adding food color.
  • Then add the milk, oil and vinegar, vanilla essence. Mix well without any lumps and make sure sugar is dissolved well.
Red velvet cake
  • The consistency of batter will be semi solid & it should fall like a thick ribbon. Make sure the batter is filled till half of the mug because this cake will double while cooking.
  • Now microwave the mug in high power for 1 minute. Cake will raise & its size would be doubled.( mine is 800w. Please adjust the timing as per the power of your microwave) Check with a toothpick or back of a spoon. If it comes out clean,cake is done. Else keep it again for 10 secs.
  • For simple decoration, you can put sprinklers on top as I did OR dust it with powdered sugar. If you apply frosting, it would be even more rich. Make your choice & variations !
Easy red velvet cake recipe
  • Serve with any frosting or just sprinkle powdered sugar & enjoy !
Happy Valentine’s day !!

Note
  • Do not mix everything together. First mix the dry ingredients & then go for mixing wet ones.
  • Adjust the time based on the power of your microwave.
  • It tastes mildly sweet. So add more sugar based on your tastebuds. But make sure sugar is dissolved before you microwave.
Red velvet cake recipe


Try this easy red velvet cake on Valentine’s day & have a fun filled day with your loved ones !
Wish you all a very happy Valentine’s day!
Easy red velvet cake recipe

Continue Reading...