Here is an Eggless vanilla cupcake recipe without butter (with oil) and without condensed milk. It comes out super soft, spongy and moist in texture. Yesterday my daughter Raksha told me to bake a cake using Vanilla essence as its her favorite flavor. She told ” Mummy, when I come back from the school, I should see a cake in your hand”. Its been months since I baked a cake in my kitchen.
For the past few months, I have been making only microwave mug cake recipes(refer side bar) for her after school snacks very easily within minutes. I think she got bored of them. So she badly wanted me to bake a regular cake this time. As I had already bookmarked some good cake recipes, I quickly browsed through them and tried this eggless vanilla cupcake. This recipe uses simple ingredients.
The cake raised beautifully and tasted great with moist, soft and spongy texture. I couldn’t feel its a no egg, no butter, no condensed milk cupcake. You can dare to try this recipe even if you are a beginner in baking. I have used choco chips in this cake to attract my daughter. You can add chopped nuts or even decorate the cake with simple chocolate frosting or buttercream frosting if you are interested.
Lets see how to make this super moist cupcake from scratch.
If you are eager to know the differences between a cupcake & muffin, here you go
Cupcakes tend to be sweeter than muffins; there are savory muffins such as cornbread.
Cupcakes are often iced or frosted, whereas muffins tend to have no topping, or a simple crumb topping.
Cupcakes usually have a head or top no larger than the body of the cupcake; muffins are often encouraged to overflow their baking cup, so that their top is larger in diameter, giving them somewhat of a mushroom shape.
Cupcakes are almost always, well, cupcake shaped; muffins can be made as just muffin tops.
Cupcakes are almost never crispy or crunchy; muffins are often encouraged to brown and develop texture, especially on the top.
Eggless vanilla cupcake recipe
Eggless,moist cupcake recipe - Easy to make n bake !
In a wide bowl sieve maida, baking powder & baking soda and a pinch of salt. Add choco chips to it. Mix well and set aside.
In another bowl,mix the vinegar & milk. It will curdle slightly (U can replace vinegar with lemon juice. But I used vinegar).To this add oil,sugar and vanilla essence. Mix well till sugar dissolves.
Add the sieved flour to it and mix in one direction. It will become a thick batter. It should flow like a ribbon. If you feel, the batter is too thick, add 1-2 tsp of milk. Do not add more milk because cake will become sticky.
Line a muffin tray with muffin papers. Pour the batter till 3/4th of the cup. Preheat the oven in convection mode at 180c. Bake the cupcakes for 15 minutes at 180c. Remove and check it with a tooth pick. If the tooth pick comes out clean, cake is done else keep it for 1-2 minutes more. Do not over bake.
Remove the cake from the tray and enjoy with tea !
Note
Add 1-2 tbsp more sugar & extra vanilla essence for more sweetness & flavor.
You can bake this as a regular cake instead of cupcakes. I guess it will work.
Do not over bake the cake because the outer layer will turn chewy.
You can use lemon juice if you don't have vinegar in hand.
Enjoy this easy, spongy cupcake recipe with tea ! Tastes yum !!
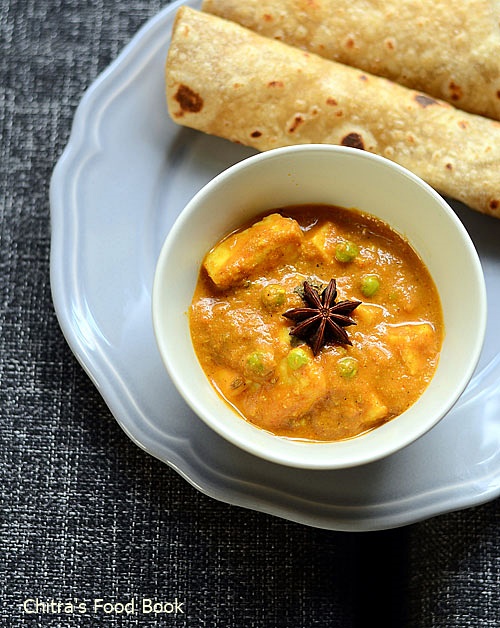
Matar paneer(in Hindi) / Green peas cottage cheese gravy(in English) is a classic Punjabi style masala gravy that is served as a side dish for Roti, Naan, Kulcha & Pulao varieties.I have been making it for years following the recipe of”My dhaba”. Recently I came across this low fat restaurant style recipe in “Saffron Trail” blog.I combined both the recipes & came up with this version.I prepared it for Sendhil & Raksha’s lunch box and packed with chapathi.It came out very well.As it is a low fat version,I have not fried the paneer pieces or used fresh cream here.I loved this gravy a lot.I am sure you will like it too.Do give a try.Lets see how to make this yummy Paneer recipe – Mutter Paneer Masala.
Matar Paneer Recipe
Punjabi Matar paneer recipe - Side dish for roti,naan,kulcha & pulao
Boil a cup of water and immerse the paneer pieces till use.Make sure the water is not too hot.Cook the peas in required water.If you are using dried peas,soak it overnight and then pressure cook it before adding to the gravy.Chop the onions & tomatoes.Peel garlic & chop ginger.
Heat 2 tsp of oil and saute the cashews,ginger,garlic,whole garam masala like cinnamon, cloves, cardamom ,onions & tomato pieces. Saute everything until tomato turns mushy.Cool & grind them to a smooth paste adding enough water. ( If you wish, you can add red chilli powder, dhania powder and garam masala powder along with tomato while sauting. But make sure you don't burn the spice powders.) I added all the spice powders in the next step.
Now heat 1 tsp of oil in a pan and splutter cumin seeds, saute slit green chilli.Add the ground paste.Add turmeric powder, red chilli powder, garam masala powder, dhania powder & saute until the paste turns thick.Add the boiled peas.Add some water and let the gravy boil till it leaves oil.
Lastly add the paneer pieces,sugar , curd & crushed kasoori methi. Boil for a minute & switch off the flame. Do not make the gravy too thick because this gravy thickens over time.So make it semi thick.Serve with roti/naan/kulcha ! Enjoy !
Note
You can skip the whole garam masala while sauting onion,tomato if you don’t want spices to be dominant.It tastes good in either ways.
Add more chilli powder to make a spicy gravy.I used medium spice here.
You can add fresh cream at the end to make this gravy more rich.You can also fry the paneer pieces in little oil till golden brown and add to the gravy.
Yummy & colorful Matar paneer is ready to serve with roti !Enjoy !
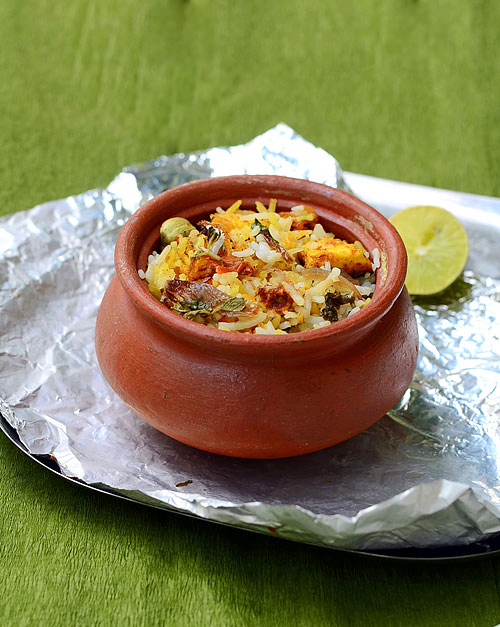
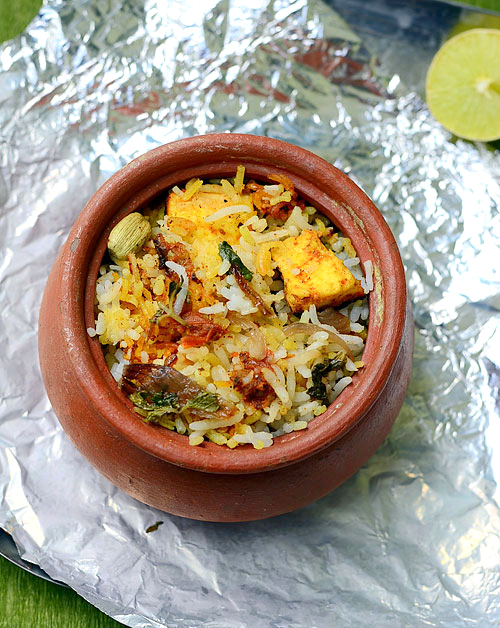
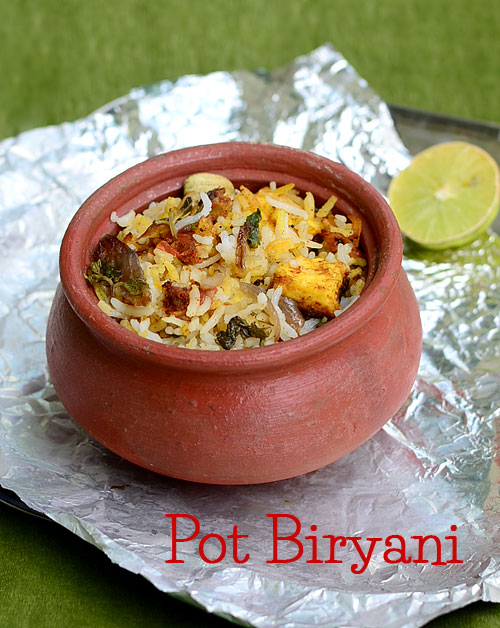
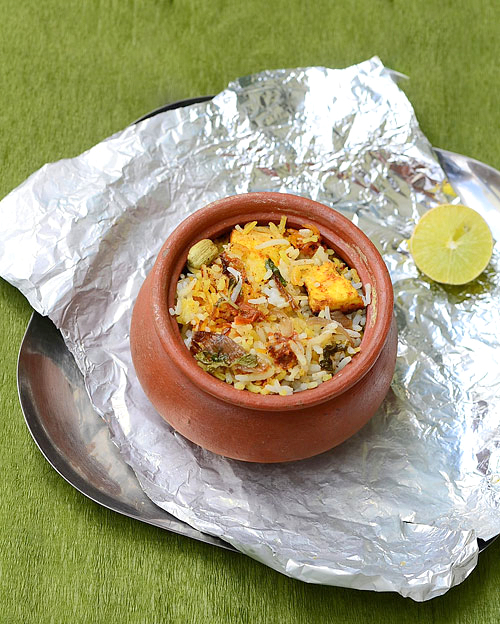
I think most of you would have heard about or tasted pot veg biryani @ Matka veg biryani / manpaanai biryani in Restaurants. I came to know about this biryani from a friend recently. I browsed few recipes & watched you tube video to get some idea. Most of them were non-veg versions using marinated chicken. But as usual, I replaced chicken with paneer pieces, made few changes in the actual recipes and came up with this post. I guess most of the people in India must be having a clay pot at home. Some people might be making gravies/Vatha kuzhambu/Sunda kulambu with it.
Do try this layer biryani using earthen pot/Matka for a change.You will love its flavor. The layered rice & the gravy cooked in slow fire lends an awesome taste. This is my 29th biryani recipe in my Sunday Lunch Recipes series. I am planning to finish this series with 2 more posts & thinking to start some other useful series for beginners. Do leave your suggestions in the comment box if you expect/need anything to be shared in this blog. I will surely try to implement them. Thanks for showing your continuous support & love across this series ! Lets check out how to make Vegetarian Matka biryani/Pot biryani recipe with stepwise pictures.
Click HERE to see my other biryani recipes of this series !
Matka Veg biryani/Pot biryani recipe
How to make flavorful biryani in mud pot/Matka
Cuisine:Indian
Category:Lunch ideas
Serves: 2-3
Prep time:30 Minutes
Cook time:20 Minutes
Total time:50 Minutes
INGREDIENTS
Basmati rice - 1 cup
Water - 5 cups
Whole spices- 1 cinnamon,1 clove,i cardamom,1 black stone flower,1 bayleaf
Salt - as needed
For gravy
Cooking oil - 3-4 tbsp
Bayleaf - 1 no
Big onion - 1 no
G&G paste - 1/2 tsp
Tomato - 2 nos
Red chilli powder - 1 tsp
Dhania powder - 1.5 tsp
Garam masala powder - 1 tsp
Turmeric powder - 1/4 tsp
Curd - 1/4 cup
Salt & water - as needed
Paneer pieces or mixed vegetables - as needed
To garnish
Fried onion - a handful
Saffron milk - 2 tbsp
Mint + coriander leaves - few
Ghee - 1 tbsp
HOW TO MAKE MATKA VEG BIRYANI - METHOD
Wash & soak basmati rice for minimum 30 minutes. Boil 5 cups of water adding whole spices & the required salt. When the water comes to boil,add the rice.Cook the rice till its 75% done. Cooked Rice should break into two but not mashed. Drain the excess water & remove the rice in a plate. Let it cool.
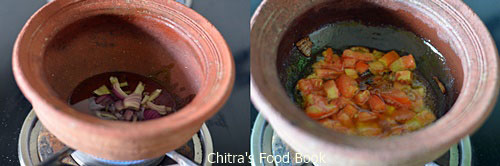
Boil some water in a bowl. Add the chopped paneer pieces. Let it be in water till use. Chop the onions & tomatoes.Fry one sliced onion till its golden brown and remove in a plate.
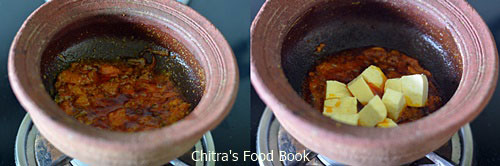
Heat oil in a mud pot and saute bayleaf, onions. Saute well. Add G&G paste. Add chopped tomatoes & saute till mushy. Add turmeric powder, red chilli powder, dhania powder & garam masala powder. Saute well adding some salt. When it becomes thick,add 1/4 cup of curd & mix well.When it becomes a semi gravy, add the paneer pieces. Mix well.Remove half of the gravy in a bowl. Make sure there is some water in the gravy.
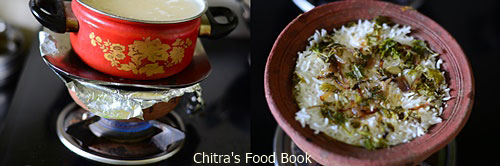
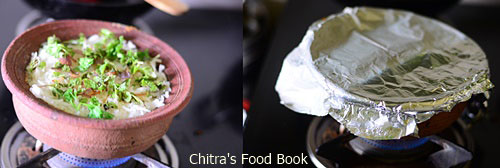
Take the mud pot with some gravy and spread a layer of rice. Now layer the gravy with the remaining rice.Spread the mint+coriander leaves & fried onions on top.Sprinkle the saffron milk. Drizzle the ghee. Close it with a thermal foil and close it with a plate. Keep a bowl full of water over the plate. Put the mud pot in DUM under very low flame for 5-8 minutes. If you keep it for long time, there are chances for the bottom layer to be burnt.
Suppose if you want to put this mixture in DUM for long time, heat a dosa tawa in high flame for 10 minutes & place the mud pot with thermal foil arrangements on top of the tawa. Let it heat in low flame for 10-15 minutes.
Enjoy !
Note
Adjust the quantity of spices as per your taste..
You can replace paneer with mixed vegetables. But pressure cook the veggies before you add them in gravy.
Make sure there is some water content in the gravy else biryani would burn.
Try this easy,flavorful pot biryani.Enjoy your Sunday Lunch !
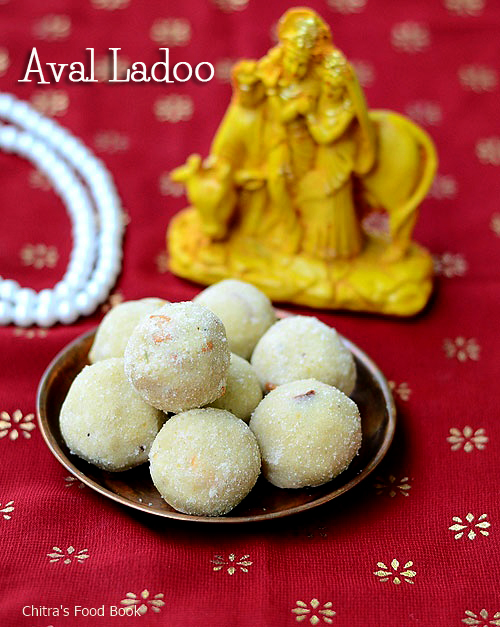
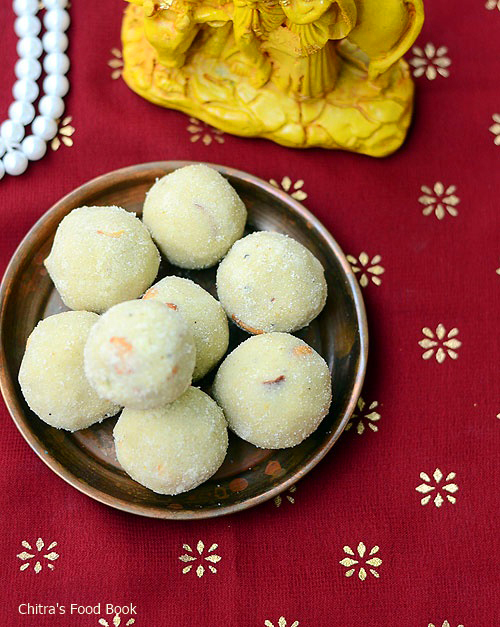
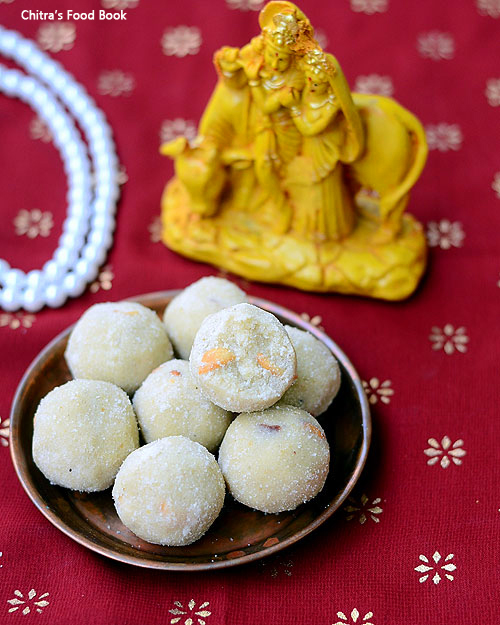
Poha ladoo/Aval laddu is one of the easiest laddu recipes that can be prepared in minutes. If you are looking for a simple , kids friendly sweet recipe for this Gokulashtami/Krishna Janmashtami prasad, you must try this laddu. It is prepared with just 3 main ingredients and you can do many variations in this recipe. For healthier options, you can use Red poha/Red aval and Jaggery.
You can also add roasted coconut, rava, fried gram dal along with poha to get a good yield and make this ladoo. When I gave this laddu to Sendhil, he told its tasting the same like Rava ladoo. Yes the method of preparation and its taste are very similar to Rava Laddu. Do try this easy recipe for tomorrow’s festival and share your feedback with me. Wish you all a very happy Krishna Jayanthi celebration !! If possible I will share an interesting seedai recipe tomorrow as my last minute entry.
Lets see how to make this easy aval urundai with simple steps.
If interested check out my other easy ladoo recipes.
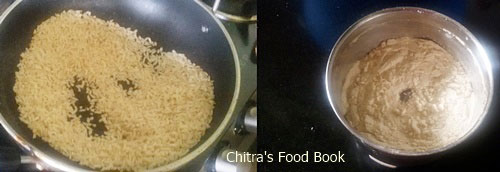
Dry roast the thick aval/Poha in a kadai for 3-4 minutes in high flame with constant mixing. Please stay nearby and do this else aval may burn. So do it patiently till aval starts to puff up slightly with a nice smell. Its color will be slightly golden brown. Remove & let it cool ( you can roast 2 cardamom & 1 clove along with this. But I powdered it with sugar without roasting them.)
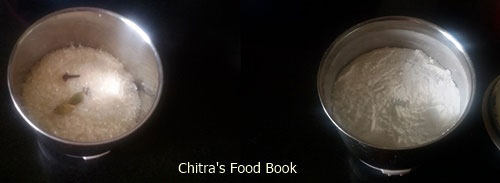
Powder the sugar along with cardamom & clove. Take in a bowl. Powder the poha and mix with sugar powder. Mix them well.
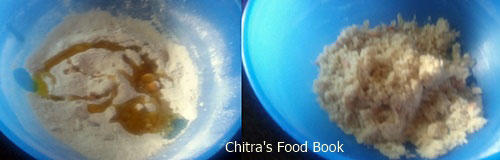
Heat the ghee and roast the chopped cashews. Add this ghee to the mixture. Mix well with a ladle till it turns warm. Now make balls and arrange them in a plate. Aval laddu is ready !
Enjoy !
Note
You can replace thick poha with thin poha.
You can also use powdered jaggery instead of sugar.
If you want more yield,u can powder fried gram dal or roasted rava along with poha and make this laddu. Check out some easy ladoo recipes below..
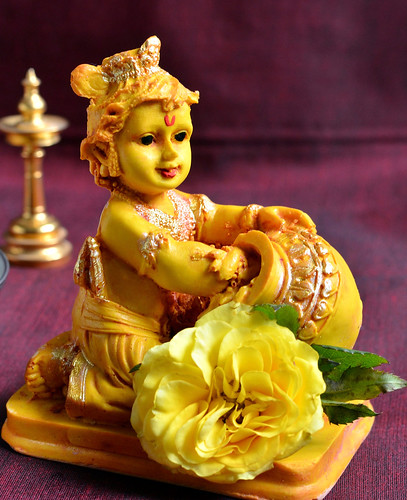
Yesterday I got a request from a reader to make a post on Krishna Janmashtami celebration / Gokulashtami celebration at home. So I have discussed how to celebrate Krishna Jayanthi/Gokulashtami/Krishna Janmashtami at home by Indians especially South Indians in a very simple way. I have also shared a video on how to draw Krishna feet using rice flour paste. Pooja procedures I have given here is based on my family's tradition. It may vary from place to place. So take this as a reference and get the guidance from your family elders.
As you all know, Krishna Jayanthi is celebrated as the birthday of Lord Krishna. It’s a most important and sacred day for Hindus. People pray to Lord Krishna on this day and seek his blessings for a happy and good life.Krishna Janmashtami is observed on Ashtami – the eighth day of Krishna Paksha month/Shravana month i.e between mid August & early September. This year 2023, it falls on September 6th Wednesday evening. It is celebrated all over India.
In Tamil nadu, Kerala, Karnataka and North Indian temples, Gokulashtami is celebrated in a grand manner. Festivities begin before dawn and extend all day until midnight, the exact moment of the anniversary of Krishna’s appearance. Many people observe fasting on this day till midnight and worship Lord Krishna. After Janmashtami pooja, they break their fasing by eating sweets and prasad offered to God. As a fasting rules, people consume only fruits, milk and drink lots of water. In my house, we don't have the practice of fasting on this day.
At home, we do a simple pooja in the evening i.e after 6 pm. On those days, my MIL used to do the pooja around 11 pm at night. So its better to do the pooja anytime after 6 pm till midnight. Midnight is the exact time that Krishna appeared on this planet, so it is the most auspicious and spiritually inspiring time to perform pooja.
Temples prepare at least one hundred and eight different food dishes on Janmashtami. At home, Tamil people do the pooja by offering flowers, neivedyam recipes like seedai , murukku, laddu, appam, payasam/Kheer etc and performing Mangala aarti to Lord Krishna Idol or photo. If you are not able to prepare all these dishes,don’t worry - Krishna says in the Bhagavad-gita, “If you offer me with love a leaf, flower, fruit or water, I will accept it.”
So offer whatever you can - it’s just your love and devotion that matters.
Please click herefor the full collection of Krishna Janmashtami recipes of my blog ! I have also shared a No cook Aval panchamirtham recipe with fruits to make a simple neivedyam.
Fruits like apple, pomegranate,Orange,banana, guava etc
One coconut for neivedyam
Betel leaves and nuts (Vetrilai paaku)
Oil and ghee to light the lamp
Rice flour and colors for drawing Rangoli and Krishna feet.
To offer in front of GOD
A small cup of milk, curd, butter, Poha/Aval mixed with jaggery or sugar.
These offerings are must and should even if you don’t prepare sweets and snacks. Ingredients for making neivedyam recipes
Raw rice and Rice flour ( for making seedai , murukku and paal payasam )
Sesame seeds or cumin seeds
Coconut
Jaggery ( For vella seedai and appam)
Banana ( for appam)
Sugar ( for Milk payasam)
Milk ( for payasam/Kheer)
Urad dal and Roasted gram dal ( Pottukadalai ) ( For making seedai, murukku)
Butter/Ghee for snacks
Cooking oil ( to deep fry)
HOW TO CELEBRATE KRISHNA JANMASHTAMI
Do the shopping two days before the festival and finish making the deep fried neivedyam recipes like vella seedai , Uppu seedai , Kai murukku etc on the previous day of festival. Store them in an air tight box after everything cools down completely else they may turn soggy. DO NOT TASTE IT UNTIL YOU FINISH POOJA.
Wash the lamps and other pooja vessels on the previous day night and keep the turmeric, kumkum dots.Put the threads and oil the lamp. Suppose if you don’t have enough time, you can do this job the next day morning or afternoon as we are going to do the pooja only in the evening after 6 pm. So its your choice.
On Gokulashtami afternoon, mix the ingredients for sweet appam and make payasam in cooker. Cook the appam around 5.30 pm. Around 4 pm in the evening, sweep the house and entrance. Draw Rangoli in the entrance and in front of the Pooja room. Draw the krishna feet from entrance till pooja room. Decorate the krishna idol by keeping flowers and garland. Make him ready for celebration :) HOW TO DRAW KRISHNA FEET
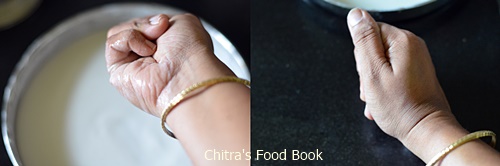
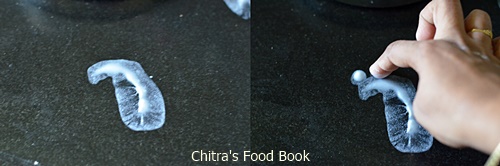
In many houses in South India, people draw footsteps of Lord Krishna from the entrance of the house to the Puja room. These footsteps are drawn with rice flour paste and drawing these footsteps is a sign of welcoming Lord Krishna to home. Women draw patterns of tiny footsteps like those of infant Krishna. I have given a video below on how to draw krishna feet using rice flour. Please watch it to draw easily.
How to draw Krishna Feet - Video
Take a broad plate such that your hands should fit in. Dilute the rice flour adding enough water and make the paste. Do not make it too thick or too thin. Its consistency should be like dosa batter. Now fold your hands as if you are punching someone😉. Dip your side of the hand in the rice paste. It will be coated with the paste. Now make the impression on the floor. Keep 5 dots for fingers. Draw the right leg first. Repeat the same procedure using your left hand for drawing left leg. Do this alternatively. Draw both the legs together near the entrance and pooja room.
Refer the stepwise pictures for clear understanding. For drawing legs of baby Krishna, fold your hands tightly and make the impressions as shown in pics. If you want to draw slightly bigger legs, watch this video. Alternatively, you can ask your kids to make impressions on the floor. They would enjoy doing this and help you out .
POOJA
After you finish the decoration and neivedyam preparations i.e after 6 pm, place the decorated Krishna on a plank/Peeta. Offer all the neivedyam recipes, fruits, curd, milk, butter in front of the God. Light the lamp and do the pooja, perform Mangala harathi. You can sing Krishna songs or read Bhagavad Gita/Sri Krishna Ashtakam OR simply chant “Om Namo Bhagavate Vasudevaya “means “Om, I bow to Lord Vasudeva or Lord Krishna’'in front of the GOD.
To perform a simple pooja without any special neivedyam recipes, just garland the Krishna idol, garland it. Light the lamp, Place a small cup of milk, curd, butter, Poha/Aval/rice flakes mixed with jaggery or sugar. Do the pooja and mangala harathi. Please check the picture below for reference.
The next morning, do the pooja with a simple neivedyam like dry grapes or candy (kalkandu). Remove the idol at a good time of the day ( Avoid Rahu kalam and Yama kandam ).
DISCLAIMER : The details I have shared here is purely our family’s method of celebration. It may vary from place to place based on your traditions. So please take this as a reference, consult the elders of your family for more guidance.
Thanks for visiting this page. Wish you all a very happy Gokulashtami :)
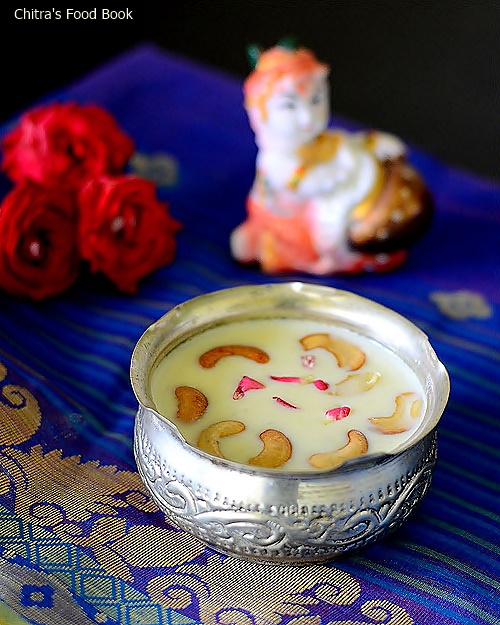
Paal payasam / milk kheer is a must and should neivedyam recipe for Krishna Jayanthi. Even if you don’t make seedai, murukku and appam , a glass of this simple & yummy milk kheer along with a small cup curd and butter is enough to please Lord Krishna & to get his blessings. It’s a very easy payasam recipe that can be made in pressure cooker. I have been making this payasam for years but I wonder how I missed this post in my blog. Few years back, I shared the most popular Kerala Paal payasam & Bengali Chaler payeshrecipes. But this paal payasam recipe is of Tamil nadu style without using condensed milk(Milk maid). Paal payasam is prepared by the people all over India in various names. In North India,this is called as Chawal kheer/Rice ki kheer. There might be slight variations in the method of preparation. Some people add vermicelli or sago along with rice. However its made,the taste would be awesome and you can enjoy creamy,rich kheer. Lets see how to make this simple and easy dessert recipe – South Indian Paal Payasam. Do try this for Krishna Jayanthi and don’t forget to share your feedback here. I have added a video for beginner's reference.Do watch it :)
Paal Payasam recipe for Gokulashtami/Krishna Janmashtami
Cuisine:South Indian
Category:Sweet
Serves:Serves 2-3
Prep time:5 Minutes
Cook time:20 Minutes
Total time:25 Minutes
INGREDIENTS
1 cup =250ml
Milk - 2 cups ( 1/2 litre)
Basmati rice or raw rice - 2 tbsp
Sugar – 1/3 cup ( 1/2 cup for more sweetness)
Cardamom powder - 1/2 tsp
Ghee - 1 tbsp
Cashews - to roast
METHOD
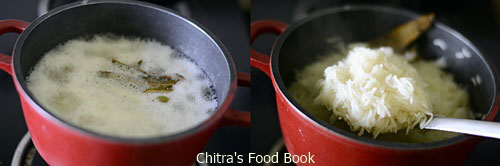
Heat 1 tsp of ghee and roast the rice till it puffs up slightly.Grind it coarsely.Make sure you don’t powder the rice.It should be just broken into two.So pulse twice for short time.
Boil milk in a small pressure cooker. Add a small plate or spoon to avoid spilling & burning of milk.When the milk starts to boil,add the rice.
Pressure cook it in very low flame for 2-3 whistles.Open the cooker after the steam is released.Mix well and boil the milk.Remove the plate using a ladle. Add sugar,stir well and boil for sometime to thicken the payasam slightly.Add cardamom powder.Do not over boil because this payasam will thicken as time proceeds.So let it be watery.
Roast the cashews in 2 tsp of ghee and add to the payasam.Mix well and enjoy !
Note
Adding more rice makes the payasam to become pongal.So add the mentioned quantity of rice.
Adjust the quantity of sugar based on your taste.Add 1/4 cup for less sugar & 1/2 cup for more.
You can also add saffron threads soaked in warm milk.It will give a nice flavor & color to this payasam.
Try this creamy,rich paal payasam recipe for this Gokulashtami !
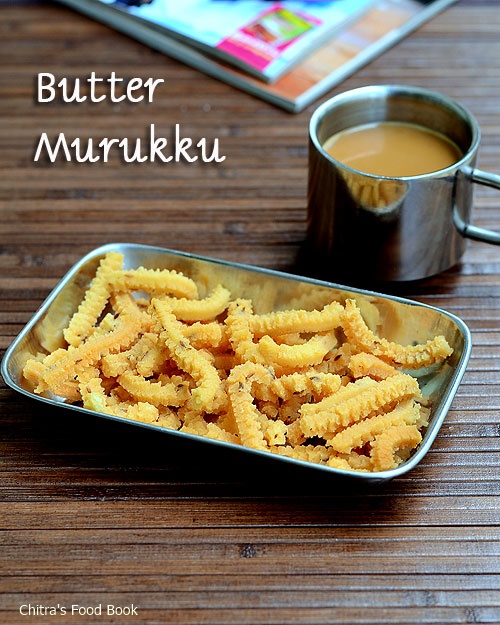
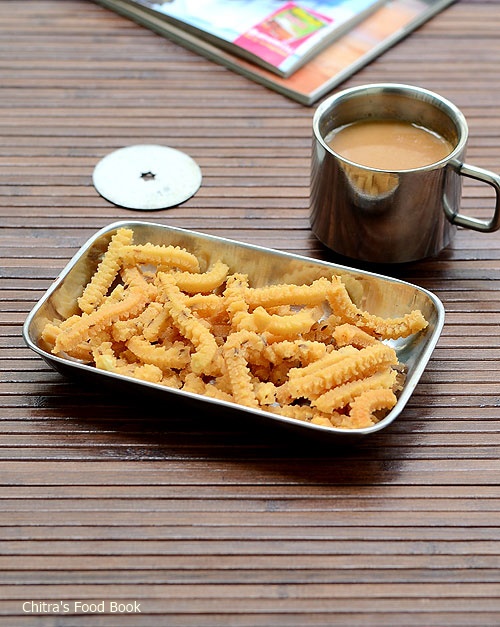
Butter murukku recipe / Vennai murukku in Tamil and Benne Murukku/ chakli in Kannada is one of the popular South Indian murukku varieties.
Gokulashtami is around the corner. As I have already shared Vella seedai , Uppu seedai ,Kai murukku , thattu vadai and Appam recipes , I wanted to try some other easy neivedyam recipe. Yesterday I came across this super crunchy butter murukku recipe/Benne murukku under easy Diwali snacks recipe.I bookmarked it immediately and tried it on account of Krishna jayanthi. The results were too good. We loved it a lot and the whole box got emptied in minutes. Making kai murukku may be difficult to some of you in this festive season. It needs a lots of practice & patience. In that case, this butter murukku comes to rescue. As Lord Krishna is fond of butter, this recipe suits this festival very well. Its so easy to make and you don’t need to prepare soaked & ground processed rice flour or urad dal flour for murukku dough. Just store bought idiyappam flour, roasted gram flour and besan flour would do. I tried this recipe from 7aum suvai by making a small change in the ratio of flours to make white colored murukku. It came out well with crispy, melt in mouth texture. Friends, If you are looking for some easy murukku recipes for this Gokulashtami, Diwali and other festivals you can go ahead with this recipe. You can make it successfully even if you are a beginner. It’s a good tea time snack & for packing kids snacks box. Lets see how to prepare butter murukku recipe with step by step pictures. Check out my collection of Gokulashtami Recipes HERE
Butter murukku recipe
Crispy,easy butter murukku recipe - For gokulashtami & diwali festivals
Cuisine:Indian
Category:Snacks
Serves:-
Prep time:10 Minutes
Cook time:15 Minutes
Total time:25 Minutes
INGREDIENTS
1 cup = 250 ml
Rice flour - 1 cup ( store bought flour/Idiyappam flour)
Besan flour/Kadalai maavu - 1.5 tbsp
Gram flour/Pottukadalai maavu - 1.5 tbsp
Soft Butter - 2 tsp ( at room temp, unmelted)
Cumin seeds - 1 tsp
Asafetida/Hing - a big pinch
Salt and water - as needed
Cooking oil - to deep fry
HOW TO MAKE BUTTER MURUKKU METHOD
In a wide bowl, take the rice flour, gram flour, besan flour, butter, salt, hing and cumin seeds.Mix everything well. Add water little by little and make a non sticky dough. Cover the dough till you make murukku. Do not let it dry.
Now take the star mould and fill the murukku maker with a ball of dough. Heat oil to deep fry and check the oil temperature by dropping a pinch of dough.If it raises to the top immediately,oil temperature is right.Keep the flame low and press the murukku.
Cook in medium flame till the bubbles cease.Fry it patiently else murukku will turn brown with a burnt smell.Remove in a tissue paper using a slotted ladle.Store in an air tight box once its cool down completely.
Enjoy with tea/coffee.
Note
As per the original recipe,2 tbsp of besan and 1.5 tbsp of gram flour is used.But I added them in equal ratio to get white colored murukku.
Do not replace butter with oil or ghee.As the name says,butter murukku should be made with butter.
You can replace cumin with sesame seeds or ajwain.But flavor would vary.
Try this easy murukku recipe and enjoy with tea/coffee !


 Eggless,moist cupcake recipe - Easy to make n bake !


[6].jpg)