Search Chitra's Food Book

February 18, 2016

Chettinad Vazhakkai Curry – Chettinad Raw Banana Fry Recipe

Chettinad Vazhakkai curry
Raw banana / Vazhakkai is our family favorite vegetable. So I keep trying varieties of curry/fry recipes with it. Recently I came across this Chettinad style vazhakkai masala curry recipe in this blog. As it had fennel seeds/soambu, I got tempted to try it. I made it as a side dish for mor kuzhambu. It was a yummy combo. We all loved it. 

Though I made it less spicy, it was very flavorful and tasty with rice. I have included this curry in my routine lunch menu too. Sure, its a welcome change from my usual Raw banana poriyal. Next I am eyeing on Chettinad varuval /roast without coconut. I will try to make it soon and upload here. Now Lets see how to make Chettinad Vazhakkai curry recipe for rice with step by step pictures. Check out my other raw banana recipes
  1. Raw banana chips
  2. Raw banana bajji/fritters
  3. Raw banana kootu
Chettinad Vazhakkai curry

Chettinad Vazhakkai Curry Recipe


Chettinad Vazhakkai Curry Recipe Chettinad style raw banana fry recipe using freshly ground masala
Cuisine: Indian
Category: Side dish
Serves: 2
Prep time: 10 Minutes
Cook time: 20 Minutes
Total time: 30 Minutes
INGREDIENTS

  • Raw banana / Vazhakkai - 1 no
  • Big onion - 1 no ( chopped finely)
  • Tomato - 1 no
  • Green chilli - 1 no ( slitted)
  • Garlic cloves - 4 nos ( chopped)
  • Turmeric powder - 1/4 tsp
  • Red chilli powder - 1/2 tsp ( i used Kashmiri chilli pwd)
  • Salt - as needed
To temper
  • Cooking oil - 1.5 tbsp
  • Mustard seeds - 1/2 tsp
  • Curry leaves - few
To grind
  • Grated coconut - 1/4 cup
  • Fennel seeds/soambu - 1 tsp
  • Coriander leaves - to garnish
METHOD

  • Wash & peel the skin of raw banana. Chop into cubes & keep inside water to avoid discoloration. Grind the coconut + fennel seeds to a smooth paste adding enough water.
Chettinad vazhakkai curry
  • In a kadai,heat oil and splutter mustard seeds,curry leaves. Saute onions,green chilli & garlic pieces until  onion becomes transparent. Add chopped tomato pieces and saute till mushy.
Chettinad vazhakkai curry
  • Add turmeric powder,red chilli powder and required salt. Mix well and add the raw banana cubes. Mix well. Add some water & cover cook till the raw banana is cooked well. Make sure it is not mushy. It should be firm.
  • Now add the ground coconut masala and mix well. Keep the flame medium and saute until you get a nice masala smell and raw banana gets coated with masala.Switch off the flame and garnish with coriander leaves.
    Enjoy ! Chettinad vazhakkai curry

Chettinad vazhakkai curry
Check out my other raw banana recipes
  1. Raw banana chips
  2. Raw banana bajji/fritters
  3. Raw banana kootu


Note
  • Original recipe called for using 2 green chillies. But I used only one to make it less spicy. So add more for spicy fry.
  • You can also add more red chilli powder instead.
  • You can replace raw banana with arbi/Seppankizhangu but you should cook the arbi before adding in masala.
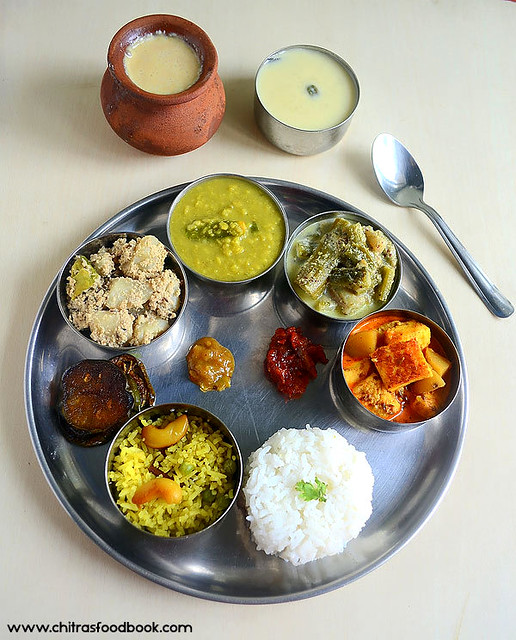
Enjoy this yummy, flavorful vazhakkai curry with ricekuzhambu and papad !

Raw banana curry
Continue Reading...


February 16, 2016

Kashmiri Rajma Gravy – Red Kidney Beans Gravy Without Onion, Garlic For Rice,Chapathi

Kashmiri Rajma masala  

Recently I bought a pack of Rajma ( Red kidney beans in English,Karamani or Karamani Payir in Tamil , Rajma in Punjabi,Hindi , Capparadavare in Kannada, Chikkuduginjalu / Nallachikkudu in Telugu ) to try some gravy/masala for rice. I have heard a lot about Rajma Chawal, a popular North Indian Dish. So I wanted to try that but then I found the pack had Kashmiri Rajma which was smaller in size than the usual rajma. So I browsed for some Kashmiri rajma masala gravy that can pair with rice and chapathi as well. I found one in Divine taste using freshly ground garam masala powder. It is a no onion no garlic Jain recipe too. I became double happy and tried it for our lunch with slight modifications in the original recipe. It came out very well. We had the same for our dinner as a side dish for Chapathi/Roti. It tasted yum and we were happy to have a healthy, protein rich gravy for our lunch & dinner. Ok lets see how to make Kashmiri Rajma masala for rice and chapathi.

Check out my Rajma Sundal & Rajma Biryani recipes too.

Continue Reading...


February 14, 2016

Cold Coffee Recipe – How To Make Cold Coffee Without Icecream

Cold coffee
Basically I love to experiment different types of coffee at home. Long back I had tried and shared homemade Espresso coffee without machine. After that I tried to make Cappuccino at home but it was not upto the mark. My recent crush is to try Cold Coffee at home. I have not tasted cold coffee in Cafe Coffee Day(CCD). But I have heard a lot from my friends. So I got tempted to give a try on my own & thought Valentine’s day would be a good choice because Sendhil likes to have cold coffee more than our South Indian filter coffee

This morning I made it for the first time following this recipe. I have never thought its so easy to make at home. Its just a mix and blend of instant coffee powder,cocoa powder, milk and ice cubes. With a mild bitterness, it was awesome. Being a coffee lover,i enjoyed every sip thoroughly. I tried to decorate the glass with hershey choco syrup. But it wasn't perfect :( Cold coffee can be made with & without ice cream. Today I made it without icecream and used Bru instant coffee powder. But I read using Nescafe and ice cream makes it tastier, creamy and rich like Cafe Coffee Day. 

So try to use them if you have in hand. Soon I must try Frappe, mocha and other variants of coffee. Ok, now lets see how to make cold coffee recipe at home. Try it for your loved ones on this Valentine’s day. Enjoy one coffee with two straw.

how to make cold coffee at home

Cold coffee recipe without ice cream


Cold coffee recipe without ice cream How to make cold coffee without ice cream at home
Cuisine: Indian
Category: Beverages
Serves: 2
Prep time: 5 Minutes
Cook time: 5 Minutes
Total time: 10 Minutes


INGREDIENTS
1 cup = 250ml
  • Instant coffee powder - 2 tbsp ( I used Bru, Nescafe would be better)
  • Unsweetened cocoa powder - 1/2 tbsp
  • Water – 3 tbsp
  • Sugar - 3-4 tbsp
  • Boiled milk - 2 cups ( use full fat milk for best taste)
  • Ice cream - 1 scoop ( optional, Vanilla or chocolate)
  • Ice cubes - few ( I used 3 nos)
HOW TO MAKE COLD COFFEE WITHOUT ICE CREAM - METHOD

  • Heat 3 tbsp of water in a pan and mix coffee powder, cocoa powder along with sugar. Boil the mixture in slow flame till sugar dissolves completely. Keep stirring. Mixture will becomes a thick solution. Switch off the flame and let it cool.
cold coffee recipe
  • Take a big mixie jar and add 2 cups of milk ( Preferrably boiled milk at room temperature or chilled), 3 tbsp of coffee solution, ice cubes and blend well for few seconds till the coffee becomes frothy. ( Store the remaining coffee solution in a refrigerator and use it the next day itself). Check for taste and add more coffee solution, sugar as per your taste.
cold coffee recipe
  • Transfer it to a glass along with froth and serve it with a scoop of icecream on top. If you are not using ice cream, just decorate it with a sprinkle of coffee powder or cocoa powder. You can also add colorful sprinklers or even choco chips.
cold coffee recipe
Enjoy !

Note
  • Adjust the quantity of sugar as per your taste.
  • Add more cocoa powder if you like chocolate flavor in your coffee.
  • Full fat milk gives more creamy,frothy coffee. But I used low fat milk here.
  • Store the remaining coffee solution in refrigerator and use it the next day. Do not keep it for long.
Enjoy this cold coffee with your loved ones and have a lovely day !
Cold coffee recipe
Continue Reading...


February 11, 2016

Homemade Stovetop Pizza – No Oven Veg Pizza

stovetop pizza
Making homemade pizza must be the dream for many.Me too not an exceptionBatting Eyelashes.Whenever I order Pizza online from Dominos or Pizza Hut,i used to think “When I am i going to make it on my own???Day dreaming” Of course,I have tried pizza using readymade pizza base and shared a post in my blog years ago.But i was waiting to make a perfect pizza from scratch following a simple recipe.Recently my friend Shalini shared me an easy,no knead,no wait, stovetop pizza recipe(Also known as Tawa pizza/skillet pizza) video in youtube.I was super excited to see the ease and quickness of this recipe and tried it on the same day.I used a simple topping with onions,tomato,olives and capsicum.It was excellent in taste and got a big thumbs up from my family members!! Raksha loved it very much and asked me to make it the next day too.I tried a no yeast stovetop pizza as well.I will try to share that recipe by next week.As Valentine’s day is nearing,i thought this post would be useful for people to cook pizza without oven and treat your familyHappy.You can make the pizza base/crust thick or thin as per your wish.This recipe uses Self rising flour.As a susbtitute you can use maida + baking powder + salt.Check its quantity in ingredients section.I am sure this recipe would surely help you in making a great Veg pizza at home and that too within 20 minutes.You can enjoy it for breakfast,dinner or as an evening snack.Just give a try and share your feedback here,I am waitingggg Winking .Ok, lets check how to make this super easy,quick Tawa Veg pizza on stovetop with step by step pictures.
Continue Reading...


February 9, 2016

Fresh Fruit Cream Recipe – Dessert Ideas For Party

Fruit cream recipe
Fresh fruit cream is an easy and yummy Indian dessert recipe that can be prepared for potluck and birthday party. Last Saturday I watched Chef Venkatesh Bhat’s sweet special episode in Samayal Samyal Programme,Vijay TV. Among the recipes he showed, this fresh fruit cream dessert attracted me very much.The recipe was so easy & simple. It looked so rich, creamy, colorful and appealing to eyes.I thought it would be the best recipe for Valentine’s day celebration and tried it for our Sunday lunch along with  Veg biryani
When I browsed for more details, I found most of the recipes call for Whipping cream and condensed milk. But whipping cream is not widely available in India. So I tried it with Amul fresh cream instead of whipped cream. Its result din’t disappoint me. It came out really fantastic & lip smacking. We loved it very much. Usually I make fruit custard using vanilla custard powder for my guests and birthday parties. After tasting this fruit cream dessert, I felt this would be even more special to try for guests and party celebrations. 
Friends, if you are looking for an yummy dessert recipe to impress your husband on this Valentine’s day, Do try it. I am sure your will be showered with praisesBut one thing I should warn you here, this is a high calories dessert. So work out more :) Ok, Lets see how to make fruit cream at home with simple steps.
Fresh Fruit cream recipe

Fruit cream recipe


Fruit cream recipe Fruit cream recipe using Amul fresh cream,fruits and nuts
Cuisine: Indian
Category: Dessert
Serves: Serves 2-3
Prep time: 10 Minutes
Cook time: 20 Minutes
Total time: 30 Minutes
INGREDIENTS

  • Amul fresh cream - 200 ml  ( U can use whipping cream too)
  • Fruits - 1/2 cup ( I used 1/2 apple, 4 strawberries, some tutti frutti)
  • Nuts - 2 tbsp of chopped cashewnuts
  • Vanilla essence - 1 tsp
  • Powdered sugar or icing sugar – 1/3 cup ( add 1/4 cup and increase based on ur taste)
HOW TO MAKE FRESH FRUIT CREAM - METHOD

  • Take the Amul fresh cream from the refrigerator. DO NOT SHAKE IT. Take the thick cream in a wide bowl leaving the water content. Make sure there is no water in the cream because thin cream may take more time to become thick and stiff.
fruit cream recipe
  • Now take an electric beater and beat the thick cream in low speed for 1 minute. Now increase the speed and beat it until the cream becomes stiff and forms a soft peak. It takes 5 to 7 minutes approx ( Electric beater can do a better job than hand whisk. You can try in mixie but i am not sure how it turns out)
fruit cream recipe
  • Add 1/4 cup of powdered sugar or icing sugar, vanilla essence. Beat it again till sugar mixes well with the cream. Check for sweetness and add more sugar if needed.
fruit cream recipe
  • Keep the beaten cream in the freezer for 10 minutes. In the mean time,chop the fruits and nuts. Add it to the frozen cream and mix well. Serve immediately ! Enjoy ! This recipe stays good for 2 days when refrigerated. So you can make it for parties well in advance. Fruits releases water. So mix well before use.
fruit cream recipe
fruit cream recipe


Note
  • You can use fruits like Pomegranate, chopped Kiwi and even banana if you like.
  • You can also add saffron threads.
  • Use whipping cream instead of fresh cream if you have in hand.
  • This recipe stays good for 2 days when refrigerated. So you can make it for parties well in advance .

Try this easy, quick and rich dessert recipe for parties and other special occasions. Enjoy !!
Fruit cream dessert recipe
Continue Reading...


February 7, 2016

Bengali Lunch Menu Recipe – Vegetarian Thali List

Bengali Lunch menu List
Its been a year since I shared a North Indian lunch menu here. After I had tried & posted my Punjabi & Gujarati Lunch Thali, I was looking forward to try Rajasthani and Bengali Lunch platters. Based on the suggestions I received from Facebook’s Chef at large group ( one of my favorite groups in facebook ) foodies, I tried this menu list for a Sunday lunch.Thanks everyone for flooding your ideas. Most of them are everyday Bengali recipes. Being a vegetarian, I tried some typical, authentic recipes to make an yummy lunch menu. I prepared Bengali Chaler payesh, Mishti Doi, Mishti pulao, Begun bhaja, Kalai er dal, aloo posto, Doodh Shukto, Bengali tomato Khejur chutney and pickle.I have shared the links for all these recipe below. I am yet to post mishti doi, Doodh shukto and tomato chutney recipes. But I have given the link for the source of these recipes. I thoroughly enjoyed cooking and tasting all these dishes.When I cooked all these recipes, I found Bengali Gobhido bhog rice, Panch phoron – 5 spice mix plays a major role in Bengali cooking. Cooking procedures were very simple yet delicious. It took nearly 1.5 hours to make this entire plattter.Sendhil & Myself enjoyed this thali very much. I loved chaler Payesh , Begun bhaja the most whereas Sendhil’s choice was Chanar dalna and tomato chutney. Over all Iam very happy that I tried & tasted this authentic Bengali Vegetarian Lunch Menu.Lets check out the menu list with some pictures below. 
Check my lunch thali from other cuisines HERE


Authentic bengali lunch menu
Recipe Links
Check my lunch thali from other cuisines HERE

Authentic bengali  vegetarian lunch menu


Continue Reading...


February 5, 2016

Chocolate Covered Strawberries Recipe – Valentine’s Day Recipes

Chocolate covered strawberries recipe
Valentine’s Day is fast approaching. Many of you might have started thinking about gifting ideas and to make some special recipes on Valentine’s day. Before 10 years,when our marriage date was fixed, 2005 Valentine’s day was very special to us. He gifted me ruby stone gold stud with a chocolate box and I gave him a T Shirt. From then, every year on Valentines day, he gives me some special gifts like Camera, mobile phones, dress, jewelleries, handbags etc whereas me as a wife shower all my love by making some interesting, new dishes for him as he loves to eat varieties of food. 

This year, when I was thinking about Valentines day recipes, my friend Shalini told me about this Chocolate covered strawberries ( Strawberries dipped in chocolate sauce). I browsed for this yummy dessert recipe & found it is a traditional gift for Valentine's Day in the United States. I became double happy & tried it this morning to start off Valentines day special recipes in my blog.

For this recipe,i referred few youtube videos for tips and tricks. I won’t say I made it perfect but still as a first timer,Iam happy with the outcome.Here i have showed you how to melt chocolate using microwave but i’ve discussed the other methods of melting as well. I used dark sweetened compound chocolate for melting.You can use white compund chocolate too. Even though the preparation is easy,there are few points you should keep in mind. 

Please refer “Notes” section for tips before you start. For variations,you can make homemade chocolate covered banana and other fruits like blueberries, prune, chocolate covered almond and even chocolate covered oreos. I decorated them with sprinklers,rice crisps. Run your imagination and play with it. Lets see how to make chocolate covered strawberries at home easily. 
Chocolate covered strawberries

Chocolate Covered Strawberries Recipe


Chocolate Covered Strawberries Recipe How to make Chocolate Covered Strawberries at home using microwave 
Cuisine: Indian
Category: Sweet
Serves: 4
Prep time: 10 Minutes
Cook time: 5 Minutes
Total time: 15 Minutes
INGREDIENTS

  • Compound Chocolate - 100 gms ( I used Vanleer brand, sweetened)
  • Fresh Strawberries - 10 nos
  • Sprinklers,rice crisps - for decoration
**Please refer”Notes”section before you start..
HOW TO MAKE CHOCOLATE COVERED STRAWBERRIES - METHOD

  • Wash & pat dry the strawberries completely. Make sure strawberries are completely dry because chocolate will not be coated over wet strawberries.
  • Break the compund chocolate into small pieces. Take them in a clean, dry, microwave safe bowl ( make sure there is not even a single droplet of water). Heat in medium power ( I kept 450W) for 30 seconds. Remove the bowl and stir it with a clean, dry spoon.
chocolate covered strawberries
  • Again microwave in medium power for 1 minute. Remove and stir well. Repeat this process until the chocolate is melted. No issues if there are minute pieces of chocolate. It will melt in the residual heat. Remove the bowl and keep mixing to melt completely. It took approximately 2.5 minutes to melt in my microwave. But this time may vary. So keep an eye. Over doing may stiffen the chocolate.Take care !!
chocolate covered strawberries
  • Now take the dry strawberries and insert a toothpick in the head part. Hold the toothpick and dip 3/4th or whole strawberry ( as per your wish) in the melted chocolate. Swipe it in the rim of bowl or pat it to remove the excess chocolate. Arrange the strawberries on a plate. Do this process quickly before the chocolate hardens.
chocolate covered strawberries
  • Suppose if the chocolate is hardened before you finish the work, microwave them in medium power for 30 seconds to melt them. If you are not able to bring the correct consistency for chocolate, add 1 tbsp of odourless cooking oil  for 100gms of chocolate and then melt in microwave. Chocolate will melt properly. Serve after few minutes once the chocolate sets.Enjoy !
Other methods of melting chocolate
  • Direct heat: This method is easy and convenient. Place the chocolate in a heavy saucepan over very low heat, stirring constantly till the chocolate begins to melt. Immediately remove the pan from the heat and stir the chocolate until it is smooth. Be careful while using this method because there are many chances for the chocolate to scorch. To avoid this,do the process in very low flame with constant stirring.
  • Double boiler: This method takes a little longer than the direct-heat method but eliminates the possibility of scorching the chocolate. Place water in the bottom of the bowl  and chocolate pieces in another bowl that fits the water bowl.The top of the water should be 1/2 inch below the upper pan. Then place the double boiler over low heat. Stir the chocolate constantly until it is melted. The water in the bottom of the double boiler should not come to boiling while the chocolate is melting.Stir chocolate occasionally as it softens. When you have just a few small unmelted chunks, remove bowl from heat (residual heat will melt the rest).


Note
Points you should keep in mind
1. There should be no water in strawberries or chocolate. So pat the strawberries and dry them completely before you dip them in the chocolate.
  • Make sure all equipment is completely dry. Any moisture on the utensils or in the container may cause the chocolate to seize/stiffen. If this happens, stir in 1/2 to 1 teaspoon shorteningor odourless cooking oil (not butter) for every 30 gms of chocolate.
  • Be careful to keep water from splashing into the chocolate. A single drop will cause the chocolate to seize.
  • Keep heat low to avoid scorching if using double boiler method.
  • Always stir chocolate during melting.
2.Melt the chocolate very carefully. Be patient and stir the chocolate every 30 seconds for best results.
  • If the chocolate becomes rock hard before completing the dipping process,add a tbsp of cooking oil  for 100gms of chocolate and melt to bring it to the right consistency.
Enjoy this easy, yummy deseert for your special day ! Have a fun filled celebration !!

Continue Reading...


February 3, 2016

Chanar Dalna Recipe – Bengali Recipes

Chanar dalna recipe
Last year i tried few Bengali dishes to share a lunch menu collection. I posted few dishes from the menu and this recipe was in pending list.Today when i was checking my drafts,i found this post lying in the folder.Chanar Dalna is an authentic vegetarian Bengali dish served for rice.It is made using potato and freshly prepared Chenna/homemade paneer.But i used store bought paneer and referred Sanjeev Kapoor’s recipe.Its a no onion no garlic recipe too.It came out pretty well.This weekend i will share the Bengali lunch menu platter.Now lets see how to make Bengali style Chanar Dalna Recipe – Vegetarian version !
Do check out my other bengali recipes

Continue Reading...


February 2, 2016

Garlic Chutney / Poondu Chutney - Tomato Garlic Chutney Recipe

Garlic chutney recipe
As I promised in my yesterday’s post here is the spicy, tangy, tomato garlic chutney (thakkali poondu chutney) that I had served with Puffed rice dosa. This recipe was shared by my reader Suchi vasan :) This tomato garlic ( Poondu in Tamil, Lahsun in Hindi) chutney is one of the best side dish for this puffed rice dosa. As the dosa has mild sourness this spicy, tangy chutney pairs with it very well. Its also a simple and easy to make chutney recipe with just 3 major ingredients. Not just for puffed rice dosa, you can make this chutney as a side dish for our regular idli dosa and it tastes good with curd rice too. Try it and enjoy. Lets see how to make this yummy tomato garlic chutney for puffed rice dosa !

You might be interested in

Easy Tomato Garlic chutney for chapathi

Onion Garlic chutney

Spicy Momos chutney

 65 Chutney recipes collection
Continue Reading...


February 1, 2016

Puffed Rice Dosa – Pori Dosa - Soft, Sponge Dosa Recipe Without Urad dal

Puffed rice dosa
I must thank my reader Suchi Vasan for sharing this super soft, spongy puffed rice dosa recipe ( Arisi pori dosai). When she told me about the ingredients of this dosa, I just couldn’t believe it. Its just a two ingredient recipe and that too a dosa without urad dal. Puffed rice ( Arisi pori in Tamil, Mandakki in Kannada, Murmura/bhel in Hindi, Borugula in Telugu) is the star ingredient for this recipe. As I haven’t tried any puffed rice recipes other than Kara pori, I got tempted to try this dosa & tried it on the same day. This dosa is not an instant version.Its batter needs to be fermented really well to enjoy its best taste. As Suchi said dosas came out very well, ultra soft and spongy with lots of holes in it. I usually make sponge dosa adding poha/aval & methi seeds. But this recipe does magic just with the puffed rice. You can grind the batter easily in a mixie.With garlic chutney as side dish, it tasted great!! Now lets see how to make this soft, sponge dosa using puffed rice/arisi pori.

Check out my other puffed rice recipes below.

Beach style Kara Pori

 Bhel Puri

Garlic flavored Kara Pori

Here is the LINK for Garlic chutney you see in the picture :)


Puffed rice dosa

Puffed rice dosa


Puffed rice dosa How to make soft,spongy dosa using puffed rice - Yummy breakfast recipe
Cuisine: Indian
Category: Breakfast
Serves: 8 nos
Prep time: 20Hours
Cook time: 3 Minutes
Total time: 20H3Minutes


INGREDIENTS
1 cup = 200 ml
  • Puffed rice - 2 cups
  • Raw rice - 1 cup ( Use good quality sona masoori rice)
  • Salt & water - as needed
METHOD

  • Wash the rice and soak in a bowl.Wash the puffed rice and soak in another bowl.(You can soak both together too).Let the rice soak for 2 hours.
Puffed rice dosa recipe
  • After 2 hours,take the soaked puffed rice,squeeze it well and take in a big mixie jar.Grind it to a smooth paste adding less water.No need to remove the batter.Now drain the soaked rice and add to the same mixie jar. Grind to a smooth paste adding required water and salt.
Puffed rice dosa recipe
  • Transfer the batter to a vessel and mix with your hands to aid fermentation.Allow the batter to ferment for minimum 15 hours and maximum a day.The next morning batter would be raised slightly.Mix the batter well.Proper fermentation of  batter is very important for this dosa.
Puffed rice dosa recipe
  • Heat a dosa pan and pour a ladleful of batter. Do not spread the dosa.It will spread automatically.Make it like thick uthappam.Drizzle a tsp of oil around the dosa and cover the dosa with a lid.Let it cook in medium flame for 2 minutes.Open the lid and remove the dosa.You will see the dosa with full of holes and it looks spongy.Serve hot with chutney.I made this spicy Garlic chutney as suggested by Suchi.Serve & eat hot to know its best taste !!


Note
  • You should use good quality raw rice for making this dosa
  • Batter should be fermented well.So see to it.
  • You can either cover n cook the dosa without flipping OR cook like utappam by flipping it.
  • You can also soak and grind 2 tbsp urad dal along with rice for variations.

Try this easy puffed rice dosa for your breakfast and enjoy !!
Puffed rice dosa recipe
Continue Reading...