Search Chitra's Food Book

April 18, 2016

Thayir Vadai Recipe – South Indian Dahi Vada / Curd Vada

Thayir vadai recipe 
I am a big big fan of Tamil nadu style thayir vadai. I love this South Indian style dahi vada more than sambar vadai & rasa vadai. My FIL used to buy thayir vadai/Curd vada ( Perugu vada in Telugu) from hotel Saravana bhavan and Guptha sweets whenever we visit Salem. Vada tastes soft and spongy soaked up in curd with a nice flavor. On Tamil new year day, I made no onion urad dal Vada/Ulundhu vadai for Pooja. Then I prepared this Thairu vadai using the leftover vada. It came out very well. I served it by garnishing with grated carrot & kara boondhi just like the way served in restaurants. We loved it very much. Long back I have shared my daughter’s favorite North Indian Dahi vada recipe. And now I am happy to share my most favorite South Indian dahi vada which is our thayir vadai recipe with you all. Try it during this Summer Vacation and enjoy with your family. Lets see how to make South Indian Thayir vadai/Curd Vada Recipe.

Thayir vadai

Thayir Vadai Recipe - Curd Vada


Thayir Vadai Recipe - Curd Vada Thayir Vadai - South Indian Dahi vada/ Curd Vada Recipe
Cuisine: South Indian
Category: Snacks
Serves: Serves 5
Prep time: 30 Minutes
Cook time: 20 Minutes
Total time: 50 Minutes


INGREDIENTS
For making vada
  • White round Urad dal - 1/2 cup
  • Green chillies - 2nos
  • Ginger - 1 inch piece
  • Curry leaves - few
  • Asafetida/Hing - 2 pinches
  • Salt & water - as needed
For Curd Vada
  • Fresh thick curd - 1 cup
  • Water - 2 tbsp
  • Salt - as needed
To temper
  • Cooking oil - 2 tsp
  • Mustard seeds - 1/2 tsp
  • Urad dal - 1/2 tsp
  • Cumin seeds/Jeera – 1/4 tsp
  • Curry leaves - few
  • Cashew nuts - few
  • Hing - a pinch
To garnish
  • Grated carrot - 2-3 tbsp
  • Finely chopped coriander leaves - 2 tbsp
  • Kara boondhi - as needed
METHOD

  • Wash and soak the urad dal for an hour or two. Drain the excess water completely. In a big mixie jar, grind green chillies, ginger and hing without adding water. Add the drained urad dal and grind it without water. It would grind coarsely.Wipe the sides of mixie jar. Now add 2 tbsp of water.Grind again. Add water in only a tsp or tbsp at regular intervals and grind a smooth & soft batter. Batter should not be watery or too thick. It should be airy & weightless. So add less water and grind the batter patiently. You can use ice cold water too. Do not add salt while grinding the batter. Remove the batter and check its consistency. For this,drop a pinch of batter in a bowl of water. If it floats on top, batter is just right. Remove the creamy batter in a bowl. Beat it well using your hands or an egg beater to make the batter airy( Updated tip from Sujata).Add finely chopped curry leaves, Pepper powder if you wish and required salt if you are going to make vada immediately. Else keep the batter in the refrigerator till use without adding salt.
  • Heat oil to deep fry and check its temperature by dropping a pinch of batter. If it rises immediately, oil temperature is right. Simmer the flame and drop the vada into the oil.Fry in batches,3-4 at a time in medium flame. Remove in a tissue once it turns golden on both the sides. Make 5 vada and keep it ready.
Check out my Medhu vada recipe using MIXIE for more details !
Thayir vadai recipe
  • Take 1 cup of thick curd in a wide bowl. Add 2 tbsp of water or little more and whisk it. Add salt and check for taste.Make sure curd is not too thick or too watery.
Thayir vadai
  • Now boil water in a wide bowl till it starts to bubble. Drop the vada in the water. Let it be inside hot water for just a minute. Then remove the vada and put it in the curd mixture.
Thayir vadai
  • Let the vada soak in curd mixture for 30 minutes to 4 hours. Make sure vada is well immersed in curd mixture.Temper mustard seeds, urad dal, hing, curry leaves, cashews and add to the curd. You can also add a finely chopped green chilli and add while tempering.
  • Just before serving, add finely chopped coriander leaves, grated carrot and Kara boondhi. Serve immediately and enjoy !!
Thayir vadai
  • Yummy Tamil nadu style thayir vadai is ready !! Enjoy !

Note
  • Grinding vada batter properly is more important. If the vada turns out hard, it won’t absorb the curd mixture properly. In that case, you can dip the vada in hot water for 30 minutes before putting in curd mixture.
  • For variations, you can grind green chillies+ginger to a paste and mix with curd instead of grinding with urad dal. But add less green chillies ( 1 or 2) because curd mixture will become too spicy.
  • Dipping in hot water helps the vada to become soft and absorb the curd mixture.
  • If the curd is too thick, vada won't absorb it.So add little water & whisk it & dilute before you drop the vada.
  • Don’t worry even if the vada is too cold or at room temperature. Dipping in hot water makes it warm and helps to absorb the curd.So you can make thayir vadai with leftover vadai easily as I did.
  • Do not forget to garnish with coriander leaves, grated carrot and kara boondhi.
Curd vada recipe
Enjoy this yummy, creamy, spongy, juicy thayir vadai !! Tastes absolutely yum !!
South Indian curd vada
Continue Reading...


April 17, 2016

Killu Vadam Recipe – How To Make Killu Vathal–2 Versions

Killu vadam recipe
I have never thought I would make koozh Vadam/Vathal in Bangalore. This year Bangalore’s weather is equally hot to Salem. So I told my MIL to make Vengaya Vadagam and killu vadam for me. Last year when I posted Arisi Koozh Vathal recipe, I had mentioned about my mom’s Killu vadam recipe using leftover rice. Before marriage, I have helped my aachi & mom to make this killu vadam. She makes in lots and store for months together. Its a very simple recipe that is made with pazhaya sadam. After marriage, I learnt another version of killu vadam from my MIL. In this version, boiled rice is soaked in water for two hours, ground smooth adding spices and cooked to make it thick like a koozh. Then it is pinched into small pieces and spread on a paper or cloth. This one tastes so crunchy with melt in mouth texture. But this is a time consuming job when compared with leftover rice killu vathal. Leftover rice vathal tastes hard when compared with rice vathal. Both the versions has its own advantages and disadvantages. So I have shared both the version of making killu vadam. Choose any as per your liking and try it. But however you make, it would be loved by all. The flavor of onion reminds you onion pakoda while eating. You can enjoy this vadam with sambar sadam, tamarind rice and lemon rice. Ideal for travel. Try it and share your feedback here. Lets see how to make Killu vadam at home.

Check out my other SUMMER RECIPES too.
Killu vadam

Killu Vadam Recipe


Killu Vadam Recipe How to make killu vadam recipe - 2 versions
Cuisine: Indian
Category: Vadam/Vathal
Serves: 2 cups
Prep time: 120 Minutes
Cook time: 20 Minutes
Total time: 140 Minutes


INGREDIENTS
1 cup - 250ml
Version - 1
  • Leftover Rice - 2 cups (Its cooked parboiled rice/ Saapatu Puzhungal arisi)
  • Green chilli - 3 nos
  • Cumin seeds/Jeera - 2 tsp
  • Small onion - 15 nos
  • Lemon juice – 1/2 lemon (small size)
  • Salt - as needed
  • Water - very little
Version - 2
  • Steamed rice/ Boiled rice - 1 cup ( Lunch rice, saapadu arisi)
  • Green chilli - 3 nos
  • Cumin seeds/Jeera - 2 tsp
  • Small onion - 15 nos
  • Lemon juice – 1/2 no ( small size)
  • Salt - as needed'
  • Water - 5 cups ( as needed)
METHOD

    METHOD –1
  • Add water to the leftover rice till it immerses and leave it overnight. The next day morning, take the rice and drain the excess water. Take the rice in a big mixie jar. Add green chillies, hing and salt. Grind to a smooth paste adding very little water if necessary. Add water in a tbsp only if needed. It should come like a thick paste. So do not make it watery. Its the most important point to keep in mind. 
  • After grinding the paste,transfer it to a vessel. Chop the onions into small cubes and add to the rice paste. Add cumin seeds.Sprinkle few drops of lemon juice. Mix well and check for salt. Take a cotton cloth or plastic sheet/Polythene sheet. Pinch the rice dough and arrange it in the cloth as shown below. Let it dry under the sun for 3-4 days till it shrinks and change in color. Keep it under the fan during night.
  • Heat oil to deep fry and fry the vadam till it becomes crispy. Deep fry one or two to check whether its dried up completely. If its not chewy and soft inside, vadam is dried. Else sun dry it for another day or two.Fry the vadam till onions turn slightly golden brown. This vadam browns faster as we use cooked rice and onion. This vadam tastes slightly hard that method - 2. So fry in medium flame carefully. Do not burn them. Remove and serve with rice varieties !!
  • Remove and serve as an accompaniment for rice.
METHOD –2
  • Wash and soak the rice for 2 hours. Grind it to a smooth paste adding green chillies, hing , salt & enough water. I added 2 cups of water to grind it.
  • ( Actually this batter has to be fermented over night.But I skipped this step and made the batter instantly by adding lemon juice for sourness).
Killu vadam recipe
  • Add 3 cups of water in a kadai. Let it roll boil.Add the rice paste and mix well.
Killu vadam recipe
  • Add cumin seeds & required salt. Mix well and boil the mixture till it becomes a thick paste. After it becomes a thick paste and leave the sides of pan, add water around the paste and cover the kadai with a lid. Adding water in the sides help to prevent the burnt bottom. Keep the flame low and cover cook the mixture till it changes its color to pale white.
Killu vadam recipe
Killu vadam recipe
Killu vadam recipe
  • After the mixture is cooled down, add lemon juice and chopped onions.Check for taste.Pinch into small pieces by dipping your hands in water.Spread them on a white cloth or polythene sheet.
Killu vadam recipe
  • Let it dry for 3-4 days till it shrinks and changes in color. Keep it under the fan during night.
Killu vadam
  • Heat oil and deep fry one or two to check whether its dried up completely. If its not chewy and soft inside, vadam is dried. Else sun dry it for another day or two.Remove after the vadam is fried well. Onions should turn slightly golden brown. Do not burn them.Remove and serve with rice varieties !!
Killu vadam
Enjoy !


Note

  • As I told, method 1 is easy compared with method 2. Its ideal for beginners and leftover rice can be used effectively in this summer. 
  • In method 2, you can add more water while grinding & cooking the batter. If the batter is too thick, vadam may taste hard. So make the batter slightly thin.
I love to have Killu vadam with Sambar Sadam more than other rice varieties. What’s your choice ??
Killu vadam

Continue Reading...


April 13, 2016

How To Celebrate Tamil New Year At Home (Tamil Puthandu)

Tamil new year celebration

In this post, I have discussed how to celebrate Tamil new year at home along with Tamil new year recipes links and menu. In our house, we celebrate Tamil varusha pirappu in a simple manner. Tamil New Year – Varusha Pirappu/Tamil Puthandu is the celebration of first day of the Tamil  new year that comes in Mid April. Its a special day for Tamilians as it marks the beginning of all Tamil festivals. Following this, we celebrate Rama Navami, Chitra Pournami, Aadi Pandigai etc. 

This year, Tamil new year falls on April 14, 2024, Sunday. Tamil people all over the world celebrate this day by Keeping new Panchangam  and offering some special dishes like Mango Pachadi, Panakam, Neer mor etc. This festival falls in the month of Chithirai, the first month of the Tamil solar calendar. On the eve of Chithirai Puthandu, a tray arranged with three fruits (mango,banana and jack fruit), betel leaves and arecanut, gold/silver jewellery, coins/money, flowers and a mirror is placed. This is to be viewed upon waking in the morning.

In the temple city of Madurai, the Chithirai Thiruvizha is celebrated in the Meenakshi Temple. In Kerala, people celebrate this  day as Vishu festival. The day is marked with a feast in Tamil homes and entrances to the houses are decorated elaborately with  Maa kolams (Visit my in-laws blog to check varieties of Kolams). In most parts of India, one can see neem trees blooming with their flowers and the first batch of mangoes hanging prominently. So this day is celebrated with neem flowers and raw mangoes to symbolize growth and prosperity ( Source:Wiki).

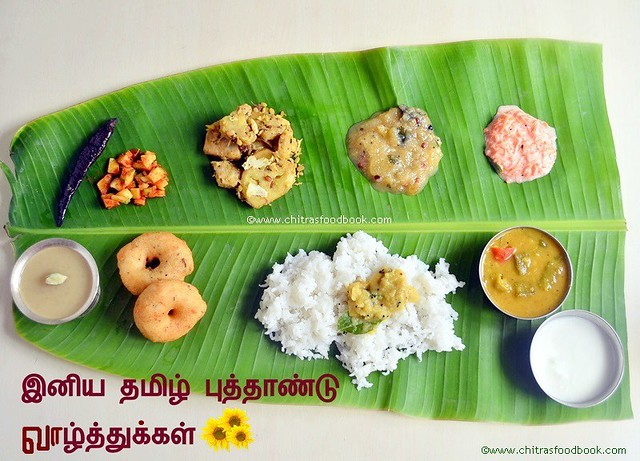
As I am posting the celebration procedures of all our Indian festivals, I guess my regular readers would be expecting this post from me :)). Though the celebration method is very simple, the specialty of this festival lies in including Raw mango, fresh or dried neem flowers & making an elaborate full meals lunch menu for offering God along with fresh fruits. We should include all the six taste on this day. Full meals menu includes Rice, Mango Pachadi, Paruppu, Sambar, Poriyal, Kootu, Payasam, Vada. You should make Panakam and neer mor if you keep Panchangam for pooja else its optional. You can do it for Rama navami. Lets see the celebration procedure of Tamil new year with recipe links.

How to celebrate tamil new year at home

 
Tamil New year kolam

Kolam from my in-laws blog

Ingredients for Pooja & menu

On this day we avoid vegetables like Drumstick, Bottle gourd, brinjal, Keerai/greens, cabbage, Beetroot, Carrot, Beans, Potato, Onion and garlic in our cooking as we offer the lunch menu to God.
  • Lamp
  • Flowers
  • KumKum and turmeric powder
  • Betel leaves & nuts
  • Banana leaf
  • Coconut
  • Match box, incense stick, dhoop, and camphor
  • Banana, Mango & fruits like apple, jackfruit on your wish ( Banana is essential)
  • Vegetables like Raw banana, cluster beans, Broad beans, Lady’s finger, Gooseberry etc
  • Raw Mango ( Must buy)
  • Dried or fresh neem flowers
  • Urad dal for making vada
  • Rice & dal, jaggery for making Payasam
  • Other essentials for cooking
Preparations for Tamil New Year

On the previous day i.e 13th of April, wash the lamps, clean the house. Decorate, put threads in the lamps. Buy all the required fruits, vegetables, groceries, flowers and pooja items for the festival and keep them ready. Some people have the practice of keeping fruits, flowers, rice, pulses, jaggery, a plate full of money and jewellery in front of a mirror in the pooja room. On April 14th morning, people used to see that before starting the day. Its called as Vishu kani celebration. If you have this practice in your home, please consult the elders of your house and arrange the fruits, groceries, money etc the previous night itself.

For cooking, wash and soak the urad dal for vada and grind the batter using mixie or grinder. Keep the batter in fridge without adding salt.

If you want, you can roast the rice & dal and keep it ready for making payasam the next day. Chop all the vegetables and store in a box if needed. These pre preparations can be done to make the lunch quickly.
You can do the pooja at any auspicious time. Make sure there is no Rahu Kalam and Yama kandam.


Tamil new year lunch menu

How to prepare the menu

On April 14th early morning, we take head bath and draw maa kolam in the entrance and before pooja room. Keep flowers and decorate the pooja room. Start preparing the lunch menu. Please check THIS POST to make this menu under one hour. 

Pressure cook roasted rice+dal mixture for making payasam. In another cooker, keep the rice. After cooking rice+dal for payasam, add the jaggery and let it boil. Add coconut milk and cardamom powder. Add the fragrant spices like Pachai karpooram, Jathikai powder. Roast cashews in ghee and add to payasam. Transfer the payasam to a bowl and wash the cooker. In the same cooker, pressure cook moong dal for making paruppu. Temper mustard seeds, curry leaves and hing. Add to the cooked moong dal. 

Make Mango pachadi. Keep it ready. Make sambar, Poriyal or kootu. We make either poriyal or kootu for the menu. You should make Panakam and neer mor if you keep Panchangam for pooja else its optional. Instead of this full meals menu, you can make 5 rice varieties like Lemon rice, Coconut rice, Sweet pongal, Tamarind rice and curd rice along with vada and payasam.

Lastly you can make Urad dal vada and appalam. Make Mormilagai and pickle if you wish.
If you can’t get Raw mango and Neem flowers, no issues. Just make some thayir pachadi with vegetables like carrot or lady’s finger or even with vada and offer to God.

How to do the pooja

After you finish cooking, wash the banana leaf and spread it in front of pooja place. Arrange all the prepared dishes in the banana leaf ( Check out my Full meals lunch menu post to view the order of arranging the dishes ). Light the lamps. Show the incense stick, do the neivedyam.Show the dhoop, deep and finish the pooja showing mangala Harathi.

Tamil New Year Recipe Links for making Full meals

FULL MEALS MENU

    OR

    Variety Rice Recipes + Vada + Payasam

    Please watch the video below to make 5 rice varieties easily.


    Check out my Full meals lunch menu post to view the order of arranging the dishes

      KOOTU VARIETIES

      Mixed vegetable kootu OR Avial without onion


      PORIYAL VARIETIES
      PACHADI VARIETIES
          OTHER LUNCH MENU IDEAS
      OTHER SWEETS

      Sweet pongal / sakkarai pongal in cooker

      Obbattu/Puran poli

      15 Easy Sweets collection

      KESARI RECIPES
      • Rava Kesari Recipe

      • Kesaribath - Karnataka style

      • Semiya/Vermicelli kesari

      • Microwave rava kesari

      • Milk kesari/Paal kesari recipe

      • All the above recipe links are for variations. You can try any based on the availability of ingredients. Its not a hard and fast rule to make a full meals and offer GOD. Some people celebrate Tamil new year just by offering a payasam and vada. 
      • If you are a bachelor and wish to do the pooja, you can simply soak Poha/Aval in Milk adding sugar & cardamom and offer to God. GOD will accept everything and anything if done whole heartedly. The celebration procedure I have shared here is based on my family practice. It may vary as per your tradition and custom. So beginners, please consult the elders of your family and do the pooja . 


      Wish you all a very happy & prosperous Tamil New Year !!
      அனைவருக்கும் இனிய தமிழ் புத்தாண்டு நல் வாழ்த்துக்கள் !!!


      Technorati Tags: Tamil new year recipes,Tamil new year celebration,Tamil new year celebration method,Tamil new year celebration procedure,Tamil new year pooja,tamil new year procedure,Tamil new year 2016,Pooja procedure,How to celebrate tamil new year,Tamil new year lunch menu,Varsusha pirappu recipes,Varuda pirappu menu,Puthandu recipes,festivals
      Very good recipes Tags: Tamil new year recipes, Tamil new year celebration, Tamil new year celebration method, Tamil new year celebration procedure, Tamil new year pooja, tamil new year procedure, Tamil new year 2016, Pooja procedure, How to celebrate tamil new year, Tamil new year lunch menu, Varsusha pirappu recipes, Varuda pirappu menu, Puthandu recipes, festivals
      Continue Reading...


      April 12, 2016

      Masala Coke (Pepsi) – Masala Soda Recipe

      Masala coke
      Masala coke is a very popular Indian Cold drink in Juice shops of Bangalore and Mumbai. I have tasted masala coke in a small juice shop in Gandhi bazaar. You can find varieties like masala Pepsi, masala Sprite, masala Thumbs up, lemon soda, Lemon cola, lemon ginger soda, paneer soda etc in the menu.

       The recipe of masala coke is very simple & that is made with easily available ingredients. It can be quickly prepared in minutes by adding a lavish sprinkle of masala powders to Coke or Pepsi. When I saw the juice shop guy making it, I got tempted to try it at home. So I bought a can of diet coke & coco cola and tried it for myself and Sendhil. We enjoyed it thoroughly. It tastes more like jal jeera with the fizz of coke. 

      If you are concerned about drinking Coke or Pepsi, you can make the same with soda water and enjoy it as masala soda. Make and Serve during parties and get together during this vacation. I am sure everyone will enjoy this drink. Lets see how to make masala coke at home.

      Check out my other Summer Drinks Recipes too !

      Masala coke recipe

      Masala coke recipe


      Masala coke recipe Masala coke/pepsi recipe at home - Masala soda drink for summer
      Cuisine: Indian
      Category: Drinks
      Serves: Serves 2
      Prep time: 2 Minutes
      Cook time: 2 Minutes
      Total time: 4 Minutes


      INGREDIENTS

      • Coke/Pepsi/Coco cola/Thumbs up - 300ml can
      ( Adjust all these powders based on taste)
      • Chat masala powder - 1/2 tsp
      • Black salt - 1/4 tsp
      • Roasted Cumin powder - 1/4 tsp
      • Ajwain powder – A  small pinch, Optional
      • Pepper powder - 1/4 tsp
      • Lemon juice - few drops
      • Mint leaves - to garnish
      • Ice cubes - to add while serving
      HOW TO MAKE MASALA COKE - METHOD

      • In a serving glass, add all the spice powders, lemon juice given above.
      Masala coke
      • Add the coke little by little till 1/3 rd of the glass and wait till the bubbles/froth subside. Mix with a spoon.Add another 1/3 rd  of glass and mix well.
      Masala coke recipe
      • Repeat until the entire glass is full.Check for taste and add more chat masala, black salt & pepper powder, lemon juice as per your taste.Serve immediately adding some ice cubes.Garnish with mint leaves if you wish and enjoy !!
        Masala coke recipe


      Note
      • Adjust the quantity of masala powders based on taste.
      • For variations, you can replace coke with diet coke, Pepsi, Thumbs up, Sprite or even Club Soda.
      • If you have jal jeera powder, you can add that instead of chat masala powder & cumin powder.
      Masala pepsi

      Enjoy this easy, yummy Masala coke/Pepsi at home during this summer vacation. You will love it !!
      Masala soda recipe
      Continue Reading...


      April 9, 2016

      Radish Chutney – Mullangi Chutney Recipe For Idli, Dosa

      Radish chutney 
      A reader requested me to post Radish chutney recipe for Idli dosa. Until then I have never thought of making a chutney with Radish ( Mullangi in Tamil, Mooli in Hindi). I have tried Mullangi thogayal for rice but this is the first time I made a chutney for idli using radish. Actually I was worried whether the smell of Radish may spoil the chutney. But to my surprise, chutney came out truly flavorful. Even Sendhil couldn’t make out its a chutney made with Radish. 

      Its a chutney without coconut and tomato too. I have used white radish, dal and onion. I must thank my reader for making me try this chutney. For this recipe, I adapted Andhra style mullangi pachadi and made slight changes as per my family’s taste buds. I guess it works well for red radish too. I am happy to include this chutney in my radish recipes and chutney collection list. Lets see how to do this easy mullangi chutney for idli dosa.


      Mullangi chutney

      Radish chutney / Mullangi Chutney recipe


      Radish chutney / Mullangi Chutney recipe White Radish Chutney for idli dosa
      Cuisine: Indian
      Category: Side dish for idli
      Serves: 2
      Prep time: 5 Minutes
      Cook time: 10 Minutes
      Total time: 15 Minutes


      INGREDIENTS

      • White Radish - 1 no ( Medium sized)
      • Big onion - 1 no
      • Chana dal - 1 tbsp
      • Urad dal - 1 tbsp
      • Red chillies - 3 nos
      • Ginger - 1/2 inch piece
      • Tamarind - a small piece
      • Salt & water - as needed
      • Cooking oil - 1.5 tbsp
      METHOD

      • Wash and peel the skin of radish. Grate it and set aside.No need to squeeze the water. Chop the big onion into chunks. Heat oil in a kadai. Saute Urad dal, chana dal, red chillies till dal turns light golden color. Next add the big onion and saute until onion turns transparent.Make sure you don’t burn the dals. Do in medium flame.
      radish chutney
      • Add the grated radish, ginger and  saute till it gets cooked and reduces in volume. It takes 3-4 minutes in medium flame. If needed you can cover and cook it. Radish should be well cooked and soft.
      radish chutney
      radish chutney
      • Let it cool. Grind it to a smooth paste adding little water. Temper with mustard seeds and curry leaves. Add to the chutney. Mix well and serve with hot idli adding a tsp of gingely oil.
      radish chutney
        Enjoy !
      Note
      • Adjust the quantity of chillies as per your taste buds.
      • If you want bright red colored chutney, use byadgi chilli.
      • You can add few tbsp of grated coconut if you wish.

      Try this easy,healthy mullangi chutney for idli,dosa. You will like it !
      Radish chutney recipe
       
      Continue Reading...


      April 8, 2016

      Poha Dosa - Aval Dosai - Instant Atukula Dosa Recipe

      Poha dosa recipe
      I have heard about Andhra’s Instant atukula dosa (Atukula Attu in Telugu, Avalakki Dosa in Kannada, Poha Dosa in Hindi, Aval Dosai in Tamil, Flattened rice in English) but I haven’t tried at home. For the first time, I tried this soft and spongy poha dosa yesterday for my in-laws as both of them have tooth problem. It came out super soft and everyone loved it at home with tomato chutney as side dish. 

      This dosa batter is made without urad dal and the best part is that the batter doesn’t need over night fermentation. It can be made instantly after grinding. This aval dosai is sure a welcome change from the aval upma. I followed the recipe from Sailu’s blog but I altered the quantity of ingredients and made it without adding cooking soda/ baking soda. This recipe works great for this summer season. I prepared the dosa batter in the afternoon and made the dosa without adding baking soda for dinner. I gave a resting time of 6 hours for the batter. So I have mentioned it as instant poha dosa as I din't ferment the batter overnight. Also you can make this dosa instantly by adding baking soda. 

      Do try it for your breakfast or dinner. You will love it and make it very often. Lets see how to make Andhra special South Indian Aval dosa recipe with step by step photos.

      Check out my other variants of this dosa

      Puffed rice dosa

      Sponge Dosa

      Set dosa

      Also check out my 50 chutney recipes collection and choose any tomato chutney as a side dish for this dosa.
      Continue Reading...


      April 6, 2016

      Corn Vada Recipe - Sweet Corn Fritters

      Corn vada recipe
      Whenever I buy corn ( Cholam in Tamil, Makai in Hindi) from the market, I make either corn cheese balls or cup corn for Raksha . This time, I tried Corn vada/corn fritters for a change. I browsed for the recipe and found Andhra style Corn vada ( Known as Mokkajonna Garelu/Vadalu in Telugu) & corn fritters recipe with mild variations in method & ingredients. I just combined both the recipes and made this South Indian sweet corn vada. It came out really well with crispy exterior and soft interior. Raksha and Sendhil loved it very much. Its a kids friendly tea time snack recipe.Ugadi festival is nearing. If you have plans to make any vada recipe, do try this one for a change.Your kids at home during this summer vacation would ask for more and moreWinking
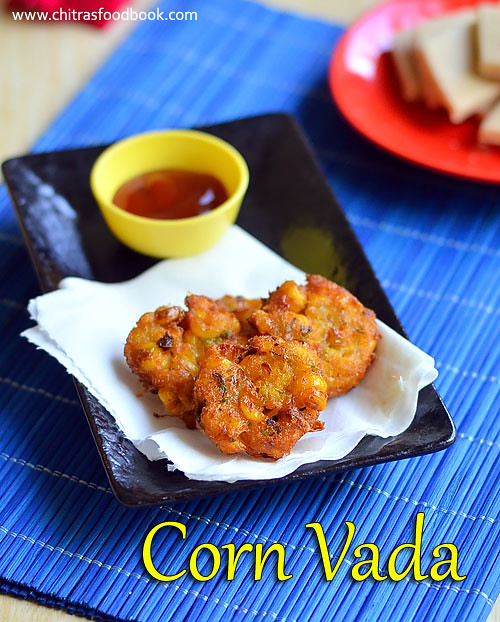
.But remember, to enjoy its best taste, you should serve and eat it hot.Ok,Lets see how to make this yummy, crispy sweet corn vada recipe !
      Do check out my Masala Vada, Mixed Vegetable Vada, Cabbage Vada, Sabudana Vada and Urad dal vada recipes.

      Continue Reading...


      April 4, 2016

      Aval Upma Recipe – Poha Upma - Tamilnadu Style Aval Upma

      Aval upma recipe
      Aval upma is an easy and quick South Indian breakfast recipe that I make at least once in a week. I have already tried Karnataka’s Avalakki chitranna, North Indian - Maharashtrian Kanda Poha , Batata poha recipes and blogged here. This poha upma recipe is very similar to both but its of Tamil nadu style.For this upma, I follow my Rava upma recipe and make it for our breakfast and sometimes for our dinner too. Its an easy to make recipe for bachelors and working women.Ideal for lunch box too. As Poha/Aval is a healthy alternative to rice, I try to include this in our diet by making varieties of poha recipes.To make it more healthy, you can use Kerala Red aval, add mixed vegetables and make the same. Lets see how to make this easy, diabetic friendly aval upma/Poha upma for breakfast & lunch box.
      Check out my Lemon poha/ Lemon aval recipe , Milagu jeeraga aval/ pepper cumin poha , Red Poha Upma too.
      Continue Reading...


      April 1, 2016

      Eggless Banana Bread Recipe – Vegan Cake Recipes

      Eggless banana cake
      I had some over ripen bananas in my kitchen counter.When I saw them, Mangalore buns & Eggless banana cake came to my mind.I have already tried & shared eggless banana walnut muffins.So this time I made eggless banana cake in my loaf pan for the first time. I followed the recipe from HERE. As Its my first attempt, I didn’t take any chance in experimenting this recipe using whole wheat flour & brown sugar.It came out soft, moist with crumbly texture.We enjoyed it with hot tea ! This recipe has no butter, no condensed milk, no yogurt too. Its a vegan recipe which uses oil as the main ingredient.For variations, you can add chopped walnuts, Chocolate chips or even tutti frutti. Summer vacation has started for kids. They must be demanding some cakes & snacks from you. Try this yummy, soft and spongy cake for them. Addition of banana makes it slightly healthy too. Do try it and share your feedback. Lets see how to make eggless banana cake recipe without condensed milk, yogurt and.
      Eggless banana cake

      Eggless Banana Cake Recipe


      Eggless Banana Cake Recipe Eggless Banana cake recipe - Moist, spongy cake without butter, condensed milk
      Cuisine: Indian
      Category: Cake
      Serves: 10 pieces
      Prep time: 10 Minutes
      Cook time: 40 Minutes
      Total time: 50 Minutes


      INGREDIENTS
      1 cup = 240ml
      • All Purpose flour / Maida - 1 cup
      • Baking powder - 1 tsp
      • Baking soda - 1/4 tsp
      • Over ripen banana - 2 nos ( I used Yelakki)
      • Sugar - 1/4 cup ( add 1/3 cup for more sweetness)
      • Cooking oil - 3 tbsp ( Use odourless oil)
      • Lemon juice/Vinegar - 1 tsp
      • Vanilla essence - 1 tsp
      METHOD

      • In a wide bowl, take the ripe banana, mash well with a ladle or fork. You can mash it in a mixie too. Grease a baking pan/loaf pan with oil and sprinkle maida all over the pan.
      eggless banana cake recipe
      • Take a bowl and sieve maida, baking powder, baking soda.Mix well and set aside.
        • To the mashed banana, add sugar, cooking oil, vanilla essence, lemon juice and mix well till sugar dissolves ( you can add powdered nutmeg or cinnamon for more flavor).
      eggless banana cake recipe
      • To this, add the sieved maida mixture.Mix well. You will get a thick batter. Spoon in the batter to the greased baking pan.You can also sprinkle choco chips, chopped walnuts to the batter.
      eggless banana cake recipe
      eggless banana cake recipe
      • Preheat oven in convection mode at 180c. Keep the loaf pan and bake the cake for 35-40 minutes. Keep an eye after 30 minutes.Top of the cake turns golden and if you insert a tooth pick,it should come clean. This is the indication for the doneness of cake.
      • Once the cake is baked, remove and set aside for 5 minutes. Invert in a plate and remove it. Cake will fall off easily.
      eggless banana cake recipe
      • Cut into slices and serve with hot tea/coffee !
      Enjoy !

      Note
      • Adjust the quantity of sugar after tasting the dough.
      • Do not reduce baking powder & baking soda.
      • Keep an eye after 30 minutes of baking because over baking makes the cake hard n chewy.
      • Batter would be semi thick and spoonable but should not be hard and crumbly. If you feel the batter is too hard, add a tbsp of milk and bring it to semi solid consistency.
      • For variations, you can add chopped walnuts, Chocolate chips or even tutti frutti.

      Enjoy this yummy cake for your tea time !! It tastes soft n smells good.
      eggless banana cake
      Continue Reading...