Search Chitra's Food Book

October 6, 2017

Ashoka Halwa Recipe –Thiruvaiyaru Pasi Paruppu Halwa–Moong Dal Halwa

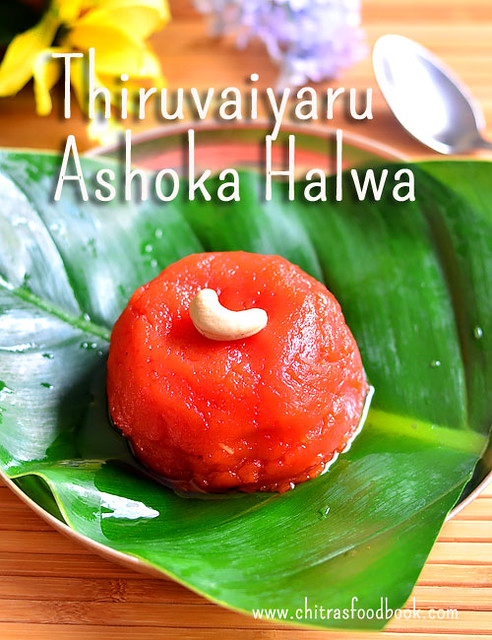
Ashoka halwa is one of the most popular South Indian sweet which is popular in Thiruvaiyaru. Thiruvaiyaru Asoka halwa (Pasi paruppu halwa) is made with yellow moong dal, sugar and ghee. This paasi paruppu halwa is completely different from North Indian moong dal halwa. Basically Ashoka halwa is originated in Thiruvaiyaru , Thanjavur district Tamilnadu.


More than 60 years ago, this halwa was first prepared by Ramu iyer in a small hotel in Thiruvaiyar. He named it as “Ashoka halwa”. People started calling it as “Asoga sweet” colloquially. You can find this halwa in all the marriage banquets in and around Tanjore. I got this authentic and traditional Ashoka halwa recipe shared by cookery experts Mrs.Usha and Mrs.Lakshmi from Aval Vikatan’s Kalyana samayal Supplementary issue. I found this recipe completely different from the ones I saw online. 


Most of the recipes called for moong dal, wheat flour, sugar and ghee as the major ingredients. But in the book, they had mentioned to use maida and cooking oil as well. To check the authenticity of this recipe, I watched the making and interview of Thiruvaiyaru Andavar hotel ashoka halwa video in Makkal TV.

Finally I got convinced and confident enough to try the magazine’s recipe by altering the quantity of ingredients as per my requirement. It came out excellent in taste and texture, very close to the original Ashoka halwa of the most famous Andavar hotel, Thiruvaiyaru. They serve this halwa with south Indian mixture. I had tasted this halwa only once when I had a trip to Tanjore. We also took a parcel of the hot halwa wrapped in a banana leaf. I could still remember the taste and the texture of the red colored, ghee dripping Asoka halwa. I am very happy and proud that I could make a similar one at home. It was like my dream came true moment when I tasted this halwa.

 All you need is “PATIENCE” to make this halwa. As I mentioned in my Tirunelveli halwa recipe , this halwa also needs constant stirring with lots of patience. You should stir this halwa till ghee ooze out. But it doesn’t take hours like wheat flour halwa. It takes 30 to 45 minutes based on the quantity. Ok, lets see how to make South India’s one of the most popular Ashoka halwa recipe perfectly with step by step pictures.

Do check out my Tirunelveli halwa recipe using wheat flour – Its a simplified version that tastes so close to the original Iruttukadai halwa.

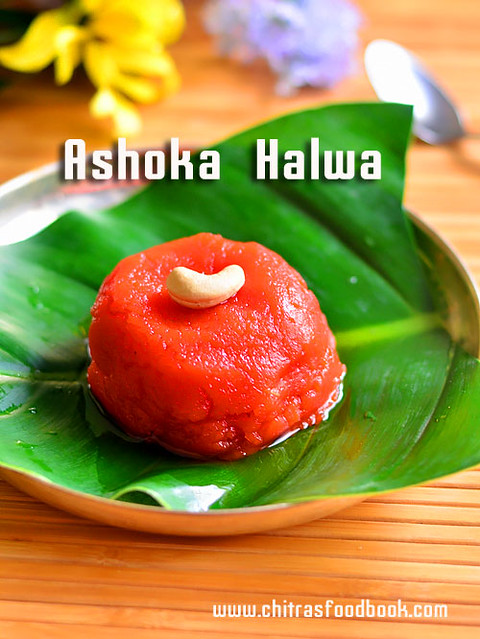
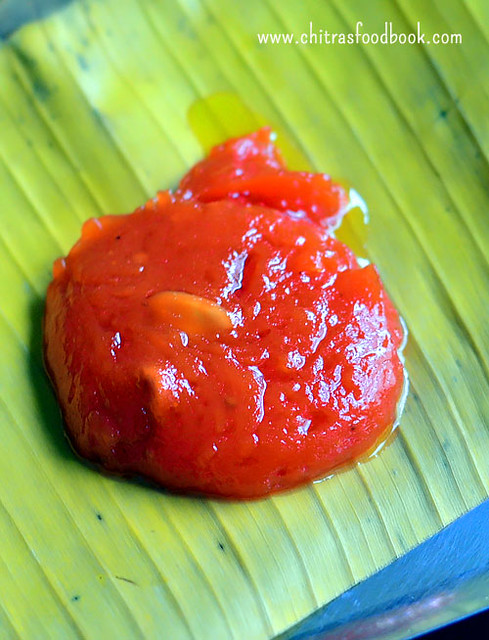
See the consistency of the halwa immediately after cooking in the pictures below.


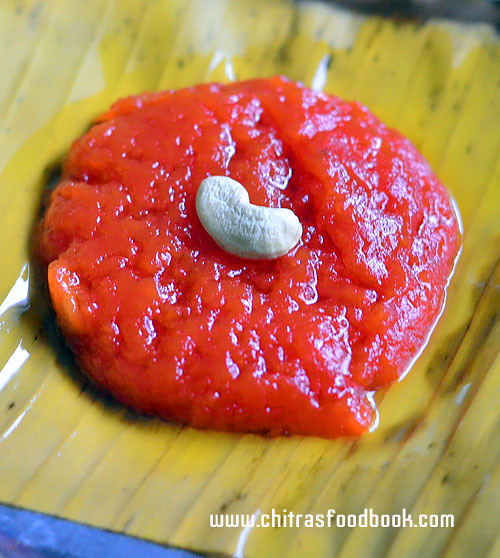
Hot Ashoka halwa served in a banana leaf immediately after cooking. 
Hot Ashoka halwa

Ashoka Halwa recipe - Pasi paruppu halwa

Ashoka halwa

How to make Ashoka halwa Recipe

South Indian
Diwali sweets
2 cups

Ingredients (1 cup - 250ml)

  • Yellow moong dal - 1/2 cup
  • Wheat flour - 1/4 cup
  • Maida/all purpose flour - 1 tbsp
  • Water - 3 cups(for cooking moong dal)
  • Sugar - 1 cup
  • Cooking oil - 1/2 cup(Use refined oil, odourless oil)
  • Melted Ghee - 1/2 cup ( at room temperature)
  • Cardamom powder - 1/2 tsp
  • Cashew nuts - 5 nos
  • Food color - Red(2 pinches mixed with 1 tbsp water, I used Orange red)

How to make the recipe

  1. In a pressure cooker base, dry roast moong dal for one minute in high flame.
  2. Add 3 cups of water and cook till mushy and soft. Mash it well or grind to smooth paste.
  3. In a kadai, heat oil and roast cashews, maida, wheat flour.
  4. Add cooked dal,mix well. Then add sugar, cardamom powder, food color.
  5. Mix well till mixture becomes thick.
  6. Add 1 tbsp oil + ghee at regular intervals and mix till halwa becomes non-sticky and ooze ghee.
  7. Collect the ghee if needed. Remove and cool down. Store in a box. Stays good for 10 days!

Ashoka halwa Recipe - Step by step photos

  • Heat a pressure cooker base and dry roast 1/2 cup of moong dal just for one minute in high flame without changing its color.
  • Add 3 cups of water, mix well and cook till mushy. I cooked in low flame for 3 whistles. Mash the dal really well. If not, grind to smooth paste without adding water.
    Ashoka Halwa Recipe
  • In a good non-stick kadai, heat 1/4 cup of cooking oil (use odorless refined oil), roast cashews. When it starts to turn golden, reduce the flame completely and add wheat flour, maida. Mix well till it emits roasted aroma.
    Ashoka Halwa Recipe
  • It looks like a paste. Then add Cooked moong dal paste to the roasted flour and mix in medium flame. Flour and dal should get mixed well. It thickens soon.
    Ashoka Halwa Recipe
  • Now add sugar, food color and cardamom powder. Mix well in medium flame. Sugar melts and mixture becomes watery.
    Ashoka Halwa Recipe
  • Increase the flame to medium high and mix till the mixture becomes slightly thick. Mix the remaining 1/4 cup of oil and 1/2 cup melted ghee. Add 1/2 tbsp ghee+oil. Mix well till ghee is absorbed. As soon as it is absorbed, add another 1/2 tbsp ghee+oil again.
    Ashoka Halwa Recipe
  • At one stage, You will find halwa turning dark red in color, becoming glossy and leaves the pan completely. Keep adding the ghee at regular intervals. Adjust the flame whenever needed. 
    Ashoka Halwa Recipe
  • Stay nearby and keep adding ghee. It may not need all the 3/4 cup of ghee+oil. It may take 1 to 2 tbsp lesser too. As the final stage, halwa starts to rotate with the ladle.Touch the halwa and check if its non-sticky. As soon as it turns non-sticky, it starts to ooze ghee.
  • Keep mixing till more ghee comes out from all the sides and center. Switch off the flame now and transfer the halwa to a bowl. If you want, you can collect the excess ghee from the halwa and use it for regular cooking.
  • This halwa thickens as it cools down. So reheat it in a kadai or dosa tawa or microwave for a minute every time you serve. Whenever you heat the halwa, it becomes soft, glossy and releases more ghee. Hope you can see the difference between hot halwa and the cold ones from the main pictures (See 1st & 2nd pictures).
    Ashoka Halwa Recipe

Notes

  • Do not reduce the quantity of sugar and ghee. If you want, you can add more cooking oil and less ghee.
  • The ratio of moong dal, wheat flour and maida given in the book is 1:1:1/2. But I altered the quantity based on the one I tasted.
  • The quantity of ghee as per the original recipe is double the quantity of moong dal.
  • Amount of cooking oil and ghee may vary slightly. You may need to add more or less than the quantity mentioned. I had approximately given the quantity I used.
  • Total cooking time takes from 30 minutes to 45 minutes.
Try this yummy moong dal halwa for this diwali. Serve with South Indian Mixture and enjoy !

Continue Reading...


October 4, 2017

Maida Burfi Recipe – Maida Sweet Cake - Easy Maida Sweets For Diwali

Maida burfi
Every year during Diwali, my MIL makes Maida Burfi without fail. She calls it as Maida cake (All purpose flour sweet cake in English). Usually Tamil people mention burfi recipes as cake. For Diwali, many people especially South Indians love to try sweets recipes made from maida like burfi, badusha, sweet samosa, sweet maida biscuits etc.  

Few years back, I posted an easy maida burfi with milk powder without using ghee during Diwali. Today I have shared my MIL’s version of maida burfi which has melt in mouth texture and tastes great. This is a beginners sweet that gives fool proof results if you use good conditioned non-stick pan.

It can be made with simple ingredients that are easily available at home like maida, sugar, ghee and cardamom powder. I have used green food color as we see in sweet stalls. But my MIL never uses food color. So this burfi comes out pale white without adding food color. Addition of food color is purely optional. If you are looking for an easy burfi recipe to try for this Diwali, you must try this maida burfi. I am sure anyone can make it easily and perfectly. I have made a full video recipe to help beginners.

 Hope you will try it and share your feedback with me. Once you make it perfect, you can easily make chocolate maida burfi. I will post that recipe next week. Ok, lets see how to make maida burfi recipe with step by step pictures and video !


If you wish to avoid maida and make some easy burfi recipe, you can try this cashew badam burfi & badam burfi which is of similar procedure. Chocolate khoya burfi and Dates roll / Khajur 
katri are my other suggestions.

Do check out my Maida sweet biscuit which is also a beginners sweet !

Maida burfi recipe


Maida burfi recipe - Easy maida cake

Maida burfi

How to make Maida burfi Recipe

Indian
Indian Sweets Recipes
12 

Ingredients (1 cup - 250ml)

  • All purpose flour/ Maida - 1/2 cup
  • Sugar - 1 cup
  • Melted Ghee - 1/4 cup
  • Water - 1/2 cup (for sugar syrup)
  • Cardamom powder - 1/4 tsp
  • Food color - Green or Orange

How to make the recipe

  1. Heat ghee in a good non-stick pan and roast maida till nice aroma wafts.
  2. In another non-stick pan, melt sugar adding water and boil till 1 string consistency.
  3. Switch off the flame. Add food color and cardamom powder to sugar syrup.
  4. Mix well and add roasted maida paste.Keep mixing without fire.
  5. Mixture becomes thick and starts to leave the sides of pan.
  6. Remove and spread in a greased tray.Level it and make pieces when warm.Remove after it cools down.
  7. Remove after it cools down. Store in a box. Stays good for 10 days!

Maida burfi Recipe - Step by step photos

  • Heat 1/4 cup of melted ghee in a non-stick pan.Add maida/all purpose flour and roast in medium flame without burning it. It becomes a smooth paste leaving a nice aroma.
    Maida burfi Recipe
  • Remove the pan from the flame and keep aside. No need to remove the maida paste from pan.
  • In another non-stick pan or kadai, melt 1 cup of sugar adding 1/2 cup of water. Stir well and melt the sugar completely. Scrape the sides as well.
  • Boil the syrup in medium flame till frothy. Lower the flame completely and check for one string consistency.
    Maida burfi Recipe
  • To check it, take little syrup in your pointer finger from the back of ladle and slide it between your thumb and pointer finger.When you release the fingers, you will get single thin string without breaking.
  • If it doesn't form one string, boil the syrup for one more minute and check it again.
    Maida burfi Recipe
  • Switch off the flame. Add food color and cardamom powder, mix well and remove the kadai from stove. Add roasted maida paste and mix well without lumps.
    Maida burfi Recipe
  • Initially the mixture looks watery but when you keep mixing, it thickens and becomes a paste. It starts to leave the sides of pan and becomes thick but pourable paste.
    Maida burfi Recipe
  • As soon as it becomes a thick paste, remove from the kadai and spread it in the ghee greased plate OR a bowl lined with butter paper.Do not wait to become thick dough. Use a square shaped plate or bowl to make uniform pieces.Immediately spread the burfi mixture with a ghee greased bowl. Press it really well and seal the cracks if any using your fingers . Act quickly before it sets completely.
  • Let it rest for 20 minutes to become warm. Invert into a plate. Remove the butter paper. Then cut into square shapes with a sharp knife greased with ghee. Remove the pieces after its cooled completely.Store in an air tight box and enjoy for one week to 10 days.
    Maida burfi Recipe

Notes

  • Do not reduce or increase the quantity of sugar and ghee. Burfi becomes hard if the sugar or ghee is reduced. It will become too soft and break if you add more ghee or sugar. So please follow the same measurement.
  • One string consistency is most important for this burfi. If you are unable to check it, just boil the syrup till frothy and pour it using a ladle. The last drop falls slowly by forming a string. This is also an indication for one string sugar syrup.
  • You should add the roasted maida only after switching off the flame. Heat of the kadai is sufficient for the mixture to thicken.
  • Remove the burfi mixture as soon as it becomes thick and pourable. Do not wait for the paste to become thick dough. Burfi will get more cracks.
Easy maida burfi


Try this easy, yummy melt in mouth Maida burfi for this Diwali and enjoy the festival !

Maida sweet cake
Continue Reading...


October 3, 2017

Pattani Sundal Recipe – Green Peas Sundal – Sundal Varieties

I had to post this Green Peas Sundal Recipe (Pattani sundal in Tamil) last week during Navaratri. But I couldn’t do it due to some personal work. I am yet to start Diwali recipes. So today I am posting this recipe from my draft. From tomorrow, you can expect some yummy Diwali sweets and snacks from here : )). Pattani sundal is one of the easy and yummy sundal varieties we make during Navaratri for neivedyam. Last week I prepared this sundal recipe for Golu. I used dried green peas, soaked it overnight and prepared this sundal. If you have frozen or fresh green peas (pachai pattani) in hand, your job becomes easier. Cooking green peas perfectly is a bit tricky. Most of us face the problem of peas becoming mushy after pressure cooking. 

Green peas sundal

Proper soaking and addition of salt while pressure cooking helps to retain its shape and cooks soft as well. Recently my neighbor shared this sundal by adding masala. It was tasting great and truly flavorful. But I made it in the usual way as we need to avoid onion & garlic for neivedyam. Soon I will share my neighbor’s masala sundal recipe. For variations, you can make this sundal with white peas or yellow peas as well. Today lets see how to make green peas sundal recipe with step by step pictures.

Pattani sundal

Green Peas Sundal Recipe / Pattani Sundal

Green peas sundal

How to make Green Peas Sundal Recipe

South Indian
Sundal Recipes
4


Ingredients (1 cup - 250ml)

  • Dried Green Peas - 1 cup
  • Water - as needed (to soak & cook the peas)
  • Salt - as needed

    To Grind

  • Grated coconut - 1/4 cup
  • Green chilli - 1 to 2 nos
  • Cumin seeds - 1/2 tsp

    To temper

  • Coconut oil - 1 tbsp
  • Mustard seeds - 1/2 tsp
  • Curry leaves - Few
  • Red chilli - 1 no (pinched)
  • Hing - 1/8 tsp

How to make the recipe

  1. Wash and soak the dried green peas for 8 hours.
  2. Pressure cook the green peas adding soaked water and salt in low flame for 2 whistles.
  3. Drain the excess water if any and keep the cooked peas aside.
  4. Grind coconut, chilli and cumin seeds to a coarse paste without water.
  5. Temper mustard seeds, curry leaves, hing and add cooked peas, ground paste.
  6. Mix till raw smell goes off. Sprinkle some lemon juice if you like.

Green Peas Sundal Recipe - Step by step photos

  • Wash and soak dried green peas for 8 hours or overnight.Pressure cook it adding enough water and salt in low flame ofr 2 whistles.
    Pattani Sundal Recipe
  • Adding salt helps to prevent peas becoming mushy.So don't forget to add salt.Remove after the steam is released.
  • Drain in a colander. Grind coconut, chilli and cumin seeds to a coarse paste without adding water.
  • Heat coconut oil in a kadai. Splutter mustard seeds, curry leaves, hing and pinched red chilli.
    Pattani Sundal Recipe
  • Add cooked peas, ground coconut paste and saute till raw smell goes off.You can sprinkle some lemon juice if you like. Serve warm !
    Pattani Sundal Recipe

Notes

  • Dried green peas should be soaked at least for 6 to 8 hours.If using fresh peas, no need to soak it.
  • Addition of salt while cooking peas helps to prevent it becoming mushy.
  • For variations, you can add grated coconut instead of grinding it.

Try this easy, kids friendly Green peas sundal recipe at home and share your feedback with me Happy.

pattani sundal recipe

Continue Reading...


September 28, 2017

Milagu Jeeraga Sadam – Pepper Cumin Rice Recipe

Pepper cumin rice
Pepper cumin rice / Milagu jeeraga sadam in Tamil is one of the yummy, South Indian rice recipes we make as prasadam for Navratri, Saraswathi pooja, Purattasi sani thaligai, aadi 18 etc. Yesterday I made this rice for navaratri afternoon neivedyam learning from my MIL. My MIL make this rice at least once in a week as pepper is a healthy Indian spice that helps to purify blood, improves appetite and digestion. Sendhil loves this rice variety a lot. So we make this pepper rice for his lunch box and  one day travel as well.

Sometimes we used to combine Saraswathi pooja, Purattasi sani thaligai festivals and make 5 rice varieties, chana sundal and thullu maavu(rice flour mixed with jaggery) for Saraswathi pooja neivedyam. We make this milagu jeeraga sadam as one of the 5 rice varieties. As its so easy to make, I thought it would be useful for you all. I have already shared a video on how to make 5 rice varieties. You can replace sesame seeds rice/ ellu sadam with milagu jeeraga sadam and offer to God for tomorrow Saraswathi pooja festival. Lets see how to make this easy milagu sadam /pepper rice with step by step pictures !
Milagu jeeraga sadam

Milagu Jeeraga Sadam - Pepper Cumin Rice

Pepper cumin rice recipe

How to Pepper cumin rice

South Indian
Main course
2

Ingredients (1 cup - 250ml)

  • Cooked rice - 1 cup
  • Ghee - 1 tsp (to roast)
  • Pepper corns - 1 tbsp
  • Cumin seeds/Jeera - 1/2 tbsp
  • Salt - as needed
  • Ghee - to mix with rice

How to make the recipe

  1. Heat ghee in a kadai.Roast pepper & cumin seeds till it starts to crackle.
  2. Remove and grind to powder adding salt.
  3. Mix this powder with cooked rice.
  4. Enjoy !

Pepper cumin rice - Step by step photos

  • Heat ghee in a kadai and roast pepper & cumin seeds in medium flame till cumin seeds starts to splutter.
    Pepper cumin rice/ Milagu jeeraga sadam
  • Remove in a plate and let it cool down. Grind to a slightly coarse powder adding salt.
  • Take the required cooked rice. Add 2 tsp of ghee, ground powder, mix well and check for taste.
    Pepper cumin rice/ Milagu jeeraga sadam
  • Add more salt & powder if required. Serve !
    Pepper cumin rice/ Milagu jeeraga sadam
  • If you wish, you can temper mustard seeds, curry leaves in ghee and add to rice.

Notes

  • Pepper alone gives spiciness to the rice. So you can add more pepper if you want spicy taste.
  • Do not add more cumin seeds. Its flavor will dominate.
  • Adding ghee helps to enhance the flavor and taste. If you don't want to add ghee, you can add sesame oil.

Try this easy and flavorful pepper cumin rice and enjoy !
Milagu sadam
Continue Reading...


September 25, 2017

Pachai Payaru Sundal Without Soaking – Green Gram Sundal Recipe( Sweet & Spicy)

Green gram sundal without soaking


Easy Green gram sweet sundal and kara sundal recipe without soaking with step by step and Video – We call it as Pachai payaru sundal / Pasi payaru sundal in Tamil. Generally We South Indians make sundal recipes for neivedyam without fail during navaratri festival. So I thought of sharing some sundal varieties this week. To begin with, I have come up with an easy green gram sundal recipe without soaking . Usually people make green moong dal sundal by soaking it for hours together. But my MIL always make it instantly by roasting the dal. This year I followed her method as it is so easy and quick to make.

If you forget to soak the legumes or when you want to make sundal instantly, you can go ahead with this recipe. I prepared green gram sweet sundal and spicy sundal varieties. Both came out very well and tasty. But the color of this sundal won’t be green. Hope you will try this easy sundal recipe and share your feedback with me. Ok, Lets see how to make pachai payaru sundal recipe with step by step pictures and video.
You can also check out my green gram sundal with soaking and my other sundal varieties.


Green gram sweet sundal


Pachai Payaru Sundal Without Soaking - Instant Green Gram Sundal - Sweet & Spicy

Rice kheer recipe

How to make Green gram sundal without soaking

South Indian
Festival recipes
4

Ingredients (1 cup - 250ml)

  • Green gram / Pachai payaru - 1 cup
  • Cooking oil - 1 tbsp (to roast dal)
  • Water - 2.5 to 3 cups (For pressure cooking dal)
  • Salt - 1/4 tsp

    Green Gram Sweet Sundal recipe

  • Cooked green gram - 1 cup(Heaped)
  • Grated jaggery - 1/3 cup
  • Water - 1/4 cup
  • Cardamom powder - 1/4 tsp
  • Grated coconut - 1/4 cup

    Green Gram Spicy Sundal recipe

  • Cooked green gram - 1.5 cups
  • Coconut oil - 1 tbsp
  • Mustard seeds - 1/2 tsp
  • Urad dal - 1/2 tsp
  • Red chilli - 1-2 no(pinched)
  • Curry leaves - few
  • Salt - as needed
  • Hing/asafetida - 1/4 tsp
  • Grated coconut - 1/4 cup

How to make the recipe

  1. Heat oil in a cooker base. Roast green gram for 5 minutes.
  2. Nice aroma arises. Add water & cook in high flame for 7 whistles.
  3. Remove & drain excess water.
  4. For sweet sundal,melt jaggery adding water.Strain & boil for a minute.
  5. Add cooked green gram, cardamom powder, coconut.Mix & boil till slightly moist.Serve!
  6. For spicy sundal, temper mustard,urad,curry leaves and hing in oil.Add cooked green gram,salt and grated coconut.Mix well and serve.

Green Gram Sundal Recipe / Pachai Payaru Sundal - Step by step photos

  • Heat oil in a cooker base and roast green gram till it gets roasted smell and turns slightly golden brown in color.
    Green Gram Sundal Recipe without soaking
  • Add 2.5 to 3 cups of water and pressure cook in low flame for 2 whistles or in high flame for 7 whistles.
    Green Gram Sundal Recipe without soaking
  • Remove after the steam is released.Drain the excess water using a colander.Let it become warm.
    Green Gram Sundal Recipe without soaking
  • For green gram sweet sundal : Heat and melt jaggery adding little water in a pan.Strain the syrup.
    Green Gram Sundal Recipe without soaking
  • Wash the pan.Add the syrup in the same pan. Let it roll boil. Put 1 cup of cooked green gram. Mix well.
    Green Gram Sundal Recipe without soaking
  • Add cardamom powder, grated coconut and mix well. Make sure this sundal is slightly moist in texture. Do not mix till its dry. Dal will become hard.
  • So switch off the flame when there is slight wetness. It will become normal when sundal cools down.Serve & enjoy !
  • For green gram spicy sundal: Heat coconut oil in a pan. Temper mustard seeds, urad dal, curry leaves, hing and pinched red chillies.
  • Saute for a minute and then add cooked green gram, salt and grated coconut. Mix well & serve.
    Green Gram Sundal Recipe without soaking
  • Green gram sweet sundal and spicy sundal are ready !
    Green Gram Sundal Recipe without soaking


Pachai payaru sundal without soaking

Notes

  • This sundal won't be bright green in color as we are roasting the green gram.
  • To get green color sundal, you need to soak the dal for 6 to 8 hours without roasting.
  • For sweet sundal: if the jaggery is pure, you can add grated jaggery directly to the cooked green gram. Mix till it melts.
  • You can add some lemon juice to spicy sundal if you like. But add it after switching off the flame.

Try this easy, no soaking, Instant green gram sundal recipe and enjoy !
Pachai payaru sundal without soaking
Continue Reading...