Easy Snowball cookies recipe with step by step photos and a video !
Christmas is the perfect time for me to attempt some interesting cakes and cookies recipes. Last year during this time, I posted few Christmas special recipes like Gingerbread man cookies, Tutti frutti cookies, eggless tutti frutti cake, shortbread cookies, Kulkul , eggless rose cookies and some more. This year, I wanted to start my Christmas recipes with this easy, melt in mouth, most special snowball cookies recipe. Its a very simple cookie that can be made with easily available ingredients. Snowball cookies is also called as Mexican wedding cakes/cookies, Russian tea cakes.
With lots of butter and nuts ( Pecan or walnuts)these cookies comes out with a melt in mouth texture and crunchy taste. Pecan nuts is widely used for the recipe. But I had used a combination of nuts which you can find in the ingredients list.These snowball cookies can be made without nuts as well. I followed the recipe from Classy cakes and watched You tube video by Jenny can cook. Even though this is my first try, I am completely happy with the result. Raksha loved it a lot and took it for her school snack box today.
Do try this easy Christmas special snowball cookies recipe for your kids and enjoy the vacation. Lets check out how to make eggless snowball cookies with step by step pictures and a video !
Do check out my other Christmas recipes in THIS LINK
Snowball Cookies Recipe - Easy Christmas recipes
Eggless snowball cookies recipe with step by step pictures and video
Granulated sugar - 2.5 tbsp ( Powdered sugar can also be used)
Vanilla essence - 1 tsp
Salt - A small pinch
Chopped Nuts - 1/2 cup ( Pecan nuts is preferable, I used combo of walnuts, cashews, hazelnut and melon seeds)
Icing sugar or powdered sugar – 1/2 cup ( to coat the cookies)
Cinnamon powder – 1/2 tsp ( optional)
METHOD
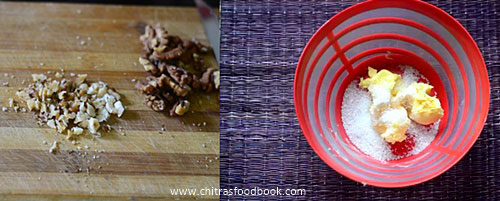
Chop the nuts finely and keep aside. In a wide bowl, mix the softened butter, sugar, salt and vanilla essence. Beat well for 5 minutes. The mixture will become creamy.
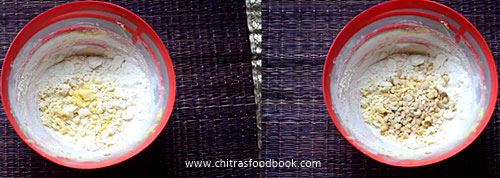
Add maida, mix well. Add chopped nuts and mix well with your hands. Make a smooth , non-sticky dough. Dough should not be too wet and sticky. Some recipes call for refrigerating the dough for 30 minutes. But some recipes don’t say so. So I baked the cookies immediately using half of the dough. I wrapped the remaining dough in a cover and refrigerated it for 30 minutes. Then made balls and baked it.
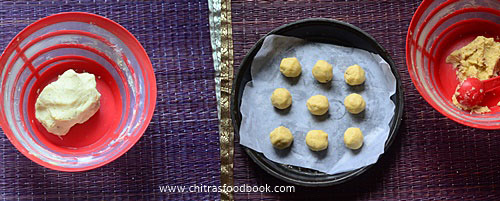
To make balls, take the cookie dough ( If refrigerated, thaw it for 10 minutes and then use it) and scoop out a tbsp of dough. Make balls and arrange them in a butter greased or butter paper lined baking tray. Leave half inch gap between each cookies.
These cookies don;t expand or flatten much as we have not used baking powder or soda. If your cookies flatten so much, then the quantity of butter is more. In that case, add more maida and sugar, proceed.
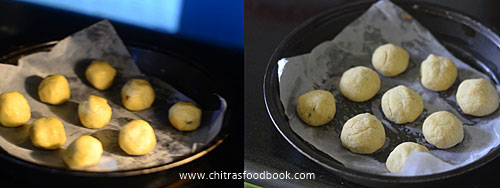
Preheat the oven in convection mode at 180c and place the baking tray inside the oven.Bake at 180c for 10-12 minutes. Open the oven and touch one cookie,try to move it. If its too soft, immovable, sticky and doughy, bake for another 2 minutes else remove the baking tray and check the bottom of cookies.If its slightly golden in color, your cookies are done. These cookies would be very soft when hot. But it will continue to cook even after taking out from the oven.So do not over bake the cookies.Just 12 –14 minutes is sufficient. My cookies had some cracks on top.
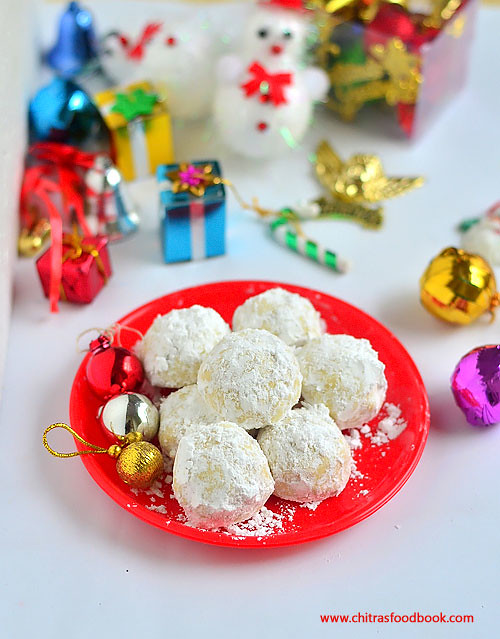
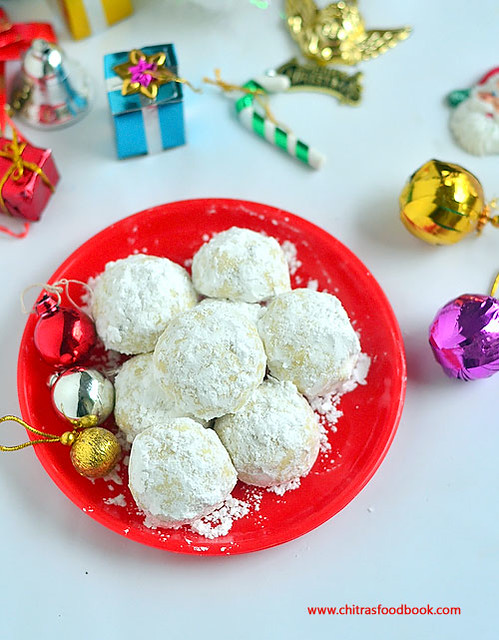
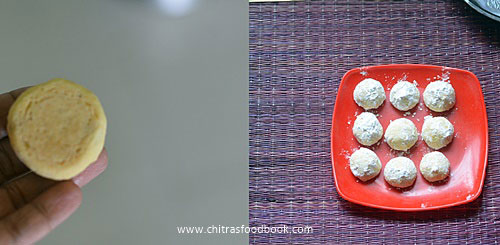
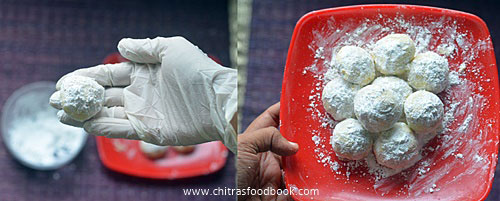
Do not touch the cookies till it becomes warm. Take 1/2 cup of icing sugar in a wide bowl. Once the cookies turn warm, dip the cookies in the icing sugar and give one coating. Arrange them in a tray and let the cookies cool down completely. Again dip the cookies in the icing sugar and give the second coating. If you wish, you can go for third coating as well. Keep the cookies in a tray and serve them. These cookies stays good for 2-3 days if done properly.
Enjoy !
Note
Do not over bake the cookies. It will turn hard and sometimes burnt. I baked it approx. 13 minutes.
The cookie dough I kept in the refrigerator baked quickly ( 2 minutes lesser) than the ones I baked without refrigeration.
Do not add more sugar than the mentioned quantity because we are coating the cookies with icing sugar.It will become over sweetened.
My cookies were mildy cracked.
Enjoy these delicious, melt in mouth cookies for your tea time!!
Eggless honey cake recipe with step by step and video. Honey cake reminds our childhood days for most of us. Yes, when we were kids many of us would have tasted this cake from our local Indian bakery. The taste of this soft, juicy, moist, honey drenched sponge cake is still lingering in our tongue.
Whenever I visit Iyengar bakery here in Bangalore, I never forget to buy their popular stuffs like Khara bun, Benne biscuit, Baked Nippattu etc. Recent days I started buying few pieces honey cake as well. Raksha is not a big fan of this cake due to the extra sweetness from honey and fruit jam. But myself and Sendhil enjoy & love this cake a lot.
Recently many of our fellow bloggers are sharing their versions of eggless honey cake which tempted me very badly to try at home.Yesterday morning I got determined to try this honey cake without eggs and followed THIS RECIPE which I had bookmarked already. Actually I wanted to follow my eggless, butter less tutti frutti cake recipe for the base of this cake. But then I thought of trying the sponge cake base using condensed milk and butter so that I can learn another eggless, moist sponge cake recipe.
Cake came out porous, pillow soft, fluffy with spongy texture as I wished. I could really feel the taste of Iyengar bakery honey cake when I tasted a piece of this cake. I am completely happy with this recipe. Even Raksha liked it very much and taken for her snack box today. You can try this cake in pressure cooker as well. I will try to share a detailed recipe for eggless pressure cooker cake.
Friends, do try this easy, delicious cake for special occasions like birthday and anniversary. I am sure you will get perfect result and enjoy with your family. Now lets see how to make Indian bakery style eggless honey cake recipe with step by step pictures and VIDEO !
If you are looking for an eggless sponge cake recipe without condensed milk and butter, do check out this recipe. For eggless orange cake recipe using cooking oil, please check this link.
Eggless Honey Cake Recipe - Indian Bakery style recipe
How to make Indian bakery style honey cake recipe without eggs.
All purpose flour / Maida - 1. 25 cups / 1 1/4 cup
Corn flour - 1/4 cup
Baking powder - 1.5 tsp
Baking soda - 3/4 tsp
Butter - 1/2 cup (Soft at room temperature, do not melt)
Condensed milk - 1/2 cup
Boiled milk - 3/4 cup ( at room temperature)
Vanilla essence - 1 tsp
Vinegar or lemon juice - 1 tbsp
For honey syrup
Honey - 1/4 cup
Sugar - 2 tbsp
Water - 1/2 cup + 2 tbsp
Rose essence - 1/2 tsp
*Increase the quantity of ingredients for honey syrup if you like more sweet and juicy cake.
For sauce
Mixed fruit jam - 3 tbsp ( I used Kissan )
Sugar - 2 tsp
Dessicated coconut powder - to garnish the cake
HOW TO MAKE EGGLESS HONEY CAKE - METHOD
In a dry bowl, sieve maida, corn flour, baking powder and baking soda . Keep it aside.
In another bowl, take the butter at room temperature ( Do not melt) and add the condensed milk. Beat it well till it becomes smooth and creamy. It takes 2-3 minutes.So beat it patiently. To this, add vanilla essence and vinegar. Just Mix well. Do not beat.
Add the sieved maida mixture to the creamy butter mixture little by little ( say 1/2 cup), Simultaneously add boiled milk at room temperature little by little (say 1/4 cup). Use a spatula and fold the cake mixture. Never beat or mix vigorously. Do it gently. When all the flour and milk is over, check the batter consistency. It should not be too thick or thin like falling ribbon. It resembles creamy paste. So don’t panic.
Grease a baking pan ( use square pan ) with butter and dust with maida all over the pan. Pat the excess flour. Add the cake batter to the baking pan and level it.
Preheat the oven in convection mode at 180c. Place the baking tray inside the oven and bake the cake for 25 to 30 minutes. Original recipe mentioned to bake for 25 minutes whereas mine took nearly 35 minutes as I added more milk. So keep an eye after 20 minutes and check with the knife as explained in the next step.
Insert a knife and check if it comes out clean. If the knife comes with uncooked batter, bake for 2-3 minutes more. Again check it. Bake the cake till the inserted knife comes out clean or with crumbs. Remove the baking tray and let it rest for 15 minutes. Run a knife along the sides and invert the cake in a plate.
Cake will come out easily if its properly cooked. You can trim the brown part of cake on the sides if you wish. But I din't remove it. Now prick the cake with a fork for the sugar syrup to spread inside the cake.
Now make the honey syrup and fruit sauce. For this, take a small kadai. Add sugar, water and boil till sugar dissolves completely. After the sugar is melted, switch off the flame. Add rose essence, honey after the sugar syrup becomes warm. Mix well and keep aside. Pour this honey syrup all over the cake. As soon as you pour, cake will absorb all the syrup. ( You can increase the quantity of honey if you like the cake to be more juicy and sweet)
In another kadai, take the jam and sugar. Mix well and melt in medium flame till the jam becomes thin. Switch off the flame and immediately apply the sauce all over the cake. If the melted jam cools down. it will start to solidify. In that case, you can heat and melt the jam again to coat over the cake. Atlast sprinkle the dessicated coconut powder for garnishing and cut into pieces.
Enjoy !
The outer layer/ crust of cake will dry if you leave it open for long time. So keep it covered in an air tight box till use. If you want to prepare this cake in advance, you can do it one day before and refrigerate the cake in a box. You should bring it to room temperature before serving.
Note
The outer layer/crust of cake will dry if you leave it open for long time. So keep it covered in an air tight box till use. If you want to prepare this cake in advance, you can do it one day before and refrigerate the cake in a box. You should bring it to room temperature before serving.
Do not beat the batter while adding milk. Fold the batter gently.
The base of this cake is not so sweet. So if you apply sugar syrup and jam sauce, sweetness will become perfect.
Do not more milk and make the batter thin. It takes longer time to cook.
Keep an eye after 20 minutes and check with the knife. Keep checking like this for every 3 minutes. Remove only after the knife comes out clean.
Original recipe told to bake for 25 minutes whereas mine took nearly 35 minutes.So baking time may slightly vary as per the oven temperature.
Do not invert or remove the cake when its hot. It will break. Invert the cake only after it cools down.
Enjoy this juicy, soft honey cake for special occasions. Have a great, sweet filled celebration.
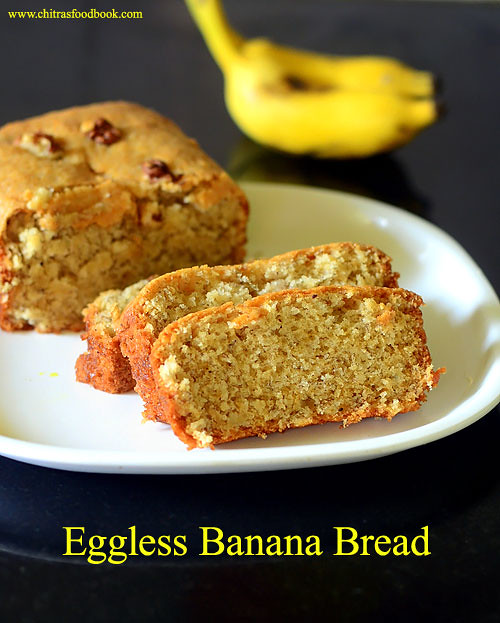
I had few over ripen banana in hand. First I thought of making banana appam for Aadi friday Neivedyam. But then I changed my mind to make an eggless, butter less, moist banana bread recipe with yogurt. I have already shared eggless banana walnut muffin and eggless vegan banana cake recipes. But still when I came across this cake recipe with yogurt and cooking oil, I got tempted to give a try. The result was a perfect, moist banana bread. The aroma of the bread while it bakes was awesome and we were badly waiting to taste it soon after baking.
As I expected, it was a very big hit with Sendhil and Raksha. I am so happy to share an easy, interesting, bread recipe with banana. You can replace maida with wheat flour, plain sugar with brown sugar and use walnut for healthy options. Do try this cake in this weekend and enjoy your teatime with this bread recipe! I have shared a quick, short video too. Check it out.. Ok, Lets see how to make eggless, butterless banana bread recipe with yogurt.
Video recipe
Eggless banana bread recipe
Eggless, butter less banana bread recipe with yogurt and cooking oil !
Maida/All purpose flour - 1 cup ( Wheat flour can be used)
Sugar - 1/2 cup ( Use brown sugar)
Baking powder - 1 tsp
Baking soda - 1/2 tsp
Cinnamon powder - 1/2 tsp
Salt - a pinch
Ripe banana - 3 nos ( Small)
Cooking oil - 1/4 cup
Yogurt - 1/4 cup
Vanilla essence - 1/2 tsp
HOW TO MAKE EGGLESS BANANA CAKE - METHOD
In a wide bowl, mix the dry ingredients – Maida, baking powder, baking soda, a small pinch of salt. You can either sieve them or just mix with a ladle well.
Take the banana, peel the skin and mash it well using your hands or back of spoon.Set aside.
In another bowl, mix the wet ingredients i.e. Cooking oil, yogurt, vanilla essence, mashed banana and mix well.
To this mixture, add the maida mix. Use a ladle and mix well thoroughly. The batter would be very thick, sticky and looks like a thick paste.
Grease a baking pan with cooking oil generously. Pour the batter and spread it evenly. Stud in some walnuts or choco chips if you wish.
Pre heat an oven in convection mode at 180c. Bake the bread for 30 minutes. Actual recipe called for 40 minutes baking time. But mine took just 30 minutes. So keep an eye after 25 minutes. Insert a toothpick or back of a spoon to check the cake. If it comes out clean, its done else bake for another 5 minutes. Remove the bread from the oven and let it cool down for 5-10 minutes. Loosen the sides of the bread using a sharp knife and invert the baking pan over a plate.Bread will come out easily. Make slices and serve it warm. Enjoy !
Note
You can replace maida with wheat flour and sugar with brown sugar or honey.
Adjust the quantity of sugar as per your taste. Check the sweetness of batter before baking and add more sugar if needed
Cinnamon powder gives an awesome aroma to this bread. Do not skip it.
Adding vanilla essence is optional.
Try this easy, eggless, butterless banana bread at home and enjoy with your family !
Valentine’s Day is fast approaching. Many of you might have started thinking about gifting ideas and to make some special recipes on Valentine’s day. Before 10 years,when our marriage date was fixed, 2005 Valentine’s day was very special to us. He gifted me ruby stone gold stud with a chocolate box and I gave him a T Shirt. From then, every year on Valentines day, he gives me some special gifts like Camera, mobile phones, dress, jewelleries, handbags etc whereas me as a wife shower all my love by making some interesting, new dishes for him as he loves to eat varieties of food.
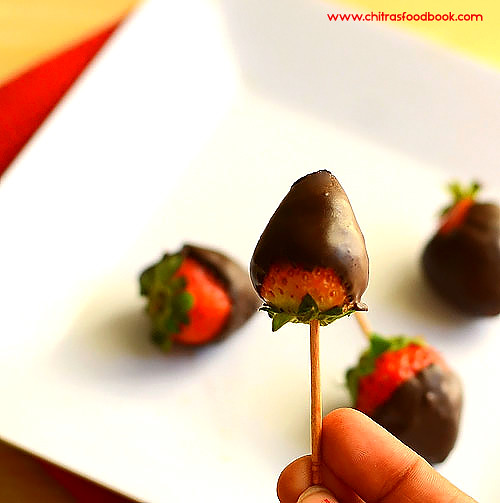
This year, when I was thinking about Valentines day recipes, my friend Shalini told me about this Chocolate covered strawberries ( Strawberries dipped in chocolate sauce). I browsed for this yummy dessert recipe & found it is a traditional gift for Valentine's Day in the United States. I became double happy & tried it this morning to start off Valentines day special recipes in my blog.
For this recipe,i referred few youtube videos for tips and tricks. I won’t say I made it perfect but still as a first timer,Iam happy with the outcome.Here i have showed you how to melt chocolate using microwave but i’ve discussed the other methods of melting as well. I used dark sweetened compound chocolate for melting.You can use white compund chocolate too. Even though the preparation is easy,there are few points you should keep in mind.
Please refer “Notes” section for tips before you start. For variations,you can make homemade chocolate covered banana and other fruits like blueberries, prune, chocolate covered almond and even chocolate covered oreos. I decorated them with sprinklers,rice crisps. Run your imagination and play with it. Lets see how to make chocolate covered strawberries at home easily.
Chocolate Covered Strawberries Recipe
How to make Chocolate Covered Strawberries at home using microwave
Cuisine:Indian
Category:Sweet
Serves: 4
Prep time:10 Minutes
Cook time:5 Minutes
Total time:15 Minutes
INGREDIENTS
Compound Chocolate - 100 gms ( I used Vanleer brand, sweetened)
Fresh Strawberries - 10 nos
Sprinklers,rice crisps - for decoration
**Please refer”Notes”section before you start..
HOW TO MAKE CHOCOLATE COVERED STRAWBERRIES - METHOD
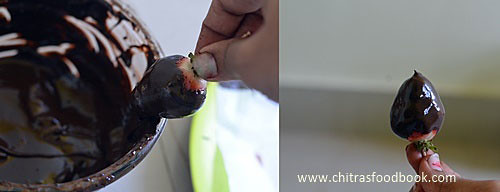
Wash & pat dry the strawberries completely. Make sure strawberries are completely dry because chocolate will not be coated over wet strawberries.
Break the compund chocolate into small pieces. Take them in a clean, dry, microwave safe bowl ( make sure there is not even a single droplet of water). Heat in medium power ( I kept 450W) for 30 seconds. Remove the bowl and stir it with a clean, dry spoon.
Again microwave in medium power for 1 minute. Remove and stir well. Repeat this process until the chocolate is melted. No issues if there are minute pieces of chocolate. It will melt in the residual heat. Remove the bowl and keep mixing to melt completely. It took approximately 2.5 minutes to melt in my microwave. But this time may vary. So keep an eye. Over doing may stiffen the chocolate.Take care !!
Now take the dry strawberries and insert a toothpick in the head part. Hold the toothpick and dip 3/4th or whole strawberry ( as per your wish) in the melted chocolate. Swipe it in the rim of bowl or pat it to remove the excess chocolate. Arrange the strawberries on a plate. Do this process quickly before the chocolate hardens.
Suppose if the chocolate is hardened before you finish the work, microwave them in medium power for 30 seconds to melt them. If you are not able to bring the correct consistency for chocolate, add 1 tbsp of odourless cooking oil for 100gms of chocolate and then melt in microwave. Chocolate will melt properly. Serve after few minutes once the chocolate sets.Enjoy !
Other methods of melting chocolate
Direct heat: This method is easy and convenient. Place the chocolate in a heavy saucepan over very low heat, stirring constantly till the chocolate begins to melt. Immediately remove the pan from the heat and stir the chocolate until it is smooth. Be careful while using this method because there are many chances for the chocolate to scorch. To avoid this,do the process in very low flame with constant stirring.
Double boiler: This method takes a little longer than the direct-heat method but eliminates the possibility of scorching the chocolate. Place water in the bottom of the bowl and chocolate pieces in another bowl that fits the water bowl.The top of the water should be 1/2 inch below the upper pan. Then place the double boiler over low heat. Stir the chocolate constantly until it is melted. The water in the bottom of the double boiler should not come to boiling while the chocolate is melting.Stir chocolate occasionally as it softens. When you have just a few small unmelted chunks, remove bowl from heat (residual heat will melt the rest).
Note
Points you should keep in mind
1. There should be no water in strawberries or chocolate. So pat the strawberries and dry them completely before you dip them in the chocolate.
Make sure all equipment is completely dry. Any moisture on the utensils or in the container may cause the chocolate to seize/stiffen. If this happens, stir in 1/2 to 1 teaspoon shorteningor odourless cooking oil (not butter) for every 30 gms of chocolate.
Be careful to keep water from splashing into the chocolate. A single drop will cause the chocolate to seize.
Keep heat low to avoid scorching if using double boiler method.
Always stir chocolate during melting.
2.Melt the chocolate very carefully. Be patient and stir the chocolate every 30 seconds for best results.
If the chocolate becomes rock hard before completing the dipping process,add a tbsp of cooking oil for 100gms of chocolate and melt to bring it to the right consistency.
Enjoy this easy, yummy deseert for your special day ! Have a fun filled celebration !!
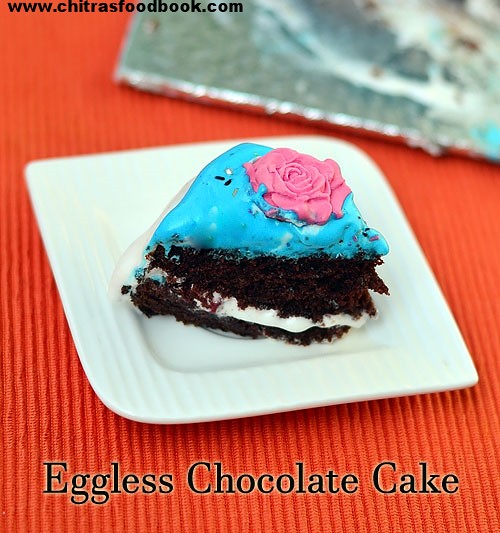
Last month I tried this eggless, super soft, moist & spongy basic Chocolate cake recipe without condensed milk for my FIL’s birthday. I wanted to share this as my new year’s post but I couldn’t do it. This post was lying in my drafts. As I am out of station, I thought of sharing this post today. I tried to do icing/frosting for the cake but it was not good. I must learn to do it perfect. But the cake base was a super hit at home.
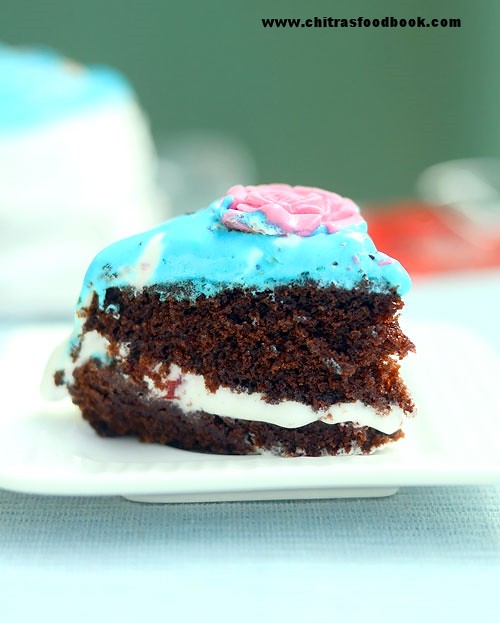
I have tried eggless chocolate cake with condensed milk for my black forest cake recipe. So I was looking for a recipe without condensed milk & butter. I came across this recipe Sharmis blog, made a small change and tried it. It came out very well. I have baked this cake so many times for Raksha’s school Christmas & New year party but without icing. I just made a simple decoration by drizzling some Hershey’s chocolate syrup and sprinkled some sugar balls. All her friends loved the cake and asked her whether your mom is a chef. This was the best complement I’ve ever received for my baking.
And now Iam happily sharing this fool proof recipe with you all. Try it for your family and take the credits. Ok, lets see how to make this eggless, spongy, moist chocolate cake recipe using oil. If you wish to try this cake using pressure cooker, please refer THIS POST for the baking procedure.
Eggless Chocolate cake recipe
Eggless Chocolate cake recipe - Moist, soft and spongy
Cuisine:Indian
Category:Eggless baking
Serves:10-12 pieces
Prep time:10 Minutes
Cook time:35 Minutes
Total time:45 Minutes
INGREDIENTS
1 cup = 250 ml
All purpose flour/maida - 1.5 cups
Cocoa powder - 3 tbsp
Baking soda - 1 tsp
Baking powder - 1/8 tsp
Salt - a pinch
Granulated Sugar - 1 cup
Chocolate Chips - 2 tbsp
Water - 1/2 cup (125ml)
Boiled milk - 1/2 cup ( at room temp) ( Vegan use 1 cup of water instead of milk)
Vanilla essence - 1/2 tbsp
Lemon juice or White Vinegar - 1 tbsp
Oil - 1/4 cup (60 ml)
METHOD
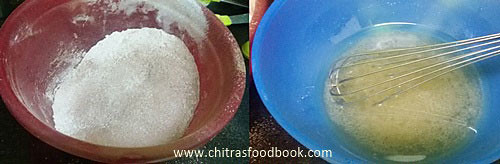
Sieve and mix the dry ingredients ( Maida, baking soda, baking powder, salt and cocoa powder). Keep aside. Take the wet ingredients ( oil, water, milk, vanilla essence, vinegar) and mix well. Add sugar and stir well to dissolve it.
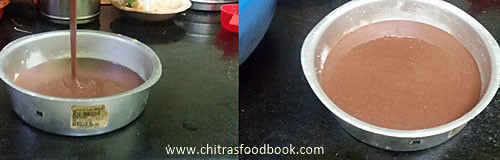
To this,add the sieved maida mixture. Make a smooth batter using a whisk. Make sure there are no lumps and sugar is dissolved properly. Grease a baking tray with butter and sprinkle maida all over it OR line the baking pan with butter paper.
The consistency of batter should be thin and falls like a thin ribbon. Lastly add the chocolate chips and mix well.
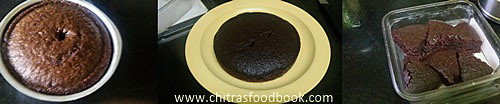
Pour the batter and keep it ready. Pre heat the oven in convection mode at 180c and keep the baking pan inside the oven. Let it bake for 30-35 minutes. Remove and check it with the back of spoon or tooth pick. If it comes out clean, cake is done else bake for 5 more minutes. Let the cake cool down for 15 minutes. Invert the cake and remove it in a plate. You can do icing & decorate the cake as you wish Or simply drizzle some chocolate syrup and sprinkle sugar balls. Serve & Enjoy !
Note
I used milk & water in equal quantity but the original recipe used only water.So Vegans can replace milk with water.
If you trying this cake for the first time, you can just half the measures given in this recipe and try it.
If you wish to try this cake in pressure cooker, do refer THIS POST for the procedure.
Try this easy, yummy eggless chocolate cake at home. You will love it !!