Search Chitra's Food Book

Showing posts with label DINNER RECIPES. Show all posts

December 25, 2017

Millet Pongal Recipe Using Millet Ven Pongal Mix

Millet pongal
Recently I got a packet of Millet Ven Pongal Mix / Siruthaniya pongal mix & Millet Sambar rice mix from Native Food Store. I tried Pongal mix for my weekend breakfast as I got up late. Its so easy and quick to make.  Our breakfast got ready under 15 minutes. This millet pongal mix is a combination of roasted moong dal, varieties of millets, pepper corns, jeera, salt and cashews. I just followed the instructions given in the pack. 

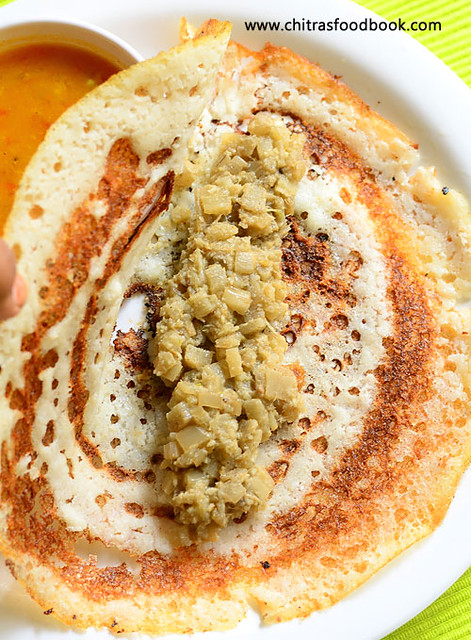
All we need to do is to add the mentioned amount of water and cook this mix in a pressure cooker. We can also season it with curry leaves and hing in ghee at the end to make it more flavorful. It came out very soft, flavorful & tasty just like homemade ven pongal. Sendhil & Myself loved it very much. We enjoyed it with coconut chutney

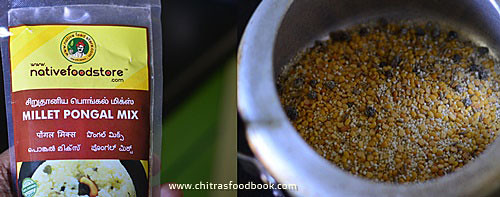
Friends, Native food store products are available online and they deliver their products all over India. I would strongly recommend to buy this pongal mix from them. I am sure you will love its taste and buy it often. Working women and bachelors can buy this product to make a quick and healthy breakfast/ dinner. Ok, now lets see how to make Millet ven pongal using Native food store’s millet pongal mix.

Click this link to buy millet pongal mix.

Check out their varieties of millet products & rice mix, cold pressed oil in their website.

Also find my post on their Millet Noodles .


Millet pongal

Millet Pongal Using Pongal Mix


Millet Pongal Using Pongal Mix Millet Ven Pongal recipe using Pongal mix from Native food store.
Cuisine: South Indian
Category: Millet Recipes
Serves: 2
Prep time: 5 Minutes
Cook time: 20 Minutes
Total time: 25 Minutes


INGREDIENTS
1 cup - 250ml
To season
  • Ghee - 1 tbsp
  • Curry Leaves - Few
  • Chopped Ginger – 1 tsp 
  • Hing - a pinch
METHOD
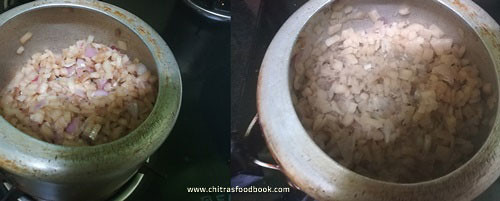
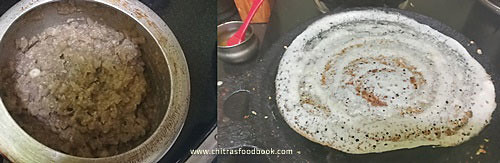
  1. In a pressure cooker base, take the millet pongal mix.
  2. Add the mentioned amount of water given in the pack.
  3. Cook for 2 whistles in very low flame.
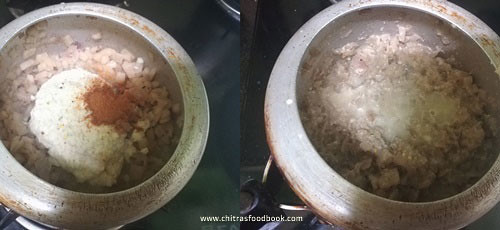
  4. Open the lid after steam is released. Mix well.
  5. Season curry leaves, ginger and hing in ghee. Add to pongal.
  6. Mix well and serve hot with coconut chutney !
METHOD - STEP BY STEP PICTURES
  • Take 1 cup of pongal mix in a pressure cooker. Add 4 cups of water, mix well. Close the lid.

  • Pressure cook in very low flame for 2 whistles. Remove the lid after steam is released. Mix well. Its consistency would be just right. Heat ghee & temper ginger bits, curry leaves & hing. Add to pongal, mix well.
    Millet pongal
  • Serve hot immediately with coconut chutney. You can add a tsp of ghee while serving If you like. This pongal tastes very soft & flavorful !
    Millet pongal

    Enjoy !


Try this healthy, yummy, quick millet pongal with pongal mix. You will love it.
Siruthaniya pongal
Continue Reading...


December 12, 2017

Red Rice Dosa Recipe – Sigappu Arisi Pirandai Dosai

Red rice dosa
I watched this red rice, Adamant creeper dosa recipe (Sigappu arisi pirandai dosai in Tamil) in Jaya TV’s arusuvai neram by Mrs. Mallika Badrinath. She shared this healthy sivappu arisi dosai adding pirandai. Recently my MIL had given some pirandai ( also known as bonesetter) from our backyard garden to make thuvaiyal. As I had some red rice and pirandai in stock, I tried this dosa immediately. Addition of pirandai helps to give more softness to the dosa. So I changed the ratio of red rice & urad dal as per my taste. It came out very well. We had a satisfaction of including a healthy food for our breakfast and dinner. I had already shared Kerala red rice idli, dosa recipe in my website. This red rice dosa is completely different from that recipe on ingredients and method.I have also shared the picture of red rice used in this recipe.  Ok, lets see how to make red rice dosa recipe / Sigappu arisi dosai adding pirandai with step by step pictures.

Also check out my  PIRANDAI THUVAIYAL, KERALA RED RICE IDLI/DOSA RECIPE and 15 IDLI VARIETIES !

Name of Adamant creeper in different languages


  • English: Bonesetter, Devil's Backbone, Veldt Grape.
  • Hindi: Hadjod, Hadjor, Asthisrumgala
  • Malayalam: Changalamparanda-ചങ്ങലംപരണ്ട
  • Sanskrit: Vajravalli, Asthisrinkhala, Kulisa, Asthisamharaka.
  • Tamil: Pirandai-பிரண்டை
  • Telugu: Nalleru, Gudametige, Kokkitaya-ralu

  • Sigappu arisi dosai

    Red rice

    Red Rice Dosa Recipe - Sigappu Arisi Dosai With Pirandai


    Red Rice Dosa Recipe - Sigappu Arisi Dosai With Pirandai Dosa with red rice and adamant creeper - Sigappu arisi dosai with pirandai
    Cuisine: South Indian
    Category: Dosa recipes
    Serves: 15 nos
    Prep time: 10 Minutes
    Cook time: 20 Minutes
    Total time: 30 Minutes


    INGREDIENTS
    1 cup - 250ml
    • Red Rice - 2.5 cups
    • White round urad dal - 1/2 cup
    • Adamant creeper/ Pirandai - 2 long sticks (As shown in picture below)
    • Methi seeds - 1/2 tsp
    • Salt & Water - As needed
    HOW TO MAKE RED RICE DOSA
    1. Wash and soak red rice, urad dal and methi seeds together for 5 hours.
    2. Wash and clean pirandai. Chop into pieces and grind to coarse paste.
    3. Grind rice, dal mixture along with pirandai adding salt and water.
    4. Ferment overnight or for 12 hours. The next day, mix dosa batter well.
    5. Add some water if needed. Make dosa thin or thick. Serve with chutney or sambar !
    METHOD - STEP BY STEP PICTURES
    • Wash and soak red rice, urad dal, methi seeds together in enough water for 5 hours. Take the pirandai and clean it.
      Red rice dosa
    • Grease your hands with sesame oil. Wash the pirandai and chop the head & tail part. Remove the ridge like part using a peeler or knife. Remove the fiber portion too. Chop into small pieces and set aside.
    • Red rice dosa

    • Grind pirandai pieces to a coarse paste without water. Add this paste to rice while grinding.
      Red rice dosa
    • Grind the soaked rice + urad dal + methi seeds adding pirandai paste to a smooth batter adding enough water and salt. Collect in a bowl. Ferment overnight or for 12 hours.
    •  Red rice dosa

    • The next morning, batter would have raised slightly. Mix it well and add some water if needed. Consistency of this batter should be like our regular dosa batter. (Sorry I mixxed these pictures. I will try to update these steps with picture soon.)
    • Heat dosa tawa and sprinkle some water to check the heat of tawa. Water droplets should evaporate immediately. Wipe with a cloth or tissue. Spread 1.5 ladle of red rice dosa batter thin or thick as you like. Drizzle 1tsp sesame oil all over the dosa. Flip the dosa and cook the other side. Remove and serve hot with chutney or sambar. Enjoy !

    Note

    • If you don’t have adamant creeper/pirandai in hand, you can use red rice & urad dal in 4:1 ratio.
    • Fermentation is mandatory for this dosa batter else it will smell raw.
    • Do not worry if the batter is not raised well. Just check whether batter has got sour smell / Pulippu vasanai the next day morning.
    • You can increase the quantity of urad dal to 1/2 cup +2 tbsp to get softer dosa.

    Try & enjoy this healthy red rice dosa with pirandai. I served it with easy tomato thokku and raw onion chutney !
    Sigappu arisi dosai


    Continue Reading...


    November 21, 2017

    Vazhaithandu Masala Dosa Recipe – Banana Stem Dosa - Dosa Varieties

    Vazhaithandu masala dosa
    Vazhaithandu masala dosa – When we saw this dosa recipe in Salem Saravana Bhavan Hotel menu, Sendhil ordered it immediately. Salem Saravana bhavan restaurant has become our must visit place during Salem trip. Raksha loves their Ghee roast very much. We too like their varieties of dinner recipes with millets. So every time we visit there, we try to order some new and interesting dish. I too have a habit of trying the same at home. I had already tried and shared their Vazhaipoo dosa/ Banana flower dosa recipe recently. This morning I tried valaithandu masala dosa for our breakfast. This masala recipe is very similar to our South Indian style kurma but thick in consistency. I won’t say this banana stem stuffing tasted exactly like hotel recipe but it was close to it. Sendhil liked it a lot. We felt this dosa is one of the best way to consume banana stem for people who doesn’t like to eat vazhaithandu or vazhaipoo in the form of poriyal or kootu. Ladies, do try it for your husband even if he is a hater of banana stem. I am sure he will like the uniqueness and taste of this recipe. Ok, lets see how to make Vazhaithandu masala dosa / Banana stem dosa at home with step by step pictures.

    Do check out my Vazhaipoo Dosai Recipe too.

    Banana stem masala dosa

    Vazhaithandu Masala Dosa - Banana stem dosa recipe


    Vazhaithandu Masala Dosa - Banana stem dosa recipe

    Vazhaithandu masala dosa recipe - Banana stem masala stuffed dosa for breakfast / dinner


    Cuisine: South Indian
    Category: Dosa Recipe
    Serves: Serves 2
    Prep time: 10 Minutes
    Cook time: 20 Minutes
    Total time: 30 Minutes


    INGREDIENTS

    1 cup - 250ml
    • Banana stem / Vazhaithandu - 1 no (Medium size), Finely chopped
    • Big onion - 1 no (Finely chopped)
    • Curry leaves - Few
    • Garam masala powder - 1/2 tsp
    • Cooking oil - 2 tbsp
    • Salt & water - as needed
    To grind
    • Grated coconut - 1/4 cup
    • Green chilli - 2 nos
    • Fennel seeds - 1/2 tsp
    • Ginger - 1/2 inch piece
    • Garlic - 6 cloves
    • Cashew nuts - 3 nos
    For Dosa
    • Dosa batter - 2 cups ( I used my idli rava idli batter)
    • Gingely oil or cooking oil or ghee - to drizzle dosa

    HOW TO MAKE VAZHAITHANDU MASALA DOSA

    1. Wash and chop banana stem into fine pieces.Keep in buttermilk or water.
    2. Grind the masala and keep aside. Heat oil in cooker base.
    3. Saute onion and banana stem pieces. When it turns soft, add the ground masala, garam masala powder.
    4. Saute till raw smell goes off. Add very little water and pressure cook in high flame for 2 whistles.
    5. Remove the lid after steam is released. Mix well and boil if there is any excess water.
    6. Make the masala thick and spreadable. Keep aside.
    7. Now make thin dosa. After its cooked 3/4th on one side, spread the masala and drizzle oil / ghee around the dosa. Cook for a minute till dosa turns golden in the bottom. Fold the dosa and serve hot with coconut chutney or tomato chutney !

    METHOD - STEP BY STEP PICTURES

    • Wash and slice the banana stem into thin rings.Discard the thread like portion that comes while slicing the banana stem. Chop the rings finely and keep them immersed in buttermilk( to avoid discoloration) or water. Chop the onion finely and set aside.

    • Heat oil in a cooker base.Saute finely chopped onion and finely chopped banana stem till it turns soft. You can add some salt to quicken the process. Saute for 2 to 3 minutes.

    • Grind coconut,green chilli, fennel, ginger and garlic to a smooth paste. Add this paste to the banana stem mixture. Add garam masala powder. Mix till raw smell goes off.

    • Add very little water say 3 tbsp and mix well. Pressure cook in high flame for 2 whistles. Remove after the steam is released. Mix well and boil if there is excess water. Make thick masala. You can sprinkle some lemon juice if you like. Garnish with finely chopped coriander leaves. Mix well and keep the masala ready.

    • Take 2 cups of dosa batter. Dilute it slightly if the batter is too thick. Heat dosa pan. Spread the dosa batter and make it thin. When the top of dosa is 3/4th cooked, spread 2 tbsp of masala in the center of dosa.

    • Drizzle two tsp of oil around the dosa. Cook till the bottom of dosa turns golden. Fold the dosa and remove. Serve hot with coconut chutney or tomato chutney. Enjoy !

    Note

    • Adjust the quantity of green chilli as per your taste.
    • You can also use red chilli powder instead of green chillies.
    • You should chop the banana stem very fine else it would be difficult to eat. Actually I couldn’t chop it fine like hotel.
    • You can use any dosa batter. I used my idli rava idli batter and made dosa with it.

    Try this different dosa variety with banana stem and enjoy !
    valaithandu masala dosa
    Continue Reading...


    November 14, 2017

    Instant Quinoa Idli Recipe – Quinoa Recipes Indian

    Instant-quinoa-idli
    Instant Quinoa idli recipe with semolina/rava/sooji and curd. This is my very first post using quinoa. Quinoa is a super natural grain which is gluten-free, high in protein, fiber, vitamins and minerals. Quinoa is not called as thinai in Tamil. There is no proper Tamil word for quinoa (Keen-wah). But many of us think quinoa is very similar to our Indian Foxtail millet (thinai in Tamil). It is not. There are slight differences between quinoa and thinai mainly in their amino acid profile. 

    Quinoa has high protein when compared with other millets. Both are gluten free, high in fiber that helps for weight loss and control diabetes. Both takes the same quantity of water for cooking pulao, upma, porridge and soup. Similar in Calories too. But cost wise quinoa is not affordable and its not easily available in all the stores in India like millets.You can find it in very few organic shops in big cities Or you can buy from online stores like Amazon. I bought it from an Organic shop in Gandhi bazaar, Bangalore. Quinoa is most popular in US and other foreign countries.


    Many of my abroad readers asked me to share quinoa recipes years ago. At that time, I was not aware of this grain. I did not even know how to pronounce it. Then I came to know from Shalini that it should be pronounced as “keen-wah”. Some people also call it as Kinua. People usually consume this healthy grain for weight loss and to control diabetes. 

    To begin with quinoa recipes, I felt Idli would be ideal for me. Being a South Indian, Idli is the staple food in my family. I like to consume millets and other super natural foods in the form of idli more than upma, kichdi, pulao or porridge. I can eat it 24x7 if its an idli with some spicy chutney or sambar. So this morning, I prepared instant quinoa idli with semolina/rava/sooji and curd just like our usual rava idli for our breakfast & refrigerated the remaining batter for dinner. 

    Quinoa idli came out great with soft and spongy texture. I was very happy with the results. Color of the idli was grey otherwise there is no particular difference in taste between this idli and rava idli. Sendhil and myself enjoyed it with spicy coconut chutney and idli podi. Personally I love instant idli recipes with tangy tomato chutney or tomato thokku. You can make the side dish as per your preference.

    You can make this instant quinoa idli in the next 15 minutes if you have quinoa, semolina and some curd in hand. Friends, do try this healthy, yummy quinoa idli and share your feedback with me. Ok, lets see how to make quinoa idli without fermentation with step by step pictures and video.


    Instant-quinoa-idli-recipe

    Instant quinoa idli recipe - Quinoa recipes Indian


    Instant quinoa idli recipe - Quinoa recipes Indian

    How to make quinoa idli instantly with semolina and curd for breakfast and dinner


    Cuisine: Indian
    Category: Breakfast
    Serves: 14 
    Prep time: 5 Minutes
    Cook time: 10 Minutes
    Total time: 15 Minutes


    INGREDIENTS

    To Grind (1 cup - 240ml)
    • Quinoa - 1 cup
    To saute in oil
    • Cooking oil - 2 tbsp
    • Mustard seeds - 1/2 tsp
    • Urad dal - 1 tsp
    • Chana dal - 2 tsp
    • Cumin seeds - 1/4 tsp
    • Green chilli - 1 no ( Finely chopped)
    • Ginger - 1/2 inch ( Finely chopped)
    • Curry leaves - Few
    • Coriander leaves - 2 tbsp (Finely chopped)
    • Semolina / Sooji / Rava – 1/2 cup (Coarse upma rava)
    • Sour curd - 1 cup
    • Salt & water - as needed ( I used nearly 3/4 cup water)
    • Baking soda - 1/2 tsp 

    HOW TO MAKE INSTANT QUINOA IDLI

    1. Take Quinoa and grind to a fine powder.
    2. Heat oil in a kadai. Splutter mustard seeds, urad dal, chana dal.
    3. Saute green chillies, ginger, curry leaves, coriander leaves.
    4. Add semolina and roast for 2 minutes. Then add quinoa powder and roast for 2 more minutes.
    5. Let it cool down. Then add salt, curd and mix well.
    6. Add water to make thick spoon able batter. Add baking soda,mix well.Rest for 5 minutes.
    7. Pour in greased idli plate and steam it for 10 minutes.
    8. Remove after one minute and enjoy Instant quinoa idli with chutney or sambar !

    METHOD - STEP BY STEP PICTURE

    • Grind Quinoa to a fine powder in a big mixie jar. Keep aside.
      Instant-quinoa-idli-recipe
    • Heat oil in a kadai and splutter mustard seeds, urad dal, chana dal and cumin seeds. Saute till dals turn golden. Add finely chopped green chillies, ginger, curry leaves and coriander leaves. Saute for a minute.
      Instant-quinoa-idli-recipe
    • Add rava and roast in medium flame for 2 minutes. Add ground quinoa and roast for 2 more minutes till nice aroma arises. Remove the kadai, transfer the roasted items to a bowl and let it cool down.
      Instant-quinoa-idli-recipe
    • Add curd, required salt and mix well. Add water gradually and make thick batter. I used 3/4 cup of water approximately. Batter should be thick and spoonable. Add baking soda, mix well and keep the batter aside for 5 minutes.
      Instant-quinoa-idli-recipe
    • Grease idli plate with oil and pour the batter till 1/2 of the mould. Steam for 10 minutes.Check with a toothpick or back of spoon. If it comes out clean, idli is done.
      Instant-quinoa-idli-recipe
    • Remove the idli plate and rest for 2 minutes. Take the idli using a spoon. Serve hot with coconut chutney or tomato chutney for best taste ! You cannot make dosa with this batter.
      Instant-quinoa-idli-recipe
      Enjoy !

    Note

    • For variations you can add oats too.
    • Sour curd is better.
    • Adding soda helps to make the idli soft and spongy. You can also add ENO instead of soda. 
    • Do not add more water to the batter. Idli becomes flat and sticky.  
    • If you wish, you can skip the tempering part and make plain idli.
    Try this healthy, instant quinoa idli for breakfast/ dinner and enjoy !
    Instant-quinoa-idli
    Continue Reading...


    November 7, 2017

    Bread Idli – Instant Bread Idli Recipe With Curd, Rava

    Bread idli
    Bread idli recipe – Instant bread idli recipe with curd and rava/sooji/semolina. I have been eyeing on instant bread idli, bread dosa and bread uttapam recipes for long time. As I make bread recipes very rarely at home, I was waiting for the day to come. Last weekend I bought a pack of bread as I needed bread crumbs to make a snack. I had almost half the packet of leftover bread slices. So I made this easy, instant bread idli with curd and rava for our breakfast today.

    I saw Tarla Dalal’s recipe and few more using idli rava/rice rava and boiled potato. But I used our normal upma rava just like my instant poha idli and rava idli as I din’t get idli rava in my place. I did not remove the brown crust of bread as I din’t want it to go waste. So the color of my idli was yellow instead of white. You can remove the corners of bread slices to make white colored idli. Also you can replace white bread with brown bread, whole wheat bread or even multigrain bread in this recipe. 


    The consistency of idli batter is very important to get soft, spongy idli. It should be like our rava idli batter. It shouldn’t be too thick or thin but pourable. You can also temper this idli with mustard, chillies, ginger or add vegetables to make it more flavorful and healthy. You can play around with variations. This idli can be prepared instantly without any resting time or fermentation time. 

    Basically I am a big fan of idli varieties. When I made this idli with my own combinations, I was very happy with the output and glad I could add this bread idli recipe in my Idli varieties collection. This idli has to be served hot to enjoy its best taste. The best side dish for this idli would be a spicy coconut chutney or tomato chutney Or you can even serve it with easy tomato onion thokku. I am planning to make instant bread dosa and bread uthappam too. I will share them one by one. Ok, now lets see how to make bread idli at home instantly with step by step pictures and video !

    Check out my Instant Poha idli, Instant rava idli  and 15 Idli varieties collection too.


    Instant bread idli

    Instant bread idli recipe


    Instant bread idli recipe

    Easy, instant bread idli recipe with curd, rava using leftover bread slices.


    Cuisine: Indian
    Category: Breakfast
    Serves: 12 to 15 nos
    Prep time: 10 Minutes
    Cook time: 10 Minutes
    Total time: 20 Minutes


    INGREDIENTS

    1 cup - 250ml
    • Bread slices - 4 nos ( Milk bread or brown bread)
    • Roasted Semolina / Sooji / Rava - 1 cup
    • Sour Curd - 1 cup
    • Water - 1 cup ( varies from 3/4 to 1 cup)
    • Baking soda - 1/4 tsp
    • Salt - as needed

    HOW TO MAKE BREAD IDLI

    1. Take bread slices and tear into pieces.
    2. Grind to fine powder.Collect in a bowl.
    3. Dry roast rava for 3-4 minutes. Let it cool down.
    4. Mix with powdered bread. Add curd, salt and mix well.
    5. Add water gradually and make thick batter. Add baking soda at the end. Mix well and rest for 5 minutes.
    6. Grease idli plate and pour batter till half of the mould. Steam for 10 minutes. Idli becomes big in size and spongy. Remove after 2 minutes.
    7. Serve hot for best taste with coconut chutney or tomato chutney as side dish.

    METHOD - STEP BY STEP PICTURES

    • Take bread slices and trim the sides if you wish. I din’t remove the corners of bread. Tear into small pieces and grind to fine powder. I got 1.5 cups of powdered bread. Collect in a bowl.
      Bread idli recipe
    • Dry roast rava for 3 to 4 minutes. Let it cool down completely. Add to the powdered bread.
      Bread idli recipe
    • Add curd, salt and mix well.
      Bread idli recipe
    • Add water gradually and make a thick but pourable idli batter consistency. Please refer video. The quantity of water may vary if you remove the crust of the bread. Water quantity also varies based on the freshness of bread. If you make the batter too thin, idli becomes flat. If the batter is too thick, idli cracks and looks very big.
      Bread idli recipe
    • Add baking soda, mix well and rest the batter for 5 minutes. In the mean time, take an idli plate and grease molds with oil. Mix & Pour the batter till  1/2 or 3/4th of the mould. This idli becomes bigger in size after its cooked. So its better to fill less batter in the mould.
      Bread idli recipe
    • Roll boil water in an idli pot. Place the idli plate and steam it for 10 minutes. Remove the idli after 2 minutes. Serve hot with coconut chutney or tomato chutney for best taste !
      Bread idli recipe
      Enjoy !

    Note

    • Roasting the rava is an important step. Do not add unroasted rava.
    • You can also use idli rava/rice rava in place of semolina but you should rest the batter for 20 minutes for the idli rava to soak well in curd.
    • Add water gradually while making the batter. Its consistency should be thick and pourable.  
    • If the batter is watery, idli comes out flat. If the batter is too thick, idli becomes very big and crack on the top. 
    • For healthy options, you can add grated carrot and cooked peas in the batter. You can also temper the batter with mustard seeds, urad dal, chana dal, finely chopped green chillies, ginger, curry leaves and coriander leaves.
    Try this easy, instant bread idli for your breakfast or dinner. Enjoy with your favorite chutney or tomato thokku !
    Bread idli recipe


    Continue Reading...


    November 2, 2017

    Javvarisi Upma – Sago Upma – Sabudana Upma Recipe

    Sabudana upma
    Recently I started making javvarisi upma at home for breakfast and dinner. This is a South Indian style sabudana upma without using potato and peanuts. Actually I came to know about sago upma(Sabudana in Hindi, Saggubiyyam in Telugu) from my friend Shalini. She taught me a version with nylon javvarisi. I will share that recipe later. 

    Today I have shared javvarisi upma with big, white sago pearls. My MIL makes a similar upma without soaking sabudana. She roast it and make just like javvarisi payasam. I too follow this method for making kheer. But I couldn’t make upma as javvarisi becomes sticky. Once I make it perfect, I will share that version.

    Last week I made this upma by soaking sabudana overnight. It came out very well, non-sticky and tasted great. I added vegetables like carrot and capsicum to make it colorful. Sendhil & Raksha loved it a lot. Now I am confident enough to try North Indian sabudana khichdi too. Hope I will start to explore more sabudana recipes from now. Now lets see how to make South Indian style Javvarisi upma with step by step pictures.
    Sago upma

    Javvarisi upma - Sago upma - Sabudana upma recipe


    Javvarisi upma - Sago upma - Sabudana upma recipe

    South Indian style Sabudana upma - Javvarisi upma recipe with step by step pictures


    Cuisine: South Indian
    Category: Main course
    Serves: Serves 3
    Prep time: 5 Hours
    Cook time: 20 Minutes
    Total time: 5H20 Minutes


    INGREDIENTS

    To soak ( 1 cup - 240ml)
    • Javvarisi / Sago / Sabudana - 2 cups ( White big )
    • Water - to soak sago ( I used 1.5 to 2 cups )
    To temper
    • Cooking oil - 3 tbsp
    • Mustard seeds - 1 tsp
    • Urad dal - 1 tsp
    • Chana dal - 2 tsp
    • Big onion – 2 nos (medium sized)
    • Green chillies – 2 to 3 nos (Finely chopped)
    • Carrot - 1 no (Small sized, Finely chopped)
    • Capsicum - 1/2 no
    • Curry leaves – Few
    • Ginger – 1 inch piece(Finely chopped)
    • Coriander leaves - 2 tbsp (chopped finely)
    • Lemon juice - 1 tsp
    • Salt - as needed

    HOW TO MAKE JAVVARISI UPMA

    1. Wash sabudana / javvarisi twice. Drain, Soak it overnight adding water.
    2. Temper mustard, urad and chana dal. Saute onion, chilli , curry leaves and vegetables.
    3. Saute till veggies turn soft and cooked. Add soaked sago and mix well adding salt.
    4.  Cover cook in low to medium flame till sago becomes transparent. 
    5. Lastly add lemon juice and coriander leaves. Serve hot !

    METHOD - STEP BY STEP PICTURES


    • Wash the sabudana twice or thrice. Drain the water completely. Soak in 1.5 to 2 cups of water over night or atleast for 5 hours minimum. The level of water should be 1/2 inch above sabudana. The next morning sabudana absorbs all the water and grows in quantity. If you take a sago and press it, it should be mushy. It shows sago is soaked well. Fluff it well without any water and keep aside.
      Javvarisi upma
    Javvarisi upma

    • Wash and chop onion, chilli, carrot and capsicum finely. Set aside.
    Javvarisi upma
    • Heat oil in a good non-stick kadai. Temper mustard seeds, urad dal and chana dal. When it turns golden, add finely chopped onion, green chillies, curry leaves, capsicum, carrot , required salt and mix well. Take care while adding salt because sago upma takes less salt unlike other upma recipes. Saute in low to medium flame till carrot becomes soft. No need to add water.
      Javvarisi upma
    • Now add sabudana and mix well. Keep the flame low to medium. Cover cook till done. Open the lid once in 2 minutes and toss gently. No need to add water. Sabudana turns transparent. It takes nearly 10 to 12 minutes to become transparent completely. Make sure it is not sticking to the bottom of kadai. 
    • Sabudana tastes soft when its cooked completely. You can taste and find it. If you keep cooking for more than 10 minutes, javvarisi starts to become sticky. So cover cook in low flame, toss once in 2 minutes till done. Sometimes a layer of sabudana sticks to the bottom of kadai if you over cook it. Don’t worry. You can serve it as adai at the end. It tastes crispy.
      Javvarisi upma
    • Switch off the flame. Sprinkle lemon juice and garnish with coriander leaves. Mix well and serve hot !
      Javvarisi upma
    • Enjoy !

    Note

    • Use white big sago variety for this upma. Do not soak in excess water ( i.e more than 1/2 inch) to cover sago. It will turn mushy. For 2 cups of sago, I used 1.5 cups of water.  You can use maximum 2 cups.
    • You should cook the sago in low to medium flame without adding water. So you should keep tossing it once in 2 minutes.
    • If you cover cook it for long time, sago may stick to the bottom. So keep stirring it in the middle. 
    • Be careful while adding salt because sago needs less salt.

    Try this easy, yummy javvarisi upma for your breakfast or dinner and enjoy  !

    Javvarisi upma
    Continue Reading...