Set dosa is one of my most favorite dosa recipes. Most of the time this would be my order in restaurants here. Set dosa served with sagu and coconut chutney tastes absolutely delicious.
Set dosa can be prepared in two ways. One with rice, urad dal, poha and methi seeds without using curd and another version without urad dal where poha and curd is used with rice. Both of them comes out super soft and tastes good. So it is also called as sponge dosa.
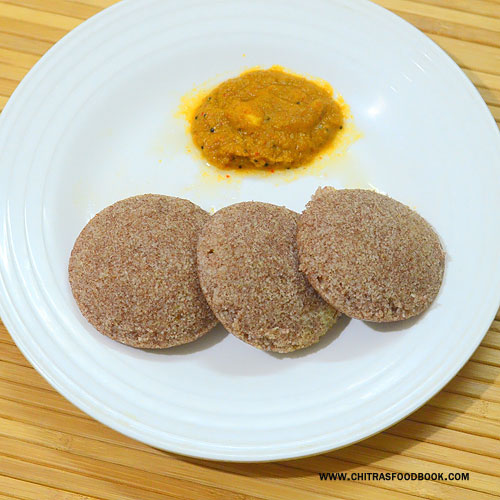
Long back I have shared a sponge dosa recipe without urad dal adding curd. Recently I tried this version without curd. It came out so well. I served it with potato kurma and kara chutney as side dish. We all loved it.
I won’t say this recipe makes Karnataka hotel style set dosa. Hotel style dosa batter has rice flour, maida, dals in it. I am still working on it to get the exact taste and texture. This one is just home style set dosa that comes out soft and spongy.
It tastes similar to the one you get in road side small eateries. To make Tamil nadu style set dosa, you can add some turmeric powder in the batter and serve with vada curry.
Friends, do try this yummy, soft and spongy dosa recipe. You will also love it like us ! Lets see how to make spongy dosa recipe without curd with step by step pictures and video.
Dosa rice or idli rice - 2 cups (Low quality Raw rice / maavu arisi or parboiled rice)
Urad dal - 1/2 cup
Poha / Aval / Pressed rice - 1/2 cup (Thin or thick)
Methi seeds / fenugreek seeds - 1/2 tsp
Salt & water - as needed
Cooking oil or sesame oil - to drizzle around dosa
HOW TO MAKE SET DOSA/SPONGE DOSA
Wash and soak rice, urad dal, methi seeds together for 4 hours.
Wash and soak poha separately for 30 minutes till soft.
Take a mixie jar and grind the rice to a smooth paste.
Transfer the batter to a vessel. Grind poha to a smooth paste and add to rice batter.
Mix both the batter with your hands. Ferment overnight or 12 hours.
The next morning, add salt and mix the batter.
Heat dosa tawa, pour a ladleful of batter. Spread slightly.
Cook till porous in medium flame. Drizzle oil and flip the dosa.
Cook the other side too. Remove it. Make 2 or 3 dosa and serve as set.
Serve hot with kurma/sagu and chutney!
METHOD - STEP BY STEP PICTURES
Wash and soak the rice, urad dal and methi seeds together for 4 hours. Wash the poha and soak it separately for an hour. Use drinking water for soaking so that you can use the same soaked water for grinding. It helps for fermentation.
Take a mixie jar and add the soaked rice along with required soaked water. Grind to a smooth paste and transfer to a big vessel with room for fermentation. You can grind in two batches.
Grind the soaked poha along with the water to a smooth paste. Add to the rice batter and mix well with your hands. Mixing with your hands aids fermentation. Do not add salt while grinding as it delays fermentation during winter.
After mixing the batter, close the vessel with a lid. Ferment it overnight or minimum 12 hours based on the weather in your place. Proper fermentation is the key to make perfect, spongy dosa with more holes.
The next morning, add required salt in the batter. Mix well and check the consistency of batter. If its too thick, add little water. Batter should be like regular dosa batter in consistency.
Heat a dosa tawa, lower the flame. Pour 1/4 cup of water. Wipe with a cloth and pour a big ladleful of batter. Spread it slightly. Keep the flame medium. Pores/ holes will appear all over the dosa. The drizzle with oil all over the dosa. Flip over and cook the other side. Remove when golden. Alternately you can cover and cook the dosa. Remove when its cooked. No need to flip it.
Serve hot with vegetable kurma or saagu and coconut chutney. Enjoy !
Note
Do not reduce the quantity of poha or urad dal. Dosa won’t be soft.
For variations, you can use idli rice instead of dosa rice.
My dosas were even more good the second day with lots of holes. Please refer the above pictures. The more fermented batter, greater the results would be.
You can refrigerate this batter up to 2 days and use it.
You can flip and cook the dosa on both the sides as I did OR cover and cook the dosa till holes appear and then remove it.
To resemble like Tamil nadu style set dosa, you can add some turmeric powder in the batter. Flip and cook both the sides.
Try this easy, yummy set dosa recipe without using curd. You will love it !
Below picture is the dosa made with second day batter !
I have an adamant creeper plant in my balcony garden. Adamant creeper is called as Pirandai in Tamil. I have given its name in all the languages and its amazing health benefits below. Please check it. As its rich in Vitamin C and Calcium which is good for bones, I try to include pirandai in my cooking atleast once in a month. Usually I make pirandai thogayal for rice. But this time, I wanted to try some other recipes with it. So as usual, I started my experiments with this healthy and yummy pirandai dosai recipe. As I expected, it came out very well in the first attempt itself.
Actually no one in my family was able to find that pirandai is added in this dosa recipe. It was tasting like usual dosas. To make it more flavorful with a green look, I added some coriander leaves, green chilli and ginger. But you can skip all these ingredients and make a plain piranadi dosai too. So friends, if you are looking for some healthy pirandai recipes apart from chutney and thogayal, do try this pirandai dosa recipe. I am sure you will love it like us. This pirandai dosa batter can be refrigerated and used for 2 days.
Lets see how to make this healthy adamant creeper dosa/ Pirandai dosai recipe with step by step pictures along with its health benefits and names in different languages.
Grease your hands with sesame oil generously and clean the pirandai.
Chop the nodes, head and tail portion. Discard it. Now remove the ridges using a knife or peeler.
Wash it well and chop into 1 inch pieces.
Wash and soak rice, urad dal and methi seeds for 4 hours.
In a mixie jar, grind pirandai, coriander leaves, green chilli, ginger to a coarse paste.
Add the soaked rice and dal. Grind to a smooth paste and collect in a vessel.
Cover and ferment it overnight or minimum 12 hours.
The next day, add salt and mix the batter well.
Make thin or thick dosa as per your liking. Enjoy with coconut or tomato chutney !
METHOD - STEP BY STEP PICTURES
To clean pirandai / adamant creeper, apply sesame oil/ gingely oil all over your hands and palm generously to avoid itching. Alternately you can wear some thick gloves and clean it.
You should apply sesame oil in your hands else your hands will be itching for one day after cleaning the pirandai. I have experienced this. So do not skip or forget this step.
Take the pirandai and break the nodes. Chop the head and tail portion. Remove the fibers if any. Now remove the ridges of pirandai using a knife or peeler. Discard it.
Wash it well and chop into small pieces of 1 inch length. Measure 1/4 cup from it and set aside. Set aside.
Take a bowl and add rice, urad dal, methi seeds. Wash it well and soak it for 4 hours.
Wash and take the chopped pirandai, coriander leaves, ginger and green chilli in a mixie jar. Grind coarsely adding little water.
Now add the soaked rice, urad dal and methi seeds. Grind everything to a smooth paste adding required water. Make the batter thick. Do not make it too watery.
Transfer the batter to a bowl. Cover and let it ferment for 12 hours or overnight based on the weather conditions in your place. I kept it for 16 hours.
The next day, batter would have been raised. Now add required salt and mix well. Adjust the consistency of batter by adding little water if needed.
Heat a dosa tawa and pour 1/4 cup of water, lower the flame and wipe the dosa tawa completely. Now pour a ladleful of dosa and spread it thin or thick as you like. Cook till 3/4th and then drizzle with sesame oil/ gingely oil or ghee all over the dosa. Flip and cook both the sides and remove in a plate.
I used coriander leaves, green chilli and ginger to give a nice flavor and color. You can add a small piece of tamarind if you like but I din't use it. You can skip all the other ingredients and use pirandai alone to make this dosa batter.
There is no need to saute the pirandai in oil before grinding. As we are fermenting the batter, it doesn’t have the itchy feeling while you eat.
Make sure the batter is well fermented. Leave it for 12 to 16 hours based on the weather.
People living in cold countries can keep the batter inside the oven with lights on or cover the batter bowl with a blanket and keep it over the gas burner after switching it off. Keep it over night. It helps to ferment the batter well.
You should apply sesame oil in your hands else your hands will be itching for one day after cleaning the pirandai. I have experienced this. So do not skip or forget this step.
While making dosa, drizzle it with sesame oil or ghee as pirandai generates body heat. Oil or ghee helps to balance it. Use ghee if giving for kids.
Yummy, healthy pirandai dosai is ready to relish. Make it thick or thin and enjoy !
I have been making this instant ragi idli with ragi flour(finger millet flour in English) and rava/suji / sooji(Semolina in English) at least once in a week for the past few months. Usually I make instant ragi dosa or ragi adai. As I got bored of those dishes, I wanted to try some varieties of ragi recipes. As a result of this, I tried Instant ragi idli, ragi idiyappam and ragi mudde these days. All the dishes came out well in the first attempt itself. Still I wanted to blog them after few trials.
So today I am confidently sharing this instant ragi idli which can be prepared under 10 minutes. In this recipe, I have used equal amount of ragi flour (Nachni in Hindi, finger millet in English), unroasted suji/ Bombay rava/ Semolina along with curd, baking soda and salt. If you want to make this ragi idli without soda, you can use Eno fruit salt instead. Similarly if you want to make this idli without curd or with less curd, you should use more water and baking soda. But I would strongly recommend to use curd and use less baking soda which is good for health. Its a diabetic friendly and diet friendly recipe. People who look for weight loss can have this for dinner. It keeps your tummy full over the night.
I have tried this instant ragi idli with many side dish combination. But I felt tomato based side dishes suits well for this ragi idli as it tastes bland. So you can make tomato chutney, tomato mint chutney, tomato capsicum chutney or tomato thokku. I make one of these side dishes regularly. If you like, you can try with coconut chutney, tiffin sambar or idli podi / gun powder too.
Ok friends, lets see how to make instant ragi idli recipe with ragi flour and rava with step by step pictures and video.
Instant Ragi Idli
Instant ragi idli recipe
Instant ragi idli recipe using ragi flour , rava / suji, curd and baking soda
In a wide bowl, mix ragi flour, unroasted rava/suji, salt and curd.
Mix well and add little water to bring into thick idli batter consistency.
Add baking soda at the end. Mix well and rest for 5 minutes.
In the mean time, roll boil water in idli pot and grease the idli plate.
Pour idli batter in greased mould and steam it for 10 to 15 minutes till tooth pick comes out clean.
Remove the idli plate and rest for few minutes. Now scoop out the idli using a ladle or spoon.
Serve hot with tomato, onion chutney as side dish. Tastes great !
METHOD - STEP BY STEP PICTURES
In a wide bowl, mix ragi flour, unroasted rava/suji, salt and curd. Mix well.
Add required water gradually and mix to make a thick batter. Do not use more water. I used 3/4 cup water but its quantity differs based on the consistency of curd. Add baking soda and mix well.
Rest the batter for 5 to 10 minutes. Mix well and check the consistency of batter. It should be thick but pourable.
Do not make the batter thin or watery. Idli becomes sticky and flat.
In the mean time, boil water in idli pot. Grease idli plate with gingely oil. Pour idli batter in each mould. You can also make this idli by spreading cloth in idli plate.
When the water starts to roll boil, keep the idli plate. Steam it for 10 to 12 minutes till toothpick comes out clean.
Remove the idli plate, rest for 2 minutes. Then remove the idli using a spoon or ladle.
Serve hot with tomato chutney, tomato mint chutney, tomato capsicum chutney or tomato thokku. We love these side dishes. Enjoy !
Note
For variations, you can ENO fruit salt instead of baking soda. Use 1/2 tsp for this recipe.
Do not reduce the quantity of semolina. Equal amount of ragi flour and rava helps.
The most important point to note is : batter should be thick and pourable. Do not make thin batter. Idli becomes sticky and flat.
Enjoy this healthy, Instant ragi idli and share your feedback with me!
Green chutney sandwich with cheese was my recent try in sandwich recipes. I tried this recipe after tasting in a sandwich shop here. Spicy Indian style green chutney with grated cheese stuffed sandwich was tasting so good. Kids would love it for sure. Raksha loved it with tomato ketchup. For me and Sendhil, I skipped adding cheese as we both are not a big fan of it. We loved the toasted, plain green chutney sandwich as such. Green chutney for sandwich can be prepared in many ways.
Here I have made it simple without adding coconut, chaat masala etc. Instead I used roasted gram dal / chutney dal for to make a thick spreadable chutney. Roasted gram dal helps to give a binding and acts as a thickening agent. To make bright green colored chutney, I used turmeric powder and a pinch of sugar. Do not skip it. Ok, lets see how to make cheese chutney sandwich recipe with step by step pictures.
I got this instant tomato dosa recipe from my School moms group friend Archana. She shared few pictures of this instant thakkali dosa and a recorded voice message with recipe in WhatsApp. She suggested me to try and blog this instant dosa variety. Usually I make varieties of instant dosa recipes like wheat flour dosa, jowar dosa, ragi or millet dosa for my dinner. I am happy that I tried this recipe too. Its a very easy and quick instant dosa recipe. This batter can be prepared under 10 minutes.
With the mild tangy taste of tomato and bright red color, this tomato dosa was so good in taste. It was a super hit in my family. We all loved it. Make the batter watery like neer dosa and rava dosa because consistency of dosa batter is the key to make super crispy and lacy dosa as shown in the picture. You will get it after making one or two dosa and adjust the water quantity accordingly.
This instant tomato dosa tastes the best when served hot with coconut chutney as side dish. It also tasted good even after cooling down. So you can pack for tiffin box if you like. This batter can be refrigerated and use it the next day too. Friends, do try this easy and quick tomato dosa recipe. You will love it for sure.
Note : Below picture was taken at night using the fresh batter. The remaining pictures were taken the next day morning by making dosa with leftover batter.
Instant Tomato Dosa Recipe
Instant tomato dosa recipe with rice flour, sooji and wheat flour.
I love to try varieties of poha recipes for our breakfast and dinner. Last week I tried this Karnataka style gojjavalakki recipe (Tamarind poha) for our breakfast. Its an instant and quick fix recipe for breakfast. This is a no onion no garlic recipe too. If you have tamarind paste or soaked tamarind in hand, gojju avalakki can be prepared under 10 minutes. It doesn’t need any side dish too.
This recipe would be ideal for bachelors and working women to make a quick breakfast and dinner. I referred few Karnataka blogs and YouTube videos and tried this recipe. Gojju avalakki works the best with thick poha. It is coarsely ground and made. But I used thin poha which is also know as paper avalakki in Karnataka. So I have shared the instructions for both the types of poha.
Soon I will try to share Tamil nadu style puli aval / tamarind poha recipe which is slightly different from this one. Ok, lets see how to make Karnataka special gojjavalakki recipe with step by step pictures.
Poha / Avalakki / Aval/ rice flakes - 3 cups ( I used thin poha)
Tamarind - Big gooseberry size
Karnataka style Rasam powder or sambar powder - 1 tbsp
Turmeric powder - 1/2 tsp
Jaggery – 2 tsp (powdered)
Salt - as needed
Water - as needed
Grated coconut - 1/4 cup ( to garnish)
To temper
Cooking oil - 1.5 tbsp
Mustard seeds - 1 tsp
Urad dal - 2 tsp
Chana dal - 1 tbsp
Peanut - 2 tbsp
Curry leaves - Few
Asafetida / Hing - 1/4 tsp
Red chilli – 1 or 2 ( pinched into 2)
HOW TO MAKE GOJJU AVALAKKI
Wash the poha once or twice in water. Drain completely.
Take in a wide bowl. Add tamarind extract, sambar powder, turmeric powder, jaggery, salt and hing. Sprinkle some water if needed and mix gently.
Mix well and set aside for 5 minutes.
In the mean time, heat oil in a kadai. Roast peanuts.
Splutter mustard seeds, urad dal, chana dal and roast well.
Add curry leaves, pinched red chilli and hing. Saute quickly.
Now add the soaked gojju avalakki mixture and mix gently.
Cover cook in low flame for 5 to 10 minutes by tossing once in the middle.
Switch off the flame and garnish with grated coconut. Serve hot !
METHOD - STEP BY STEP PICTURES
Take the poha in a bowl. If you are using thick poha, grind it coarsely using pulse option in your mixer grinder. If using thin poha, no need to grind it. Proceed to next step.
Wash the poha once or twice in water to remove the debris. Drain the water completely and set aside in a bowl. Soak tamarind in 1 cup of water and take the extract.
Add the tamarind extract, turmeric powder, sambar powder/ rasam powder, jaggery, hing and salt. Mix well and rest it for 5 minutes.
In the mean time, heat oil in a kadai. Roast the raw peanuts for few minutes. Now add mustard seeds in the same oil. Let it splutter.
Add urad dal, chana dal, pinched red chilli, hing and curry leaves. Saute for a minute.
Add the soaked poha + tamarind mixture to the kadai. Mix gently, check for taste and add more spices, salt if required. Cover cook for 5 to 10 minutes in low flame. Toss it once or twice in the middle. Cook till poha becomes hot. Switch off the flame and garnish with grated coconut. Serve hot and enjoy ! You can eat it as such or serve with coconut chutney.
Note
Do not add more water while soaking thin poha. If you are using thick poha , grind it coarsely and then soak in tamarind water. It helps to soak the poha quickly in less water. Adding more water makes the dish mushy.
You can use Karnataka style rasam powder or sambar powder in this recipe.
For variations, you can also add a tsp of roasted sesame seeds powder and mix at the end.
Try this easy, instant Karnataka special gojju avalakki and enjoy !


