Search Chitra's Food Book

Showing posts with label DIWALI RECIPES. Show all posts

October 14, 2019

Dates and Nuts Ladoo Recipe – Dates Laddu Recipe - Sugar Free Sweets Recipes

dates nuts laddu
To start with this year’s Diwali recipes, here is an easy and simple, sugar-free Dates nuts laddu recipe. This recipe is similar to Dates and nuts roll I posted few years back. But its procedure is much easier than dates roll. I tried this with the leftover pack of dates. It tastes so good and flavorful too. With a nice flavor of ghee and crunchy taste of nuts, this dates ladoo is sure a healthy choice for kids and adults with good calories. Use soft dates (Medjool dates) if you like soft ladoo or use regular, hard dates like Lion dates for slightly, chewy and hard ladoo. Its your choice finally. Chopping the nuts is little time consuming otherwise this ladoo can be prepared in few minutes. If you want to ease this chopping job, you can grind coarsely and then roast it. Friends, do try this healthy, sugarless sweet for this Diwali and enjoy ! Lets see how to make dates and nuts ladoo with step by step pictures.

Check out my Dates and Nuts Roll Recipe.

dates nuts laddu

Dates Nuts Ladoo Recipe


Dates Nuts Ladoo Recipe

Sugar free dates and nuts laddu recipe


Cuisine: Indian
Category: Sweet
Serves: 12
Prep time: 10 Minutes
Cook time: 10 Minutes
Total time: 20 Minutes


INGREDIENTS
1 cup - 250ml
  • Dates - 1 cup / 15 nos ( I used Lion Seedless Dates)
  • Chopped Cashew nuts - 1/4 cup
  • Chopped Almond - 1/4 cup
  • Melon seeds - 2 tbsp
  • Chopped pista - 1 tbsp (optional)
  • Poppy seeds / Khus khus - 1 tbsp
  • Desiccated coconut - 1 tbsp (optional)
  • Ghee - 1 tbsp + for greasing hands
HOW TO MAKE DATES LADDU
  1. Wash and chop dates roughly. Grind to a coarse paste. Set aside.
  2. Heat 1 tbsp ghee in a kadai and roast the nuts.
  3. Once golden, add poppy seeds and coconut.
  4. Roast for a minute. Lastly add ground dates.
  5. Mix well till it becomes a whole mass.
  6. Remove and cool down. Grease hands with ghee.
  7. Make balls and arrange the ladoo in a plate.
DATES AND NUTS LADOO - STEP BY STEP PICTURES
  • Wash the dates and chop roughly. Grind to a coarse paste and set aside.
  • dates nuts laddu
  • Heat 1 tbsp ghee in a kadai. Roast the cashew nuts, almonds and melon seeds in low to medium flame. When they start to turn golden, add poppy seeds and desiccated coconut. Roast for a minute. Do not burn anything.
  • dates nuts laddu
  • To this add the ground dates paste. Mix in medium flame till everything comes together as a whole mass. Initially you will find it difficult to mix the dates and nuts. But when the dates paste gets heated, it become easy to mix.
  • dates nuts laddu
  • Once everything comes together as a mass, switch off the flame.  Let it become warm. Grease your hands with ghee. Make balls / shape ladoo. Arrange in a plate.
  • dates nuts laddu
  • Once the ladoo comes to room temperature, store in an air tight box. Use within a week for best taste. Enjoy !

Note

  • Adjust the quantity of nuts as per your taste. I used 1/4 cup, you can use 1/2 cup too.
  • Do not add sugar or honey. Its not necessary.
  • You can use soft dates or regular dates. But taste and texture of ladoo differs.
  • Do not over cook the mixture after adding dates paste. Ladoo may become hard and chewy after cooling down. Just cook till it comes together as a mass.
  • Greasing your hands with ghee helps to give a shine to ladoo and also adds nice flavor.
Try this easy, yummy dates and nuts ladoo recipe and enjoy !
dates nuts laddu recipe
Continue Reading...


July 30, 2019

Muscoth Halwa Recipe – Halwa Without Ghee

Muscoth halwa

Muscoth halwa / Muscat halwa is a popular halwa recipe in Mudalur near Tuticorin (Thoothukudi), Tamilnadu. It is also known as Mudalur halwa. AJJ bakery/ sweet shop is very famous for this halwa preparation. I got this recipe from a Tamil magazine where the sweet shop owner has given the recipe with measurements. I reduced the sugar quantity and tried it. I also watched Sutralaam suvaikalaam Youtube channel video for more details. This halwa is prepared using Maida milk / All purpose flour milk and coconut milk. It can be called as coconut milk halwa too. 

Highlight of this halwa is its made without adding a drop of ghee or oil. The oil releases from the coconut milk makes the halwa glossy and flavorful. If you are a big fan of coconut based recipes, you must try this halwa. It looks and tastes similar to Tirunelveli halwa. Patience is the only thing you need to make this halwa successfully. It needs a day for pre- preparation and an hour to cook.  But it tastes great with the nice flavor of coconut. You will love it ! 

For variations, you can use wheat flour instead of maida. But authentic, sweet shop recipe uses all purpose flour/ maida. But this halwa stays good for 2 to 3 days as we are using coconut milk. Use a good non-stick kadai for best results. If you have an iron kadai, you can use that as well.

Recently Kent appliances sent me a non-stick kadai (Kent Red plus with SS lid) for my review about the product. I have shared a picture of it in my Instagram feed as well. Kent by Kent Appliances is a kitchen appliance brand. It caters to the various needs of homemakers in the country. It has a varied product portfolio ranging from pressure cookers, non-stick cookware, hard anodized cookware, thermoware, mixer grinders to varied other electrical appliances and kitchen tools. The company has been at the forefront of innovation and has been the fastest growing company in the kitchen appliance space

When they sent me a kadai for reviewI wanted to try some sweets with it because its easy to identify the final consistency. As this Muscoth halwa is without ghee, I felt it would be ideal for making in the new kadai. As expected, kadai was so good. I cooked this halwa for more than one hour still the kadai and its handle was heat resistant. Spatula is good and sturdy. Halwa came out beautifully without sticking to the pan. I loved the red outer coating which is my favorite color too. 

Above all this product has one year warranty. I started using this kadai in my regular cooking. So far so good ! Friends, if you are planning to buy this kadai, use CHITRAS5 coupon code for 5% discount (for purchasing through website only).
Check out their website, Facebook and Instagram page links below to see all their products.

Website : https://kentappliances.com/

Facebook:  https://www.facebook.com/KENT-Appliances-486182058591104/

Instagram:  https://www.instagram.com/kent_appliances/

Note : This is not a paid post. 

Lets see how to make this yummy Muscoth halwa recipe with step by step pictures. I am happy to include this halwa in my halwa recipes collection.

Muscoth halwa recipe

Muscoth halwa recipe


Muscoth halwa recipe

Muscoth halwa / muscat halwa recipe - An yummy halwa recipe without using ghee


Cuisine: South Indian
Category: Sweet
Serves: 8 pieces
Prep time: 10 Minutes
Cook time: 20 Minutes
Total time: 30 Minutes


INGREDIENTS
1 cup = 250ml
  • Maida / all purpose flour - 1 cup
  • Coconut milk - 4 cups using 1 big coconut
  • Sugar - 2 cups ( 1.25 cups + 3/4 cup for caramel)
  • Cashew nuts – 5 ( break into small pieces)
  • Ghee - Few drops to grease the halwa plate
HOW TO MAKE MUSCOTH HALWA
  1. To make Muscoth halwa, take maida in a wide bowl and make a smooth dough adding water.
  2. Add 3 cups of water to the maida dough. Mix it well with your hands. Dough dissolves in water and you will get white colored milk.
  3. Discard the gluten part and set the maida milk aside. Keep it covered and leave overnight.
  4. The next morning, discard the water carefully and use the sedimented maida milk for making halwa.
  5. In a kadai, add maida milk, coconut milk, 1.25 cups sugar and start cooking in medium flame.
  6. In another small kadai, take 3/4 cup sugar and a tsp of ghee. Mix well and caramelize it in low flame.
  7. Add to maida mixture , add cashew nuts and keep cooking for an hour. Remove when halwa starts to release oil in the sides of kadai.
  8. Transfer the halwa to a ghee greased plate. Cut into pieces when warm. Serve and enjoy !
  9. Tastes best the next day !
MUSCOTH HALWA RECIPE - STEP BY STEP PICTURES
  • In a wide bowl, take 1 cup of maida/ all purpose flour. Add water gradually and make a smooth dough. No problem even if the dough is sticky. Add 3 cups of water to the dough and start mixing with your hands. Dough dissolves in water and you will get white colored maida milk.
  • Muscoth halwa recipe
  • Keep mixing till you get the fiber like gluten part separately. Squeeze well and discard it. Now maida milk with water is ready. Cover the milk bowl with a plate and rest it overnight or 6 hours. Maida milk will be settled down and you will find the water on top. Drain the water carefully. No problem if little water is present with maida milk. Measure the sedimented maida milk. You will get around 1 cup. Keep it aside. Muscoth halwa recipe
  •  Muscoth halwa recipe
  • Take one big coconut. Grate it or make pieces. Grind to a smooth paste adding 1 cup of warm water. Strain and collect the coconut milk in a bowl. Add more warm water and take the second milk too. Total quantity of coconut milk should be 4 cups. So you can add water based on this. In a kadai take 1 cup of maida milk, 4 cups of coconut milk, 1.25 cups of sugar. Mix well. Muscoth halwa recipe
  • Muscoth halwa recipe
  • Keep the kadai in medium flame and keep stirring till sugar dissolves. After 5 to 10 minutes, halwa starts to thicken. Keep cooking by changing the flame from low to medium high.
  • Muscoth halwa recipe
  • In the mean time, keep a small kadai in another gas burner. Add 3/4 cup sugar and a tsp of ghee. Keep the flame very low. Mix well till sugar dissolves and changes the color to golden brown. Do not burn the sugar. Halwa tastes bitter. This process is called sugar caramelization. Switch off the flame and add the caramelized sugar to the halwa. Do it quickly. Mix well. Muscoth halwa recipe
  • Muscoth halwa recipe
  • Color of halwa changes to golden brown. Add cashew nut pieces. Keep mixing the halwa for another 30 minutes. Halwa thickens completely and leave the sides of kadai. It rolls with the ladle and becomes a lump. It will be non-sticky to touch. If you want, you can remove the halwa to a ghee greased plate at this stage. Set it till warm, cut into pieces and enjoy. It tastes good. But If you want really glossy halwa like in sweet shops , you need to proceed to the next step. Muscoth halwa recipe
  • Keep the flame medium and mix until halwa starts to leave traces of oil in the sides of kadai. Total cooking time would be more than one hour. Once you see the oil releasing in the sides, remove and transfer to a ghee greased plate. Level it with ghee greased spatula. Rest the halwa till warm, invert to a plate. Make pieces and consume within 2 to 3 days. Enjoy ! Muscoth halwa recipeMuscoth halwa recipe

Note

  • For healthy options, you can use wheat flour / atta instead of maida.
  • You can skip cashew nuts.
  • You can also reduce the quantity of coconut milk to two cups and make this halwa. But halwa won’t release oil. You can remove once it becomes non-sticky.
  • Actual recipe called for fermenting maida milk overnight. But I saw many recipes that make the maida milk instantly. You can try that way too.
  • Cardamom powder is not needed. If you wish, you can add it.


Friends, try this easy yummy Muscoth halwa and enjoy with family and friends.

It stays good only for 2 to 3 days because of coconut milk.


Continue Reading...


February 15, 2019

Delhi Carrot Halwa In Pressure Cooker – Gajar Halwa Recipe Without Khoya In Pressure Cooker

Gajar halwa / Carrot halwa using Delhi carrot was in my try list for long time. Recently I bought some fresh Delhi carrots in Reliance. I thought of trying carrot halwa and red carrot pickle with it. To begin with, I tried this easy carrot halwa recipe without khoya and condensed milk in pressure cooker for a surprise guest at home yesterday. I finished the preparation quickly under 20 minutes. It came out really well with a bright red color. We loved it very much. I served the same for Valentine’s day treat as well.

 Friends, do try this yummy carrot halwa using Delhi carrot easily in a pressure cooker. Don’t forget to share your feedback with me.  For variations, you can use Ooty carrot instead of Delhi carrot. Cook the grated carrot in an open kadai, add condensed milk instead of sugar, milk and try it.


Check out my other 18 halwa varieties too !


Delhi carrot halwa in a pressure cooker


Delhi carrot halwa in a pressure cooker

Carrot halwa with Delhi carrot made eaaily in a pressure cooker.


Cuisine: Indian
Category: Sweet
Serves: Serves 3
Prep time: 10 Minutes
Cook time: 20 Minutes
Total time: 30 Minutes


INGREDIENTS
1 cup - 250ml
  • Grated carrot - 2 cups (I used 2 Delhi carrot)
  • Sugar - 3/4 cup ( Use 1/2 cup for mild sweetness)
  • Cardamom powder - 1/2 tsp
  • Boiled milk - 1/2 cup
  • Salt - a pinch
  • Cashew nuts - Few
  • Ghee - 2 to 3 tbsp
HOW TO MAKE CARRTOT HALWA IN PFRESSURE COOKER
  1. Wash and peel the outer skin of Delhi carrot. Grate it using a big holed grater.
  2. Measure 2 cups from it. In a pressure cooker base, heat 1 tbsp ghee.
  3. Saute carrot for 5 minutes to leave the raw smell. Add milk and a pinch of salt.
  4. Pressure cook in high flame for 2 to 3 whistles.
  5. Open the cooker after the steam is released. Add sugar, cardamom powder and a tsp of ghee.
  6. Mix well in medium flame till halwa starts to leave the sides of cooker.
  7. Lastly add ghee roasted cashews along with the remaining ghee. Mix well and serve warm with ice cream !
METHOD - STEP BY STEP PICTURES
  • Wash and peel the outer skin of Delhi carrot. Grate it using a big holed grater. Measure 2 cups from it and set aside.

  • Heat 1 tbsp ghee in a pressure cooker. Saute the grated carrot in medium to high flame till its raw smell leaves completely. It takes 5 to 7 minutes. Carrot changes to pale red in color. Add boiled milk( at room temperature) and a pinch of salt. Mix well.

  • Cover the lid. Put the weight valve. Keep the flame high and pressure cook for 2 to 3 whistles. Open the cooker after steam is released. Carrot becomes soft after cooking and some milk will be leftover in the bottom of cooker.

  • Add sugar, cardamom powder and a tsp of ghee to avoid halwa sticking to the bottom of cooker. Mix well. Carrot mixture liquifies after adding sugar. Mix in medium to high flame till the mixture becomes thick and starts to leave the sides of cooker.

  • Do not over cook the carrot, sugar mixture to prevent halwa becoming hard and chewy. Switch off the flame at the right time with some wetness in it. When it cools down, halwa comes to perfect consistency.

  • Roast cashews in the remaining ghee. Add to the halwa. Mix well and serve it warm with a scoop of vanilla ice cream. Enjoy !
  •  


Note

  • Adjust the quantity of sugar as per your taste.
  • You can replace sugar and milk with condensed milk. In that case, cook carrot adding little water.
  • Do not over mix the carrot after adding sugar. Halwa may become chewy and hard after cooling down.

Try this easy, yummy Carrot halwa in a pressure cooker and enjoy ! I served halwa and dry fruits mixture for my guest.
Continue Reading...


January 18, 2019

Kavuni Arisi Recipe – Chettinad Kavuni Arisi Sweet Recipe – Black Rice Recipes

 Kavuni arisi recipe
 Kavuni arisi is a popular sweet recipe in Chettinad region. It is served in all Chettinad wedding feast. Kavuni arisi is prepared with black rice / Karuppu arisi (Oryza Sativa). It can be prepared with red rice/ Sigappu arisi too. Kavuni rice sweet is an easy recipe. Just wash and soak black rice, pressure cook it. Mix with sugar and coconut. Enjoy, its that simple and easy to make. Black rice is also known as purple rice, sticky rice in India. 

Black rice is completely different from brown rice and white rice. Its a popular rice variety in Myanmar, Burma. They call it as Chak-hao. It tastes chewy and slightly hard. Black rice is considered as a super food. The bran hull (outermost layer) of black rice contains one of the highest levels of anthocyanins found in food. It has a deep black color and usually turns deep purple when cooked. Its dark purple color is primarily due to its anthocyanin content, which is higher by weight than that of other colored grains. 

Black rice is also a good source of iron, vitamin E, fiber and antioxidants. It is suitable for preparing dessert, porridge, pongal, idli, dosa and some traditional Chinese black rice cake, bread and noodles. During our recent trip to Karaikudi, people told Chettiars used to bring black rice, burma teakwood and much more by trading all over the world in olden days. 

Nowadays good quality black rice is cultivated in pudukkottai, karaikudi region and is supplied all over Tamil nadu. You can get it online or from any organic millet shops. I bought this black rice, hand pounded rice ( Kaikuthal arisi) and bamboo rice (moongil arisi) from a shop in front of Green park restaurant in Palani road, Kottapatti – Dindigul.

This is the first time I am using black rice. So I went through many websites and watched YouTube videos for cooking this rice perfectly. I also asked Viji akka from Chettinad for Kavuni arisi recipe mainly the rice water ratio and the quantity of sugar, coconut. Based on her traditional family recipe, I tried it twice and made a perfect kavuni arisi sweet. I noticed two things in this recipe. One, black rice is basically hard and wild. So it should be soaked for a minimum of 6 hours to cook well. I soaked overnight, nearly 12 hours. 

Secondly, it takes more water to cook no matter about cooking in an open pot or in a pressure cooker. It takes 1:4 rice water ratio. You should cook till the white part comes out from the red bran. So cooking time varies as per the rice. Old rice takes more water and more time to cook whereas new rice consumes less water. Based on the age of rice, water quantity and cooking time varies. 

Quantity of sugar can be varied as per your taste. Usually it is 1:1 ratio of rice and sugar but I felt its too sweet. So I used 1:3/4 ratio. There is no need to cook the rice after adding sugar and coconut as per Viji akka’s recipe. But I saw many versions with variations in the basic kavuni arisi recipe. However you make it, its a tasty indulgence ! If you are conscious about using sugar, you can always add Karupatti / Palm jaggery or jaggery. Just powder them and add it. 

Ok, lets see how to make Chettinad special Kavuni arisi recipe with step by step pictures.

Check out more Chettinad special recipes !

Kavuni arisi recipe

Kavuni arisi recipe


Kavuni arisi recipe Chettinad special sweet - Kavuni arisi using black rice, sugar and coconut.

Cuisine: Chettinad
Category: Sweet
Serves: 4
Prep time: 8 Hours
Cook time: 20 Minutes
Total time: 8 Hours 20 Minutes


INGREDIENTS
1 cup = 250ml
  • Black rice / Kavuni arisi - 1/2 cup
  • Water - 2 to 2.5 cups
  • Sugar - 1/2 cup (I used 1/3 cup)
  • Grated coconut - 1/2 cup
  • Ghee - 1 tbsp
  • Cashew nuts – Few
  • Cardamom powder – 1/2 tsp (optional)

How to make kavuni arisi - METHOD

  • Wash the black rice / Kavuni arisi twice or thrice to remove the dust. Soak overnight (12 hours) or minimum 6 hours. Use clean water to soak. 
  • In a pressure cooker base, take 2.5 cups of water. Add the soaked kavuni arisi along with remaining water. Pressure cook in very low flame for 5 to 6 whistles till the rice becomes mushy.  Switch off the flame. 
  • After cooking, you should be see the white part and red bran separately. It is cooked soft but it tastes mildly chewy and hard. Do not panic.  Quantity of water and number of whistles to pressure cook depends on the age of rice. (Old rice takes more water whereas new rice takes just 2.5 cups of water for 1 cup of rice. Similarly old rice takes more time to cook than new ones).
Kavuni arisi recipe
  • After the steam is released, open the cooker. You will find a layer of water. Just mash the rice with a ladle. Drain the excess water and reserve it. Add sugar, grated coconut and cardamom powder (optional) in fire OFF.  No need to keep the flame on while adding sugar. As soon as you add sugar, it will melt and mixture becomes watery. But it will thicken as it cools down.   
  • If you feel its too thick you can add the cooked, reserved water to adjust the consistency. Suppose if its too watery, you can boil till thick. But the traditional kavuni arisi recipe doesn't call for cooking after adding sugar and coconut. 
Kavuni arisi recipe
  • After mixing the rice, sugar and coconut, check for the taste. Add more sugar if needed. Lastly add cashew nuts roasted in a tbsp of ghee. Serve warm or cold. Enjoy !
Kavuni arisi recipe
Note
  • Cardamom powder is optional. You can skip it to enjoy the flavor of black rice.
  • Black rice takes more time to cook than white rice and brown rice. So cook in low flame for more whistles.
  • There is no need to cook the rice after adding sugar and coconut. Just mix them and serve immediately.

Try this yummy Chettinad special Kavuni arisi recipe. You will love it !
Chettinad Kavuni arisi recipe
Continue Reading...


January 4, 2019

Paal Poli Recipe – Milk Poli – Paal Poori Recipe

Paal poli recipe
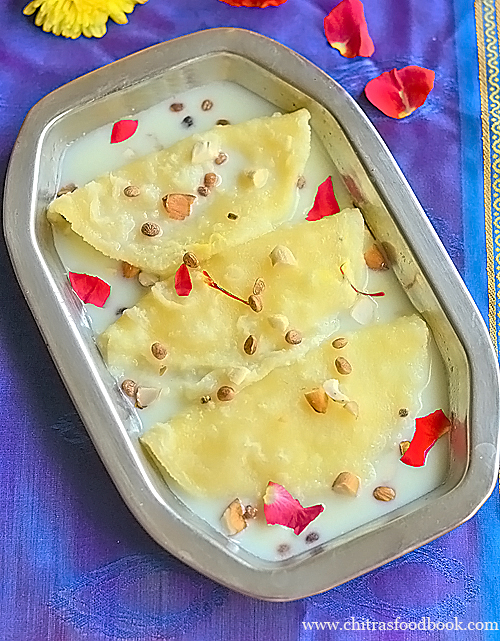
 Paal poli recipe also known as paal poori ( milk poli) is a traditional south Indian dessert recipe. This sweet is prepared with poori and sweetened milk. Poori can be prepared with maida / all purpose flour or chiroti rava. Similarly sweetened milk can be made by boiling and reducing the milk adding sugar or by adding condensed milk. 

Paal poli is usually served in Tamil brahmins wedding feast. They also make it for festivals like Tamil new year, avani avittam, bhogi and krishna jayanthi. I have tasted this in my friend’s house but she had dipped the maida poori in badam milk. I loved it very much and wanted to try at home. Finally I prepared it for this New year celebration and thought of starting my 2019 recipes with this delicious sweet. 

As this is my first attempt, I followed an authentic recipe from my cookbook collections. Sendhil loved it very much. I liked it too. Though the procedure seems to be lengthy, it can be prepared easily. Just make maida poori and dunk in sweetened, reduced milk. I served it by garnishing with lots of nuts and saffron for enhanced flavor and taste. 

Friends, do try this yummy paal poli recipe for festivals and occasions at home. I am sure your family members would love it. Lets see how to make paal poli recipe with step by step pictures.

Paal poli

Paal poli recipe / Paal poori / Milk poli recipe


Paal poli recipe / Paal poori / Milk poli recipe

Traditional South Indian dessert recipe - Paal poli prepared using maida poori and sweetened milk.


Cuisine: South Indian
Category: Sweet
Serves:
Prep time: 15 Minutes
Cook time: 10 Minutes
Total time: 25 Minutes


INGREDIENTS
1 cup - 250ml
  • Maida / all purpose flour - 1/2 cup
  • Coarse Rava / Semolina / Sooji - 1/2 tbsp
  • Ghee - 1/2 tsp
  • Salt - a pinch
  • Water - as needed
For sweetened milk
  • Milk - 1/2 liter ( 2 cups)
  • Sugar - 1/4 cup
  • Cardamom powder - 1/2 tsp
  • Edible camphor - a pinch (optional, I used it)
  • Chopped cashew nuts, badam, chironji - a handful
  • Saffron threads - few
HOW TO MAKE PAAL POLI
  1. To make paal poli, take maida, rava, ghee and salt in a bowl. Mix well.
  2. Add water gradually and make a smooth, non-sticky, stiff dough.
  3. Let the dough rest for 15 minutes. Cover and keep it aside.
  4. In the mean time boil milk. Boil till its reduced slightly.
  5. Add sugar, cardamom powder and chopped nuts. Mix well and switch off the flame.
  6. After 15 minutes, take the dough. Knead well. Roll thick, small poori by dusting in maida.
  7. Heat oil in a kadai. Deep fry poori both the sides. Do not over fry like papad.
  8. Remove the poori, drain the oil and add to milk.
PAAL POLI RECIPE - STEP BY STEP PICTURES

  • In a wide bowl, take maida, rava, salt and ghee. Mix well to spread ghee in the flour.

  • Add water gradually and make a smooth, non-sticky, tight dough. Knead for few minutes. Cover and rest for 15 minutes to 30 minutes.

  • In the mean time boil milk in a pan. When its quantity is reduced slightly, add sugar, chopped nuts and saffron. Boil till sugar melts and switch off the flame. Add a pinch of powdered edible camphor for nice flavor. Its optional though.
  •  

    • Take the dough and knead for a minute. Make lemon sized balls. Dust it with maida if needed. Roll into thick, small poori.

    • Heat oil to deep fry. Check oil temperature by dropping a pinch of dough. If it rises to the top immediately, its heated. Drop one poori and pat it gently. It will puff up and comes to top. Flip and cook the other side. Remove and drain the oil. You can fold into half moon shape if you wish.

      • Dunk the poori in milk and set aside to soak for 30 minutes. Serve warm or cold. Garnish with more nuts and saffron if you like. 

      Enjoy !

      Note

      • Adjust the quantity of sugar as per your taste.
      • Do not add more rava. It makes the poori hard.
      • Do not over fry the poori. It will become a papad.

      Try this yummy, delicious paal poori and enjoy.
      Continue Reading...