To celebrate this Diwali 2020, today I have shared an easy, yummy, nostalgic sweet recipe that kindles our school days memories. Yes, its a 80’s – 90’s kids favorite sweet fondly known as Palkova / halkova. We used to call this as Maida burfi. When we were young, we used to buy this 25p/ 50 paise sweet from the petty shop (Petti kadai) near our school and house. Nowadays its very rare to find petti kadai and 2k kids are not even aware of this sweet. So I thought of making this sweet in my home and enjoy. Even though this is titled as palkova, this is no way related to a milk sweet. Milk or milk powder is not used in this recipe. As it looks white in color, it is called as palkova I guess.
During this lock down, I came across this halkova recipe in my Instagram feed, tried and posted by @starving.tummy Vinesh. When I saw the picture, I was tempted to know the recipe and DM’ ed him. He was so sweet and he shared this perfect recipe immediately. With just 3 major ingredients, this petty shop palkova can be prepared under 15 minutes. Its completely a beginners sweet. There is no sugar syrup consistency or mixing process unlike our usual Maida burfi. It is so simple to make. Original recipe called for using Dalda / Vanaspathi but I used ghee in my first attempt and dalda in my second try. We loved the ghee ones more.
Anyone can make this halkova easily without any fuss. Friends, do try this easy, yummy, halkova / palkova / Maida burfi recipe for this Diwali 2020 and enjoy !
Heat ghee in a kadai for few seconds. Add maida and roast in low flame for 8 to 10 minutes without changing the color.
Maida gets roasted and resembles a semi thick paste. Switch off the flame. Transfer to a bowl.
Let it come to room temperature. Add cardamom powder.
Add powdered sugar gradually and mix well to make a thick dough.
Take a ghee greased bowl lined with butter paper and press the dough to make square shape.
Let it set for an hour in room temperature or in refrigerator.
Then loosen the sides and invert the bowl in a plate.
Cut into small squares and store in an air tight box. It tastes the best from the next day.
Store in an air tight box and enjoy up to one week.
METHOD - STEP BY STEP PICTURES
Powder 1/2 cup + 2 tbsp sugar and measure 1 cup from it. Set aside.
Take melted ghee in a kadai and heat it for few seconds. Add Maida. Roast it well for 8 to 10 minutes in low to medium flame without changing the color of maida. Maida turns like a semi thick paste after roasting. Switch off the flame and remove the kadai. Transfer the roasted maida to a mixing bowl and cool down. I kept in the kadai itself.
Let the maida paste cool down to room temperature. It should be warm enough to handle with your hands. It should not be hot. Add cardamom powder and half of powdered sugar. Mix well and add the remaining powdered sugar gradually.
Mix well to make a smooth, thick dough. Take a bowl. Line with butter paper. Grease with ghee and transfer the dough to it. Press to make shape. Let it set for an hour on counter top or refrigerate it. It takes 30 minutes to set in refrigerator. Remove the bowl and keep it outside. If it's too hard to cut, wait for sometime to bring down to room temperature otherwise burfi may crumble while you cut it.
Loosen the sides with a knife gently. Invert the bowl to a plate and pat it. It will fall easily. Now cut into small squares and arrange in an air tight box. It tastes the best from the next day. You can store and use up to one week. Enjoy !
Note
To make white colored burfi, maida should be roasted patiently in low flame without changing its color.
Do not forget to line the bowl with butter paper for easy removal.
If you use dalda, texture and taste of burfi varies slightly. Also burfi sets quickly than the ones made with ghee.
Make sure, you don’t change the color of maida while roasting. Burfi won’t come white in color.
For variations, you can add a tbsp of milk powder along with powdered sugar.
If you cut the burfi before its set completely, it may crumble into small pieces.
Try this easy, yummy palkova / maida burfi recipe and enjoy !
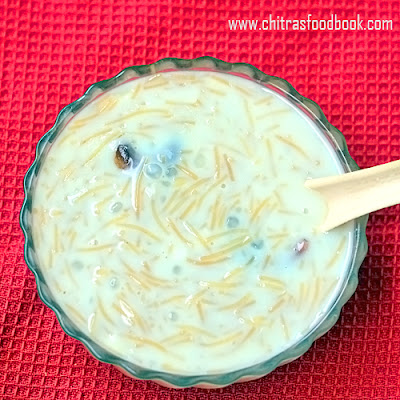
Every Thursday I make this Instant semiya payasam in a pressure cooker easily for my Guru Pooja naivedyam / prasad. It takes just 15 minutes to prepare it. I started making vermicelli kheer in pressure cooker after hearing from my friend Shalini. Once she shared her vermicelli payasam recipe in instant pot. I thought of making the same in our Indian pressure cooker and it was a huge success in my home. But there are few points to be remembered while making this payasam in cooker to avoid curdling. I have shared all of them in this recipe.
I have shared a Kerala style semiya payasam recipe in pressure cooker but this version is much more easy and less time consuming too. For variations, you can add condensed milk / Milkmaid instead of sugar. It tastes even more rich. Ok friends, lets check out this easy semiya payasam recipe in cooker with step by step pictures and video.
Pre Roasted semiya / Roasted Vermicelli - 1/2 cup (I used MTR roasted vermicelli)
Sugar - 1/2 cup
Raw, unboiled milk - 2 cups
Water - 1/2 cup
Cardamom powder - 1/2 tsp
Ghee - 1 tbsp
Cashew nuts, dry grapes – few
Salt – a pinch (optional)
HOW TO MAKE SEMIYA PAYASAM IN PRESSURE COOKER
Wash and clean the pressure cooker, lid and gasket properly. Let it dry.
In the pressure cooker, take the roasted vermicelli, sugar, milk, water and cardamom powder.
Mix well. Pressure cook under low flame for two whistles.
Remove the lid after the steam is released naturally.
Heat ghee in a kadai and roast the cashews till golden in color. Add the raisins and roast till its puffy.
Add to the semiya payasam. Mix well and enjoy !
METHOD - STEP BY STEP PICTURES
Take a medium or big sized pressure cooker. Wash it well. Wash the lid, gasket properly and wipe it dry. This is the first step that helps to avoid curdling of payasam.
In that pressure cooker, take roasted vermicelli, sugar, unboiled milk, a pinch of salt, water and cardamom powder .
( TIP: Addition of both water and milk helps to prevent curdling of payasam). If you have unroasted vermicelli, roast it in a tsp of ghee till golden in color. Then add water, milk, sugar and cardamom powder. Mix well.
If you are using small sized cooker, keep in small sized burner. I used my 2 liters cooker and used my medium sized burner.
Add a small spoon or a plate in the bottom of cooker. It helps to reduce the splashing of milk while the cooker whistles. This step is optional though.
Close the lid and keep the cooker in high flame till steam comes out. lower the flame completely and then put the weight valve. Cook for two whistles in very low flame and switch off the flame. It takes nearly 8 to 10 minutes to whistle.
Let the pressure release naturally. Now open the cooker lid and mix well.
Heat ghee in a kadai and roast the cashews. When it starts to turn golden in color, add the raisins and roast till its puffy. Switch off the flame and add this to the semiya payasam.
Mix well and serve hot or cold by refrigerating it for an hour. Semiya payasam thickens after it cools down completely. To make it drinkable, add some boiled milk before serving, adjust sweetness by adding more sugar, mix well and serve it. Enjoy !
Note
Adjust the quantity of sugar as per your taste.
For variations, you can use condensed milk instead of sugar.
You can add some saffron threads too.
Do not add milk alone. Add some water to prevent curdling.
Do not add ghee along with milk. While cooking, fat separates from the milk and gives a curdled look to the payasam.
If you want to make payasam without pressure cooker, first cook the vermicelli in water. Then add milk, sugar, cardamom powder. Boil and garnish with roasted nuts.
Try this easy, instant semiya payasam in pressure cooker and enjoy !
Making traditional rabdi/ rabri at home without condensed milk and khoya was in my long time pending list. Rabdi is basically a North Indian special dessert recipe prepared by boiling and reducing the milk till thick by collecting the malai(skin of milk). Its also known as lachha rabdi in Hindi.
Last year, when I prepared instant Malpua, I tried instant rabdi recipe with condensed milk in microwave. It was so quick and easy. After that, I prepared this traditional method of making rabdi for Krishna jayanthi to post under North Indian Krishna Janmashtami special recipes. Though this traditional rabdi is a time consuming process, the end result makes you forget the pain.
I have always thought rabdi and South Indian special dessert basundi are the same. But after preparing this rabri from scratch, I found there are some differences between rabdi and basundi in consistency, taste and method of preparation. Rabri is thicker than basundi. You can enjoy it warm or serve it chilled. You can enjoy eating as such or with malpua, jalebi, shahi tukda or even with gulab jamun. Tastes so good !
Ok friends, lets see how to make rabdi / rabri at home with step by step pictures and video.
Rabdi Recipe - How to make Rabri for malpua
Rabdi Recipe - How to make Rabri for malpua at home
Pour the thick, full fat milk in a wide based kadai. Boil well. When the milk starts to rise, lower the flame and let it boil. Keep a wooden ladle over the kadai diagonally. It helps to prevent spilling of milk when it boils in medium flame. While it boils, cream/skin forms on top of milk which is called as malai in Hindi / paalaadai in Tamil . Keep the flame low to medium.
Use a ladle or spoon and move the cream to the sides of kadai. Repeat the same and collect it in the sides of kadai. Do not stir the milk continuously because malai won’t form on top. So boil the milk patiently in low to medium flame such that malai keeps forming on top. But don’t forget to stir the milk occasionally till the bottom of kadai because there are chances of milk getting burnt in the bottom.
Collect the malai and deposit in the side of kadai. Milk boils and reduce in quantity. In the mean time, you can chop the nuts and set aside. Once it is reduced to 1/3rd of its quantity, add sugar, saffron threads, cardamom powder.
Mix well and boil till the sugar melts. Milk turns slightly yellow in color. When the milk is reduced to 1/4th of its quantity, switch off the flame. Scrape the malai from the sides of kadai and add to the milk. Mix well and serve. Rabri thickens as it cools down. So switch off at the right stage. Make sure its not thick.
Lastly add few drops of rose water and chopped nuts.(I din't blanch the badam. I used it with skin). Mix well and serve warm or chilled by refrigerating it for an hour. You can serve and consume as such or serve with rabri with malpua, gulab jamun, jalebi, Imarti or with shahi tukda. Enjoy !
Note
Do not stir the milk continuously or often because it prevents the formation of cream on top of milk.
Don’t forget to stir the milk occasionally otherwise milk gets burnt in the bottom of pan.
Adjust the quantity of sugar as per your taste buds.
Do not skip rose water or use kewra essence for a nice and unique flavor to rabdi.
Do not make it too thick because rabri thickens as it cools down. So switch off the flame when its slightly thin in consistency. Adding malai makes it thick.
I din't blanch / peel the skin of almonds/ badam. If you wish, you can do it by soaking in hot water for 30 minutes.
Try this traditional Rabdi recipe at home and enjoy !
My aachi and mom makes semiya javvarisi payasam / sago vermicelli kheer adding nylon javvarisi very often. It can be prepared instantly without soaking and it cooks quickly too. She makes this yummy Indian dessert recipe for all the celebrations, occasions, festivals at home and specially for guests. I have never seen them making semiya payasam without javvarisi. My mom says addition of sago in semiya payasam helps to give more yield and also gives an appealing look to see the transparent tapioca pearls swimming with vermicelli in milk. You would have seen this kind of watery payasam in marraige feast and hotels. They serve in a small cup in drinkable consistency. In my house, both aachi and amma use nylon javvarisi (crystal, small sago) which is commonly found in Tamilnadu. But I have never tried kheer in this combination as I don’t get nylon javvarisi here. I can get white, big, pepper sized sago which we call as maavu javvarisi in Tamil. I thought javvarisi semiya payasam can be prepared only with small sized javvarisi.
Recently when I was talking to my mom and MIL, they told me to try semiya javvarisi payasam using this white sago itself. They told me the method and measurements clearly along with some tips. So I prepared it yesterday for my Thursday Guru pooja. Usually I make white, big sago payasam by soaking it at least for 4 to 8 hours or overnight. But yesterday I prepared this payasam by soaking the sago in hot water for just 15 minutes. It came out so well. I was so happy with the end result. Soon I will try to share this payasam recipe in a pressure cooker easily. For variations, you can use condensed milk / milkmaid instead of sugar.
Friends, now you too can make this yummy semiya javvarisi payasam irrespective of the sago variety by following this recipe with step by step pictures. I have also taken a video but iam yet to edit it. I will try to add the video soon.
Semiya javvarisi payasam
Semiya javvarisi payasam / sago vermicelli kheer in Tamilnadu style.
Water – 2 to 2.5 cups ( to cook javvarisi and semiya)
Boiled Milk at room temperature – 2 cups
Sugar – 3/4 cup
Cardamom -3 (crushed)
Cashew nuts - 5 (whole)
Dry grapes - 10
Ghee - 1 tbsp
HOW TO MAKE SEMIYA JAVVARISI PAYASAM
Wash and soak javvarisi in hot water for 15 minutes.
In the mean time, heat 1 tbsp ghee in a kadai.
Roast cashew nuts and dry grapes till golden. Remove in a plate.
Roast semiya for 2 minutes. Remove in a plate.
Roll Boil 2 cups of water in a vessel. Add the soaked javvarisi.
Cook in medium flame for 10 to 15 minutes till its semi transparent.
Add the roasted semiya and cook for another 10 minutes.
Both semiya and javvarisi will be well cooked, soft and transparent.
Add sugar, cardamom powder, roasted nuts. Mix well and boil till sugar melts.
Switch off the flame once payasam becomes thick.
Add boiled milk at room temperature to the hot payasam. Add half the quantity of milk for thick payasam.
Mix well and serve!
METHOD - STEP BY STEP PICTURES
Take a bowl and add the sago (I used white ones). Add hot water till 1 inch above the sago. Soak it for 15 minutes.
In the mean time, heat 1 tbsp ghee in a kadai. Roast cashews till light golden in color. Add the dry grapes and roast till bulgy. Remove cashews and dry grapes in a plate. Set aside.
Add semiya / vermicelli to the remaining ghee. Roast for 2 minutes. If you use unroasted semiya, roast till it turns light golden in color. It takes 5 to 7 minutes in low flame. I used roasted semiya. So I did it for 2 minutes.
Take 2 cups of water in a pan. Let it roll boil. Add the soaked sago pearls. Mix well. Let it cook in low to medium flame for 10 minutes. You can cover and cook it. Stay nearby and keep an eye on it. Stir it twice in the middle to avoid sticking to the bottom of pan. Cook till it becomes semi transparent. You should see less white parts in sago.
Once the sago is 3/4th cooked, add 1/2 cup more water and add the roasted vermicelli. Cover and cook till its done. It takes another 10 minutes in low to medium flame.
After the semiya and javvarisi are well cooked, add sugar and crushed cardamom. Mix and boil till sugar melts. Payasam becomes thick. Now switch off the flame.
Add boiled milk at room temperature to the hot payasam. Add milk according to the consistency you like. Do not boil the payasam after adding milk. It may give a curdled look. For thick, spoonable payasam add 1 cup milk. For thin, drinkable payasam, add 2 cups milk. Lastly add the roasted nuts. Mix well and set aside.
This payasam will remain in the same consistency for few hours. It won't become thick as we are adding milk at room temperature. It will thicken if you add hot milk or less milk. I made in a drinkable consistency like the ones served in marriages and hotels. You can enjoy drinking hot or refrigerate and serve cold as per your wish. Enjoy !
Note
For less sweetness, add 1/2 cup sugar.
Do not add more javvarisi than the mentioned quantity because adding more sago gives a porridge look to the payasam I feel.
While cooking javvarisi, stay nearby and keep checking it else javvarisi dissolves in water.
If you are using nylon variety sago, you have to dry roast it till puffy and white. Then cook it along with semiya because it takes lesser time to cook than the white, big sago.
Do not roll boil the payasam after adding milk. If you want to heat it, do in very low flame.
For variations, you can add a tbsp of badam milk powder at the end.
Try this easy, yummy semiya javvarisi payasam and enjoy !
Besan ka halwa in Hindi( Kadalai maavu halwa in Tamil) is a rich and delicious Indian dessert recipe. It is prepared with besan flour, sugar, ghee, milk, water flavored with cardamom powder and garnished with nuts. Though its a very simple recipe, it needs some patience and continuous attention to make it perfect. Roasting besan flour patiently is the key to make a flavorful halwa else halwa tastes and smells raw.
This halwa can be prepared adding water or milk. Color of halwa varies as per the use. I used water here. For variations, you can use jaggery instead of sugar. Do not reduce the quantity of ghee and sugar mentioned. It will affect the taste and texture of this besan halwa. For making this halwa, I used pure cow's ghee from Ghee store. It came so well !!
Recently I got a pack of pure desi cow ghee and wood pressed sesame oil and ground nut oil from Ghee store for my review. Ghee store is an online shop where they sell organic pure desi cow ghee, buffalo ghee, brown ghee, cold pressed and wood pressed oils and organic honey. All their products are traditionally prepared without machines. They use wood fire for preparation and is done 100% manually. So they give assurance to the flavor, taste and purity.
As they promised, I found the ghee, sesame oil and groundnut oils are so good, fresh and flavorful. We all just loved it. Price is also reasonable when compared to some other brands who sells A2 ghee at a very high price. I am sure I will buy their products regularly in future. I would recommend this brand for my friends and family too.
Friends, do check out their website gheestore.in and place your orders. You can try their sample pack at a minimal price and then go for bulk orders if you are satisfied. Here is their Instagram , Facebook andtwitter page links. Check it out friends. You can also click on the below image to view their website. You can also find some useful informations regarding the health benefits of pure cow ghee, buffalo ghee and cold pressed oils in their blog page.
Ok, lets see how to make besan ka halwa using pure cow ghee with step by step pictures.
Besan Ka Halwa / Besan Halwa Recipe
Besan Ka Halwa / Besan Halwa Recipe - Rich and delicious halwa recipe
Add besan flour and roast in low to medium flame till golden in color with a nice smell.
Add water and mix till besan turns thick. Add sugar and mix in low flame.
Halwa becomes thick, non sticky and leaves the pan.
When it becomes a whole mass, add the remaining ghee, chopped cashews and cardamom powder.
Mix well and switch off the flame. Remove in a plate. Serve warm and enjoy !
METHOD - STEP BY STEP PICTURES
Add 1/3 cup of melted ghee in a heavy bottomed kadai. I used my thick non-stick kadai.
Heat ghee and add the besan flour. Keep the flame low to medium and roast the besan flour for 8 to 10 minutes till besan flour turns golden in color with a nice smell.
Lower the flame completely and add water at room temperature. You can also add boiled milk at room temperature instead of water. I used water. Mix quickly to break the lumps.
Keep mixing till all the water / milk is absorbed by the besan flour. When it becomes thick, add sugar.
Mix well till all the sugar is dissolved in halwa. Keep the flame medium and mix for few minutes. Halwa thickens and starts to leave the sides of pan.
Keep mixing till halwa leaves the pan completely and becomes a whole mass. Add cardamom powder, remaining ghee and chopped cashew nuts. Mix well. Switch off the flame. Transfer to a plate and serve warm or hot !
Enjoy.!
Note
You can add milk instead of water. Color of halwa differs if you add milk.
Add 1 cup of sugar for more sweetness.
Do not reduce the quantity of ghee.
You can use wheat flour instead of besan and make this halwa.
For variations, add 2 tbsp of suji / rava / semolina to 1 cup of besan flour while roasting. It gives a coarse texture to the halwa.
Do try this easy, yummy besan ka halwa and share your feedback !
Hi friends, Wish you all a very happy 2020. Let this new year brings all the joy and prosperity!!. Bread kaja is an easy and interesting Indian style dessert recipe with bread. It can be prepared quickly and instantly with less procedures. Last week when I was looking for some easy sweet recipes / dessert recipes using leftover bread slices, I came across this bread kaja recipe in Hari Chandana’s blog.
Bread kaja sweet is a simplified version of Shahi tukda which is a rich and famous Mughal dessert. For making bread kaja, we have to just deep fry the bread slices in oil / ghee and dip in flavored sugar syrup. Rabri / sweetened milk is not needed for this sweet. So preparation time is lesser. You can make it under 10 minutes for your surprise guest. Kids will love it. I thought this sweet would be ideal for this new year celebration.
When I googled for images, I found bread kaja looks triangle in shape similar to Shahi tukra. But I made in small squares to attract the kids. Its an interesting recipe to empty the leftover bread slices. You can make and consume it immediately for crispy tasting bread OR you can soak the fried bread slices in sugar syrup overnight and enjoy like bread gulab jamun. It tastes so soft and flavorful. In fact I loved the soft and well soaked bread pieces more than crispy ones. Ok friends, do try this yummy, easy bread kaja sweet recipe for this new year 2020 and share your feedback with me.
Once again wish you all a very happy new year!!. This year I have planned to start my YouTube channel in Tamil as requested by many of you during last year. Hope you will continue to give your love and support for my new venture too. Thank you !
Bread kaja recipe - Easy sweet with bread
Bread kaja recipe - Easy sweet with bread for dessert & snack.
Take the bread slices and cut into squares or a triangle.
Heat oil and deep fry bread pieces till golden in color. Drain in a tissue paper.
Melt sugar in water and make sugar syrup of half string consistency.
Add rose essence and saffron thread. Mix the syrup. Add the fried bread pieces.
Soak it for few minutes and serve warm by garnishing with chopped nuts.
BREAD KAJA RECIPE - STEP BY STEP PICTURES
Take the bread slices and discard the brown part if you wish. I used the brown part too. Chop into square shaped pieces or into triangles.
Heat oil in a kadai. Deep fry the bread pieces in medium flame till golden brown in both the sides. Remove and drain the excess oil in a tissue paper.
Melt sugar in water and make sugar syrup. Boil and bring the syrup to half string consistency. i.e Take little syrup in your thumb finger and press with pointer finger. Release it, check if the string is formed and gets cut. This is called half string consistency. Switch off the flame and add rose essence, saffron threads.
Dip the fried bread pieces in sugar syrup and soak for few minutes by flipping both the sides. Sugar syrup will be absorbed by the bread pieces. Garnish with chopped nuts. You can serve it immediately if you like crispy tasting bread else soak overnight and serve soft bread pieces which tastes like bread gulab jamun.
Stays good for a day or two. Enjoy !
Note
You can use cardamom powder instead of rose essence.
You can also bake the bread pieces or toast in a toaster instead of deep frying. But taste differs.