Basically I love milk sweets especially milk halwa and doodh peda are my favorites. I love Nandini Doodh peda very much and tried to recreate it at home several times but I couldn’t get it perfect. Then I came across this Instant doodh peda with milk powder and condensed milk in a YouTube channel.
Usually Doodh peda is prepared by boiling and reducing the milk till thick. It takes more time to prepare. But this is a short cut version which gives the end result equal to the shop ones. To shape this peda just like Nandini ones, I bought peda maker from Amazon and tried it. It came out perfect in shape. I loved it and became very happy to see my doodh peda just like store bought ones.
Friends, if you are looking for easy Diwali sweets to prepare under 20 minutes, this is one recipe. Even though it takes less time to cook, you need to wait atleast for one day to get the perfect sweet stall taste because doodh peda takes more time to set. It stays good for a week with refrigeration and two days without refrigeration.
Do try this easy, yummy instant doodh peda recipe with milk powder and condensed milk. You will love it like me. Lets move on to the recipe with step by step pictures and a video.
Doodh peda recipe with milk powder and condensed milk
Doodh peda recipe with milk powder and condensed milk - Easy Diwali Sweet with milk powder.
In a wide bowl, mix the milk powder and milk to a smooth paste.
Heat ghee and add the condensed milk. Mix well.
Add the milk powder paste and mix well.
Cook till the mixture becomes thick and leaves the sides of pan.
To check the doneness, take a pinch and roll it. It will be non sticky.
Switch off the flame and transfer to a greased plate immediately.
Let it become warm. Make shapes with peda mould and enjoy !
METHOD - STEP BY STEP PICTURES
In a wide bowl, take the milk powder and add the boiled milk at room temperature. Milk should not be hot or warm.
Mix with a whisk till no lumps and becomes smooth paste. Set aside.
Heat ghee in a non stick kadai. Add the condensed milk and mix well. Add milk powder paste and mix well.
Cook in low to medium flame till it becomes thick and leaves the sides of pan. It becomes a whole mass.
When you take a pinch and roll it, it will be non sticky. Now switch off the flame and transfer to a ghee greased plate.
Let it become warm. Now take a tbsp full of dough and press it. Make round shape and press the peda mould on it. Peda is ready. Let it rest over night. It tastes best the next day.
Enjoy !
Note
You can add powdered sugar instead of condensed milk. You can add 1/3 cup of powdered sugar in that case. Check for taste and add more if needed.
Make sure you cook the peda mixture till it becomes a whole mass.
Do not cook in high flame. It may burn in the sides or it becomes hard and chewy.
Easy, yummy Doodh peda is ready to enjoy ! Stays good for 2 to 3 days in room temperature.
Every Thursday and Friday, we do Guru pooja and Lakshmi pooja at home in a simple manner. Thinking about what to make as prasadam / neivedyam every week is a big task for me. Even though I know many prasadam recipes like sweet pongal, Kesari, Payasam etc, I always look for simple and healthy naivedyam recipes that can be prepared easily.
For this year Navarathri, I have come to Salem and spending some good time with my in-laws as we don’t have Golu celebration this year. Still we make some sweets and sundal varieties on all these 9 days and offer God. Today my MIL prepared this easy sweet aval mixture for Thursday guru pooja neivedyam.
Its a very simple sweet mixture recipe. There is no deep frying and my MIL had used jaggery instead of sugar. So this is a super quick and super healthy recipe you can munch on for your evening snacks. I am sure kids will love it a lot.
All you need is Poha / Aval, Sesame seeds, Roasted chana dal and jaggery for this recipe. Its so tasty and crunchy to eat. Friends, If you are looking to make some simple sweet mixture along with sundal for this Navratri and Diwali, you must try this recipe. Even bachelors can make this easily. Everyone will love it.
Ok friends, lets jump on to this easy sweet poha chivda / Aval mixture with jaggery in simple steps.
Roasted chana dal / Gram dal / Pottukadalai - 2 tbsp
Grated or powdered jaggery - 1/4 cup ( adjust as per you need)
Ghee - 1 tbsp
Cardamom - 2 (crushed or powdered)
HOW TO MAKE SWEET AVAL MIXTURE
Heat a kadai and dry roast the sesame seeds till it splutters.
Collect in a plate. Add a tsp of ghee and roast a fistful of poha till it puffs up and become crispy. Remove in the plate.
Repeat the same procedure for 1/2 cup of poha. Collect in the plate.
Switch off the flame and add in the roasted gram dal. Let it roast in the heat of kadai. Collect in the plate.
Let everything cool down. Lastly add grated jaggery and crushed cardamom.
Mix well and serve immediately for best taste. Store in an air tight box and consume within a day.
METHOD - STEP BY STEP PICTURES
Heat a kadai and dry roast the sesame seeds till it splutters. Remove in a plate.
Heat 1 tsp of ghee. Add a fistful of poha / thick aval and roast patiently it turns white and puffs up well. If you try to break it, it will be crunchy. Remove in the sesame seeds plate.
Again add 1 tsp of ghee. Add fistful of poha and roast till crispy and puffy. Remove in the plate. Repeat the procedure until all the poha is roasted.
Switch off the flame and add the roasted chana dal. Mix well. Let it roast in the heat of kadai. Remove in the plate.
Let everything cool down. Lastly add the crushed cardamom and grated jaggery. Mix well and serve immediately for best taste.
Note
For variations, you can add powdered sugar instead of jaggery.
You can also add some ghee roasted cashews.
I have not deep fried the poha to make a low calorie version. You can also deep fry in oil and ghee mixture to make it rich.
As it is not deep fried, this mixture turns soggy soon. So store it in an air tight box and consume within a day.
Try this easy sweet aval mixture and enjoy at home.
Green gram laddu / Pasi payaru urundai (in Tamil) is a super healthy and easy sweet cum snack recipe. Last week I prepared this for my Guru pooja neivedyam. It can be prepared instantly under 15 minutes. I used Organic powdered jaggery / Naatu sakkarai. You can use sugar too.
Friends, you can pack this healthy green moong ladoo for yours and kids snacks box. You can also prepare this ladoo as prasadam for festivals like Diwali, Gokulashtami, Navarathri and Ganesh chaturthi as its easy, healthy and quick to prepare. Ok, Lets check out how to make this easy and yummy Green gram laddu with jaggery with step by step pictures.
Green gram laddu with jaggery / Pasi payaru urundai recipe
Green gram laddu with jaggery / Pasi payaru urundai recipe for Kids snacks box and festivals.
Heat a kadai and dry roast the green gram in low to medium flame till reddish brown with nice aroma.
Cool down completely. Grind to a fine powder along with cardamom.
Lastly add powdered jaggery to it and grind again to smooth powder.
Collect in a plate. Heat ghee and roast broken cashews. Add to the mixture.
Mix well and shape ladoo. Store in an air tight box. You can use up to 1 week.
METHOD - STEP BY STEP PICTURES
To make green gram ladoo with jaggery, firstly heat a kadai. Lower the flame and add the green gram. Roast it till it leaves a nice aroma and turns reddish brown color. Roast patiently in low to medium flame else laddu tastes raw.
Switch off the flame and remove in a plate. Let it cool down completely.
In a mixie jar, take the green gram, cardamom and grind to a fine powder.
Lastly add the powdered jaggery to the mixie jar. Powder it nicely. Remove and collect in a plate.
Heat ghee in a small kadai and roast the broken cashew pieces till golden in color. Add to the green gram jaggery mixture.
Mix evenly with a spoon as the ghee is hot. Once it turns warm, mix well with your hands and shape balls. Make ladoo and store in an air tight box. Enjoy up to 1 week.
Note
For variations, you can roast the powdered green gram in melted ghee, cashew mixture and shape ladoo once it cools down. Ladoo looks little moist and shiny.
You can use powdered sugar instead of jaggery.
Make sure you roast the green gram without raw smell.
Easy, super healthy and instant green gram ladoo is ready to relish !
Aval puttu / Poha jaggery puttu is one of the easy and yummy neivedyam recipes you can prepare for Gokulashtami, Navarathri and other occasions at home. I learnt this recipe from my MIL. She used to make it often for our Friday Thiru vilakku poojai.
Last week I made this for my pooja asking the recipe and procedure from her. Actually my MIL told me to add powdered jaggery to the powdered and soaked poha directly. But I made jaggery syrup and strained it as it had some impurities. If your jaggery is clean, you can powder and add it as such.
Friends, do try this easy Aval puttu / Poha puttu for Gokulashtami festival and enjoy.
Aval puttu / Poha puttu recipe
Aval puttu / Poha puttu recipe for Gokulashtami and Navarathri festivals.
Dry roast aval / poha for 5 minutes in medium flame till crispy.
Remove and powder it coarsely. Wash and keep it aside.
Add little hot water to make the poha soft. Cover it for 10 minutes
Poha becomes soft and crumbly in few minutes.
Boil jaggery and melt it. Strain the syrup and boil till frothy and thick.
Add the syrup to the soaked poha. Mix well.
Add cardamom powder, grated coconut and mix well.
Lastly roast the cashews in ghee till golden in color.
Add to the aval puttu and offer as prasadam to Lord Krishna for Gokulashtami !
METHOD - STEP BY STEP PICTURES
Heat a kadai and dry roast the aval / poha for few minutes in medium flame. Roast till it becomes crispy. You can use thin or thick poha.
Remove and cool down. Grind to a coarse powder and add little hot water to it. ( Say 1/2 to 3/4 cup). Cover and sit for 10 minutes. Poha absorbs all the water and it becomes soft, crumbly.
In the mean time, boil the jaggery adding 1/4 cup water and melt it. Strain the syrup and boil again till syrup becomes frothy and slightly thick.
Add the syrup to the soaked aval and mix well. It will look mushy initially but it becomes crumbly and fluffy after some time.
Lastly add the crushed cardamom,grated coconut and mix gently. Roast cashews in ghee and add to the poha mix.
Mix well and offer as prasadam to Lord Krishna. You can also make this neivedyam for Navarathri along with some sundal varieties.
Enjoy !
Note
For variations, you can add powdered jaggery to the soaked poha if its clean.
For thin poha, just follow the same procedure but do not add all the syrup at once. Add gradually till poha absorbs it because thin poha doesn’t take all the syrup.
Nagara Panchami and Maha Shivaratri is one of the most popular festivals in Karnataka. Every year during Nag Panchami and Shivaratri, my neighbor used to pass this akki tambittu recipe as pooja prasadam. We all love it. I wanted to get the recipe from her and blog it for long time. Due to this pandemic situation, we are not able to get this prasadam from her for the past two years.
This year, I got the recipe from her and made it in my kitchen. I also offered this laddu / unde as prasad for my Thursday Guru pooja. My neighbor makes it big in size but I made it small as per my family’s liking. Friends, this tambittu is a super healthy ladoo recipe with all the goodness of jaggery, roasted rice, roasted gram, sesame seeds, peanuts, poppy seeds and desiccated coconut. You can give it to your kids snacks box as well.
Apart from this akki thambittu recipe, people also make Chigali ladoo/ sesame seeds laddu, hurigadale tambittu on this occasion. Soon I will try to share those recipes here.
Now lets see how to make Karnataka special akki tambittu recipe with step by step pictures. Prepare this special recipe for Nagara Panchami festival tomorrow and enjoy !
Akki thambittu recipe / Akki tambittu recipe
Akki thambittu recipe / Akki tambittu recipe for Nagara panchami and Maha Shivaratri festival prasada.
Grated jaggery - 1/2 cup (Use 3/4 cup for more sweetness)
Roasted gram dal / Hurigadale - 1/4 cup
Peanuts - 1/4 cup
Sesame seeds - 2 tbsp
Khus khus /Poppy seeds - 1 tbsp
Cardamom powder - 1/2 tsp
Ghee - 1 tbsp
Desiccated coconut - 2 tbsp (Grated)
Water – 1/3 cup
HOW TO MAKE AKKI THAMBITTU RECIPE
Heat a kadai and dry roast the rice till puffy. Transfer to a plate.
Dry roast sesame seeds and poppy seeds till they splutter.
Add roasted gram dal and roast for a minute. Reserve half and transfer to the rice plate.
Dry roast peanuts till skin crackles. Remove the skin and keep aside.
Dry roast coconut and set aside.
Grind the rice, sesame seeds, roasted gram dal mixture to a fine powder.
Transfer to a plate. Grind peanuts coarsely and add to the plate.
Now add the roasted coconut, cardamom powder, reserved poppy+sesame seeds+gram dal and ghee. Mix well.
Melt jaggery adding water and boil till frothy. Let it cool down. Filter it and add to the rice mixture.
Mix evenly and make balls. Karnataka Akki thambittu is ready !
METHOD - STEP BY STEP PICTURES
Heat a kadai and roast the rice in low to medium flame till puffy. Remove in a plate.
Dry roast sesame seeds and poppy seeds till it starts to splutter. Add the roasted gram dal and roast for a minute. Switch off the flame.
Reserve half of this mixture in a plate and add the remaining in the rice plate. Cool down and grind to a fine powder.
Transfer to a plate. Dry roast desiccated or fresh coconut for few minutes and add to the rice flour plate.
Dry roast peanuts till its skin crackles. Cool down and remove the skin. Grind coarsely.
Add the powdered peanuts to the rice flour mixture. Add cardamom powder, ghee and the reserved poppy seeds, sesame seeds and roasted gram dal. Combine and mix everything well.
Take jaggery in a kadai. Add water to cover it. Boil and melt the jaggery. Boil for few minutes in medium flame till it becomes frothy and slightly thick. No need to look for any consistency. But make sure, jaggery syrup is not too thick. Thambittu will become hard to bite after it sets. So keep the syrup slightly thick like oil. Let it cool down completely.
Now filter the syrup and add to the rice flour mixture. Mix well to coat the rice flour. No problem if the mixture looks wet and loose. Shape ladoo and arrange in a plate.
This ladoo becomes hard after its set in few hours. So make sure the ladoo is soft to handle while shaping.
Enjoy !
Note
For variations, you can skip grinding sesame seeds and poppy seeds. You can add the roasted ones as such.
You can skip desiccated coconut or use fresh coconut instead. In that case, roast the fresh coconut till its dry.
Try this easy, healthy akki thambittu recipe for festivals and enjoy !
Rice kheer / rice pudding (arisi payasam in Tamil) was the very first recipe I tried in my instant pot for Thursday Guru pooja prasad. Rice kheer is a creamy Indian dessert recipe that is prepared for festivals and special occasions at home. The ease of this recipe has made me prepare this dish almost every week Thursday or Friday poojai. All we have to do is to just add in roasted basmati rice, water, milk, sugar, cardamom powder and few saffron threads. Cook in pressure cooker mode in instant pot for just 12 minutes and your creamy rice kheer is done ! It tastes more like restaurant style rice kheer.
Before making this rice kheer in instant pot, I referred so many recipes for perfect measurement, procedure and cooking time. Most of the recipes called for cooking rice in milk (in porridge mode or pressure cook mode) and then add sugar or condensed milk, flavoring ingredients like cardamom, saffron, nuts etc. But I wanted a recipe like one pot one shot just like my pressure cooker semiya payasam.
When I was discussing about this with my friend Shalini, she suggested me to try this method. She has been doing making rice kheer in instant pot for the potluck, get togethers and weekend party following this procedure. Its a hassle free and easiest method to make this yummy Indian dessert even in the last minute. You can serve 10 people easily with just 1 cup of rice.
In Instant pot rice kheer, most of the people complain about curdling of milk or rice sticking to the bottom of instant pot or kheer getting burnt in the bottom. Don’t worry, this method doesn’t disappoint you in any way. Addition of water is the key here. You will get a rich, super creamy, thick and yummy rice kheer all the time.
I have used basmati rice, sugar and milk in this recipe. You can use raw rice, condensed milk or soy milk, Almond milk, coconut milk( for Vegan options) instead. You can also use evaporated milk.
Friends, do try this easy and creamy rice kheer in instant pot. You will love it and make it more often like me. Lets see how to make Indian rice pudding / rice kheer in instant pot with step by step pictures.
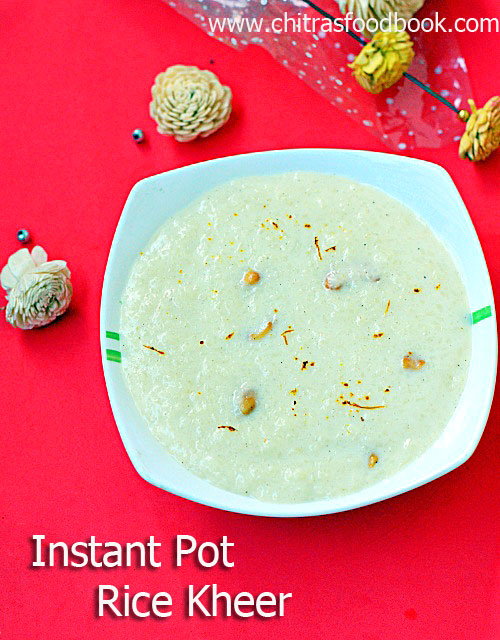
Instant pot rice kheer / rice pudding in Instant pot
Rice kheer / Rice pudding - Rich and creamy Indian dessert recipe using Instant pot
Add the rice and roast for a minute. Firstly add water, mix well.
Then add milk, sugar, cardamom powder, saffron threads. Mix well.
Press CANCEL. Press PRESSURE COOK and set the time to 12 minutes in normal pressure.
Make sure pressure valve is in SEALING position. Let the pressure release NATURALLY (NPR). Open the cooker and mash the rice well.
Add more milk and sugar if needed.
Add roasted cashews. Mix well and serve hot. Enjoy !
METHOD - STEP BY STEP PICTURES
Take basmati rice and grind coarsely using pulse button in mixie. Wash it well and set aside.
Wash the instant pot vessel and the inner ring portion of the lid thoroughly. Dry it completely. This helps to prevent curdling of kheer.
Switch on the instant pot and press SAUTE button. Heat 1 tbsp ghee in the instant pot base vessel. Add cashew nuts and roast it till golden in color. Remove in a plate.
Add washed rice and roast for a minute. Add water (DO NOT SKIP WATER) and mix well. Add boiled milk (at roon temperature), sugar, cardamom powder and saffron threads. Mix well to scrape the rice sticking to the bottom of the vessel.
Now press CANCEL button and press PRESSURE COOK button. Set the timer to 12 minutes in NORMAL pressure. Close the instant pot lid and keep the pressure valve in SEALING position.
After 12 minutes, instant pot goes to warm mode and pressure releases. Let the pressure release naturally (NPR). Open the lid after the pressure button drops down. Mix well. Do not release the pressure forcefully. Milk will be splashed everywhere and make a mess. I removed it after 40 minutes. Kheer would be well cooked and looks thick. Mix well and check for taste and consistency. Add more milk and sugar if needed. I used 1/2 cup more milk. So totally I used 4.5 cups milk. Lastly add roasted cashewnuts. Mix well and serve hot.
Enjoy !
Note
Wash the instant pot vessel, lid and dry it properly before cooking . It helps to avoid curdling of kheer.
Do not skip water. It helps to avoid the kheer burning in the bottom.
Make sure your scrape the bottom of vessel to avoid the rice sticking to the vessel and getting burnt.
You can also use PORRIDGE Mode in instant pot but it takes longer time to cook.
You can make the kheer thick or thin as per your wish.
For variations, you can use condensed milk instead of sugar.
Do not use JAGGERY. Kheer will curdle. If you want to use jaggery, make a thin syrup. Add it only after cooking the rice in milk and water.
You can also make vermicelli kheer in the same way. You can set the cooking time even lesser as it cooks quickly.
Do not try to quick release because hot milk spills from the vent.
Try this easy, yummy rice kheer in instant pot. You will love it !