Iyengar style sweet pongal / Sakkarai pongal recipe was in my try list for long time. Recently I bought a cookbook named “Iyengar Pandigai Samayal “ from Kumbakonam. All the Iyengar specialty recipes are discussed in that book according to the festival. I found a traditional Sakkarai Pongal recipe prepared using a pot ( bronze pot/ Venkala paanai).
When I saw that recipe, I immediately called my school friend Sumi who is the only source for my Tamil Iyengar Recipes in my website to confirm the recipe and ingredients. She shared all the most important tips to get perfect Perumal temple style Sakkarai Pongal. Thank you so much Sumi. I became very happy and tried it for my Thursday Guru Pooja Neivedyam yesterday. It came out finger licking good. But for your help, this post would not have come up today :).
My friend told me to prepare this pongal in a
bronze pot to get the authentic flavor and taste. But my pot is too big to make small quantity. So I used a pressure cooker to ease my job. My job was done in less than 30 minutes.
Friends, I have shared all the tips shared by my friend Sumi if you like to try the authentic version like temples. If you wish, you can prepare in a bronze pot like temples or use your cooker to make it quickly. Choice is yours ! But taste wise pot pongal is the best.
Next year during pongal festival, I will try to buy a small pot and make a separate & detailed post. Now lets see how to make Iyengar style sakkarai pongal recipe / Sweet pongal recipe with step by step pictures and video.
POINTS TO NOTE
- To make temple style pongal, you should cook the rice & dal in an open pot, preferably in a bronze pot as it helps to retain the heat longer & maintain the consistency of pongal.
- Addition of Pachai karpooram/ edible camphor is a must in Iyengar Pongal.
- They also use freshly made ghee from butter to roast the cashews and add to pongal for neivedyam. They do not use the ghee used for regular cooking. So the taste & flavor of fresh ghee matters a lot.
- Never use boiled rice. Always use good quality Sona masoori rice for best taste.
- Do not use basmati rice as well.
- Roasting moong dal is an optional step. Some people add it as such.
- My friend told me to soak rice & moong dal in milk & water for 15 to 30 minutes to cook quickly. But I din’t soak it as I used pressure cooker.
- Milk should be used in Iyengar pongal. Some people cook the rice only with milk. But I have used a combination of water & milk as suggested by my friend.
- The quantity of milk may vary based on the consistency of pongal. So reserve some boiled milk and add it while serving if needed.
- I have used rice & jaggery in the ratio of 1: 2. Some people use 1:1.5 for mild sweet taste. It all depends on your taste buds.
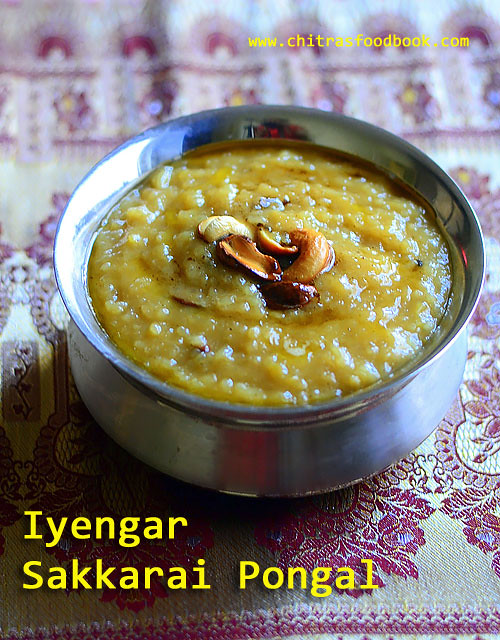
Iyengar Sakkarai Pongal - Sweet Pongal recipe
 How to make Iyengar style sweet pongal recipe / sakkarai pongal with milk & jaggery.
Cuisine: South Indian
Category: Iyengar recipes
Serves: 3
Prep time: 5 Minutes
Cook time: 20 Minutes
Total time: 25 Minutes
1 cup - 250ml
- Raw rice - 1/2 cup ( Good quality Sona Masoori rice)
- Yellow moong dal - 2 tbsp
- Boiled milk - 1 cup
- Water - 1.5 cups
- Powdered Jaggery - 1 cup ( Use 3/4 cup if using paagu vellam)
- Water- 1/2 cup ( to melt jaggery)
- Ghee - 2 to 3 tbsp ( I used 2 tbsp butter to roast nuts)
- Cashew nuts - Few
- Cardamom powder - 1/2 tsp
- Edible camphor / Pachai karpooram - A pinch
|
HOW TO MAKE IYENGAR SAKKARAI PONGAL
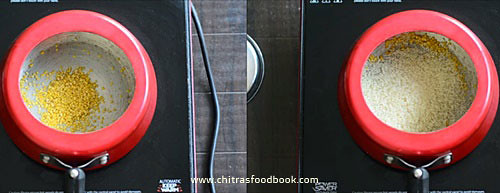
- In a pressure cooker base, heat 1 tsp ghee. Roast moong dal for a minute.
- Add raw rice to it and roast for another minute. Wash them.
- Add water + milk to the cooker along with a pinch of salt.
- Pressure cook in very low flame for 2 whistles.
- Mash the cooked rice & dal. Boil and melt jaggery adding water and strain the syrup.
- Add jaggery syrup, 1 tbsp ghee to the mashed rice. Mix well and boil till semi solid in consistency. Switch off flame.
- Add cardamom powder, a pinch of edible camphor and cashews roasted in ghee.
- Mix well and remove from flame. Garnish with more cashews if you like and serve hot !
METHOD - STEP BY STEP PICTURES
- In a pressure cooker base, heat 1 tsp of ghee. Roast yellow moong dal for a minute. To this, add rice and roast for one more minute. Remove the cooker and wash the rice + dal. Drain the water and keep it back in flame.
- Add milk + water to the washed rice, dal mixture. Add a pinch of salt as well. Mix well.

- Pressure cook in very low flame for 2 whistles.Open the cooker after steam is released. Mash the rice and dal very well with a ladle or masher. Make sure rice + dal is mashed properly. Add more boiled milk or water if needed. Mix well. Keep the cooker aside.

- In a kadai, boil and melt jaggery adding water. Strain the syrup in a wire mesh. (If the jaggery tastes too sweet, you can reduce to 3/4 cup)

- Add the syrup to the mashed rice and mix well. Add little more hot water or milk if the pongal is too thick at this stage. Add 1 tbsp ghee to avoid sticking of rice to the bottom of cooker.

- Mix well and boil till pongal comes to semi solid in consistency. Do not cook till too thick. It will harden as it cools down. So make it semi thick. Remove from the flame.
- Roast cashews in the remaining 1 tbsp ghee and add to pongal. ( I used fresh butter, melted to make ghee and roasted the cashews as suggested by my friend.) Add cardamom powder, a pinch of edible camphor and mix well. Add 1 tbsp more ghee and few more roasted cashews for garnishing. Serve hot !


Enjoy !
|
Note
- The ratio of rice & water depends on the quality of rice. Old rice takes more water. For pongal festival, we buy new rice ( pudhu arisi).So it takes less water. I used 1:5 ratio of rice and water. You can also use 1:4 or 1:6 based on the rice.
- Similarly the quantity of jaggery depends on the type of jaggery. If you use paagu vellam, you can add 1:1.5 ratio of rice & jaggery else use 1:2 as I did to get nice color and taste.
- If you feel the sweetness is more, you can add more boiled milk or hot water to reduce the sweetness.
- Edible camphor is the most important to get temple flavor.
- You can also add powdered nutmeg and roasted cloves if you like.
- Do not reduce ghee than the mentioned quantity. You must add more ghee to get ghee dripping pongal else pongal looks dry.
|
Try this easy, yummy Iyengar style Sakkarai pongal for this Pongal festival at home and enjoy !
Continue Reading...


 12 Kesari Varieties