Search Chitra's Food Book

Showing posts with label HOW TOs. Show all posts

March 5, 2018

HomePuff Insulated Lunch Box Review


Last week I got Home Puff's Double Wall Vacuum Insulated, leak proof, Stainless steel Lunch Box of 1700ml capacity. I am sharing my reviews on this product after using it for one week. I have been using it regularly for packing Sendhil & Raksha’s lunch. Food stayed warm for more than 4 hours If you pack them really hot. I have tried packing Idli & sambar, Ven pongal, Sambar rice, Veg fried rice, Kuzhambu, Kootu, Dal tadka with rice and Veg biryani. Everything stayed warm for more than 4 hours. More over its completely leak proof which is a big relief for me. This insulated lunch box is much much better when compared with my old M****n steel lunch box. Friends, If you are looking for a good Insulated lunch box, you can go for Homepuff’s product. This product would be ideal for gifting too. I have also shared all the PROS & CONS based on my opinion. Have a look at them.


Home Puff Double Wall Vacuum Insulated - Stainless Steel Lunch Box With 3 Leak Proof,1700 Ml - Grey

PROS & CONS:
  1. Looks so good and professional.
  2. Its containers are with top grade stainless steel interior (304-Grade Stainless Steel) and exterior with Double Walled Vacuum Insulation for temperature control and durability over time. High Quality Lid with Silicone lining for heat insulation, BPA-free, non-toxic.
  3. Well Designed with 3 separate Leak proof food containers with silicone gasket rings to keep dry and wet food hot in the same. I have tried packing sambar, Dal tadka as well.
  4. Easy and comfortable to handle with good grip. Easy to carry too.
  5. Every HomePuff lunch box comes with bag which unzips into a tablemat. This bag is made up of specially coated aluminium material which repels water and food stains.
  6. Quantity of food would be enough for one adult/ 2 children.
  7. Food stays hot for 2 hours and becomes warm for more than 6 hours. Similarly cold foods remain cold for 2 to 3 hours.
  8. Warranty Details : 12 MONTH WARRANTY UNDER MANUFACTURING DEFECTS ONLY. DOES NOT COVER PHYSICAL DAMAGE, LIQUID DAMAGE & BURNT DAMAGES.
CONS :
  1. This product is a bit pricey.
  2. Looks big in size.
  3. It would be better if there is some partition in one of the containers. It helps to pack more dishes. 
  4. Please do not expect the food to be to hot. It stays warm around 60 to 70c upto 5 hours.
     

    Homepuff lunch box reviews
Continue Reading...


February 17, 2018

How To Make Eggless Red Velvet Cake Recipe Without Condensed Milk

Eggless red velvet cake recipe

My daughter Raksha is a big fan of Red velvet cake. So I tried this eggless red velvet cake recipe at home with whipped cream frosting for the first time on Valentine’s day.  Last year during this day I had shared a simple and easy eggless red velvet cake in a mug using microwave. So this year I wanted to try in convection oven. It came out moist, soft, spongy without even using condensed milk, butter & eggs. Cooking oil and buttermilk are the magic ingredients in this recipe. I was very happy with the result even though its my first attempt. Thanks Ranjani for the fool proof recipe. 

Actually cream cheese frosting is most suitable for red velvet cake. But I used heavy whipping cream for the frosting as I din’t have cream cheese in hand. We loved this combo as well. I used food coloring liquid for the bright red color. I din’t want to test with beetroot juice as its my first attempt. 

Last year we ordered red velvet cake from a popular bakery chain for Raksha’s birthday. But it was not good at all. We were disappointed with the taste of frosting and felt the cake was not even moist. When compared with that cake, my homemade eggless red velvet cake is outstanding. Beginners can dare to try this recipe. You will get good results for sure. You can also use this recipe to make red velvet cupcake. 

Ok, Lets see how to make eggless red velvet cake at home with step by step pictures.


How to make eggless red velvet cake at home

Eggless red velvet cake recipe


Eggless red velvet cake recipe

How to make soft, moist eggless red velvet cake without condensed milk.


Cuisine: Indian
Category: Eggless cakes
Serves: 1/4 kg
Prep time: 10 Minutes
Cook time: 30 Minutes
Total time: 40 Minutes


INGREDIENTS

1 cup - 240ml
  • Maida / All purpose flour - 1 cup
  • Baking powder - 1 tsp
  • Baking soda - 1/2 tsp
  • Cocoa powder - 1 tbsp
To mix
  • Sugar – 1/2 cup ( I used regular crystal sugar)
  • Buttermilk - 1/2 cup ( thick curd ( 1.5 tbsp + 1/3 cup water)
  • Cooking oil - 1/3 cup ( Any flavorless oill)
  • Vanilla essence - 1 tsp
  • Colorless vinegar - 1 tbsp
  • Red food color - 1 tsp
Frosting
  • Heavy whipping cream - 1/2 cup ( I used Tropolite brand)
  • Icing sugar - 1/4 cup
  • Vanilla essence - 1/2 tsp
  • Sugar + water – 1 tbsp each for sugar syrup.

HOW TO MAKE EGGLESS RED VELVET CAKE

  1. In a small bowl, whisk curd & water to make buttermilk. Keep aside.
  2. In another wide bowl, take sugar and cooking oil. Mix till sugar melts. Then add the remaining wet ingredients and make a smooth liquid.  
  3. Keep a sieve over this bowl. Sieve maida, baking powder, soda and cocoa powder.
  4. Mix gently with a whisk to make cake batter. Transfer to a greased baking pan.
  5. Bake in a preheated oven for 30 to 35 minutes. Check with toothpick.
  6. Remove the pan and let the cake cool completely. Invert in a plate and cover with a cling wrap to avoid drying.
  7. Now beat the heavy whipping cream adding icing sugar, vanilla essence till stiff peak using electric beater.
  8. Slice the cake into two rounds. Drizzle sugar syrup all over the cake base.  Apply frosting. Decorate with piping nozzles as you like. Refrigerate the cake for an hour before use.
  9. Cut the cake and enjoy chilled cake.

METHOD - STEP BY STEP PICTURES

  • In a small bowl, whisk thick curd + water. Make buttermilk. Set aside. In a wide bowl, whisk sugar and cooking oil. Mix till sugar dissolves. To this  add buttermilk, vinegar, vanilla essence, food color and mix well.
    Eggless red velvet cake recipe
  • Place a sieve over the bowl. Sieve maida, baking powder, baking soda and cocoa powder. Mix gently and make the cake batter. Batter consistency should be pourable and fall like ribbon.
    Eggless red velvet cake recipe
  • Take a baking pan, grease with cooking oil or butter at the sides & bottom pf pan. Dust the pan with maida & coat it completely. Pour the cake batter till half of the pan.
    Eggless red velvet cake recipe
  • Preheat convection oven at 180c for 10 minutes. Place the baking pan inside the oven and bake the cake for 30 minutes. Prick the cake with a toothpick and check if it comes out clean without batter. If not, bake for another 2 minutes to 5 minutes. Remove the cake pan and allow it to become warm.
    Eggless red velvet cake recipe
  • After 30 minutes, run a knife in the sides of cake and invert it in a plate.Cake falls smooth without sticking to the pan. Let the cake cool down completely if you are frosting it with cream. Else you can make pieces and serve warm as teatime cake immediately.
  • After the cake cools down completely, cover the cake in a cling wrap or polythene cover and rest it for 6 hours to overnight. This will help to slice the cake without or with less crumbs. But If you want to apply icing on the cake, you can also slice it once the cake becomes warm but crumbs will be more. No problem, you can collect the crumbs and use it for decoration.
    Eggless red velvet cake recipe
  • Now remove the cling wrap. Slice into two using a knife or thread.Cut the cake into two roundels using a knife or thread as shown the picture below. Place the base on seperate plate.
    Eggless red velvet cake recipe
  •  Drizzle sugar syrup on both the layers. Do not add too much of sugar syrup. Cake base will become soggy. Stop adding sugar syrup once you feel the cake is completely wet by pressing with your fingers gently.
  • To make frosting, take the heavy whipping cream in a wide bowl. Add icing sugar, vanilla essence. Whip it using an electric beater till soft peaks form. Remove more than half of this cream to another bowl and use it to apply on the cake base. Beat the remaining cream till firm peaks, add food color to a portion of it ( I used pink) and use it for piping.
    Eggless red velvet cake recipe
    Eggless red velvet cake recipe
  • Apply cream on the cake base and layer the cake one over the other. Cover the top and sides with the cream. Now take the piping bag and insert a nozzle. Fill with cream. Decorate the cake as you like. If there are crumbs in the cake, you can sprinkle them all over the cake. Refrigerate the cake for an hour and then cut it. Enjoy !
    Eggless red velvet cake recipe
    Eggless red velvet cake recipe

Note

  • Do not reduce the quantity of cooking oil. Instead you can replace with soft butter.
  • To substitute buttermilk, you can use 1/2 cup warm milk + 1 tsp lemon juice.
  • Baking time may vary as per the oven settings. So keep an eye after 25 minutes.
  • After you apply frosting on both of the cake base, refrigerate it for 30 minutes to set well. Then you can layer them and give the top coating. After coating the sides and top of the cake, again refrigerate it for 30 minutes. Finally you can do the piping design, refrigerate for 1 hour and cut it. All these steps helps to make the frosting set well.
Make this rich, creamy, soft, spongy, delicious looking eggless red velvet cake at home for birthdays, anniversaries and special occasions, enjoy !
Moist red velvet cake recipe
Continue Reading...


October 20, 2017

Rasam Powder Recipe – Tamilnadu Style Homemade Rasam Podi

Rasam powder Tamilnadu
Tamil nadu style rasam powder / rasam podi recipe with step by step pictures and video. This is one of the best rasam powder I have ever made at home. I am a not a regular buyer of store bought rasam podi. But my friends used to buy Sakthi masala rasam powder, aachi rasam powder and MTR rasam powder. They say everything tastes good in its own way.  But I love to grind homemade rasam powder with fresh ingredients & make rasam with it  

I have already posted my Tirunelveli aachi’s rasam powder recipe for small quantity in my South Indian rasam recipe post. It smells and tastes awesome. I have also shared my Dad’s style rasam recipe using a 2 ingredient, instant rasam powder and easy bachelors style rasam. But some of my readers who tried my homemade sambar powder asked me to share authentic, traditional, Tamil people style homemade rasam powder recipe to grind & store for one month use.

When I told this to my MIL, she immediately suggested a recipe she read long back in a magazine. She made a trial batch and passed it to me. I loved its flavor and taste. Last month when my MIL came to Bangalore, I told her to make this rasam podi & idli podi and took video for my reference. 

The quantity I have mentioned in this recipe comes for 1 month use if you prepare rasam regularly. Its flavor and spiciness remains the same if stored in an airtight box. You can grind it easily at home using your Indian mixer. Use it within a month to enjoy its best taste & flavor. Ok, lets see how to make Tamil nadu style homemade rasam powder recipe !

Rasam powder ingredients

Rasam Powder Recipe - Tamil nadu Style Rasam Podi


Rasam Powder Recipe - Tamil nadu Style Rasam Podi

Tamil nadu style, homemade rasam powder recipe with easily available ingredients


Cuisine: South Indian
Category: Rasam Recipe
Serves: 1 cup
Prep time: 5 Minutes
Cook time: 10 Minutes
Total time: 15 Minutes


INGREDIENTS

1 cup - 250ml
  • Dhania / Coriander seeds - 1/2 cup
  • Pepper - 1/4 cup
  • Cumin seeds / Jeera - 2 tbsp
  • Toor Dal - 2 tbsp
  • Chana dal - 2 tbsp
  • Methi seeds - 3/4 tbsp
  • Red chilli - 25 to 30 nos
  • Curry leaves - fistful
  • Turmeric powder – 1/2 tbsp

HOW TO MAKE RASAM POWDER

  1. Measure & Take all the ingredients required for rasam powder.
  2. Sun dry or dry roast one by one.
  3. Cool & Grind to coarse powder.
  4. Store for a month & make rasam with it.

RASAM POWDER RECIPE - STEP BY STEP PICTURES

Measure all the ingredients given for rasam powder. Sun dry them for one day till it gets heated. Then grind to a coarse powder and store for months.
Alternatively you can dry roast all the ingredients one by one carefully without burning them
Heat a kadai and dry roast coriander seeds till it gives nice aroma.Remove in a plate.
Then roast the methi seeds and roast till golden brown.Remove in the plate.
rasam powder recipe
Dry roast cumin seeds and then pepper corns till its heated.
rasam powder recipe
Now roast toor dal and chana dal till it gets heated. Collect them in the plate. Then roast the red chillies in medium flame till it becomes crispy, keep it in a separate plate.

rasam powder recipe
Lastly roast the curry leaves. Switch off the flame and let it be in the hot kadai till it turns crispy. Transfer it to the red chilli plate.

rasam powder recipe
After it cools down, transfer to a mixie jar. Add turmeric powder and grind everything to a slightly coarse powder.  Grinding coarsely helps to retain the flavor for long time. But do not grind it too coarse. Store in an air tight box once the powder cools down completely.

rasam powder recipe
You can add 1 tbsp of this rasam powder for making rasam for 3 people.
This rasam powder stays good for 1 to 2 months. Use a clean spoon for handling.

Note

  • I have used more red chillies which helps to retain the flavor and spiciness for more days. If you reduce the quantity of chillies, powder will become bland in taste after few days. 
  • You can skip curry leaves if you don’t like. Instead you can add some fresh curry leaves while making rasam. 
  • Toor dal and chana dal helps to give some thickness to the rasam. So adding cooked dal water is optional. 
  • Use fresh ingredients and grind it whenever needed.

Try this yummy, flavorful homemade rasam powder and make rasam with it. You will love its taste !
Rasam podi
Continue Reading...


September 7, 2017

Birthday Party Recipes Menu Ideas – Indian Party Food Items List

Indian Birthday party menu list
List of Indian food ideas for kids birthday party recipes menu at home / vegetarian food items list for birthday party dinner & Lunch – Organizing Children’s birthday party is really a challenging task for parents. Some people love to conduct an elaborate dinner or lunch party and some prefer to make a simple tea party by just providing cake and snacks based on their budget.

 Most of the people wish to keep the party in the evening or in the afternoon if its a weekend. Since its a kids party, many people stick to vegetarian menu if they have a mix of vegetarian and non-vegetarian guests.

Be it a simple snacks party or an elaborate dinner/lunch party, choosing the cake, planning the menu, decoration of home/ party hall and arrangements would be tough for many especially beginners.
 
So I have tried my best to help you choose the party menu. Birthday party food items should be attractive, kids friendly and healthy at least to some extent. Not just for kids, menu should be appealing to adults as well. Long back I had shared a simple kids birthday party menu idea after getting inspired from one of my friend’s party.

After I made that post, I too got the confidence and started conducting simple birthday party at home for Raksha’s birthday. I got many mails from my readers to post more related to this topic. So today I have come up with the list of kids friendly, birthday party menu items list for Indian kids to help parents like me. I have also linked the recipes for reference. Its purely a vegetarian menu but you can find both South Indian & North Indian recipes.

Non-vegetarians, please excuse me. You can get some ideas from this list and make fries, gravies, biryani with chicken, mutton and egg. I took the help of my friend Shalini to frame this list. As we live in apartments, we have the chance of attending many parties. Shalini is in US now. Being in abroad, her friends conduct some potluck, get together and parties during weekends to meet people and build relationships. So she could help me well with her own ideas.

 I have also got some menu ideas from my school moms friends. With the help of this list, you can decide the party menu based on your budget. You can cook the food on your own or buy from outside/ restaurants.You can also opt to make Jain food without using onion and garlic.


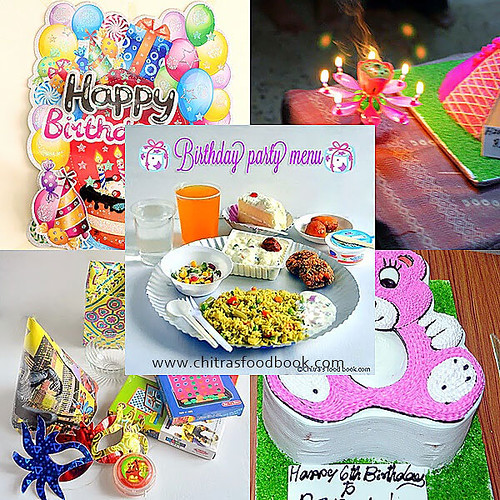
All these pictures shared in this post are the ones I collected for years. The picture given below is the simple decoration I made at home for Raksha’s birthday party.

Birthday party decoration ideas

I have categorized this list as Starters/Appetizers, Main course, Dessert, Drinks & Beverages that are suitable and loved by kids from 3 to 10 years. Basically kids love to have foods based on tomato, paneer, sweet corn, cauliflower, baby corn, bread, cheese and fruits. So I have given most of the dishes using these ingredients. These recipes would be surely a winner among the kids. 

Friends, do make your own permutations and combinations according to your kids preferences and frame the party menu. Hope you all find this list useful. Do leave a few words in the comment section and help me with your suggestions for more recipes and a few words of appreciation to motivate me if you find this post helpful. Ok, lets move on to the list of birthday party menu ideas ! Friends, do help me by sharing your thoughts and more recipes to include in this list.


Birthday party menu

In the above picture, you can find a sample of simple snacks party and the lunch party menu. If you are inviting kids without parents, you can give a simple party by giving a drink, starter/snacks, cake and a dessert. Finger foods is the best option for kids below 10 years. Skip the main course. To make it even more simple, you can just finish it with cake & samosa or veg puffs.  If you are inviting adults/parents, then you can go for wider options. Birthday party should be more of fun, hassle free and memorable. So you can arrange for small games, magic shows, music, dance to make the party more interesting.

Do refer my Simple birthday menu post to get some ideas on how to conduct the party & gifting for kids. I have also shared a sample menu at the end of this post to get some idea.

Also check out my Indian potluck party recipes menu if interested.

Drinks/ Beverages/Welcome Drinks

Starter/Appetizer/ Snacks

Main course

Salad

  • Sweet corn salad
  • Mixed Fruit salad
  • Kosambari
  • Vegetables with dip/ hummus
  • Fruits on skewers

Dessert

Sample menu for simple birthday party

  • Orange juice
  • A slice of Birthday cake
  • Mini samosa with ketchup or Veg puffs or cashew pakoda
  • Gulab Jamun

Sample menu for Dinner or Lunch party buffet

  • Any aerated drink or Fruit punch for welcome drink
  • Tomato soup/Sweet corn soup
  • French fries or aloo tikki or kabab with tomato sauce/green chutney
  • Gobi manchurian
  • Roti / Naan / Kulcha
  • Paneer butter masala or Mixed veg gravy
  • Dal tadka
  • Dum aloo or baby potato gravy
  • Veg Dum Biryani with raita
  • Plain rice, rasam, fryums
  • Curd and pickle
  • Gulab jamun
  • Carrot halwa
  • Ice cream
  • Fruit salad
  • Paan/ Beeda

POINTS TO NOTE

  • Pastries are better than the cream cakes. So choose the cake accordingly.
  • Make less spicy food as you are cooking for kids. Parents will adjust/ compensate about the taste.
  • Kids prefer deep fried foods for starters. Gobi 65 or manchurian is the best choice.
  • They love the food more if its cheese, paneer and potato based.
  • Kids love to have poori more than roti.
  • Most of the kids love paneer butter masala and potato, peas kurma more than mixed vegetable kurma.
  • Always keep some plain rice, dal and rasam to tackle fussy kids.
  • If you arrange for dinner party, make some idli too.
  • Its always better to avoid aerated drinks like pepsi, 7up etc. You can give some fruit juices instead. No problem even if its store bought.
  • Gulab jamun would be the best dessert for Kids. No kid would say NO.
  • Ice cream is also a must for kids.
  • Keep some hot water ready. Many kids are allergic to cold stuffs like ice cream , chocolate and cakes. So you can tell the parents to give them hot water immediately after they eat ice cream/chocolates to prevent from cold, fever. I am sure this tip works.
  • Finally, do not force your kids to eat everything in the plate. Most of the kids love to eat the cake, starter and dessert. Do not worry about it. Parents can feed them later at their house if needed.
Hope this list helps you to decide the menu quickly. Thanks for visiting this page !

Continue Reading...


August 22, 2017

Kozhukattai Dough Recipe | Kozhukattai Maavu Preparation in 2 Methods

Yesterday I made a post on kozhukattai dough using store bought idiyappam flour/ kozhukattai flour in 3 ways. In continuation with that, today I have shared how to make homemade rice flour for kozhukattai dough/ Kozhukattai maavu preparation traditionally in 2 methods. One by soaking raw rice, grinding to a fine powder, sieve and make kozhukattai outer covering dough with that homemade processed rice flour.  My MIL always follows this method. 

Second method is to soak the rice, grind to a thin batter and then cook to make a thick kozhukattai dough for outer cover/ Kozhukattai mel maavu. I learnt this one from my friend Shalini. She told me to make this post during last year Ganesh Chaturthi as this is her fool proof method of making homemade kozhukattai maavu. She told beginners would find it useful.
Kozhukattai dough recipe
Last year I couldn’t do it. So I badly wanted to make this post at least this year. Tomorrow I will try to post some interesting kozhukattai variety. Ok, lets see how to make homemade kozhukattai dough recipe / Kozhukattai maavu with step by step pictures and video.


How to make Kozhukattai dough - Kozhukattai maavu, traditional method in 2 ways

Homemade Kozhukattai dough - How to make Kozhukattai maavu in 2 ways

How to make Kozhukattai dough/Kozhukattai maavu at home

South Indian
Cooking basics
20 

Ingredients (1 cup - 250ml)

  • Raw rice - 1 cup (Use good quality Sona masoori rice or dosa rice/Maavu arisi)
  • Water - as needed ( 2 cups for method 2)
  • Salt - 1/2 tsp
  • Sesame oil or ghee - 1 tsp
  • Sesame oil - to grease hands

How to make homemade Kozhukattai maavu in 2 ways

  1. METHOD 1 : Wash and soak raw rice in water for 2 hours.
  2. Spread rice in a cloth. Dry for 15 minutes.
  3. Grind to fine powder, sieve.
  4. Dry roast the flour for 2 minutes.
  5. Remove in a plate and cool down.
  6. Grind the roasted flour to remove lumps. Store in a box.
  7. Homemade kozhukattai flour is ready. You can use this as Idiyappam flour too.
  8. METHOD 2: Wash and soak raw rice in water for 2 hours.
  9. Grind to a smooth paste to thin smooth batter. Use the soaked water for grinding.
  10. Heat a kadai with ghee and add rice flour batter.
  11. Mix till thick in low flame. Knead after it becomes warm.
  12. Wrap the dough with wet cloth and cover with a lid till use.

Kozhukattai dough / Kozhukattai maavu - Step by step photo

  • Always prepare the stuffing/pooranam before making kozhukattai dough because fresh dough gives best kozhukattai.
  • METHOD 1: Wash and soak 1 cup of raw rice for 2 hours.Drain the excess water and spread in a cotton cloth.
    How to make kozhukattai dough
  • Let it dry for 15 minutes. Remove the rice and grind to a smooth powder. Sieve and grind the coarse particles again. Sieve twice.
    How to make kozhukattai dough
  • Dry roast the sieved flour for 2 minutes in medium flame till it heated. Make sure you do not heat it more. When you roast it, small lumps may form.So grind to a fine powder after it cools down.
  • Alternatively you can steam the flour in idli pot for 10 minutes. Spread in a plate, cool down and grind it.Homemade rice flour for making kozhukattai or idiyappam is ready. You can store in a box for months. For 1 cup of raw rice, you get approx. 2 cups of flour.
    How to make kozhukattai dough
  • For making dough with this homemade rice flour, boil 1.5 cups of water adding 1/2 tsp salt and oil/ghee.
  • Add 1 cup of rice flour to it. Mix in low flame till it becomes a thick dough.
    How to make kozhukattai dough
  • Remove in a plate and knead using greased hands. Dough will become non-sticky after kneading.
    How to make kozhukattai dough
  • Cover with a wet cloth and lid above it till use. Never allow the dough to dry.Kozhukattai may crack.
    How to make kozhukattai dough
    How to make kozhukattai dough
  • METHOD 2: Wash and soak 1 cup of raw rice using 2 cups of water.Grind to a smooth batter without any grits. Grind for long time. Use the soaked water for grinding.Batter should be thin like dosa batter.
    How to make kozhukattai dough
  • Heat a kadai with 1tsp ghee. Add the rice flour batter. Mix in low flame.It becomes a thick dough. Keep stirring to avoid lumps. When the dough becomes very thick and leaves the pan completely, switch off the flame.
    How to make kozhukattai dough
  • Cover with a lid till warm. Transfer the dough to a plate. Grease your hands with oil and knead the dough for 5 minutes till it becomes very smooth without any cracks.
    How to make kozhukattai dough
  • Remove the dough to a plate and cover till warm. Grease hands and knead well for 5 minutes till dough becomes completely non-sticky and smooth without cracks.
  • Cover the cloth with a wet dough and keep aside till use. Keep the stuffing inside the dough and make kozhukattai.
    How to make kozhukattai dough

Notes

  • First make the stuffing part/pooranam before making the dough because dough should not sit for long time.
  • Kneading is important to make the dough crack free.
  • Dough should be non-sticky and smooth without cracks to make perfect kozhukattai.
  • Homemade rice flour shown in method 1 can be used to make idiyappam as well.
  • You can also use dosa rice/Maavu arisi instead of good quality raw rice.

Homemade rice flour for idiyappam & kozhukattai.
Kozhukattai maavu
Continue Reading...


August 21, 2017

Kozhukattai Dough | Kozhukattai Maavu With Store Bought Rice Flour in 3 Ways

How to make Kozhukattai dough( Kozhukattai maavu in Tamil) with step by step pictures and video. Dough for kozhukattai outer covering (Mel maavu) can be prepared at home using raw rice or with store bought rice flour / idiyappam flour / Anil Kozhukattai flour (unroasted rice flour).

 Kozhukattai made using homemade processed rice flour always gives the best and soft kozhukattai. But many of us like to ease our job by using store bought kozhukattai flour or idiyappam flour. Yes, ready made kozhukattai maavu or idiyappam maavu also gives decent results when compared with the traditional ones.
Kozhukattai maavu
So I have shared 3 methods of making kozhukattai outer cover using store bought rice flour. You can try any based on your liking. I learnt method 1 & method 2 from my MIL. Method 3 is from my friend Shalini. She also taught me a traditional method of homemade kozhukattai dough. I will share it tomorrow. I personally like method 2 because I follow the same procedure for making idiyappam. So I am used to this method and its more convenient to me. 

There are few points you should keep in mind to make soft and crack free kozhukattai. I have shared few tips and tricks to make perfect kozhukattai dough. I have also made a short video on the making of this dough in 3 ways. I hope beginners would find it useful. 

North Indian style modak dough differs in method and ratio of water & flour. I will share that post later. Now Lets see how to make kozhukattai maavu using rice flour with step by step pictures and video.


Kozhukattai dough recipe


Kozhukattai dough - Kozhukattai maavu in 3 ways

Kozhukattai dough - How to make Kozhukattai maavu in 3 ways

How to make Kozhukattai dough using store bought rice flour

South Indian
Cooking basics
20 

Ingredients (1 cup - 250ml)

  • Store bought kozhukattai flour or idiyappam flour - 1 cup ( I used Anil kozhukattai maavu)
  • Water - as needed ( 1.5 to 1.75 cups)
  • Salt - 1/2 tsp
  • Sesame oil or ghee - 1 tsp
  • Sesame oil - to grease hands

How to make Kozhukattai Maavu in 3 ways

  1. Method 1 : Heat 1.5 cups of water in a bowl adding salt and oil.
  2. When the water roll boil, add the rice flour.Stir without lumps.
  3. Mix well in low flame till its thick.
  4. Dough will be formed.Remove from flame.
  5. Cover till it becomes warm. Remove in a plate and knead with greased hands.
  6. It will become smooth and crack free.Cover with wet cloth and lid till use.
  7. Method 2 : Boil 2 cups of water adding salt & oil/ghee.
  8. Let the water roll boil.Add the required water to 1 cup rice flour, mix well.
  9. Knead when warm. It will become smooth and crackfree.Wrap with wet cloth and cover with lid till use.
  10. Method 3 : Mix 1 cup rice flour and 2 cups of water adding salt & oil/ghee.
  11. Heat a kadai and add the rice flour batter.
  12. Mix till thick in low flame. Knead after it becomes warm.
  13. Wrap the dough with wet cloth and cover with a lid till use.

Kozhukattai dough - Step by step pictures

  • Always prepare the stuffing/pooranam before making kozhukattai dough because fresh dough gives best kozhukattai.
  • Method 1: Measure 1 cup of store bought idiyappam flour or kozhukattai flour. Boil 1.5 cups of water in a kadai adding salt and oil/ghee.
  • Add the rice flour to the water and mix well till it becomes thick and forms a dough. Touch the dough with your fingers to see if its sticky. If its slightly sticky or non-sticky, dough is done.
    How to make kozhukattai dough
    How to make kozhukattai dough
  • Switch off the flame, transfer to a plate.Let it become warm enough to handle. Grease the hands with oil and knead the dough for 5 minutes till smooth and crack free.
  • Wrap the dough with wet cloth and cover it with a lid till use. You can store the dough for 6 to 8 hours without refrigeration.
    How to make kozhukattai dough
  • Method 2: Take 1 cup of rice flour in a plate. Keep aside.
  • Boil 2 cups of water adding salt and 1 tsp oil/ghee in a wide bowl.
    How to make kozhukattai dough
  • When the water roll boils vigorously, remove and add to the rice flour gradually. Mix with a ladle.Add water little by little and keep mixing. Kozhukattai maavu takes 1.25 to 1.5 cups and not more. But I always boil more water and keep it ready in hand to mix if needed.So I have mentioned 2 cups of water.
    How to make kozhukattai dough
  • Mix to become thick,non-sticky dough. Transfer to a plate and cover till warm. Knead with greased hands for 5 minutes till smooth and crackfree.
    How to make kozhukattai dough
    How to make kozhukattai dough
  • When the water roll boils vigorously, remove and add to the rice flour gradually. Mix with a ladle.Add water little by little and keep mixing. Kozhukattai maavu takes 1.25 to 1.5 cups and not more. But I always boil more water and keep it ready in hand to mix if needed.So I have mentioned 2 cups of water.
    How to make kozhukattai dough
  • Method 3: Mix 1 cup of rice flour with 2 cups of water and 1/2 tsp salt. Whisk to make a thin batter.Heat 1 tsp ghee in a kadai and add the rice flour batter.
    How to make kozhukattai dough
  • Mix in low flame till it becomes a thick dough.It leaves the pan and becomes a smooth dough. Keep stirring continuously to avoid lumps.
    How to make kozhukattai dough
  • Remove the dough to a plate and cover till warm. Grease hands and knead well for 5 minutes till dough becomes completely non-sticky and smooth without cracks.
    How to make kozhukattai dough
  • Cover the cloth with a wet dough and keep aside till use. Keep the stuffing inside the dough and make kozhukattai.
    How to make kozhukattai dough

Notes

  • First make the stuffing part/pooranam before making the dough because dough should not sit for long time.
  • Kneading is important to make the dough crack free.
  • Dough should be non-sticky and smooth without cracks to make perfect kozhukattai.
  • I used Anil Kozhukattai maavu.You can use idiyappam flour as well.
  • Water quantity may vary as per the flour you use. Anil kozhukattai maavu takes 1.25 to 1.5 cups of water.

Make this kozhukattai dough using store bought rice flour and ease your job !
Kozhukattai maavu preparation
Continue Reading...