Search Chitra's Food Book

Showing posts with label KARNATAKA RECIPES. Show all posts

August 26, 2021

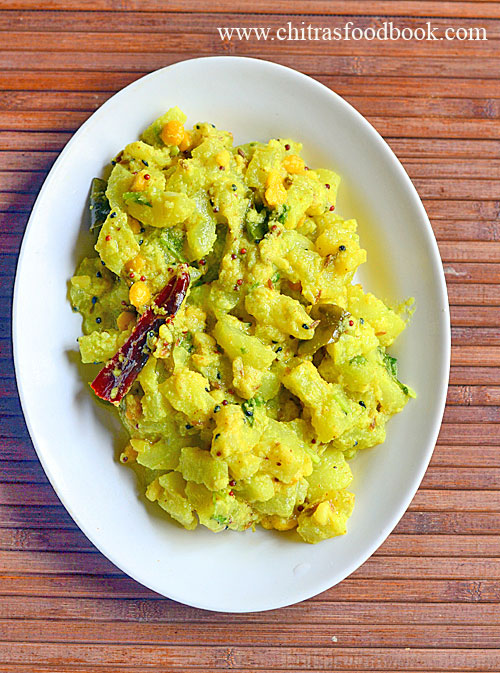
Southekayi Palya – Cucumber Poriyal | Vellarikka Poriyal Recipe

southekayi palya

Cucumber (Southekayi in Kannada, Vellarikai in Tamil, Vellarikka in Malayalam, Dosakaya in Telugu, Kheera in Hindi) is a super healthy vegetable that is usually consumed as a salad. We eat it as such or add in Kosmbari or green gram carrot salad. But this time, I tried a simple, Karnataka style palya / poriyal/ curry with cucumber. Generally people in Karnataka use Mangalore Cucumber also known as Sambar Cucumber for making side dishes. But I used the salad Cucumber today.

This Cucumber poriyal is a no onion no garlic recipe. Its so easy to make and its cooking time is very less because of its water content. Sendhil and Raksha couldn’t make out its cucumber curry. It was so tasty and flavorful. Friends, if you are bored of making salad with Cucumber, try this palya. You will love it.

Lets see how to make Karnataka style Southekayi palya recipe with step by step pictures.

southekayi palya


Southekayi palya recipe / Cucumber curry / Vellarikai poriyal recipe


Southekayi palya recipe / Cucumber curry / Vellarikai poriyal recipe

Southekayi palya recipe / Cucumber curry / Vellarikai poriyal recipe for rice


Cuisine: Karnataka
Category: Side dish
Serves: 3
Prep time: 10 Minutes
Cook time: 20 Minutes
Total time: 30 Minutes


INGREDIENTS

  • Cucumber / Southekayi / Velarikkai - 2
  • Turmeric powder - 1/4 tsp
  • Salt - as needed
To Temper
  • Coconut oil or cooking oil - 1 tbsp
  • Mustard seeds - 1 /2 tsp
  • Urad dal - 1 tsp
  • Chana dal - 2 tsp
  • Curry leaves - few
  • Red chilli - 1 or 2
  • Asafetida / hing - 2 pinches

  • Grated coconut - 1/4 cup
  • Coriander leaves - to garnish
HOW TO MAKE SOUTHEKAYI PALYA
  1. Wash and peel the skin of Cucumber. Chop into small cubes.
  2. Heat oil in a kadai. Splutter mustard seeds, Urad dal, Chana dal, curry leaves, red chilli and hing.
  3. Add chopped Cucumber pieces, turmeric powder and salt. Mix well.
  4. Cover and cook in medium flame till Cucumber becomes soft.
  5. If there is water, boil for few minutes to drain.
  6. Lastly add the grated coconut and coriander leaves. Mix well.
  7. Serve hot with rice.
METHOD - STEP BY STEP PICTURES
  • Wash and peel the skin of Cucumber/ Southekayi. Trim the ends, chop into small cubes. Set aside.
    • southekayi palya
  • Heat oil in a kadai. Splutter mustard seeds, urad dal, chana dal, red chilli and curry leaves.

  • Add the Cucumber pieces, turmeric powder and salt. Mix well and cover cook in low to medium flame till Cucumber turns soft. No need to add water because the water content in Cucumber is sufficient to cook. (If needed sprinkle little water)
  • southekayi palya
  • Stir the curry once or twice in the middle. Once its cooked, add grated coconut, chopped coriander leaves and mix well. Cook for a minute and switch off the flame. 
  • southekayi palya
    Enjoy with rice !

Note

  • No need to add water for cooking this vegetable. If necessary, just sprinkle little water. Say few tbsp.
  • For variations, you can add sambar powder instead of red chilli.
  • If you wish, you can grind coconut, one green chilli, 1/2 tsp cumin seeds, 2 small onion coarsely and add to cucumber once its cooked. It gives a nice flavor to poriyal more like Kerala style thoran.


Easy, yummy Karnataka style Cucumber palya is ready to serve !

cucumber poriyal


Continue Reading...


August 13, 2021

Akki Tambittu | Akki Hittina Thambittu | Karnataka Rice thambittu recipe

Akki thambittu

Nagara Panchami and Maha Shivaratri is one of the most popular festivals in Karnataka. Every year during Nag Panchami and Shivaratri, my neighbor used to pass this akki tambittu recipe as pooja prasadam. We all love it. I wanted to get the recipe from her and blog it for long time. Due to this pandemic situation, we are not able to get this prasadam from her for the past two years.

This year, I got the recipe from her and made it in my kitchen. I also offered this laddu / unde as prasad for my Thursday Guru pooja. My neighbor makes it big in size but I made it small as per my family’s liking. Friends, this tambittu is a super healthy ladoo recipe with all the goodness of jaggery, roasted rice, roasted gram, sesame seeds, peanuts, poppy seeds and desiccated coconut. You can give it to your kids snacks box as well.

Apart from this akki thambittu recipe, people also make Chigali ladoo/ sesame seeds laddu, hurigadale tambittu on this occasion. Soon I will try to share those recipes here.

Now lets see how to make Karnataka special akki tambittu recipe with step by step pictures. Prepare this special recipe for Nagara Panchami festival tomorrow and enjoy !

akki thambittu recipe

Akki thambittu recipe / Akki tambittu recipe


Akki thambittu recipe / Akki tambittu recipe

Akki thambittu recipe / Akki tambittu recipe for Nagara panchami and Maha Shivaratri festival prasada.


Cuisine: Karnataka
Category: Sweet
Serves: 8
Prep time: 10 Minutes
Cook time: 20 Minutes
Total time: 30 Minutes


INGREDIENTS
1 cup = 250ml
  • Raw rice / Sona masoori rice - 1/2 cup
  • Grated jaggery - 1/2 cup  (Use 3/4 cup for more sweetness)
  • Roasted gram dal / Hurigadale - 1/4 cup
  • Peanuts - 1/4 cup
  • Sesame seeds - 2 tbsp
  • Khus khus /Poppy seeds - 1 tbsp
  • Cardamom powder - 1/2 tsp
  • Ghee - 1 tbsp
  • Desiccated coconut - 2 tbsp (Grated)
  • Water – 1/3 cup
HOW TO MAKE AKKI THAMBITTU RECIPE
  1. Heat a kadai and dry roast the rice till puffy. Transfer to a plate.
  2. Dry roast sesame seeds and poppy seeds till they splutter.
  3. Add roasted gram dal and roast for a minute. Reserve half and transfer to the rice plate.
  4. Dry roast peanuts till skin crackles. Remove the skin and keep aside.
  5. Dry roast coconut and set aside. 
  6. Grind the rice, sesame seeds, roasted gram dal mixture to a fine powder.
  7. Transfer to a plate. Grind peanuts coarsely and add to the plate.
  8. Now add the roasted coconut, cardamom powder, reserved poppy+sesame seeds+gram dal and ghee. Mix well.
  9. Melt jaggery adding water and boil till frothy. Let it cool down. Filter it and add to the rice mixture.
  10. Mix evenly and make balls. Karnataka Akki thambittu is ready !
METHOD - STEP BY STEP PICTURES
  • Heat a kadai and roast the rice in low to medium flame till puffy. Remove in a plate.
  • akki thambittu recipe
  • Dry roast sesame seeds and poppy seeds till it starts to splutter. Add the roasted gram dal and roast for a minute. Switch off the flame.
  • akki thambittu recipe
  • Reserve half of this mixture in a plate and add the remaining in the rice plate. Cool down and grind to a fine powder.
  • akki thambittu recipe
  • Transfer to a plate. Dry roast desiccated or fresh coconut for few minutes and add to the rice flour plate.

  • Dry roast peanuts till its skin crackles. Cool down and remove the skin. Grind coarsely.
  • akki thambittu recipe
  • Add the powdered peanuts to the rice flour mixture. Add cardamom powder, ghee and the reserved poppy seeds, sesame seeds and roasted gram dal. Combine and mix everything well.
  • Take jaggery in a kadai. Add water to cover it. Boil and melt the jaggery. Boil for few minutes in medium flame till it becomes frothy and slightly thick. No need to look for any consistency. But make sure, jaggery syrup is not too thick. Thambittu will become hard to bite after it sets. So keep the syrup slightly thick like oil. Let it cool down completely.
  • akki thambittu recipe
  • Now filter the syrup and add to the rice flour mixture. Mix well to coat the rice flour. No problem if the mixture looks wet and loose. Shape ladoo and arrange in a plate.akki thambittu recipe
  • This ladoo becomes hard after its set in few hours. So make sure the ladoo is soft to handle while shaping.akki thambittu recipe

  • Enjoy !

Note

  • For variations, you can skip grinding sesame seeds and poppy seeds. You can add the roasted ones as such.
  • You can skip desiccated coconut or use fresh coconut instead. In that case, roast the fresh coconut till its dry.


Try this easy, healthy akki thambittu recipe for festivals and enjoy !

thambittu recipe


Continue Reading...


March 1, 2021

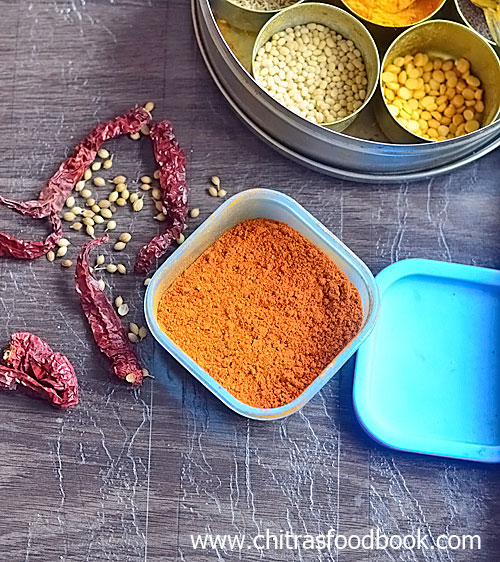
Karnataka Idli Sambar Powder Recipe

Karnataka idli sambar powder

My daughter Raksha is an ardent fan of Karnataka hotel style idli sambar. She loves the sweet and spicy taste of this sambar which is very unique across South Indian sambar recipes.  Whenever I visit Jayanagar or old Bangalore, a parcel of Mysore masala dosa with chutney and sambar ( I request the parcel section to pack some extra sambar for me 😀) is a must for Raksha. Usually I buy from Krishna bhavan, Ganesh Bhavan, SLV and Upahara Darshini. Raksha always tells me to make this at home to pair with idli rava idli.

I have tried so many versions of Bangalore hotel idli sambar at home. But nothing came up to my expectation. Recently I tried a Karnataka hotel style idli sambar recipe from Rekha aduge and Anvika Youtube channel. I prepared a idli sambar powder as suggested and tried this sambar. It was so close to the restaurant ones. Raksha gave a big thumbs up and told me to follow this recipe every time.

Before posting the hotel style idli sambar recipe, I wanted to share this sambar powder recipe which plays a vital role in sambar preparation. Its definitely different from our usual sambar powder in certain ingredients. Cinnamon and dry coconut are the secret ingredients here. You can always use fresh coconut and roast it instead of dried coconut / kobbari but do not skip cinnamon. I also used a clove/ lavang to give more flavor which is optional in the original recipe.

Friends, do try this Karnataka idli sambar powder. I feel making this sambar powder is the only time consuming work in sambar preparation. If you make it once, you can store this powder and prepare sambar for 2 to 3 times. Lets see how to make Karnataka style idli sambar powder recipe with step by step pictures.

Check out my Tamilnadu style idli sambar powder recipe. 

Karnataka sambar powder


Karnataka idli sambar powder recipe


Karnataka idli sambar powder recipe

Karnataka hotel style idli sambar powder recipe


Cuisine: Karnataka
Category: Sambar powder
Serves: 1/2 cup
Prep time: 10 Minutes
Cook time: 10 Minutes
Total time: 20 Minutes


INGREDIENTS
1 cup = 250ml
  • Cooking oil – 2 tsp
  • Byadgi chilli - 12 to 15 nos (Most important ingredient)
  • Coriander seeds - 3 tbsp
  • Chana dal - 2 tbsp
  • Urad dal – 1/2 tbsp
  • Curry leaves - 5
  • Methi seeds / fenugreek seeds - 1/2 tsp
  • Cumin seeds - 1 tbsp
  • Asafetida / Hing - 1 tsp
  • Cinnamon - 2 inch piece
  • Cloves - 1
  • Pepper corns - 1/4 tsp
  • Dried coconut / Kobbari - 1.5 tbsp
HOW TO MAKE KARNATAKA IDLI SAMBAR POWDER
  1. Heat oil in a kadai and add the chana dal.
  2. When it starts to roast, add all the other ingredients one by one.
  3. Roast carefully in low to medium flame. Lastly add red chilli and dried coconut.
  4. Roast for a minute. Switch off the flame. Cool down.
  5. Grind to a fine powder. Store in an airtight box and use it twice or thrice.
METHOD - STEP BY STEP PICTURES
  • Heat oil in a kadai. Add chana dal, roast for few seconds in medium flame.

  • Add urad dal, coriander seeds, methi seeds, cumin seeds, curry leaves, clove, cinnamon, pepper corns, red chilli and dried coconut. Add hing.
  • Karnataka sambar powder
  • Roast everything together in low to medium flame for few minutes till you get nice roasted smell. Do not burn any.
  • Karnataka sambar powder
  • Switch off the flame and let it cool down completely. Grind them to a smooth powder and store in an air tight box. It stays good for 2 weeks. You can make sambar twice or thrice with this quantity. Karnataka sambar powder

Note

  • You can use more chilli based on the taste. Use up to 15.
  • Use byadgi chilli or Kashmiri chilli for bright color.
  • Cloves is optional.

Easy, Karnataka hotel style idli sambar powder is ready !

 Karnataka hotel style idli sambar powder

Continue Reading...


February 1, 2021

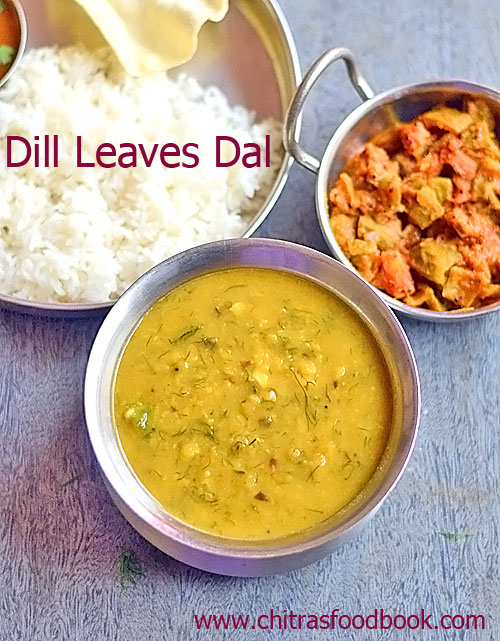
Dill leaves dal recipe / Sabsige soppu dal / Shepu dal/ Suva dal Recipe

Dill leaves dal recipe

Dill leaves dal is an easy and healthy recipe (Sabsige soppu in Kannada, Dill leaves in English, Shepu or Suva Bhaji in Hindi, Sathakuppai in Tamil and Sowa in Bengali). Sabbasige soppu / Sabsige soppu was very new to me until I come to Bangalore. My friends and neighbors here buy this soppu/ Keerai/ greens often. They add it along with coriander leaves in most of the dishes like instant idli, paddu/ paniyaram, akki roti, instant dosa varieties etc. Its very good for lactating mothers after pregnancy.

I tasted this dill leaves in Iyengar bakery masala bun for the first time and started loving its flavor. Then I tried a palya/ poriyal/ dry curry with dill leaves but my family didn't like its flavor. It became a flop in my house. So I stopped buying it.

Recently when I was looking for sago idli / sabbaki idli (recipe coming up next week) in a YouTube channel, dill leaves were added to the idli. It gave a nice and unique look to the idli. So after a long time, I bought a small bunch of dill leaves again and tried this dill leaves dal and sago idli with it. 

This dal recipe is of North Karnataka / Uttara Karnataka style sabsige soppu saaru with toor dal. Surprisingly both of them loved this sabbasige soppu dal recipe. They loved its flavor and had two servings. I am so happy that finally I found one good recipe to include this healthy greens in our diet. Before making the recipes, I explained its health benefits to my husband and daughter. Please find the health benefits below. 


Dill leaves dal

HEALTH BENEFITS OF DILL LEAVES / SABSIGE SOPPU :

Dill leaves are rich in anti oxidants. They are a good source of Vitamin C, Vitamin A, D, Iron, Magnesium etc. It helps to protect against heart diseases and cancer.

Dill leaves also promote healthy vision, augment skin, boost immune functions, treat digestive anomalies, remedy for sleep problems, fortify bone health, relieve respiratory infections, regulate hormonal balance, and enhance reproductive health. 

Friends, do try this easy, yummy and healthy sabsige soppu dal/ dill leaves dal and enjoy with plain rice adding ghee. You will love it. For variations, you can use moong dal instead of toor dal.

Sabsige soppu dal

Dill leaves dal / Sabsige soppu dal recipe


Dill leaves dal / Sabsige soppu dal recipe

Dill leaves dal / Sabsige soppu dal recipe for plain rice and roti.


Cuisine: Indian
Category: Side dish
Serves: 4
Prep time: 10 Minutes
Cook time: 20 Minutes
Total time: 30 Minutes


INGREDIENTS
1 cup = 250ml
  • Toor dal or moong dal - 1/2 cup
  • Dill leaves /Sabsige soppu - 1/2 cup
  • Cooking oil - 2 tbsp
  • Crushed Pepper + Cumin seeds - 1 tsp (pepper 1/2 tsp, cumin seeds 1 tsp)
  • Big onion - 1
  • Crushed garlic - 10 cloves
  • Curry leaves - few
  • Tomato - 1
  • Green chilli - 2
  • Tamarind - small berry size
  • Dhania powder - 1/2 tsp
  • Turmeric powder - 1/2 tsp
  • Sugar or jaggery - 1/2 tsp
HOW TO MAKE DILL LEAVES DAL / SABSIGE SOPPU DAL
  1. Wash and chop dill leaves, onion, tomato and green chilli.
  2. Wash and pressure cook toor dal in enough water for 2 whistles.
  3. Mash well and set aside. Heat oil in a kadai. Splutter mustard seeds, crushed cumin+pepper.
  4. Saute onion, crushed garlic, curry leaves, dill leaves and green chilli. Saute for 5 minutes. Add tomato and saute till mushy.
  5. Now add the cooked dal, tamarind extract, dhania powder, sugar and salt.
  6. Add required water and boil for few minutes. Serve hot with plain rice adding ghee. Enjoy !
METHOD - STEP BY STEP PICTURES
  • Wash and chop dill leaves, onion, tomato, green chilli and set aside. Wash and pressure cook toor dal adding required water, turmeric powder and few drops of oil.

  • Pressure cook in low flame for 2 whistles. Open the cooker after the steam is released. Mash well and set aside.
  • dill leaves dal
  • Now heat oil in a kadai. Splutter mustard seeds, crushed pepper + cumin seeds. Saute onion, curry leaves, crushed garlic cloves, green chilli and dill leaves. Saute for 5 minutes. The more you saute, the more flavor it lends. Saute in medium flame.
  • dill leaves daldill leaves dal
  • Add cooked dal, tamarind extract, dhania powder, sugar or jaggery and salt. Mix well and add required water. Boil for few minutes till nice aroma emits out.
  • dill leaves dal
  • Switch off the flame. Serve hot with plain rice adding few drops of ghee. If you make it thick, you can serve with roti as well. Enjoy !

Note

  • Add more green chillies based on your taste.
  • You can use moong dal instead of toor dal.
  • You can use red chilli powder instead of green chilli.

Try this easy, healthy, dill leaves dal for rice and roti. You will love it.

 Sabsige soppu saaru


Continue Reading...


July 10, 2020

Karnataka Gojjavalakki Mix – Instant Huli Avalakki Mix Recipe / Poha Puliogare Mix

instant gojjavalakki mix
Recently I started making homemade, instant mix recipes inspired by my fellow blogger friends. I have tried rava upma mix, poha upma mix, ven pongal mix, bajji bonda mix recipes successfully. Following that, I tried this easy and yummy Karnataka style gojjvalakki mix recipe. Gojjavalakki is nothing but tamarind flavored poha upma which we call as puli aval in Tamil, Huli avalakki / kuttu avalakki recipe in Kannada. People also call this as poha puliyogare. This is one of the popular breakfast recipes in Karnataka.

  When I tried the authentic gojjavalakki recipe to share in my blog, Raksha and Sendhil loved it very much. Raksha told me to make it often and that’s when I came across this instant gojjavalakki mix. As Raksha’s online school starts early in the morning, I am trying to make easy and instant breakfast recipes. This gojjavalakki mix is so handy. All we have to do is to add hot water to this pre made mix and soak it. Your breakfast would be ready in minutes. Just garnish with grated coconut , drizzle with gingely oil and serve. Tastes so good and flavorful. For this recipe, I referred many blogs and YouTube videos. Though its my first attempt, it came out so well.

 Usually people use thick poha for making gojjavalakki but I used thin avalakki which is called as paper aval / thin poha. This gojjavalakki mix takes very less time to prepare. Once you prepare in bulk and store in a box, you can make breakfast, dinner or for evening snacks instantly. It stays good for a month without refrigeration. Bachelors, working women and people who plan for a trip or travel abroad officially or for studies can make this instant mix and keep it. It would be really helpful to whip up a quick food. Ok friends, lets see how to make Karnataka style gojjavalakki mix recipe with step by step pictures.

instant gojjavalakki using gojjavalakki mix


Homemade, Instant Gojjavalakki Mix Recipe


Homemade, Instant Gojjavalakki Mix Recipe

Easy, instant gojjavalakki mix recipe


Cuisine: Karnataka
Category: Main course
Serves: 1 kg
Prep time: 10 Minutes
Cook time: 20 Minutes
Total time: 30 Minutes


INGREDIENTS
1 cup = 240ml
  • Thin or thick poha /avalakki /Aval – 4 cups
  • Karnataka style Rasam powder – 1.5 tbsp
  • Turmeric powder – 1 tsp
  • Tamarind – lemon size, oil – 2 tsp (roast n powder)
  • Salt – 1.5 tsp
  • Jaggery – 1 to 2 tbsp ( I used nattu sakkarai powder)
  • Cooking oil – 2 tbsp
  • Mustard seeds – 2 tsp
  • Urad dal – 1.5 tbsp
  • Chana dal – 2 tbsp
  • Roasted Peanuts – 1/4 cup
  • Curry leaves – few
  • Hing – 1/4 tsp
  • Water – to soak ( 1 cm above poha), around 2 cups
  • Poha mix – 1.5 cups ( for 3 people)
  • Grated coconut – to garnish
HOW TO MAKE INSTANT GOJJAVALAKKI MIX
  1. Grind the poha in batches to a coarse rava texture. Set aside
  2. Heat 1 tbsp oil and roast the tamarind pieces. Switch off the flame, let it cool.
  3. Grind to a fine powder. Heat oil in a kadai. Temper mustard seeds, urad dal, chana dal, roasted peanuts, curry leaves, hing, red chilli.
  4. Roast till dals turn golden in color. Switch off the flame. Cool down.
  5. Add powdered poha, tamarind powder, rasam powder, jaggery and salt.
  6. Mix everything nicely. Store in a box. No need to refrigerate.
  7. Stays good for 2 to 3 weeks.
  8. To make gojjavalakki for 3 persons using this mix : Take 1.5 cups gojjavalakki mix in a bowl.
  9. Add hot water till its 1 cm above the mix. Using a ladle mix it thoroughly.
  10. Cover and rest it for 10 minutes. Garnish with grated coconut and serve !
METHOD - STEP BY STEP PICTURES
  • Grind the poha in a mixie in batches. Grind it like rava / semolina. Do not make it too coarse or powdery. I used 1 cup per batch. Collect in a plate. 
  • instant gojjavalakki mix recipe
  • Heat 1 tbsp oil in a kadai. Pinch lemon sized tamarind into small pieces. Roast in oil patiently till it turns crispy.
  • Switch off the flame and transfer to a plate. Let it cool down completely. Grind to a fine powder. 
  • instant gojjavalakki mix recipeinstant gojjavalakki mix
  • Heat oil in a kadai. Temper mustard seeds, urad dal, chana dal, peanuts, red chilli, hing and curry leaves. Switch off the flame and cool down.
  • instant gojjavalakki mix
  • Add the powdered poha, Karnataka style rasam powder, salt, powdered tamarind, jaggery and mix well. Check for taste and add salt, rasam powder if required. Store in a box after it cools down. Use a clean spoon whenever you use. Instant gojjavalakki mix is ready. You can keep it for 2 weeks to 3 weeks without refrigeration. 
  • instant gojjavalakki mix instant gojjavalakki mix
  • To make gojjavalakki for 3 people : Take 1.5 cups of instant gojjavalakki mix in a bowl. Boil 2 to 2.5 cups of water till it bubbles. Add this hot water to the mix. Water level should be 1cm above the poha mix. Mix well to coat the poha with water. If it looks dry, you can add little more hot water. Cover the poha mix with a lid and rest for 10 minutes. Open the lid and fluff it gently. Add grated coconut . I drizzle a tsp of gingely oil and serve with curd, sev or chutney !instant gojjavalakki mix instant gojjavalakki mix recipe

  • Enjoy !

Note

  • Adjust the quantity of tamarind based on the rasam powder's spice level.
  • Sauting tamarind in oil helps to roast it evenly and makes it crispy once it cools down.
  • Alternately you can dry roast the tamarind too.
  • Do not store the mix before it cools down completely.
  • You can also cook the poha mix in low flame in a kadai adding plain water.
  • Actual recipe called for using dried coconut powder/ kobbari powder.  But I din't add coconut in the gojjavalakki mix to increase its shelf life.
  • Use store bought or homemade Karnataka style rasam powder for best taste. 
Try this easy, yummy, Instant gojjavalakki mix and enjoy a quick breakfast / dinner !

instant gojjavalakki mix


Continue Reading...

June 12, 2020

Instant Tomato Dosa Recipe With Rice Flour – Instant Thakkali Dosai

Instant tomato dosa
I got this instant tomato dosa recipe from my School moms group friend Archana. She shared few pictures of this instant thakkali dosa and a recorded voice message with recipe in WhatsApp. She suggested me to try and blog this instant dosa variety. Usually I make varieties of instant dosa recipes like wheat flour dosa, jowar dosa, ragi or millet dosa for my dinner. I am happy that I tried this recipe too. Its a very easy and quick instant dosa recipe. This batter can be prepared under 10 minutes.

 With the mild tangy taste of tomato and bright red color, this tomato dosa was so good in taste. It was a super hit in my family. We all loved it. Make the batter watery like neer dosa and rava dosa because consistency of dosa batter is the key to make super crispy and lacy dosa as shown in the picture. You will get it after making one or two dosa and adjust the water quantity accordingly.

This instant tomato dosa tastes the best when served hot with coconut chutney as side dish. It also tasted good even after cooling down. So you can pack for tiffin box if you like. This batter can be refrigerated and use it the next day too. Friends, do try this easy and quick tomato dosa recipe. You will love it for sure.

Note : Below picture was taken at night using the fresh batter. The remaining pictures were taken the next day morning by making dosa with leftover batter.

Instant tomato dosa

Instant tomato dosa

Instant Tomato Dosa Recipe


Instant tomato dosa

Instant tomato dosa recipe with rice flour, sooji and wheat flour.


Cuisine: South Indian
Category: Side dish
Yield: 10
Prep time: 10 Minutes
Cook time: 20 Minutes
Total time: 30 Minutes


INGREDIENTS
To Grind (1 cup = 240ml)
  • Tomato – 3 ( Use 4 for more tangy taste)
  • Byadgi or Kashmiri Red chilli – 4 (helps to get bright color, add 6 to 8 for spicy taste)
  • Pepper corns – 1/2 tsp
  • Cumin seeds – 1 tsp
  • Ginger – 1 inch piece
  • Water – to grind smoothly
For dosa batter
  • Rice flour – 1 cup
  • Sooji / Rava / Semolina – 1/2 cup ( I used Chiroti rava/ fine rava)
  • Wheat flour – 1/2 cup
  • Big onion - 1 (finely chopped )
  • Curry leaves – Few (finely chopped)
  • Coriander leaves – finely chopped
  • Salt & Water – as needed
  • Cooking oil – to drizzle over dosa
HOW TO MAKE INSTANT TOMATO DOSA
  1. Grind tomato, pepper corns, cumin seeds, ginger to a smooth paste.
  2. In a wide bowl, take rice flour, wheat flour and sooji.
  3. Add the ground tomato paste, salt, finely chopped onion, curry leaves and coriander leaves.
  4. Add required water and make thin batter.
  5. Heat dosa tawa. Pour the watery batter in a circular motion. 
  6. Flip and cook both the sides in medium flame till golden and crispy.
  7. Remove the dosa and serve hot with coconut chutney. 
INSTANT TOMATO DOSA RECIPE - STEP BY STEP PICTURES

  • To make tomato paste, grind tomato, pepper corns, cumin seeds, ginger to a smooth paste. Set aside.Instant tomato dosa
  • In a mixing bowl, take rice flour, wheat flour and sooji. Add tomato paste, finely chopped onion, curry leaves, coriander leaves and salt. Instant tomato dosa recipe
  • Add required water and make thin batter. Batter should be watery in consistency just like neer dosa or rava dosa batter.

  • Instant tomato dosa recipe
  • Heat a dosa tawa. Pour the batter in a circular motion. Cook in medium flame till golden. Flip and cook the other side too.

  • Instant tomato dosa recipe
  • Fold and remove the dosa in a plate. Serve hot with coconut chutney. Enjoy !!

Note

  • Make the batter thin and watery to make the dosa crispy else dosa looks thick and hard.
  • Add more tomatoes and red chillies if you like more tangy and spicy dosa. 
  • You can also use green chillies instead of red chillies but color of dosa won’t be bright red.

Try this easy, instant tomato dosa recipe and enjoy !
Instant tomato dosa with rice flour
Continue Reading...