Search Chitra's Food Book

Showing posts with label KIDS SNACKS. Show all posts

June 2, 2017

Bread Roll Recipe – Potato Stuffed Crispy Bread Rolls Recipe

Stuffed potato bread roll recipe
I have few snacks recipes using bread in my try list for long time. So I started with this bread roll recipe and thought of trying them one by one to share in my blogHappy
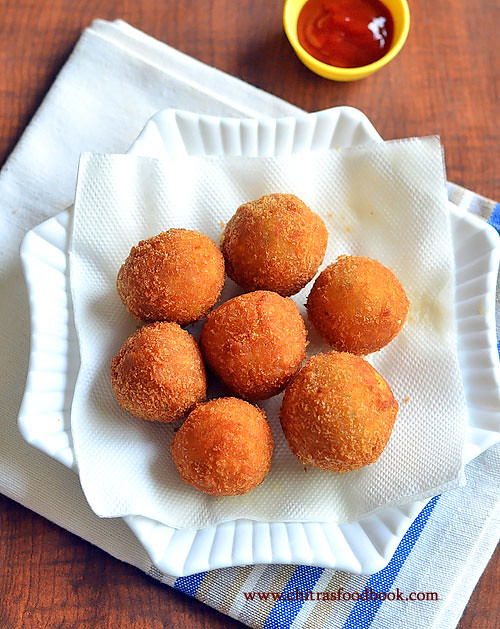
. This potato stuffed bread roll recipe is a yummy, kids friendly snack with their 2 favorite major ingredients – Potato and bread. Recently I tasted this bread rolls in a simple birthday party conducted in my neighbor’s house.It was a snack party.So she had served this bread roll with tomato sauce/ketchup,a cake slice, store bought potato chips and a glass of store bought drink. Bread roll was crispy outside and soft inside. When I asked about the recipe, she gave a gist about it. After getting the idea from her, I watched a chicken bread roll video in YouTube to find out how to make it crispy. I tried it last week for Raksha and her friends. I made some lemon popsicle too. All of them loved itLove Struck. Myself and Sendhil stopped with one as its deep friedWinking. I guess these aloo bread rolls can be baked as well.  Friends, Do try this easy, kids friendly evening snack & party snack – Indian style Stuffed bread roll at home and enjoy.  Lets see how to make bread roll recipe with step by step photos and video.

Continue Reading...


April 18, 2017

Elai Vadam Recipe – Ilai Vadam – Easy Rice Appalam In Banana Leaf

Elai vadam
Elai Vadam / Exhibition appalam – Rice papad / Arisi appalam made in banana leaf ( Vazhai ilai) was in my try list for the past few years. Whenever my fellow bloggers post this elai vadam recipe, I get tempted to try but I never got the confidence to try on my own. Recently my MIL prepared this ilai vadam using idli rice after watching Revathy Shanmugam mam’s cookery show in Jaya TV. Last week when she came to Bangalore, she brought some vadam to taste. She said its a time consuming process but the end result is worthy.Its taste reminded Delhi appalam we get in exhibition.We had this rice papad sprinkled with red chilli powder and we loved it very much.  

My MIL told me the tradition behind this appalam making process.On those days, people in Tamilnadu villages used to make this rice vadam using Vadham ilai or Poovarasan ilai. This vadam is usually given for ladies after delivery ( Postpartum diet) as urad dal papad creates gas problem.This vadam is roasted in direct fire ( Sutta appalam) instead of deep frying in oil as deep frying makes it difficult to digest.The best thing about this vadam is it dries up quickly even under the shade. It takes one to two days to get ready based on the weather in your place. Overnight drying under the fan would be enough. I felt this vadam is ideal for places where there is lack of sunlight. 

With the help of my MIL, I prepared this easy arisi appalam in Bangalore using raw rice. This vadam can be prepared with raw rice, idli rice or both in equal quantity. If you make it with raw rice, vadam comes out super light, airy and crispy whereas vadam made with idli rice comes out crunchy and very flavorful like store bought arisi appalam but slightly dense in texture. 

In that case, you can add little sago( javvarisi) to bring the light texture. As I have thatte idli stand, this vadam process was completed within one hour. If you don’t have this plate it may take more time. You can buy thatte idli stand or elai vadam stand in the market if you are really interested to try this one. Now lets see how to make elai vadam recipe with step by step pictures and VIDEO !

Delhi appalam

Elai vadam recipe- Ilai vadam - Easy rice appalam in banana leaf


Elai vadam recipe- Ilai vadam - Easy rice appalam in banana leaf How to make elai vadam - Easy rice appalam n banana leaf - Summer special recipes
Cuisine: South Indian
Category: Snacks
Serves: 24 
Prep time: 120 Minutes
Cook time: 60 Minutes
Total time: 180 Minutes


INGREDIENTS
1 cup - 250ml
  • Raw rice - 1 cup ( I used Maavu arisi/dosa rice)
  • Salt - as needed
  • Cumin seeds - 1/2 tsp
  • Water - As needed (I used 1/2 cup for grinding, 3/4 cup for mixing)
HOW TO MAKE ILAI VADAM / RICE APPALAM - METHOD

  • Wash and soak the raw rice in enough water for 2 hours. Drain the excess soaked water completely and grind the rice coarsely without adding water. Then wipe the sides and add 1/2 cup water, required salt. Grind to smooth paste like maida. Please note there should not be any grits in the batter. It should be completely smooth. So grind patiently for long time. I used my Indian mixie for grinding the batter and it took 5 minutes. Grind in two batches.
    Elai vadam
    Elai vadam
  • Remove the batter in a bowl.Add cumin seeds. The consistency of batter should be slightly thinner than dosa batter.
  • Now take a banana leaf and spread the leaf inside the plate according to its shape.Add 1/2 ladle of batter and swirl the plate. Batter spreads all over the plate. If you don’t have banana leaf, just spread the batter directly in the plate & swirl/rotate it.It also works but its difficult to peel once its cooked. If you have 3 plate or 6 plate ilai vadam stand, follow the same and spread the batter in all the plates.
    Elai vadam
    Elai vadam
  • Heat water in an idli pot. When the water comes to roll boil, place the idli plate. Let it steam for 5 minutes. The color of batter changes to pale white & transparent after cooking. Remove the leaf from the plate and let it become warm. Peel the cooked vadam and spread in a cotton cloth( Dhoti) or in a polythene sheet. Do not put in newspaper. It will stick with it.
     Elai vadam
    Elai vadam
  • Let it dry in balcony or under the sun for one day. If you don’t have this option, dry it under the fan wind. When it dries up, it shrinks in size & changes in color slightly.
    After one day drying, it would have dried up to 75%. During night, keep it under the fan. If its crispy all over, its ready. If its soft in the middle, it needs more time to dry. So the next day, keep it under the sun & repeat the same till its completely moisture free. Store it in a box & use it for months. Stays good even for an year if prepared properly.
    Elai vadam
  • Heat required oil in a kadai to deep fry. Break the vadam into half & deep fry in oil. Flip & cook both the sides. Remove & drain in a tissue. Sprinkle red chilli powder on top & serve as an evening snack or with any variety rice !
    Elai vadam
Enjoy !

Note
  • The consistency of batter is very important. Do not make it too watery or thick.
  • You can make this vadam with idli rice instead of raw rice.
  • Steaming takes maximum 5 minutes.
  • Try to peel the vadam after its cooled down.
  • If the vadam turns golden brown after frying, it may be due to the quality of rice. In that case, you can try adding few drops of lemon juice in the batter and make it next time. 
ilai vadam
Enjoy this crispy, yummy arisi appalam with rice or as an evening snack !
Easy arisi appalam
Continue Reading...


February 1, 2017

Crispy Corn Cheese Balls Recipe – Indian Party Snacks Recipes

Corn cheese balls recipe
Long back I have shared a recipe for Masala corn cheese balls in which all the spice powders, ginger-garlic paste are used. Its purely of our Indian style with all the masala flavor in it. Its made without potato. Cheese and sweet corn are the major ingredients.I used to make it for my guest and kids parties at home. Recently I came across this video of Corn cheese balls with Oregano & chilli flakes. I got tempted and tried it last Sunday for evening snacks. I followed my Aloo patties( Burger) recipe technique, coated the balls twice in maida paste and bread crumbs to get super crispy exterior. It came out very well. Use Panko crumbs for best result. Raksha liked it very much but she wanted the Indian masala flavor instead of Oregano. Then I made few balls adding garam masala powderWinking.Overall this recipe is a big hit in home. Friends, do try this recipe either with Indian masala or Italian seasoning based on your kids liking. Follow the same procedure and make this yummy, crispy corn cheese balls to celebrate kids birthday party, get together, kitty parties to serve as a starter. The dough can be made in advanced and refrigerated till use. All the kids would easily fall for this cheesy snackLove Struck. For variations, these balls can be made like nuggets. Ok, Lets see how to make this easy corn cheese balls with step by step photos, tips and tricks and a video !

Continue Reading...


November 23, 2016

Masala Peanuts Recipe – Masala Kadalai (Microwave & Deep fried Versions)

masala peanuts recipe
When I was young, my dad used to buy this besan coated, red colored, deep fried, spicy, dry masala peanuts( masala kadalai in Tamil) and roasted green peas ( Kara Pattani ) that is sold in small packets along with cone ice cream in cinema theatres to munch on during interval time Nowadays we could find mostly popcorn & boiled sweet corn ( butter cup corn) in most of the theaters which I am not fond of. So we buy it only for my daughter Raksha. She likes Haldirams masala peanuts and moong dal as well. But I feel the quantity of salt is high in it. So I started making them at home either in microwave or by deep frying in oil depending on the time in hand. Mostly I make it for Raksha’s school snack box or for her evening snacks after coming back from school. Yesterday I prepared this masala peanuts for our teatime. I took a video recipe by making one batch in microwave and deep frying the other batch. Both came out really well, equally crunchy and tasty. Kids would like the deep fried version more than microwave ones. For people under diet or calorie conscious, you can opt for baked version in oven to cut down the calories.I have shared both of them with step by step pictures and a video below. Do try this easy, quick and yummy evening snack for your kids & elders in your family. Enjoy your teatime ! Now Lets see how to make this yummy South Indian Masala peanuts / masala kadalai at home.
microwave masala peanuts recipe


Masala Peanuts Recipe - Microwave & Deep Fried Versions


Masala Peanuts Recipe - Microwave & Deep Fried Versions How to make besan coated masala peanuts - Deep fried version & microwave versions !
Cuisine: Indian
Category: Snacks
Serves: Serves 2-3
Prep time: 20 Minutes
Cook time: 20 Minutes
Total time: 40 Minutes


INGREDIENTS
1 cup - 250ml
  • Raw peanuts - 1/2 cup
  • Besan flour / Kadalai maavu - 3 tbsp
  • Rice flour - 1.5 tbsp
  • Red chilli powder - 1 tsp ( Add 1.5 tsp for spicy taste)
  • Garam masala powder - 1 tsp
  • Ginger & Garlic Paste - 1/2 tsp
  • Salt & water - as needed
  • Asafetida/ Hing – 2 pinches
  • Cooking oil - 1 tsp ( to mix in the batter)
  • Cooking oil - to deep fry
METHOD

  • Wash and soak raw peanuts in water for 15 minutes. Soaking helps to skin to remain intact with peanuts while frying. The masala won’t come off with the skin after frying. After soaking drain the soaked water completely.
    masala peanuts recipe
  • Take them in a wide bowl and add the besan, rice flour, red chilli powder, Garam masala powder, Ginger & garlic paste, hing and required salt. Mix well. Then add water little by little and mix well till all the peanuts are well coated with the masala. Do not make the batter too thick or too thin. Now add 1 tsp of cooking oil all over the batter. Mix well and set aside.
    masala peanuts recipe
    masala peanuts recipe
  • For deep frying : Heat cooking oil to deep fry and drop a pinch of batter to check its temperature. When its hot, it will rise to the top immediately. Now sprinkle the masala coated peanuts in oil and deep fry till it becomes golden in color and crunchy. Cook in medium flame and toss them in oil whenever needed, cook till bubbles cease. Remove in a tissue paper.
    masala peanuts recipe
  • For microwave version : Grease a microwave plate with oil and spread the masala coated peanuts in the plate.You can spread them directly on the glass plate inside the microwave.  Microwave in high power for 6-7 minutes and cook till its roasted. Keep an eye to avoid burning of peanuts. You should remove the plate once in the middle( after 3 minutes) and flip them to cook the other side as well. Again microwave for 3-4 minutes. Mine took totally 7 minutes in 800w power. Roasted Peanuts will be soft to touch when hot. But it will become very crispy once it cools down. So let it cool down completely before you munch. Serve with tea !
    Microwave masala peanuts recipe
Enjoy !

Note
  • Adjust the quantity of spice powders as per your taste buds.
  • If you don’t have enough time for soaking, just wash the peanuts and mix all the flours in the wet peanuts and proceed as given above.
  • Timings in microwave depends on the power of microwave. So please keep an eye. It will burn off suddenly.
Microwave masala peanuts recipe
Enjoy this crunchy masala peanuts for your teatime !
Masala peanuts recipe
Continue Reading...


October 17, 2016

Garlic Murukku/Poondu Murukku Recipe - Easy Murukku Varieties

Poondu murukku recipe
Recently when I went to Salem - Tamil nadu, we visited Lakshmi sweet stall to buy some sweets and snacks for Sendhil’s friend.There I saw some interesting murukku varieties like Onion murukku, Poondu murukku, butter murukku and many more. As I had already tried butter murukku and vengaya murukku, I wanted to prepare garlic murukku at home. I browsed few recipes and came across this one. This is the first time I am trying a murukku recipe with garlic.The combination of rice flour, besan and butter worked out very well. It came out white, crispy and mildly spiced with a nice garlic flavor. Its a great teatime snack and we loved it very much.Friends, If you are looking to try a flavored murukku recipe for this Diwali, do try this easy murukku variety and enjoy with your family! Lets see how to make yummy poondu murukku ( Garlic chakli) at home with step by step photos and a video !
Do check out my Ribbon pakoda , Garlic Karasev , other murukku varieties too !


Poondu murukku recipe

Garlic murukku / Poondu murukku recipe


Garlic murukku / Poondu murukku recipe How to make easy garlic murukku with rice flour, besan flour, hot oil and butter
Cuisine: Indian
Category: Snacks
Serves: 12-15 nos
Prep time: 10 Minutes
Cook time: 2 Minutes
Total time: 12 Minutes


INGREDIENTS
1 cup - 250ml
  • Rice flour/Idiyappam flour - 1 cup
  • Besan flour/Kadalai maavu - 1/3 cup
  • Softened butter -  3/4 to 1 tbsp (Unmelted)
  • Hot oil - 1 tsp
  • Salt & water - as needed
  • Cumin seeds - 1/2 tsp ( optional)
To grind
  • Garlic cloves - 5 nos
  • Red chillies - 2-3 nos ( I used 2 spicy chillies)
  • Water – 1 tbsp ( To soak)
METHOD

  • Peel garlic cloves.Soak garlic and red chillies in 1tbsp water ( you can use hot water too).Let it soak for 10 minutes. Then grind it to a paste adding the soaked water.It won’t grind to a smooth paste as the quantity is less. So grind it continuously for a minute, wipe the jar and grind it till it turns smooth.Don’t worry , it looks watery after grinding. But make sure there are no garlic pieces or chilli seeds. It may block the chakli nozzle while squeezing.
    Poondu murukku recipe
    Poondu murukku recipe
  • In a wide bowl, take the rice flour, besan flour, salt and sieve it. To this, add softened butter.Heat oil in a mini pan and add 1 tsp hot oil to the murukku mixture. Add ground garlic paste. Mix well to spread the butter and oil with the flour. Check for salt. Add more if needed. Then add water little by little and make a smooth dough. No problem if the dough is slightly sticky.
    Poondu murukku recipe
    Poondu murukku recipe
  • Take the star mould and keep in the murukku press/Chakli press. Fill the mould with the dough and squeeze it to make a round, concentric circle. You can press the murukku in a butter paper or polythene sheet. Cover the remaining dough with a wet cloth or a plastic cover. This dough may tighten over time.So if needed, sprinkle some water, mix well and press it.
    Poondu murukku recipe
  • Heat oil in a kadai and when it gets heated, drop a pinch of dough and if it rises to the top immediately, oil temperature is right. Drop 2-3 murukku in hot oil and cook both the sides till bubbles cease. Remove in a tissue paper. You can also squeeze the murukku directly in oil, cook them and break into pieces just like butter murukku. Either ways would do. In Lakshmi stall, I saw it as pieces/Thool murukku and not as whole ones. So I made a batch in that way too. 
  • Store in an airtight box after cools down. Enjoy for weeks ! This murukku takes time to lend all its flavor. So try to consume the murukku after few hours of making.
    Poondu murukku recipe
    Enjoy !

Note
  • I am not sure about using ghee instead of butter. The color of murukku may vary.
  • You can use red chilli powder instead of red chillies. But grinding garlic would become difficult. In that case, grind garlic as much as possible and strain it adding some water. Add the garlic water to make the dough.
Try this easy, garlic flavored murukku for this Diwali and enjoy !

Garlic murukku recipe

Continue Reading...


October 11, 2016

Easy Potato Murukku – Potato Chakli Recipe - Murukku Varieties

Potato murukku

Murukku recipes comes to my mind only when Diwali is nearby. Thenkuzhal murukku is a must & should Diwali snack in my home.We prepare other murukku varieties too based on our interest. This year I have a big list of murukku recipes to try. To begin with, I started my Diwali Snack/Savories recipes with this crispy, all time favorite potato murukku recipe ( Urulai kizhangu murukku) also known as Potato chakli/Aloo chakli in Hindi. I tried it last week by referring Sharmi’s passions. Actually I asked her for using ghee instead of butter but then I tried it with butter as per her recipe.It came out really well and crunchy. Raksha and Sendhil loved it a lot. Its very easy to make without using urad dal powder or fried gram powder.I have heard about Gulab jamun made with potato but murkku with potato is really a new thing to me. When I saw its results, I became very happy. Butter and potato does the magic in this recipe.Soon I will try this recipe with ghee and update the results.Now, Lets see how to make this simple and easy potato murukku recipe with step by step photos and a video !
Continue Reading...


September 30, 2016

Maladu Recipe(Roasted Gram Ladoo) – Pottukadalai Urundai

Maaladu recipe
Maladu/ Maa ladoo (Fried gram dal laddu Or roasted Gram ladoo in English) is one of the very popular and easiest laddu recipe in South India especially in Tamil nadu. Some people call it as Pottukadalai urundai or pottukadalai ladoo as well. It can be made quickly in few minutes. When I was thinking of some easy Navratri sweets to distribute to the guests, ladoo recipes came to my mind. Ladoo is one of the best crowd pleaser sweets and this maa ladoo is a kids friendly snack, healthy sweet too. I have made this with sugar and nuts. You can even use jaggery, roasted raisins to make it more healthy.Friends, do try this easy laddu recipe during this Navarathri along with a sundal variety.Offer to God and distribute it to your friends along with thamboolam. Ok, Lets check how to make maaladu recipe with step by step pictures.

Continue Reading...


June 9, 2016

Eggless French Toast Recipe – Bread Toast Without Egg

Eggless French Toast Recipe
Eggless French toast recipe - How to make eggless French toast without eggs. Learn with step by step photos and a video !
French toast is a very easy, popular and quick breakfast recipe. Its an ideal recipe for kids breakfast & lunch box as well. Basic plain French toast batter has eggs in it. But nowadays many Indian people are making it without eggs by using custard powder or corn starch. My friend Shalini prepares this sweet toast quite often as evening snacks for her kids.She shared her eggless recipe with me and was telling me to make this post in my blog. As Raksha is not a big fan of sweetened bread toast, I was hesitating to try it. But her Father is just the oppositeWinking. He has a big sweet tooth and I know he will like this toast very much. So once I tried it for Sendhil’s breakfast with some leftover bread after making Cheese toast for Raksha. He loved it very muchApplause
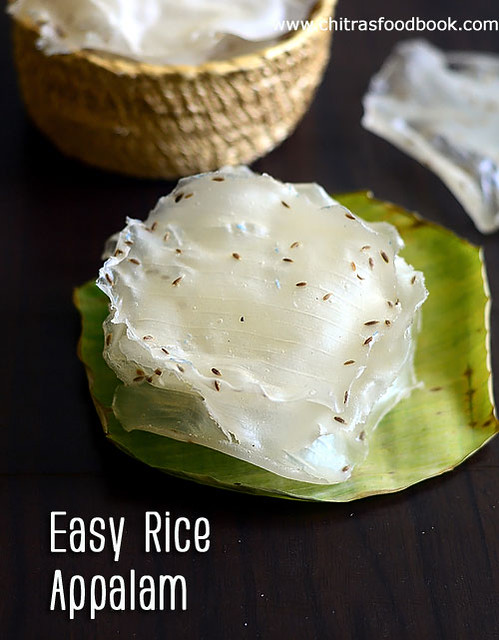
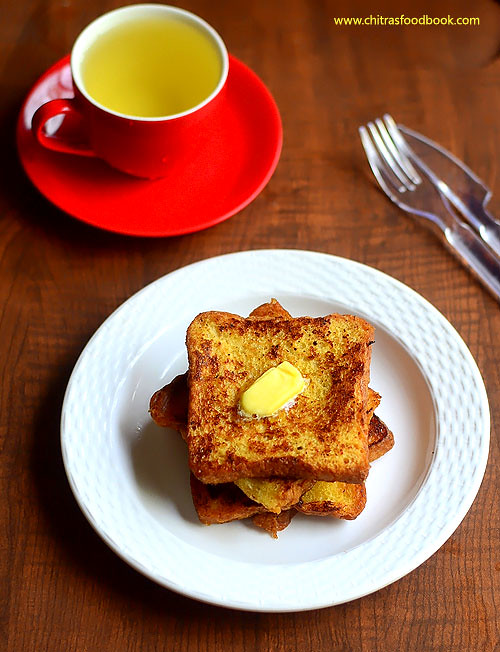
. Nowadays this eggless French toast is appearing often in my kitchen.You can serve this with freshly chopped fruits like strawberries, banana or by smearing with buttter, drizzling with honey or chocolate sauce and enjoy it.Soon I must try the savory version too. Lets see how to make this easy eggless French toast recipe at home. I am sure most of the kids & even their fathers would love this toast. Give it a shot and let me know !!


Eggless French toast recipe

Eggless French toast recipe


Eggless french toast recipe


Eggless French toast recipe using custard powder

Cuisine: Indian
Category: Breakfast
Serves: 5 nos
Prep time: 5 Minutes
Cook time: 5 Minutes
Total time: 10 Minutes


INGREDIENTS
1 cup - 250ml
  • Bread slices - 5 nos ( Milk bread or wheat bread)
  • Custard powder - 1.5 tbsp ( Vanilla flavor)
  • Sugar - 1.5 tbsp
  • Boiled milk - 1/2 cup
  • Cinnamon powder - 1/2 tsp
  • Vanilla essence or rose white essence - 1/2 tsp
  • Cooking oil or melted butter - to grease
METHOD

  • Take the custard powder, sugar, Vanilla essence, cinnamon powder in a wide plate.Add boiled & cooled milk and mix well without lumps. I used a big plate as its convenient for dipping the bread slice. If you want, you can mix them in a bowl too.
eggless french toast recipe
  • Now dip the bread slice on both the sides and all the corners.
  • Heat a dosa pan and drizzle with oil or butter. Place the bread slice and keep the flame medium.Flip the bread after it turns golden brown. Cook both the sides and remove in a plate. Serve hot with chocolate sauce or honey or chopped fruits !!
eggless french toast recipe
Enjoy !

Note
  • Adjust the quantity of sugar based on your sweet buds. The quantity of sugar also depends on the sweetness of bread. I used 1.5 tbsp. Use just 2 tsp to 1tbsp for mild sweetness.
  • Make sure the milk is boiled and is at room temperature.It should not be hot. 
  • U can replace custard powder with corn flour.
  • Serve it really hot to enjoy its best taste.
Try this easy n quick French toast recipe for your family and enjoy !
French toast without egg
Continue Reading...