Search Chitra's Food Book

Showing posts with label LUNCH BOX IDEAS. Show all posts

June 8, 2017

Easy Sambar Sadam In Pressure Cooker – Bachelors Style Sambar Rice Recipe in cooker

Easy sambar sadam recipe - Bachelors style
South Indian style Sambar rice / Sambar sadam using a pressure cooker is an yummy, healthy one pot recipe for vegetarians that is packed with the nutrients of rice, dal and mixed vegetables. Usually I make my hotel style sambar sadam at least once in a week for Sendhil’s lunch box. I prepare it by adding sambar powder made of freshly roasted & ground spices. Recently I saw this easy, bachelors style sambar sadam video in Tamil. Its so easy to make, absolutely no grinding job, no pre-cooking of dals & no tamarind too. 

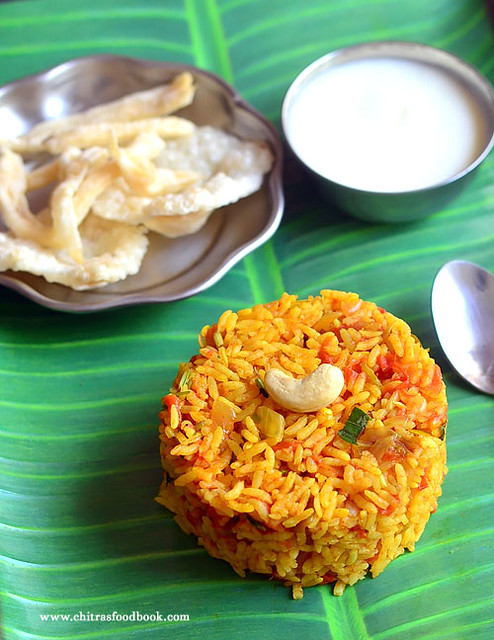
Yes, Its 100% a bachelors kind of recipe and it would be helpful for students, working women and busy moms to cook easily in the weekday mornings. I loved the idea and tried it the next day. It was so quick to make and tasted really good.I made few changes in the original recipe by adding mixed vegetables & spice powders to make it more healthy and flavorful. Sendhil love it a lot with rice papad or vadam as side dish. I loved it with pickle. It tastes good even if cools down. So we can pack this for lunch box as well.  

You can skip onion to make a no onion no garlic version on festival days. You can use almost all the vegetables except beetroot and bitter gourd as they dominate the taste. Friends, do try this easy, sambar sadam in pressure cooker and let me know your feedback. I am sure you will love its simplicity and taste. Lets check out how to prepare South Indian style Sambar rice with step by step photos and video !
If you like to make Hotel style sambar sadam recipe, please check this link. For Karnataka style Bisi bele bath, check out this link .


How to prepare sambar sadam

Easy Sambar Sadam - Bacehlors Style Sambar Rice Recipe


Easy Sambar Sadam - Bacehlors Style Sambar Rice Recipe How to make Sambar Rice Recipe easily in a pressure cooker - One pot rice variety

Cuisine: Indian
Category: Rice Varieties Indian
Serves: 3
Prep time: 10 Minutes
Cook time: 15 Minutes
Total time: 25 Minutes


INGREDIENTS
1 cup - 250ml
  • Raw rice or Steamed rice - 1 cup
  • Toor dal - 1/3 cup ( You can use 1/4 to 1/2 cup)
  • Water - 5 cups
  • **Mixed Vegetables - 1 cup ( 1 small carrot, 1/2 radish, 1 brinjal, Beans 3 nos, broad beans 5 nosl)
To saute in pressure cooker
  • Cooking oil - 2 tbsp
  • Mustard seeds - 1/2 tsp
  • Methi seeds - 5 nos
  • Curry leaves - Few
  • Coriander leaves - 1 tbsp ( finely chopped)
  • Green chilli - 1 no ( Slit )
  • Big onion - 1 no ( sliced)
  • Ripe Tomato - 3 nos ( finely chopped, I used 2 big tomato)
  • Sambar Powder - 1 tsp
  • Red chilli powder - 1/2 tsp
  • Dhania powder -1 tsp
  • Turmeric powder - 1/4 tsp
  • Hing/Asafetida – 1/8 tsp
  • Salt - as needed
To Garnish
  • Coriander leaves - 1 tbsp ( finely chopped)
  • Ghee - 1 tbsp
HOW TO MAKE SAMBAR RICE IN COOKER - METHOD


  • Wash rice & toor dal.Drain the water & Set aside. Wash & chop all the required vegetables.
                             How to make Sambar sadam
  • In a pressure cooker base, heat oil and splutter mustard seeds, methi seeds,curry leaves and coriander leaves. Saute for a second. Add sliced onion, slit green chilli and saute till onion turns transparent.
  • Add finely chopped tomato, mix well.Add turmeric powder, hing, sambar powder, red chilli powder, dhania powder and salt. Saute in medium flame till tomato turns mushy. Do not burn the masala.( Tamarind extract is not needed for this recipe)
    How to make Sambar sadam
  • Lastly add the chopped vegetables.Saute for a minute. Add the washed rice, dal and 5 cups of water. Mix well and check for taste.Add more salt, chilli powder or sambar powder if needed.
  • Close the cooker and pressure cook for 2 whistles in very low flame.Open the cooker after steam is released. Mix well. ( If you want to add tamarind extract, add it now, boil for a minute till its raw smell goes off).Don't forget to garnish with chopped coriander leaves and add 1 tbsp of ghee. Serve hot with chips, papad or pickle if you like !
    How to make sambar sadam
  • Enjoy !
Note
  • Red chilli powder and coriander powder are not given in the original recipe. So if you don’t have in hand, just add 2 tsp of sambar powder instead of 1 tsp.
  • Tamarind is not used in this recipe. If needed, you should add tamarind extract only after opening the cooker at the end because rice & dal won’t cook mushy in tamarind extract.
  • Adding coriander leaves and ghee is a must. It gives a nice flavor.
  • The quantity of water depends on the texture you like. I like it mushy,so I added 6 cups of water.

Try this easy, one pot sambar rice recipe and have a quick, hassle free lunch !
Sambar sadam

Continue Reading...


March 27, 2017

Mavinakayi Chitranna Recipe – Raw Mango Rice Recipe Karnataka Style

mavinakayi chitranna recipe
Ugadi festival is around the corner. This year for Ugadi, I am sharing a Karnataka special delicacy Mavinakayi Chitranna recipe. Its nothing but raw mango rice recipe ( Mangai sadam) prepared in  Karnataka style. I learnt this recipe from my School moms friend Archana. 

When I was asking her about Ugadi special recipes of Karnataka other than holige/Obbattu, she told me that they make Mavinakayi chitranna , Mavinakayi chutney, kosambari, obbattu saaru and some palya for the festival. As I had already shared Holige recipe and easy obbattu saaru recipe,I wanted to try Kosambari and mango chitranna this year. 

Actually our friend Tara told me another recipe for Mavinakayi chitranna adding onion and roasted methi seeds powder. I will post that version later. I found many variations for this particular recipe on net. As I am sharing a festival recipe, I wanted to make a simple no onion, no garlic green mango rice and I followed my friend's recipe blindly :) So here you go, Ugadi special Karnataka style mango rice recipe – Mavinakayi chitranna with step by step photos and a video !

Check out my Holige recipe, easy obbattu saaru, Karnataka Ugadi lunch menu post !

Check out my Andhra Ugadi pachadi recipe, pulihora and boorelu recipes.


mavinakayi chitranna

Mavinakayi Chitranna Recipe - Karnataka style raw mango rice


Mavinakayi Chitranna Recipe - Karnataka style raw mango rice Mavinakayi chitranna recipe - Raw mango rice recipe - Karnataka style
Cuisine: Karnataka
Category: Rice varieties
Serves: 3
Prep time: 5 Minutes
Cook time: 15 Minutes
Total time: 20 Minutes


INGREDIENTS
1 cup - 250ml
  • Cooked rice – 2 cups ( Raw rice or steamed rice – 1/2 cup)
  • Grated raw mango – 1/2 to 3/4 cup ( Based on sourness of mango)
  • Grated coconut - 1 tbsp
  • Turmeric powder - 1/4 tsp
  • Salt - as needed
To temper
  • Cooking oil - 2 tbsp
  • Mustard seeds - 1/2 tsp
  • Urad dal - 1 tsp
  • Chana dal - 1.5 tsp
  • Raw Peanut - 1 tbsp
  • Green chillies - 3 nos ( Slit)
  • Curry leaves - Few
  • Coriander leaves - 1.5 tbsp
METHOD

  • Wash and pressure cook 1/2 cup of rice ( you can use raw rice or steamed rice) adding 1.25 cups of water and few drops of cooking oil. I used steamed rice/ Boiled rice. I used 1:3 ratio of rice and water. After the rice is cooked, spread it in a plate and add a tsp of oil around. Let it cool down. Measure 1.5 cups of cooked rice and keep aside.
    mavinkayi chitranna
  • Wash and grated a medium sized raw mango. Taste it to check its sourness. After grating measure 3/4th cup of it and set aside. Pls refer the pic above. Adjust the quantity of  raw mango based on its tanginess.

  • Heat oil in a kadai.Splutter mustard seeds.Add urad dal, chana dal and peanuts. Roast till peanuts are done and dal turns golden brown in color. Roast it in medium flame. Now add the slit green chillies, curry leaves and half of the chopped coriander leaves. Saute for a minute.
    mavinkayi chitranna
  • Now add the required salt and turmeric powder.Mix well. Some people add raw mango,saute for a minute and then add the rice. But I added the cooked rice first and tossed well for a minute then added the raw mango as the sourness of my mango was less. My friend also told me to do the same. You can saute the raw mango before adding the rice if its too sour. It can be done in either ways.
    mavinkayi chitranna
  • Lastly add the grated mango and mix well for a minute. Check for taste. If the taste is too sour, add some more cooked rice, some red chilli powder or slit green chillies to balance the sour taste. You can add more rice or grated mango based on your taste. Mix well and cook for a minute.Switch off the flame and garnish with coriander leaves and grated coconut. Serve hot or warm as u wish.
    mavinkayi chitranna
    mavinkayi chitranna
  • Enjoy !

Note
  • For variations, you can make the raw mango paste without coconut seperately, refrigerate it for a week and then mix with cooked rice whenever needed.For this, add the grated raw mango after the tempering is done. Allow it to cook for a minute and switch off the flame. Let it cool down and then store in a box. Use clean spoon to handle.
  • Adjust the quantity of green chillies based on the sourness of mango.
  • I have used steamed rice ( Puzhungal arisi). Generally raw rice is used. You can add basmati rice as well.
  • The quantity of rice may vary based on the sourness of raw mango. My mango was not too sour.
  • It is optional to peel the skin of mango. As we are grating the mango, it is not necessary to peel the skin.
  • Some recipes call for grinding mango, coconut, green chillies and add to cooked rice. You can try this method for variation.
  • Do not avoid coriander leaves. It lends a nice flavor to the rice. Add half of the coriander leave while tempering and the remaining to garnish.
Try this simple and yummy raw mango rice at home, enjoy your lunch !
mango rice recipe karnataka style
Continue Reading...


January 30, 2017

Potato Poori – Aloo Puri Recipe - Alu Ki Puri

Potato poori
Potato poori / aloo puri in Hindi is an interesting kids friendly puri recipe. Poori would be our Sunday breakfast mostly. So I started exploring varieties of poori for a change. I have already shared Palak Poori, Masala poori, Beetroot poori, Tomato poori, chola poori recipes. This Sunday I tried potato poori ( Alu ki puri in Hindi) for the first time. I made the poori dough by mixing wheat flour with boiled, mashed potato and spice powders. 

Puri came out super soft with awesome masala flavor. It stays soft for hours together. So it can be packed for lunch box and ideal for travel as well. Side dish is not required for this puri recipe. Still I served it with tomato sabji and onion raita. Mixed veg kurma also goes well I guess.We loved it a lot. Its a winner recipe in my house. Do try this potato poori recipe for your kids and family. They will love it very much. 

Next I am planning to make methi poori and mint poori. Friends, If you know any other interesting poori varieties, do share them in the comments section. I will make it. As I say in all my poori posts, thickness of poori while rolling and the proper temperature(heat) of oil is the secret to get nicely puffed up poori. I have shared those points below in detail. If you are a beginner, It will sure come by practice. Ok, Lets see how to make Aloo Poori recipe with step by step photos and a video !


Aloo ki puri recipe

Potato Poori - Aloo Ki Poori Recipe


Potato Poori - Aloo Ki Poori Recipe How to make aloo ki puri / Potato poori recipe with step by step photos and video
Cuisine: North Indian
Category: Breakfast
Yields : 12 nos
Prep time: 10 Minutes
Cook time: 2 Minutes
Total time: 12 Minutes


INGREDIENTS
1 cup - 250ml
  • Whole Wheat flour / atta - 1 cup ( I used Aashirvad)
  • Medium sized potato - 2 nos
  • Cumin seeds or Ajwain - 1/4 tsp
  • Red chilli powder - 1 tsp ( I used Kashmiri chilli powder)
  • Dhania powder - 1 tsp
  • Garam masala powder - 1/2 tsp
  • Coriander leaves - 2 tbsp ( finely chopped)
  • Crushed kasoori methi – 1 tsp
  • Salt - as needed
  • Water - as required ( I added 1/3 cup)
METHOD

  • Wash and pressure cook potato in required water in very low flame for 2 whistles.Open the cooker and remove the potato. Peel the skin. Place the potato in a wide plate or bowl and mash it.
  • To the mashed potato, add turmeric powder, red chilli powder, dhania powder, cumin seeds, garam masala powder, salt, finely chopped coriander leaves, crushed kasoori methi, wheat flour and mix well without adding water.
    Aloo ki puri
  • Add wheat flour and mix well without adding water.
    Aloo ki puri
  • Now add water little by little and make a smooth, non-sticky dough. No need to rest the dough. Roll immediately. Grease your hands with oil. Take a portion of dough.Knead for a minute. Make balls roughly. Keep the remaining dough closed till use. Take one ball, roll it well and flatten it. Dust in wheat flour once and roll the poori slightly thick. Make sure corners are thick. Remember it should not be rolled too thin like roti. It won’t puff up.
  • Roll all the poori and arrange in a plate without overlapping each other.
    Aloo ki puri
  • Heat oil in a kadai and when it gets heated , put a pinch of dough. If it rises immediately to the top, oil temperature is right. It should not be smoky. Pat the excess flour in the poori and drop one in the oil. Let it rise to the top.
    Aloo ki puri
  • When it comes to top, pat it gently with the ladle. It will puff up nicely. Flip it after the bubbles cease. Cook the other side too.Press with the ladle for uniform cooking. Drain in a tissue paper and serve hot with raita or any sabji. Do not make any side dish with potato. U can make tomato sabji or mixed veg kurma for this poori.
    Aloo poori recipe
Enjoy !

Note
  • Poori gets puffed up only if its rolled thick evenly and properly. Oil temperature should be perfect. If its rolled thin, it comes like a papad. If the oil temperature is less, poori absorbs lot of oil and it won’t puff up.
  • At the same time, oil should not be smoking hot. Poori will become dark golden. So after you deep fry one poori, reduce the flame completely low. After dropping the next poori, increase the flame to high. By doing this way, heat of the oil can be maintained. If oil becomes smoky hot, switch off the stove for sometime. When the oil comes to right temperature, deep fry again.
  • As I have added Kashmiri red chilli powder, color of my poori was red. If you like white colored poori, add finely chopped green chilli instead of red chilli powder.
  • Do not rest the dough for long time. Poori may drink oil while frying.Try to make puri as soon as u make the dough.
  • No side dish is required for this poori. If you want to make it , mixed veg kurma and tomato onion sabji would be some good options.

Enjoy this soft, masala flavored Potato Poori at home with raita and sabji !
Aloo ki puri
Continue Reading...


January 6, 2017

Gobi Paratha Recipe–How To Make Cauliflower Paratha With Video Recipe

Gobi paratha recipe with step by step pictures
Gobi Paratha is Sendhil’s most favorite Paratha recipe. After marriage he took me to In-swing restaurant in BDA complex, Banashankari and got this cauliflower paratha for me as he loves it very much. That’s the first time I tasted a stuffed paratha in my life. He told me to try the same at home. As I was a beginner in cooking, I did not have any idea about the stuffing part, how to roll paratha etc. 

When I tried it, all the stuffing came out while rolling and the paratha became a disaster. Still he appreciated me for my attempt and ate well. And that’s my man. Now after so many years of cooking, I can make a good gobi paratha for him. So I wanted to share this recipe in my blog with step by step photos and a detailed video recipe to help beginners. 

You can try this yummy paratha recipe for dinner or lunch box. Even Kids would love this paratha if you cook it adding ghee or butter. It comes out soft and stays good for hours. Lets see how to make Gobi paratha/Cauliflower paratha at home easily !


Cauliflower paratha

Gobi paratha recipe/ Cauliflower paratha recipe


Gobi paratha recipe/ Cauliflower paratha recipe How to make gobi paratha/Cauliflower paratha at home with step by step photos and video !
Cuisine: Indian
Category: main course
Serves:
Prep time: 30 Minutes
Cook time: 10 Minutes
Total time: 40 Minutes


INGREDIENTS
1 cup - 250ml
  • Atta/Wheat flour - 1cup
  • Cooking oil - 1 tbsp
  • Salt & water - as needed
For paratha stuffing
  • Cauliflower - 1 no or Grated cauliflower - 1.5 cups
  • Cooking oil - 2 tbsp
  • Green chilli - 1 no ( finely chopped)
  • Grated ginger - 1 tsp
  • Ajwain/Carom seeds – 1 tsp
  • Red chilli powder - 1 tsp
  • Dhania powder/coriander seeds powder - 1 tsp
  • Garam masala powder - 1 tsp
  • Cumin seeds powder - 1/4 tsp
  • Turmeric powder - 1/4 tsp
  • Aamchur powder - 1/4 tsp ( optional)
  • Coriander leaves - 2 tbsp. ( to garnish)
  • Salt - as needed
METHOD

  • In a wide bowl, take the wheat flour, add required salt and 1/2 tbsp. of cooking oil. Mix well. Add water little by little and make a smooth, non-sticky dough.Knead well, apply a tsp of oil and cover the dough with a dry cloth, leave it for 20 minutes. In the mean time, lets prepare the stuffing.
    Gobi paratha recipe - step by step
    Gobi paratha recipe - step by step
  • Take the cauliflower and remove the leaves, cut into 4. Remove the stem part and separate the florets in a plate. In a wide bowl, boil water and add the florets. Boil for few minutes, parboil and drain the excess water. Remove the half cooked cauliflower florets to a dry kitchen towel/cloth. Pat it dry.
    Gobi paratha recipe - step by step
    Gobi paratha recipe - step by step
  • Grind the florets in a dry mixer jar without water. Wipe the sides of jar and grind in batches. You can also grate it. But grinding is easy. Take in a plate.
    Gobi paratha recipe - step by step
  • Heat oil in a kadai and when it gets heated , add the finely chopped green chilli, grated ginger (If u wish u can add very finely chopped onions at this stage) and saute well. Add the grated cauliflower, salt, red chilli powder, dhania powder, cumin powder, garam masala powder ,aamchur powder and ajwain. Mix well till all the moisture is absorbed. Let the mixture cool down.Divide the stuffing into lemon sized balls.
     Gobi paratha recipe - step by step
    Gobi paratha recipe - step by step
  • Take the chapathi dough and make lemon sized balls. The size of dough ball & stuffing ball should be equal.
  • Take one dough ball, dust it in wheat flour and roll into small poori size.Make the corners thinner than center. Keep the stuffing ball in the center and seal it. Again dust in the flour and roll to a thick or thin paratha as u wish. Sendhil likes it medium thick.So I do it accordingly.
    Gobi paratha recipe - step by step
    Gobi paratha recipe - step by step
  • Heat a dosa tawa, cook the paratha on both the sides till half cooked in medium flame. Brush one side of paratha with ghee or cooking oil and cook for few seconds till brown spot appear.Flip the paratha and brush the other side of paratha.Cook for a minute. Keep flipping and cooking till brown spots appear all over the paratha. Brush with ghee and remove in a plate. Serve hot immediately with raita or pickle OR stack the paratha in a clean kitchen towel or thermal foil for later use. (Remember the more you brush with ghee, softer the paratha would be.) Gobi paratha recipe - step by step
Enjoy !

Note
  • Do not make the chapathi dough very sticky. Rolling will be difficult. You may have to dust the paratha with more flour which leads to dry paratha.
  • You should grease the paratha with cooking oil or ghee for best taste.
  • Cauliflower stuffing should be free from moisture so that paratha won’t become sticky while rolling.
  • Adding aamchur powder gives a mild tangy taste. Skip if you don’t have it.
Gobi paratha

Enjoy this yummy, flavorful gobi paratha with your favorite side dish or simple masala raita.
How to make gobi paratha
Continue Reading...


November 30, 2016

Easy Tomato Rice Recipe In Pressure Cooker – Thakkali Sadam Recipe

Tomato rice recipe - Thakkali sadam in cooker
I am a big big fan of  South Indian tomato rice (Thakkali sadam in Tamil). So I keep trying varieties of tomato rice recipes. Earlier I had posted my version of thakkali sadam in which the spicy tomato paste is mixed with cooked rice. Then I shared my friend Shalini’s tomato rice recipe using electric rice cooker

Today I have shared about how to make tomato rice directly in a pressure cooker. I learnt this recipe from my Thangam Athai ( My dad’s sister). Its a very simple, quick and easy to make rice variety that is ideal for lunch box preparation. 

Bachelors and working women would love this recipe. This tomato rice recipe is prepared with very less whole garam masala ingredients and had a slight spicy taste.So it has become our family favorite.I loved it very much and had the same for my lunch & dinner as well. Simple onion raita and a papad or vadagam would be the best side dish for this tomato rice. 

Friends, Do try this yummy South Indian style Tomato rice recipe for your lunch box. I am sure you will love its taste. Now lets see how to make Thakkali sadam using a pressure cooker easily with step by step photos. I have updated this recipe with a full video, Please check it !

Check out my

1. Tomato biryani recipe

2. Tomato rice using rice cooker

3. Traditional tomato rice


Tomato rice in cooker

Tomato rice recipe / Thakkali sadam


Tomato rice recipe / Thakkali sadam How to make tomato rice / thakkali sadam in a pressure cooker - Easy method !
Cuisine: Indian
Category: Lunch box recipes
Serves: 3
Prep time: 10 Minutes
Cook time: 20 Minutes
Total time: 30 Minutes


INGREDIENTS
1 cup - 250ml
  • Steamed rice / Boiled rice - 1 cup
  • Ripe tomato - 4 nos ( Big)
  • Big onion - 2 nos
  • Green chilli - 1 no ( Long one, Finely chopped, use 3 slit chillies for spicy rice)
  • Turmeric powder – 1/8 tsp
  • Red chilli powder - 1 tsp ( add 1.5 tsp for spicy rice)
  • Cooking oil - 3 tbsp
  • Cinnamon - 2 inch piece
  • Cloves - 2 nos
  • Garlic cloves - 5 nos
  • Curry leaves - few
  • Coriander leaves - a fistful ( finely chopped)
  • Salt – as needed
  • Water – 2 cups
HOW TO MAKE TOMATO RICE IN COOKER - METHOD

  • Wash and chop the onion, tomato, green chilli, garlic cloves, curry leaves and coriander leaves very finely. Wash and soak the rice adding 2 cups of water for 30 minutes. ( If using basmati rice, add 1.75 cups of water)
    Tomato rice in cooker
  • Heat oil in a pressure cooker base, add cinnamon and cloves. Add finely chopped garlic cloves and saute for a second. Then add the chopped onion and sauté till transparent. Add finely chopped green chilli and curry leaves. Saute for few seconds.
    Tomato rice in cooker
    Tomato rice in cooker
  • Add finely chopped tomato pieces and the required salt for rice. Saute until tomato turns pulpy and mushy. Add turmeric powder, red chilli powder and mix well for few seconds. Lastly add the soaked rice along with water. Mix well and check for taste. Add more salt & red chilli powder based on it. Pressure cook in very low flame for one whistle. It takes 8 to 10 minutes. Remove the lid after the steam is released.
    Tomato rice in cooker
    Tomato rice in cooker
  • Mix the cooked rice with a fork. Garnish with finely chopped coriander leaves, mix well and serve hot with raita & papad.
    Thakkali sadam in pressure cooker
Enjoy !

Note
  • Add more chilli powder if you want spicy tomato rice.
  • Adding coriander leaves gives a nice flavor to this rice. So do not skip it
  • You can also add mint leaves along with curry leaves if you like the flavor of mint leaves.
  • I have used steamed rice/ puzhungal arisi. You can use basmati rice or raw rice. But soak the rice in water for minimum 30 minutes to get fluffy, soft and grainy rice.

Enjoy this delicious South Indian style tomato rice recipe and have a quick lunch !
Thakkali sadam in pressure cooker
Continue Reading...