Last week I got Home Puff's Double Wall Vacuum Insulated, leak proof, Stainless steel Lunch Box of 1700ml capacity. I am sharing my reviews on this product after using it for one week. I have been using it regularly for packing Sendhil & Raksha’s lunch. Food stayed warm for more than 4 hours If you pack them really hot. I have tried packingIdli& sambar, Ven pongal, Sambar rice, Veg fried rice, Kuzhambu, Kootu, Dal tadka with rice and Veg biryani. Everything stayed warm for more than 4 hours. More over its completely leak proof which is a big relief for me. This insulated lunch box is much much better when compared with my old M****n steel lunch box. Friends, If you are looking for a good Insulated lunch box, you can go for Homepuff’s product. This product would be ideal for gifting too. I have also shared all the PROS & CONS based on my opinion. Have a look at them.
Home Puff Double Wall Vacuum Insulated - Stainless Steel Lunch Box With 3 Leak Proof,1700 Ml - Grey PROS & CONS:
Looks so good and professional.
Its containers are with top grade stainless steel interior (304-Grade Stainless Steel) and exterior with Double Walled Vacuum Insulation for temperature control and durability over time. High Quality Lid with Silicone lining for heat insulation, BPA-free, non-toxic.
Well Designed with 3 separate Leak proof food containers with silicone gasket rings to keep dry and wet food hot in the same. I have tried packing sambar, Dal tadka as well.
Easy and comfortable to handle with good grip. Easy to carry too.
Every HomePuff lunch box comes with bag which unzips into a tablemat. This bag is made up of specially coated aluminium material which repels water and food stains.
Quantity of food would be enough for one adult/ 2 children.
Food stays hot for 2 hours and becomes warm for more than 6 hours. Similarly cold foods remain cold for 2 to 3 hours.
Warranty Details : 12 MONTH WARRANTY UNDER MANUFACTURING DEFECTS ONLY. DOES NOT COVER PHYSICAL DAMAGE, LIQUID DAMAGE & BURNT DAMAGES.
CONS :
This product is a bit pricey.
Looks big in size.
It would be better if there is some partition in one of the containers. It helps to pack more dishes.
Please do not expect the food to be to hot. It stays warm around 60 to 70c upto 5 hours.
You can find this product in HOMEPUFF.COM website, Amazon and Flipkart. You must visit their website to see their wide range of kitchen gadgets.
Brinji rice is a very popular rice variety in small hotels in Chennai. Long back I had shared a plain brinji recipe with coconut milk. Recently I came across a vegetable brinji rice recipe(Brinji sadam in Tamil) in Eesha’s kitchen YouTube video which is completely different from my earlier version. So I tried it for our Sunday lunch. I am not sure if this the original Chennai brinji rice. But it came out well and tasted more like biryani/ pulao made with coconut milk. We all loved it. But I felt there is no much difference between the taste of this veg brinji and biryani. There are many versions available for this particular recipe.
Some recipes call for using freshly ground masala. As I had already shared a plain brinji sadam recipe, I wanted to prepare it with vegetables. Friends, If any of you know the authentic Chennai brinji rice recipe, please let me know. I am ready to try again and update this post. I have used jeera rice as its popularly known as brinji rice. So you can call this rice as Seeraga samba pulao as well.
In the original recipe, it is prepared with basmati rice. So you can also use basmati or even Sona masoori raw rice to make this brinji. But the flavor and the quantity of water varies. For variations, you can add fried bread pieces at the end. As this recipe has no grinding job and done directly in a pressure cooker bachelors can give a try and pack it for your lunch box.
Ok, Lets see how to make Tamil nadu style Vegetable brinji rice with step by step pictures.
I used my Preethi Zodiac mixer grinder for extracting coconut milk easily. So I have shared separate step by step pictures for the same. Please check it out if interested. Preethi zodiac has really made my cooking much easier by helping me in chopping, grinding, atta kneading etc. Friends, you can think about buying this product if you are planning to change your old mixer.
COCONUT MILK EXTRACTION USING PREETHI ZODIAC
Take the coconut and cut into small pieces. You can also use grated coconut.
Now take the super extractor jar and fit the blade. Cover the spout with the cap. Put the coconut pieces and grind to a coarse paste without adding water.
Now add the required warm water ( 1:1 ratio of coconut and water for thick milk) and grind continuously.Coconut milk collects in the jar.
Pour into a bowl and use as required.
Vegetable Brinji Rice Recipe
How to make Chennai special Brinji rice with vegetables & coconut milk
Mixed vegetables - 1/2 cup ( 1 small carrot, 2 beans, handful of green peas, 1 potato)
Basmati rice / jeera rice/ Raw rice - 1 cup
Cooking oil + ghee - 2 tbsp + 1 tbsp
Cinnamon - 1 inch piece
Cloves - 2 nos
Cardamom - 1 no ( crushed)
Bay leaf - 1 no
Black stone flower / Kalpasi- 1 no
Big onion - 1 no
Ginger garlic paste - 1/2 tbsp ( Use freshly ground paste for best taste)
Green chillies - 2 nos. ( Use 3 to 4 for spicy brinji)
Mint leaves - 2 tbsp
Ripe tomato - 1 no ( big, chop finely)
Coriander leaves - Few
Turmeric powder - 1/8 tsp
Red chilli powder - 1/2 tsp
Salt - as needed
Curd - 1 tbsp
Water + coconut milk - 1 cup + 3/4 cup
Fried bread pieces – Few (Optional)
METHOD
Wash and chop all the vegetables into small cubes. Set aside.
Heat oil + ghee in a pressure cooker. Saute the whole garam masala.
Add sliced onion and saute till transparent.Saute GG paste till raw smell goes off.
Add green chillies + mint leaves. Saute for a minute.
Saute tomato + coriander leaves till mushy.
Add spice powders, salt, curd and mix well.
Lastly add water, coconut milk and let it roll boil. Add washed rice and pressure cook in low flame for one whistle.
Remove the lid after steam is released. Fluff the rice and serve hot with raita, kurma or brinjal gravy as side dish.
METHOD - STEP BY STEP PICTURES
Wash the rice, drain the water completely and keep aside. No need to soak if using Jeera rice/ seeraga samba rice. If you are using basmati rice or raw rice, soak for 30 minutes.
Wash and chop vegetables into small cubes, slice onions, finely chop tomato. Heat oil in a pressure cooker base. Saute cinnamon, cloves, bayleaf, black stone flower and crushed cardamom.
Add onion, gg paste and saute till onion turns transparent. Add slit green chilli and mint leaves. Saute for a minute. Add tomato pieces, coriander leaves and saute till tomato becomes mushy.
Add turmeric powder, red chilli powder and salt. Saute well and add curd. Mix well. Add water and coconut milk.
After it comes to roll boil, add washed rice. Mix well and cover the cooker with a lid. Pressure cook in low flame for one whistle. Remove the lid after steam is released. Mix gently and serve hot with onion raita, vegetable kurma, Biryani brinjal gravy, tomato gravy etc.
Enjoy !
Note
Adjust the quantity of green chillies as per your taste.
You can also use basmati rice or raw rice. In that case, soak the rice for minimum 30 minutes and use 1: 1.5 cups to 2 cups of water.
You can skip red chilli powder and use green chillies alone.
Yummy Tamilnadu style vegetable brinji rice is ready ! Try at home and relish with your favorite side dish !!
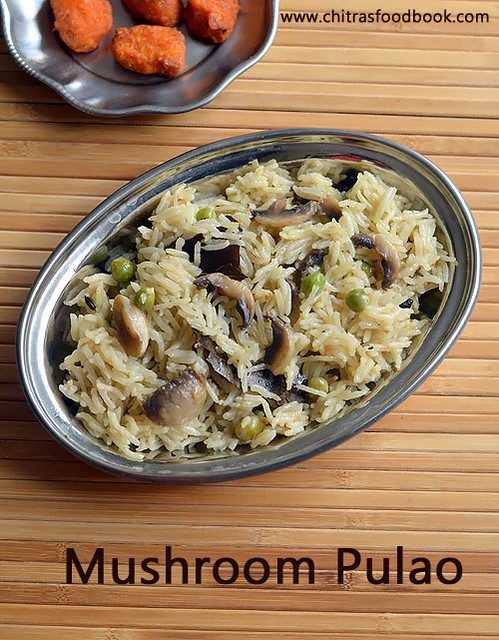
Last Sunday I prepared this Indian style mushroom peas pulao with some leftover mushrooms and fresh green peas in a pressure cooker. Its a very simple and easy pulao recipe just like my vegetable pulao. It can be prepared directly in an Indian pressure cooker. So it gets ready under 15 minutes. No grinding or big chopping works needed. You can prepare it for your lunch box easily and quickly. Since its a mild pulao recipe without much of garam masala powders, you can enjoy it with any spicy kurma as side dish. But my family liked it with simple onion raita. Usually people add coconut milk instead of water. But I used only water to cook the rice. Still it was good with nice flavor. Lets see how to make this simple and quick mushroom peas pulao with step by step pictures.
Heat oil + ghee in a cooker. Saute whole garam masala.
Add onion, gg paste, green chilli, mint leaves and saute till transparent.
Add mushroom, peas and saute for a minute. Add rice, saute for a minute.
Lastly add water or coconut milk and mix well.
Pressure cook in low flame for one whistle.
METHOD - STEP BY STEP PICTURES
Wash and clean mushroom with a cloth. Remove the stem and slice it. Keep aside.Finely chop onion and slit the green chilli. Wash the basmati rice and set aside. No need to soak it.
Heat oil + ghee in a pressure cooker base. Saute cinnamon, cloves, bay leaf, cardamom and black stone flower. Add fennel seeds, big onion, gg paste and green chillies. Saute in medium flame till onion turns transparent.
Add mint leaves, mushroom and peas. Mix well. Lastly add the washed rice and saute for a minute.
Then add 1.75 cups of water or thin coconut milk. Sprinkle few drops of lemon juice. Mix well and pressure cook in very low flame for one whistle. Remove the lid after the steam is released.
Mix gently, fluff the rice and serve hot with any spicy kurma or raita ! Enjoy !
Note
Adjust the quantity of green chilli as per your taste.
You can use thin coconut milk instead of water.
I used lemon juice. You can saute one finely chopped tomato along with onion.
Try this easy, yummy, healthy mushroom pulao and enjoy ! I served with raita and Paneer 65.
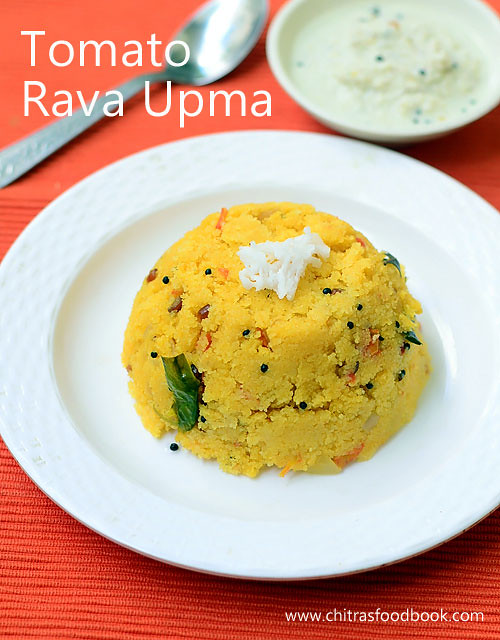
Tomato rava upma recipe / Rava upma with tomatowith step by step pictures - Tomato rava upma is an yummy, instant, South Indian breakfast recipe with a nice variation from our regular rava upma. Usually I add tomato and vegetables only for rava kichadi but this morning I prepared rava upma with tomato just for a change. Basically I am a big fan of tomato based recipes. Even though I don’t like rava upma, I loved this tomato rava upma a lot. It tastes tangy and spicy as well just like rava kichadi. If you wish you can add green peas in this upma to make it look colorful.
I had some leftover upma for my dinner too. It was good and stayed soft. So you can pack it for lunch box as well. Friends, If you are bored of making rava upma, do try this tomato upma for your breakfast or dinner. It tastes good with coconut chutney as side dish. Try and let me know your feedback . My School moms friends make Karnataka style tomato rava bath. I will ask them and share that recipe later. Now lets see how to make this Tamil nadu style tomato upma recipe with step by step photos.
Heat oil, Temper mustard, dals.Saute the vegetables adding salt.
After tomato becomes mushy, add spice powders.
Mix well and add water. After water comes to boil, add rava.
Mix well, cover cook for 5 minutes.
Add coconut oil / ghee.Garnish with coriander leaves and serve with coconut chutney.
Tomato Rava Upma Recipe - Step by step photos
Wash and chop the tomato, onion, chilli.Set aside.Dry roast rava for 7 minutes in medium flame without burning it.Keep in a plate.
Heat oil in a kadai.Splutter mustard seeds, urad dal, chana dal and curry leaves. After it turns golden, add finely chopped onion and slit green chilli.
After onion becomes transparent, add finely chopped tomato.Saute till tomato becomes mushy. Add salt to cook tomato quickly.
Add red chilli powder or sambar powder and turmeric powder. Mix well till raw smell goes off.Add water and let it roll boil.
Lower the flame completely.Add the roasted rava in a sprinkled way using one hand while stirring constantly with other hand. It helps to avoid lumps.Once all the rava is added, it absorbs the water and becomes thick. Cover it with a lid and cook for 5 minutes in low flame.Mix once in the middle.
Switch off the flame after rava is cooked soft. Add coconut oil or ghee. Garnish with coriander leaves.Mix well and serve hot with coconut chutney!
Notes
Adjust the quantity of chillies as per your taste.
For variations, you can add 1/2 tsp garam masala powder for masala flavor.
Remember to add rava in a sprinkled way to avoid lumps.
No need to add more water. Adding more water makes it like kichadi.
You can use wheat rava instead of semolina and make the same. But add 3 cups of water.
Color of this upma varies as per the chilli powder you use. Use Kashmiri chilli powder for bright red color.
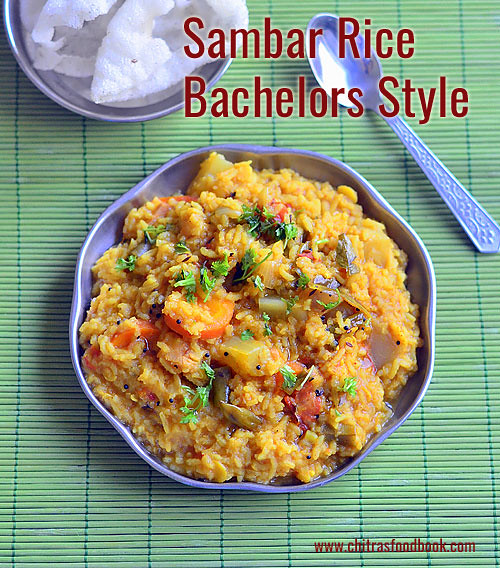
South Indian style Sambar rice / Sambar sadam using a pressure cooker is an yummy, healthy one pot recipe for vegetarians that is packed with the nutrients of rice, dal and mixed vegetables. Usually I make my hotel style sambar sadam at least once in a week for Sendhil’s lunch box. I prepare it by adding sambar powder made of freshly roasted & ground spices. Recently I saw this easy, bachelors style sambar sadam video in Tamil. Its so easy to make, absolutely no grinding job, no pre-cooking of dals & no tamarind too.
Yes, Its 100% a bachelors kind of recipe and it would be helpful for students, working women and busy moms to cook easily in the weekday mornings. I loved the idea and tried it the next day. It was so quick to make and tasted really good.I made few changes in the original recipe by adding mixed vegetables & spice powders to make it more healthy and flavorful. Sendhil love it a lot with rice papad or vadam as side dish. I loved it with pickle. It tastes good even if cools down. So we can pack this for lunch box as well.
You can skip onion to make a no onion no garlic version on festival days. You can use almost all the vegetables except beetroot and bitter gourd as they dominate the taste. Friends, do try this easy, sambar sadam in pressure cooker and let me know your feedback. I am sure you will love its simplicity and taste. Lets check out how to prepare South Indian style Sambar rice with step by step photos and video !
If you like to make Hotel style sambar sadam recipe, please check this link. For Karnataka style Bisi bele bath, check outthis link .
Easy Sambar Sadam - Bacehlors Style Sambar Rice Recipe
How to make Sambar Rice Recipe easily in a pressure cooker - One pot rice variety
**Mixed Vegetables - 1 cup ( 1 small carrot, 1/2 radish, 1 brinjal, Beans 3 nos, broad beans 5 nosl)
To saute in pressure cooker
Cooking oil - 2 tbsp
Mustard seeds - 1/2 tsp
Methi seeds - 5 nos
Curry leaves - Few
Coriander leaves - 1 tbsp ( finely chopped)
Green chilli - 1 no ( Slit )
Big onion - 1 no ( sliced)
Ripe Tomato - 3 nos ( finely chopped, I used 2 big tomato)
Sambar Powder - 1 tsp
Red chilli powder - 1/2 tsp
Dhania powder -1 tsp
Turmeric powder - 1/4 tsp
Hing/Asafetida – 1/8 tsp
Salt - as needed
To Garnish
Coriander leaves - 1 tbsp ( finely chopped)
Ghee - 1 tbsp
HOW TO MAKE SAMBAR RICE IN COOKER - METHOD
Wash rice & toor dal.Drain the water & Set aside. Wash & chop all the required vegetables.
In a pressure cooker base, heat oil and splutter mustard seeds, methi seeds,curry leaves and coriander leaves. Saute for a second. Add sliced onion, slit green chilli and saute till onion turns transparent.
Add finely chopped tomato, mix well.Add turmeric powder, hing, sambar powder, red chilli powder, dhania powder and salt. Saute in medium flame till tomato turns mushy. Do not burn the masala.( Tamarind extract is not needed for this recipe)
Lastly add the chopped vegetables.Saute for a minute. Add the washed rice, dal and 5 cups of water. Mix well and check for taste.Add more salt, chilli powder or sambar powder if needed.
Close the cooker and pressure cook for 2 whistles in very low flame.Open the cooker after steam is released. Mix well. ( If you want to add tamarind extract, add it now, boil for a minute till its raw smell goes off).Don't forget to garnish with chopped coriander leaves and add 1 tbsp of ghee. Serve hot with chips, papad or pickle if you like !
Enjoy !
Note
Red chilli powder and coriander powder are not given in the original recipe. So if you don’t have in hand, just add 2 tsp of sambar powder instead of 1 tsp.
Tamarind is not used in this recipe. If needed, you should add tamarind extract only after opening the cooker at the end because rice & dal won’t cook mushy in tamarind extract.
Adding coriander leaves and ghee is a must. It gives a nice flavor.
The quantity of water depends on the texture you like. I like it mushy,so I added 6 cups of water.
Try this easy, one pot sambar rice recipe and have a quick, hassle free lunch !
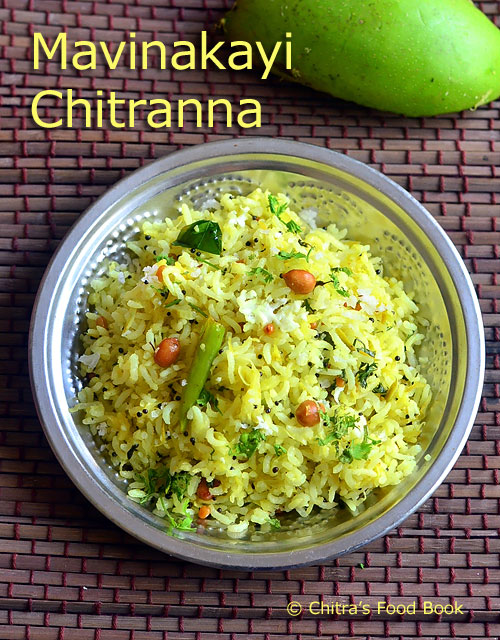
Ugadi festival is around the corner. This year for Ugadi, I am sharing a Karnataka special delicacy Mavinakayi Chitranna recipe. Its nothing but raw mango rice recipe ( Mangai sadam) prepared in Karnataka style. I learnt this recipe from my School momsfriend Archana.
When I was asking her about Ugadi special recipes of Karnataka other than holige/Obbattu, she told me that they make Mavinakayi chitranna , Mavinakayi chutney, kosambari, obbattu saaru and some palya for the festival. As I had already shared Holige recipe and easy obbattu saaru recipe,I wanted to try Kosambari and mango chitranna this year.
Actually our friend Tara told me another recipe for Mavinakayi chitranna adding onion and roasted methi seeds powder. I will post that version later. I found many variations for this particular recipe on net. As I am sharing a festival recipe, I wanted to make a simple no onion, no garlic green mango rice and I followed my friend's recipe blindly :) So here you go, Ugadi special Karnataka style mango rice recipe – Mavinakayi chitranna with step by step photos and a video !
Cooked rice – 2 cups ( Raw rice or steamed rice – 1/2 cup)
Grated raw mango – 1/2 to 3/4 cup ( Based on sourness of mango)
Grated coconut - 1 tbsp
Turmeric powder - 1/4 tsp
Salt - as needed
To temper
Cooking oil - 2 tbsp
Mustard seeds - 1/2 tsp
Urad dal - 1 tsp
Chana dal - 1.5 tsp
Raw Peanut - 1 tbsp
Green chillies - 3 nos ( Slit)
Curry leaves - Few
Coriander leaves - 1.5 tbsp
METHOD
Wash and pressure cook 1/2 cup of rice ( you can use raw rice or steamed rice) adding 1.25 cups of water and few drops of cooking oil. I used steamed rice/ Boiled rice. I used 1:3 ratio of rice and water. After the rice is cooked, spread it in a plate and add a tsp of oil around. Let it cool down. Measure 1.5 cups of cooked rice and keep aside.
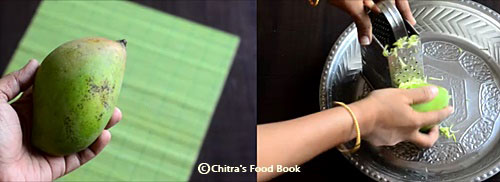
Wash and grated a medium sized raw mango. Taste it to check its sourness. After grating measure 3/4th cup of it and set aside. Pls refer the pic above. Adjust the quantity of raw mango based on its tanginess.
Heat oil in a kadai.Splutter mustard seeds.Add urad dal, chana dal and peanuts. Roast till peanuts are done and dal turns golden brown in color. Roast it in medium flame. Now add the slit green chillies, curry leaves and half of the chopped coriander leaves. Saute for a minute.
Now add the required salt and turmeric powder.Mix well. Some people add raw mango,saute for a minute and then add the rice. But I added the cooked rice first and tossed well for a minute then added the raw mango as the sourness of my mango was less. My friend also told me to do the same. You can saute the raw mango before adding the rice if its too sour. It can be done in either ways.
Lastly add the grated mango and mix well for a minute. Check for taste. If the taste is too sour, add some more cooked rice, some red chilli powder or slit green chillies to balance the sour taste. You can add more rice or grated mango based on your taste. Mix well and cook for a minute.Switch off the flame and garnish with coriander leaves and grated coconut. Serve hot or warm as u wish.
Enjoy !
Note
For variations, you can make the raw mango paste without coconut seperately, refrigerate it for a week and then mix with cooked rice whenever needed.For this, add the grated raw mango after the tempering is done. Allow it to cook for a minute and switch off the flame. Let it cool down and then store in a box. Use clean spoon to handle.
Adjust the quantity of green chillies based on the sourness of mango.
I have used steamed rice ( Puzhungal arisi). Generally raw rice is used. You can add basmati rice as well.
The quantity of rice may vary based on the sourness of raw mango. My mango was not too sour.
It is optional to peel the skin of mango. As we are grating the mango, it is not necessary to peel the skin.
Some recipes call for grinding mango, coconut, green chillies and add to cooked rice. You can try this method for variation.
Do not avoid coriander leaves. It lends a nice flavor to the rice. Add half of the coriander leave while tempering and the remaining to garnish.
Try this simple and yummy raw mango rice at home, enjoy your lunch !
Potato poori / aloo puri in Hindi is an interesting kids friendly puri recipe. Poori would be our Sunday breakfast mostly. So I started exploring varieties of poori for a change. I have already shared Palak Poori, Masala poori, Beetroot poori, Tomato poori, chola poori recipes. This Sunday I tried potato poori ( Alu ki puri in Hindi) for the first time. I made the poori dough by mixing wheat flour with boiled, mashed potato and spice powders.
Puri came out super soft with awesome masala flavor. It stays soft for hours together. So it can be packed for lunch box and ideal for travel as well. Side dish is not required for this puri recipe. Still I served it with tomato sabji and onion raita. Mixed veg kurma also goes well I guess.We loved it a lot. Its a winner recipe in my house. Do try this potato poori recipe for your kids and family. They will love it very much.
Next I am planning to make methi poori and mint poori. Friends, If you know any other interesting poori varieties, do share them in the comments section. I will make it. As I say in all my poori posts, thickness of poori while rolling and the proper temperature(heat) of oil is the secret to get nicely puffed up poori. I have shared those points below in detail. If you are a beginner, It will sure come by practice. Ok, Lets see how to make Aloo Poori recipe with step by step photos and a video !
Potato Poori - Aloo Ki Poori Recipe
How to make aloo ki puri / Potato poori recipe with step by step photos and video
Whole Wheat flour / atta - 1 cup ( I used Aashirvad)
Medium sized potato - 2 nos
Cumin seeds or Ajwain - 1/4 tsp
Red chilli powder - 1 tsp ( I used Kashmiri chilli powder)
Dhania powder - 1 tsp
Garam masala powder - 1/2 tsp
Coriander leaves - 2 tbsp ( finely chopped)
Crushed kasoori methi – 1 tsp
Salt - as needed
Water - as required ( I added 1/3 cup)
METHOD
Wash and pressure cook potato in required water in very low flame for 2 whistles.Open the cooker and remove the potato. Peel the skin. Place the potato in a wide plate or bowl and mash it.
To the mashed potato, add turmeric powder, red chilli powder, dhania powder, cumin seeds, garam masala powder, salt, finely chopped coriander leaves, crushed kasoori methi, wheat flour and mix well without adding water.
Add wheat flour and mix well without adding water.
Now add water little by little and make a smooth, non-sticky dough. No need to rest the dough. Roll immediately. Grease your hands with oil. Take a portion of dough.Knead for a minute. Make balls roughly. Keep the remaining dough closed till use. Take one ball, roll it well and flatten it. Dust in wheat flour once and roll the poori slightly thick. Make sure corners are thick. Remember it should not be rolled too thin like roti. It won’t puff up.
Roll all the poori and arrange in a plate without overlapping each other.
Heat oil in a kadai and when it gets heated , put a pinch of dough. If it rises immediately to the top, oil temperature is right. It should not be smoky. Pat the excess flour in the poori and drop one in the oil. Let it rise to the top.
When it comes to top, pat it gently with the ladle. It will puff up nicely. Flip it after the bubbles cease. Cook the other side too.Press with the ladle for uniform cooking. Drain in a tissue paper and serve hot with raita or any sabji. Do not make any side dish with potato. U can make tomato sabji or mixed veg kurma for this poori.
Enjoy !
Note
Poori gets puffed up only if its rolled thick evenly and properly. Oil temperature should be perfect. If its rolled thin, it comes like a papad. If the oil temperature is less, poori absorbs lot of oil and it won’t puff up.
At the same time, oil should not be smoking hot. Poori will become dark golden. So after you deep fry one poori, reduce the flame completely low. After dropping the next poori, increase the flame to high. By doing this way, heat of the oil can be maintained. If oil becomes smoky hot, switch off the stove for sometime. When the oil comes to right temperature, deep fry again.
As I have added Kashmiri red chilli powder, color of my poori was red. If you like white colored poori, add finely chopped green chilli instead of red chilli powder.
Do not rest the dough for long time. Poori may drink oil while frying.Try to make puri as soon as u make the dough.
No side dish is required for this poori. If you want to make it , mixed veg kurma and tomato onion sabji would be some good options.
Enjoy this soft, masala flavored Potato Poori at home with raita and sabji !