Search Chitra's Food Book

Showing posts with label SIDE DISH FOR RICE. Show all posts

January 20, 2020

Iyengar Paruppu Urundai Kuzhambu Recipe – No Onion No Garlic Recipe

Paruppu urundai kuzhambu is our family favorite. Usually I make in this method. But this time I tried Iyengar style no onion, no garlic paruppu urundai kuzhambu recipe following the recipe from Iyengar thaligai. It came out very well and super flavorful as I cooked in tin coated bronze pot which I recently got from Zishta. Its an organic cookware shop in Jayanagar, Bangalore. You can get handcrafted, quality checked, traditional cook wares in this shop.

 Actually I have a bronze pot given by my mom for my marriage. Every year I use that pot for making sweet pongal on Pongal festival day. In bronze pot, we cannot cook tamarind based or lemon based tangy dishes. But tin coated bronze pot can be used to prepare all the tamarind, lemon based dishes and rice dish like pongal, upma, payasam, So I got this pot from Zishta. Its really good. I can feel its handcrafted and not a machine mould. I am not sure about wear off of the tin coating. But I hope it will take at least an year if used on a daily basis. But proper washing care is needed. Click this link on how to maintain this pot. 

When I made this kuzhambu in tin coated bronze pot, it was so flavorful which I never experienced in my kitchen. It was amazing and I had a different cooking experience. Though the pot takes slightly more time to heat up and cook, it holds the heat for hours together. So we can enjoy this kuzhambu hot or warm for more time. Overall, I am happy with this purchase. Friends, do check out this recipe and try in a traditional cookware. You will love its taste and flavor ! Lets see how to make Iyengar style paruppu urundai kuzhambu with step by step pictures.

Check out my Iyengar style milagu kuzhambu recipe, manathakkali vathal kuzhambu , Iyengar sweet pongal too.


Iyengar Paruppu Urundai Kuzhambu Recipe


Iyengar Paruppu Urundai Kuzhambu Recipe

Learn how to make this delicious Iyengar paruppu urundai kuzhambu recipe


Cuisine: Indian
Category: Sweet
Serves: Serves 4
Prep time: 120 Minutes
Cook time: 20 Minutes
Total time: 140 Minutes


INGREDIENTS
1 cup = 240ml (For paruppu urundai)
  • Bengal gram / chana dal - 1/4 cup
  • Toor dal - 1/4 cup
  • Red chilli - 2
  • Coriander leaves - 2 tbsp
  • Rice flour - 1 tsp
  • Cooking oil or gingely oil - 2 tsp
  • Salt - as needed
  • Cooking soda - a small pinch ( optional)
  • Asafetida / hing - 1/4 tsp
For kuzhambu
  • Tamarind - Big gooseberry size
  • Kuzhambu milagai thool or sambar powder - 1 tbsp
  • Turmeric powder - 1/4 tsp
  • Salt - as needed for kuzhambu 
To temper
  • Gingely oil/ Sesame oil - 2 tbsp
  • Mustard seeds - 1/2 tsp
  • Urad dal - 1 tsp
  • Chana dal - 2 tsp
  • Red chilli - 1 (pinch into 2)
  • Hing / Asafetida - a pinch
HOW TO MAKE IYENGAR PARUPPU URUNDAI KUZHAMBU
  1. Soak tamarind. Wash and soak dals, red chilli in required water for 2 to 4 hours.
  2. Drain the water and grind coarsely adding salt and hing.
  3. Take in a bowl. Add rice flour, coriander leaves, oil and cooking soda.
  4. Make balls and keep aside. In a pot or kadai, take 2 cups of tamarind extract.
  5. Add sambar powder, salt and hing. When it boils, add the dal balls one by one.
  6. Cook till balls float on top and gets cooked. Switch off the stove once the kuzhambu becomes thick.
  7. Lastly temper the ingredients in gingely oil and add to kuzhambu. Garnish with curry leaves.
  8. Serve hot with plain rice adding ghee or gingely oil. Tastes great for 2 to 3 days when refrigerated.
IYENGAR PARUPPU URUNDAI KUZHAMBU - STEP BY STEP PICTURES
  • Wash and soak dals and chilli in required water for 2 to 4 hours. Drain the water completely. Grind coarsely adding required salt and hing. Soak tamarind in 2 cups of water.

  • Take in a bowl. Add rice flour, coriander leaves, gingely oil and cooking soda (If using). Mix well and make balls. Set aside.

  • Take 2 cups of tamarind extract. Add sambar powder, hing and required salt. Boil in high flame. When the tamarind extract starts to roll boil, add dal balls one by one keeping the flame high.

  • After adding all the balls, lower the flame to medium. Cook in medium flame till urundai gets cooked. Balls float on top after its cooked. Adjust water quantity based on need. Check the kuzhambu taste and add more sambar powder, salt if needed. Boil for few minutes. 

  • Switch off the flame when the kuzhambu turns thick as you like. Lastly do the tempering part. Heat gingely oil. Splutter mustard seeds, urad dal, chana dal, hing and red chilli. Add to kuzhambu.

  • Garnish with curry leaves and serve with plain rice adding ghee or gingely oil. It stays good for 2 days when refrigerated.

    Enjoy !

Note

  • Addition of baking soda and oil in the urundai mixture helps to make the urundai soft and well cooked.
  • Adjust the quantity of sambar powder as per your taste.
  • Thickness comes to this kuzhambu from the dal balls/ urundai. If necessary you can mash one or two urundai in the kuzhambu. 

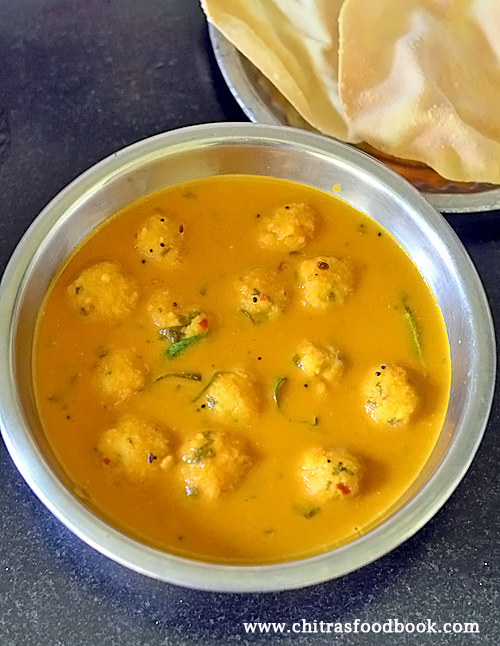
Try this Iyengar style paruppu urundai kuzhambu and enjoy with plain rice and roasted papad !
Continue Reading...


December 25, 2019

Chow Chow Palya / Chow Chow Poriyal Without Onion

chow chow poriyal
This is a simple and yummy Karnataka style basic palya recipe with chow chow / Chayote. Its called as seeme badanekayi palya in Kannada. I have tasted this kind of palya in friends house, marriage function and restaurants. As I told, this is the basic Karnataka style poriyal without onion, garlic. People call it as Palya in Kannada. I have tried it with chow chow vegetable. You can use bottle gourd, radish, snake gourd and beans instead. It so easy to make and tastes great with rice. Its a no onion, no garlic recipe as well. Grated coconut and coriander leaves are the star ingredients for this recipe. So do not skip these two at any cost. Friends, do try this simple and easy Karnataka style chow chow palya. You will love it. Lets see how to make chow chow poriyal with step by step pictures.

Check out my another version of chayote curry, chow chow kootu, chow chow thogayal.

chow chow palya


Chow chow palya / Chow chow poriyal recipe


Chow chow palya / Chow chow poriyal recipe

Karnataka style chow chow palya/ Chayote curry, Chow chow poriyal for rice


Cuisine: South Indian
Category: Side dish
Serves: Serves
Prep time: 10 Minutes
Cook time: 20 Minutes
Total time: 30 Minutes


INGREDIENTS
1 cup = 240ml
  • Chayote / Chow chow / Seeme badanekayi - 2
  • Green chilli - 2 (slit)
  • Cooking oil or coconut oil - 1 tbsp ( I used refined oil)
  • Mustard seeds - 1/2 tsp
  • Urad dal - 1 tsp
  • Chana dal - 2 tsp
  • Cumin seeds – 1/ 2 tsp
  • Curry leaves - few
  • Asafetida / Hing - a pinch
  • Grated coconut - 1/4 cup
  • Chopped coriander leaves - to garnish
  • Turmeric powder – 1/4 tsp (optional)
  • Sugar – 1/2 tsp
  • Salt - as needed
  • Water - 1 tbsp

HOW TO MAKE CHOW CHOW PALYA
  1. Wash and peel the skin of chow chow. Chop into small cubes and set aside.
  2. Heat oil in a pressure cooker base. Splutter mustard seeds, urad dal, chana dal and curry leaves.
  3. Add chopped chow chow and saute for a minute till it shrinks a bit.
  4. Add turmeric powder, salt and sugar. Mix well.
  5. Add 1 tbsp water and pressure cook in high flame for 2 whistles.
  6. Switch off the flame. Remove the whistle after the steam is released.
  7. Boil and drain the excess water. Lastly add the grated coconut and coriander leaves.
  8. Mix well and cook for a minute. Switch off the flame.
  9. Serve with sambar, vatha kuzhambu and even with chapathi if you like !
METHOD - STEP BY STEP PICTURES

  • Wash and peel the skin of chow chow. Chop into small cubes. Slit green chilli and set aside.

  • Heat oil in a pressure cooker base. Temper mustard seeds, urad dal, chana dal, cumin seeds, green chilli and curry leaves. Saute for few seconds.

  • Add chopped chow chow and saute for few minutes. Add turmeric powder, sugar, salt and mix well. Chow chow leaves water while you saute. So do not add more water while pressure cooking.

  • Add just 1 tbsp water. Mix well and pressure cook in high flame for 2 whistles. Switch off the flame. Remove the lid after the steam is released.

  • There will be excess water. Do not mix it. Poriyal will become mushy. So boil the poriyal for few minutes in high flame and drain the excess water. Add grated coconut and finely chopped coriander leaves. Toss gently and switch off the flame.

  • Serve with sambar, vatha kuzhambu, rasam and curd rice. You can serve with chapathi if you like. Enjoy !

Note

  • Adjust the quantity of green chilli as per your taste.
  • Do not add more water while pressure cooking. Chow chow will become mushy and poriyal becomes kootu ; ))

Try this easy, chow chow poriyal recipe and enjoy !
chow chow palya recipe
Continue Reading...


December 18, 2019

Baby Potato Roast / Small Potato Fry Recipe For Rice

baby potato roast
Baby potato roast is a simple and quick side dish for rice. It must be the favorite for everyone. It tastes great with sambar rice, rasam rice and even curd rice. A plate full of rasam rice with baby potato roast and a papad is a pure bliss. I have already shared two different recipes of baby potato curry for rice namely baby potato fry and Madurai style baby potato. But this one is very easy and quick to prepare. Its similar to potato kara kari. If you like to make this roast crispy, you should cook the potato in simmer flame and finally sprinkle with some rice flour. Friends, do try this easy and yummy baby potato fry and share your feedback with me. Lets see how to make baby potato roast with step by step pictures.

Check out my another version of  baby potato fry

Small potato roast / madurai masal


baby potato roast


Baby potato roast / small potato fry recipe


Baby potato roast / small potato fry recipe

Baby potato roast for rice


Cuisine: South Indian
Category: Side dish for rice
Serves: Serves 3
Prep time: 10 Minutes
Cook time: 20 Minutes
Total time: 30 Minutes


INGREDIENTS
1 cup = 240ml
  • Baby potato / small potato - 20
  • Cooking oil - 2 tbsp
  • Mustard seeds - 1/2 tsp
  • Urad dal - 1 tsp
  • Curry leaves - few
  • Red chilli powder – 1 tsp
  • Coriander powder / Dhania powder – 1.5 tsp
  • Garam masala powder - 1/2 tsp
  • Turmeric powder - 1/4 tsp
  • Salt - as needed
HOW TO MAKE BABY POTATO ROAST
  1. Wash the baby potato and pressure cook adding required water.
  2. Peel the skin of cooked baby potato. Set aside.
  3. Heat oil in a kadai. Splutter mustard seeds, urad dal and curry leaves.
  4. Lower the flame and add all the spice powders , salt. Mix quickly.
  5. Add the boiled potato and mix well to coat the masala powders.
  6. Cover cook in low flame till potato turns golden with nice flavor.
  7. Serve with lemon rice, rasam rice and curd rice. 
METHOD - STEP BY STEP PICTURES

  • Wash the baby potato twice or thrice. Add sufficient water and pressure cook in high flame for 2 to 3 whistles. Remove the lid after pressure is released. Peel the skin of cooked baby potato. Set aside.
  • baby potato roast
  • Heat oil in a kadai. Splutter mustard seeds, urad dal and curry leaves. Lower the flame completely. Add red chilli powder, dhania powder, garam masala powder, salt and turmeric powder. It should not burn.
  • baby potato roast
  • Add cooked baby potato and mix well. Make sure masala is well coated in baby potato. Cover cook in low flame till baby potato turns golden in color with a nice smell. Open the lid and mix whenever needed.
  • baby potato roast
  • Cooking in low flame for long time makes the baby potato roast well and becomes crispy. Serve with lemon rice, rasam rice and curd rice.
  • For variations, you can sprinkle a tsp of rice flour over the potato and cook for few minutes.
    Enjoy !

Note

  • Adjust the quantity of spice powders as per your taste.
  • Roasting the potatoes in low flame is necessary.
  • Make sure masala powders doesn’t burn.

Try this easy, kids friendly baby potato fry and enjoy !
Small potato fry
Continue Reading...


November 21, 2019

Vendakkai kootu Recipe – Lady’s Finger Kootu Recipe

My MIL tried this vendakkai kootu (Lady’s finger kootu) with tomato, coconut and moong dal after tasting in a hotel/ restaurant. Its procedure is very similar to our poricha kuzhambu. Last week when she was here, she made this kootu for me. We loved it very much. Its a simple and easy kootu recipe. We can serve it thick as a side dish for vatha kuzhambu/ sambar or make it slightly thin like kuzhambu, mix with plain rice adding ghee. Tastes good in either ways. Ok lets see how to make vendakkai kootu recipe with step by step pictures.


Vendakkai kootu recipe / Lady's finger kootu


Vendakkai kootu recipe / Lady's finger kootu

Lady's finger kootu recipe / Vendakkai kootu recipe


Cuisine: South Indian
Category: Kootu recipes
Serves: Serves 3
Prep time: 10 Minutes
Cook time: 20 Minutes
Total time: 30 Minutes


INGREDIENTS
1 cup 250ml
  • Lady's finger - 20 nos.
  • Moong dal - 2 tbsp
  • Ripe tomato - 1
  • Sambar powder - 1 tsp
  • Salt & water - as needed
To grind
  • Grated coconut - 1/4 cup
  • Rice flour - 1 tsp
  • Water - to grind
To Temper
  • Coconut oil - 1 tbsp
  • Mustard seeds - 1/2 tsp
  • Urad dal - 1 tsp
  • Cumin seeds - 1/2 tsp
  • Curry leaves - Few
HOW TO MAKE VENDAKKAI KOOTU
  1. Wash and chop lady’s finger, tomato into cubes.
  2. Grind coconut , rice flour to a smooth paste.
  3. Pressure cook moong dal adding required water, turmeric and sambar powder.
  4. Heat oil in a kadai, saute lady’s finger, tomato.
  5. Add required water and cover cook till soft.
  6. Add cooked moong dal, coconut paste and salt. Boil for few minutes.
  7. Temper and add to kootu. Mix and adjust consistency. 
  8. Serve hot with rice. Enjoy !
VENDAKKAI KOOTU RECIPE - STEP BY STEP PICTURES
  • Wash and chop lady’s finger and tomato into cubes. Set aside. Grind coconut + rice flour to a smooth paste.

  • In a pressure cooker, take the moong dal, sambar powder, required water and turmeric powder. Pressure cook in low flame for 2 whistles. Open the cooker after the steam is released. Mash well and set aside.

  • Heat oil in a kadai. Add chopped lady’s finger and saute till it shrinks without threads. Add tomato and saute well till its mushy. Add some water, cover cook till lady's finger is done.  

  • Add the cooked moong dal, coconut paste and mix well. Add required water if the kootu is thick. 

  • Boil for few minutes. Temper mustard seeds , curry leaves and add to kootu. Mix gently and serve with plain rice. Enjoy ! 

Note

  • You can use red chilli powder and coriander powder instead of sambar powder.
  • For variations, you can use toor dal or chana dal instead of moong dal.

Try this yummy vendakkai kootu for rice and enjoy !
Continue Reading...


November 2, 2019

Vazhaipoo Mor Kootu – Banana Flower Kootu For Rice

vazhaipoo mor kootu
Vazhaipoo mor kootu is a delicious side dish for rice prepared with banana flower, moong dal, coconut and fresh curd/ yogurt as major ingredients. Usually I make vazhaipoo kootu in this method. For a change, I tried it with curd as suggested by my neighbor. Generally mor kootu is prepared with banana stem / vazhaithandu. But banana flower/ vazhapoo mor kootu is equally delicious. I loved to serve with vatha kuzhambu. Tastes yummy ! Friends, do try this easy vazhaipoo mor kootu in a pressure cooker. Its so easy, quick to prepare and tasty too !

Cooking is an art and when we cook it for others, don't forget to add a dollop of your love and passion for cooking in it. It is that secret ingredient which can help you get rave reviews from food lovers all over. Nowadays, many of us are turning our passion to profession and cooking is one such choice that offers a great platform to kickstart a profession that blends in your passion. But, when it comes to making cooking a profession, there is another secret ingredient you need to be aware of! You need to register and get your FSSAI food license before you do the chef's hat and start serving yummy delicacies to your customers. 

banana flower kootu


Vazhaipoo mor kootu / Banana flower buttermilk kootu


Vazhaipoo mor kootu / Banana flower buttermilk kootu

Vazhaipoo mor kootu / Banana flower buttermilk gravy for rice


Cuisine: South Indian
Category: Kootu recipes
Serves: 3
Prep time: 10 Minutes
Cook time: 20 Minutes
Total time: 30 Minutes


INGREDIENTS
1 cup = 250ml
  • Banana flower - 2 cups
  • Moong dal - 2 tbsp
  • Salt & water - as needed
To grind
  • Grated coconut - 1/4 cup
  • Green chilli - 2
  • Fresh curd - 1/4 cup
  • Cumin seeds - 1/2 tsp
To Temper
  • Coconut oil - 1 tbsp
  • Mustard seeds - 1/2 tsp
  • Curry leaves - Few
HOW TO MAKE VAZHAIPOO MOR KOOTU
  1. Take the banana flower and clean it. Chop finely.
  2. Heat oil in a pressure cooker. Splutter mustard seeds, curry leaves.
  3. Add chopped banana flower, saute for a minute.
  4. Add moong dal and required  salt. Mix well.
  5. Grind the ingredients given under “to grind” to a smooth paste adding fresh curd.
  6. Add to the cooker. Mix for a minute and add required water.
  7. Pressure cook in low flame for one whistle. Switch off the flame.
  8. Remove the lid after steam is released. Mix and serve hot with rice !
VAZHAIPOO MOR KOOTU RECIPE - STEP BY STEP PICTURES
  • Take the banana flower / vazhaipoo. Peel the skin and remove the flowers. Discard the black stamen and paper like kaalan. Keep the cleaned flower immersed in water or diluted buttermilk to avoid banana flower turning black. 
  • vazhaipoo mor kootu
  • In a pressure cooker, heat coconut oil. Splutter mustard seeds, urad dal and curry leaves. Add chopped banana flower and saute for a minute.
  • vazhaipoo mor kootu
  • Add moong dal and salt. Mix well. Grind coconut, cumin seeds and green chilli to a coarse paste. Add fresh curd and grind to a smooth paste. Add water while grinding if needed.  
  • Vazhaipoo mor kootu
  • Add this paste to the cooker and mix well. Add required water and mix well. Close the cooker and keep the flame high. Wait till vapor comes off through the nozzle.
    • Vazhaipoo mor kootu
  • Lower the flame completely and put the weight valve. Cook in very low flame for two whistles. Switch off the flame. Open the cooker lid after the steam is released.
  • Vazhaipoo mor kootu
  • Mix well and Check for consistency. If kootu is too thick, add some water and bring to a boil. If the kootu is watery, boil for some time and make it thick as you like.
  • Serve with vatha kuzhambu, kara kulambu etc.
    Enjoy !

Note

  • Adjust the quantity of green chilli as per your taste.
  • Do not add sour curd. It spoils the taste of kootu.
  • Instead of grinding curd, you can add thick buttermilk.
  • Color of kootu was mildly on yellow side due to moong dal. 

Try this easy, yummy banana flower mor kootu and enjoy with rice !
Vazhaipoo mor kootu
Continue Reading...


August 27, 2019

Kovakkai Masala Kuzhambu Recipe –Tindora Gravy For Rice, Roti

kovakkai masala kuzhambu
Today’s Kovakkai masala kuzhambu / Tindora gravy for rice and roti is my long time pending recipe bookmarked from Nees kitchen. At last I tried it yesterday for our lunch. I made slight changes in the ingredients and prepared this gravy directly in my pressure cooker as I had less time to cook. So the job was done under 15 minutes. It was so easy to make and tasted great with nice peanut flavor. We all loved it with plain rice and ghee. You can enjoy with roti if you make the gravy slightly thick. The taste of this gravy reminds you Andhra style dondakaya masala. Ok friends, lets see how to make this easy and yummy kovakkai masala with step by step pictures.

kovakkai kulambu


Kovakkai masala recipe


Kovakkai masala recipe

Kovakkai masala recipe / Tindora gravy for rice, roti


Cuisine: South Indian
Category: Side dish
Serves: Serves 4
Prep time: 10 Minutes
Cook time: 10 Minutes
Total time: 20 Minutes


INGREDIENTS
1 cup - 250ml
  • Tindora / Kovakkai - 25 nos
  • Ripe tomato - 2
  • Red chilli powder - 1/2 tsp
  • Turmeric powder - 1/4 tsp
  • Salt - as needed
To roast and grind
  • Coriander seeds - 1 tsp
  • Sesame seeds - 2 tsp
  • Cinnamon - 1 inch
  • Cloves - 2
  • Cardamom - 1
  • Roasted peanuts - 1/3 cup ( I used with skin)
  • Grated coconut - 1 tbsp (optional)
To temper
  • Gingely oil – 3 tbsp
  • Mustard seeds – 1/2 tsp
  • Urad dal – 1 tsp
  • Chana dal – 1 tsp
  • Cumin seeds – 1/2 tsp
  • Curry leaves – Few
  • Green chilli – 2
  • Big onion – 2
  • Ginger garlic paste – 1/2 tsp
HOW TO MAKE KOVAKKAI MASALA
  1. Wash and slit kovakkai into . Set aside.
  2. Heat oil in a kadai and roast all the ingredients given under “to roast and grind”.
  3. Lastly add roasted peanuts and coconut. Mix well and switch off the flame.
  4. Grind the masala to a smooth paste. In a pressure cooker heat oil.
  5. Splutter mustard seeds, urad, chana dal and cumin seeds. Add green chilli.
  6. Add the onion and saute well. Add the slit kovakkai and toss for a minute.
  7. Add gg paste and saute well. Add turmeric powder and chilli powder.
  8. Saute quickly without burning the masala. Add tomato , peanut masala and cook for a minute.
  9. Lastly add 1 cup of water and pressure cook in low flame for one whistle.
  10. Open the cooker after steam is released. Garnish with coriander leaves.
  11. Serve hot with rice or roti.
KOVAKKAI MASALA RECIPE - STEP BY STEP PICTURES
  • Wash and slit the kovakkai / Ivy gourd into 4 parts till half the way. 

  • Heat a kadai and dry roast the sesame seeds, dhania seeds, cloves, cinnamon and cardamom. Switch off the flame and add roasted peanuts, grated coconut. Grind to a smooth paste adding required water. Set aside.

  • Heat oil in a cooker base and splutter mustard seeds, urad dal , chana dal and cumin seeds. Add onion and green chilli. Saute till onion become transparent.

  • Add chopped kovakkai, saute for a minute. Add ginger garlic paste and saute for one minute. Add turmeric powder, chilli powder, salt & mix well. Do not burn any spices.

  • Now add chopped tomato. Cook till mushy. Then add the ground peanut masala. Mix and cook for a minute. Now add required water. I used 1 cup of water. Mix well and check for taste. Pressure cook in low flame for one whistle (It takes 8 to 10 minutes). Switch off the flame and let the pressure subside.

  • Open the cooker. You will see a layer of oil floating on top with a nice masala smell. Check the thickness of gravy. If its too watery, boil for a minute. If its too thick, add little water and mix well. Give one boil if needed. Garnish with coriander leaves.

  • Enjoy mixing with plain rice adding few drops of ghee ! You can also try with roti / chapathi if you like.

Note

  • Use small size kovakkai for better looks. I used bigger ones. So my gravy was not so appealing.
  • Cinnamon and coconut are optional. Its not mentioned in the original recipe. But I used it.
  • Adjust the quantity of green chilli and chilli powder as per your taste.

Try this easy, yummy kovakkai masala kuzhambu recipe and enjoy !
kovakkai kuzhambu

Continue Reading...