Search Chitra's Food Book

Showing posts with label SIDE DISH FOR RICE. Show all posts

January 18, 2021

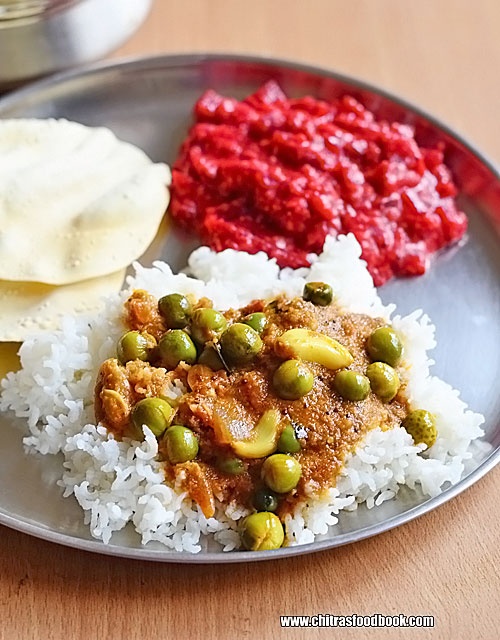
Pachai Sundakkai Puli Kuzhambu–Pachai Sundakkai Kara Kuzhambu

Pachai sundakkai kuzhambu

Last week I went to Salem after 10 months. Had a good time with my in-laws and parents. While coming back to Bangalore, my MIL gave me some vegetables that were grown in our house backyard. She gave me some pachai sundakkai / raw Turkey berry too.

After a long time, I am so happy to cook an interesting recipe with pachai sundakkai. Usually I make pacha sundakkai poricha kuzhambu learning from my MIL. But this time, I tried pachai sundakkai puli kuzhambu referring some YouTube channels. It came out so well in the first attempt itself as its more like our arachuvitta vatha kuzhambu.

If you don’t have fresh sundakkai in hand, you can use dried turkey berry/ sundakkai vathal too. It tastes and smells so good. You can make and store this pacha sundakkai kuzhambu in refrigerator and use it for 2 to 3 days. Its taste and flavor improves say by day. 

Friends, do check out this easy and yummy pachai sundakkai puli kuzhambu with step by step pictures. Enjoy mixing with plain rice and serve it with some papad and kootu / poriyal as side dish. You will love it !

Other common names for turkey berry include:

  • prickly nightshade
  • devil’s fig
  • shoo shoo bush
  • wild eggplant
  • pea eggplant
  • susumber

Pachai sundakkai kuzhambu

Pachai sundakkai kuzhambu recipe


Pachai sundakkai kuzhambu recipe

Pachai sundakkai kuzhambu / Fresh turkey berry gravy for rice.


Cuisine: Indian
Category: Kuzhambu recipes
Serves: 4
Prep time: 10 Minutes
Cook time: 20 Minutes
Total time: 30 Minutes


INGREDIENTS

  • Gingely oil - 4 tbsp
  • Mustard seeds - 1 tsp
  • Methi seeds / fenugreek seeds - 1/4 tsp
  • Cumin seeds - 1/2 tsp
  • Toor dal - 1 tsp
  • Small onion - 10 OR big onion - 1 (cubed)
  • Garlic cloves - 15
  • Curry leaves - few
  • Pachai sundakkai / Fresh, raw turkey berry - 1 cup
  • Tamarind - Small lemon size
  • Tomato - 1 (finely chopped)
  • Turmeric powder - 1/2 tsp
  • Sambar powder - 1 tsp
  • Jaggery - 1 tsp
  • Salt & water - as needed
To dry roast and grind
  • Coriander seeds / Dhania - 1 tbsp / 3 tsp
  • Grated coconut - 2 tbsp
  • Red chilli - 5 to 7
HOW TO MAKE PACHAI SUNDAKKAI KUZHAMBU
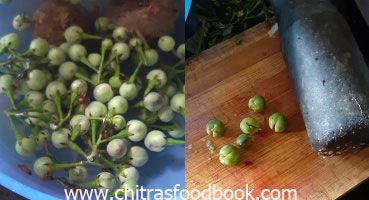
  1. Wash and chop pachai sundakkai into two or crush with mortar and pestle slightly. Set aside in water till use.
  2. Wash and peel onion, garlic cloves. Chop tomato.
  3. Heat a kadai. Dry roast dhania seeds, red chilli and coconut till nice aroma emits. Cool and grind to a smooth paste adding water.
  4. Heat the kadai adding oil. Splutter mustard seeds, methi seeds, cumin seeds and toor dal.
  5. Saute onion, garlic cloves and curry leaves. Add pacha sundakkai and saute for 5 minutes.
  6. Now add tomato and saute till mushy. Add 1 cup of water and cover cook sundakkai for few minutes.
  7. Add ground masala paste and 1 cup of tamarind extract. Add sambar powder, salt, turmeric powder and jaggery.
  8. Let the kuzhambu boils till oil floats on top. Switch off the flame and transfer to a vessel.
  9. Serve with plain rice along with kootu and appalam/ papad.
METHOD - STEP BY STEP PICTURES
  • Wash and crush the sundakkai lightly or chop into two halves. Keep them in water till use. Wash and chop onion, tomato and garlic cloves. Set aside.
  • Pachai sundakkai kuzhambu
  • Heat a kadai and dry roast coriander seeds, red chilli and grated coconut till nice aroma arises. Let it cool and grind to a smooth paste adding required water.
  • Pachai sundakkai kuzhambu
  • Heat oil in the kadai. Splutter mustard seeds, methi seeds, toor dal or chana dal and cumin seeds. Saute for a minute without burning them.
  • Pachai sundakkai kuzhambu
  • Add onion, garlic and chopped sundakkai. Saute till onion becomes transparent. Sundakkai shrinks and becomes dark green in color. Add tomato and saute till mushy.
  • Pachai sundakkai kuzhambu
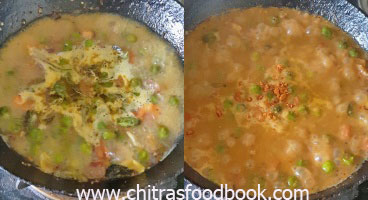
  • Add 1 cup of water and cover the kadai. Boil and cook sundakkai is soft and well cooked. After sundakkai is cooked, add 1 cup of tamarind extract, ground masala paste, required salt, turmeric powder and sambar powder. Mix well.
  • Pachai sundakkai kuzhambu
  • Add jaggery. Mix well and check for taste. Boil till oil floats on the top. Kuzhambu will become thick by this time. Check for taste and thickness, add little water if required. Switch off the flame. Transfer the kuzhambu to a vessel and cover it. Serve after 30 minutes to one hour to enjoy its best flavor and taste. Enjoy !Pachai sundakkai kuzhambu

Note

  • You can add more red chillies and skip sambar powder.
  • Do not burn any spices while roasting. So roast in medium flame patiently.
  • You can skip tomato and add more tamarind if you like.


Do try this yummy and healthy pachai sundakkai kuzhambu. You will love it !

 Pachai sundakkai kara kuzhambu


Continue Reading...


December 3, 2020

Snake Gourd Dal Recipe – Pudalangai Paruppu Kulambu

Snake gourd dal recipe

Recent days I have been trying varieties of dal recipes for lunch. Snake gourd dal / Pudalangai paruppu kulambu is a simple and easy dal recipe for rice and roti. When I was looking for easy Snake gourd recipes, I came across this snake gourd moong dal recipe in this blog. I loved the simplicity and ease of the recipe and tried it immediately.

Its a quick one pot recipe that can be prepared easily in a pressure cooker. I used both moong dal and toor dal in this recipe. Just add chopped Snake gourd, onion, tomato , ginger, garlic and green chilli to the dals. Pressure cook and mash it. Temper mustard seeds and red chilli in ghee and add to dal. Voila, dish is ready in few minutes !

You can mix this Snake gourd dal in plain rice drizzled with few drops of ghee and have it with any spicy curry as side dish. I prepared Brinjal podi curry and vatha kuzhambu along with it and served with some karasev prepared for Diwali. We had a soul satisfying lunch.

Lets see how to make this simple and quick, one pot Snake gourd dal recipe with step by step pictures.

Snake gourd moong dal

Snake Gourd Dal Recipe - Pudalangai Paruppu Kuzhambu


Snake Gourd Dal Recipe - Pudalangai Paruppu Kuzhambu

Snake Gourd Dal Recipe - Pudalangai Paruppu Kuzhambu for rice


Cuisine: Indian
Category: Side dish
Serves: 3
Prep time: 10 Minutes
Cook time: 20 Minutes
Total time: 30 Minutes


INGREDIENTS
1 cup = 250ml
  • Toor dal - 1/4 cup
  • Moong dal - 1/4 cup
  • Snake gourd - 1 (chop into small slices)
  • Green chilli - 1 or 2 (Use 1 for less spice)
  • Big onion - 1 (roughly chopped)
  • Ginger - 1 inch piece (finely chopped)
  • Garlic cloves - 5
  • Tomato - 1 (finely chopped)
  • Turmeric powder - 1/4 tsp
  • Hing / Asafetida - 1/4 tsp
  • Salt & water - as needed
  • Cooking oil – few drops
To Temper
  • Ghee - 2 tsp
  • Mustard seeds - 1/2 tsp
  • Cumin seeds - 1/2 tsp
  • Curry leaves - few
  • Red chilli - 1
To Garnish
  • Coriander leaves - 2 tbsp (finely chopped)
HOW TO MAKE SNAKE GOURD DAL
  1. Wash the dal and soak in water for 15 minutes.
  2. Wash and chop onion, tomato, ginger finely and Snake gourd into small slices. Set aside.
  3. In a pressure cooker base, take the soaked toor dal, moong dal, chopped snake gourd, onion, slit green chilli, tomato, ginger, garlic cloves, turmeric powder, hing, required salt, few drops of cooking oil and water.
  4. Mix well and pressure cook in very low flame for two whistles.
  5. Open the cooker after the steam is released. Mash it well. 
  6. Temper mustard seeds, curry leaves and red chilli in ghee and add to dal.
  7. Mix well and boil for few minutes till thick. Garnish with coriander leaves.
  8. Serve with plain rice along with a curry / poriyal !
METHOD - STEP BY STEP PICTURES
  • Wash the moong dal and toor dal. Soak in enough water for 15 minutes. In the mean time, wash and chop onion, tomato, ginger finely. Wash and chop Snake gourd into small slices or cubes as you like.

  • In a pressure cooker base, take the soaked toor dal, moong dal, chopped snake gourd, chopped onion, tomato, garlic, ginger, turmeric powder, hing, salt, a drop of oil and drinking water.
  • Snake gourd dal recipe
  • Mix well and pressure cook in low flame for 2 whistles. Open the cooker after the steam is released. Mash it well. 
  • If the dal is too thick, add little water and mix well.

  • Heat ghee in a kadai. Splutter mustard seeds, curry leaves, cumin seeds, red chilli and switch off the flame. Add this to the mashed dal.
  • Snake gourd dal recipe
  • Boil the dal till it thickens slightly. Garnish with coriander leaves and switch off the flame.
  • Snake gourd dal recipe
  • Serve hot with plain rice adding few drops of ghee.

  • Enjoy !


Note

  • Soaking the dal helps to cook it mushy.
  • Use drinking water to cook the dal.
  • Adjust the quantity of green chilli based on your taste.
  • You can use moong dal or toor dal alone in this recipe.
  • If you want to make it for chapathi / roti, make the dal thicker and add a tsp of garam masala powder while the dal boils.


Try this easy, Snake gourd dal recipe and enjoy with plain rice!

Snake gourd dal


Continue Reading...


October 18, 2020

Pirandai Kuzhambu Recipe–Adamant Creeper Gravy– Pirandai Recipes

Pirandai kuzhambu

After making Pirandai dosai successfully, I tried this yummy and interesting Tamil nadu style pirandai kuzhambu recipe. Generally Pirandai puli kulambu is prepared by cooking tender adamant creeper stems in tangy tamarind sauce but I prepared it like arachuvitta vatha kuzhambu by freshly roasting and grinding spices along with pirandai as the stems are bit old and dried. Soon I will try to make that version with tender pirandai stems and share it. This version of adamant creeper gravy came out so well. I stored in refrigerator for 3 days and consumed it. Day by day its taste and flavor improved a lot. We all loved it.

As we are grinding Pirandai in this recipe, you cannot find any difference in taste or flavor. It would be more like arachuvitta vathal kulambu. One thing, we should remember is that, for any instant pirandai recipes, it should be sauteed well in oil till its turns pale white in color else you will get itching in the tongue and throat after eating this kuzhambu. Also while cleaning Pirandai, you should apply Sesame oil / Gingely oil all over the hands to avoid itching.

Ok friends, lets see how to make this easy, yummy Pirandai kuzhambu recipe with step by step pictures and video.


Pirandai kuzhambu recipe

Pirandai Kuzhambu / Adamant Creeper Gravy For Rice


Pirandai Kuzhambu / Adamant Creeper Gravy For Rice

Pirandai Kuzhambu / Adamant Creeper Gravy For Rice


Cuisine: South Indian
Category: Side dish
Serves: 4
Prep time: 10 Minutes
Cook time: 20 Minutes
Total time: 30 Minutes


INGREDIENTS

  • Cooking oil or Sesame oil - 2 tbsp
  • Mustard seeds - 1/2 tsp
  • Urad dal - 1 tsp
  • Cumin seeds - 1/2 tsp
  • Methi seeds - 1/4 tsp
  • Curry leaves - Few
  • Big onion - 1 OR small onion - 15
  • Garlic cloves - 20
  • Sambar powder - 1 tsp
  • Turmeric powder - 1/2 tsp
  • Jaggery - 1 to 2 tsp
  • Salt & water - as needed
To roast and grind
  • Sesame oil / Gingely oil - 2 tbsp
  • Pirandai / Adamant Creeper - 1/2 cup (chopped)
  • Methi seeds - 1/4 tsp
  • Chana dal - 1 tsp
  • Urad dal - 1/2 tsp
  • Dhania / coriander seeds - 1 tsp
  • Curry leaves - Few
  • Grated coconut - 2 tbsp
  • Red chilli - 3
  • Tamarind - big gooseberry size
HOW TO MAKE PIRANDAI KUZHAMBU
  1. To clean and chop pirandai, apply sesame oil generously. Peel the ridges of pirandai, chop the edges. Wash it well and chop into small pieces. Set aside.
  2. Heat oil in a kadai and saute the pirandai pieces till it turns pale white.
  3. Add the other ingredients mentioned under “To roast and grind” and saute well.
  4. Grind everything to a smooth paste adding tamarind. Set aside.
  5. Heat oil in a kadai. Temper mustard, methi seeds, urad dal and curry leaves.
  6. Saute onion and garlic till golden. Add the ground pirandai paste, turmeric, sambar powder,salt and mix well till thick.
  7. Add water and make it thin. Mix well. Add jaggery.
  8. Boil till oil floats on top and switch off the flame once thick.
METHOD - STEP BY STEP PICTURES
  • How to clean pirandai :  Apply sesame oil all over the hands. Take the pirandai stem and chop both the ends. Peel the ridges of pirandai and wash well. Chop into 1 inch length pieces. Measure 1/2 cup and set aside.

  • Heat sesame oil in a kadai. Add pirandai pieces and saute till it turns pale white. It takes time to turn color. So saute it patiently. If you don’t saute well, you will get tongue and throat itchy taste in the kuzhambu.

  • After sauting the pirandai, add the other ingredients given under “to roast and grind” and roast them till golden in color. Switch off the flame and grind everything to a smooth paste adding tamarind. Set aside.
  • Pirandai kuzhambu
  • Heat oil in a kadai and when it gets heated, splutter mustard seeds, methi seeds, urad dal and curry leaves. Add onion, garlic and saute till onion turns transparent. Now add the ground pirandai paste. Add turmeric powder, sambar powder and salt. Saute till it turns thick.
    Pirandai kuzhambu
  • Add 1 cup of water and dilute it. Mix well and add jaggery. Let the kuzhambu roll boil till oil floats on top. It becomes thick too. Switch off the flame as soon as it reaches your desired consistency. Transfer the kuzhambu to a bowl and close it with a lid.
  • Pirandai kuzhambu
  • Enjoy with plain rice drizzling few drops of sesame oil. Store in refrigerator for 2 to 3 days, reheat and serve. Its taste improves day by day.
    Pirandai kuzhambu

Note

  • Adjust the quantity of red chilli and sambar powder as per the taste and tamarind you use.
  • Do not forget to saute the pirandai till it turns white in color else you will get itching in your tongue and throat.

Try this yummy Pirandai kuzhambu and enjoy with plain rice and any kootu or poriyal as side dish. 
Pirandai kuzhambu

Continue Reading...


September 19, 2020

Onion Raita / Thayir Pachadi For Biryani–How To Make Raita For Biryani

Many of you may wonder by seeing a post for onion raita recipe (Vengaya thayir pachadi in Tamil). But yes, making perfect onion raita is also a bit tricky. Sometimes it looks very thick or too watery with onions separated from curd. Basically Onion raita / Vengaya thayir pachadi is an easy and quick side dish for biryani and pulao. I serve it for paratha and masala chapathi too. It is prepared by mixing sliced raw onions with fresh curd/ yogurt. I would say onion raita is not only easy to make but also the best side dish for biryani as it is healthy and helps to enhance digestion of biryani. Raw onion mixed with curd helps to prevent skin infection and hair fall.

Its advisable to consume onion raita during day time than night. Also it can be stored upto one day in refrigerator but I like to serve and eat it fresh rather than storing and consuming the leftovers because you may catch cold after storing in the fridge.

In some hotels, finely chopped green chilli and coriander leaves is added in onion raita. It looks colorful and gives a mild spicy taste too. My friends here add grated carrot, finely chopped cucumber and tomato in onion raita. Sometimes they give tadka with mustard seeds, cumin seeds and curry leaves. It tastes good for vegetable pulao.

Even though there are varieties of raita recipes like boondi raita, gooseberry raita, lady’s finger raita, banana stem raita, raita with greens like mint leaves, coriander leaves, this onion raita is the basic and the mostly preferred one. Ok, lets see how to make this easy and simple onion raita for biryani !


Onion Raita Recipe - Thayir Pachadi for biryani


Onion Raita Recipe - Thayir Pachadi for biryani

Onion raita recipe - Thayir pachadi recipe for biryani. Easy and simple side dish recipe !


Cuisine: Indian
Category: Side dish
Serves: Serves 2
Prep time: 5 Minutes
Cook time: 5 Minutes
Total time: 10 Minutes
 
1 cup = 250ml
  • Fresh curd / Yogurt - 1 cup
  • Big onion - 1 (sliced thinly or finely chopped)
  • Salt - as needed
  • Coriander leaves - 1 tbsp (finely chopped)
  • Green chilli - 1 (optional, finely chopped)
HOW TO MAKE ONION RAITA / THAYIR PACHADI FOR BIRYANI
  1. Wash and peel the onion. Slice it thin lengthwise or chop finely.
  2. Take them in a bowl. Add required salt and mix well. Set aside.
  3. Take 1 cup of fresh curd and whisk it smooth without adding water.
  4. Add the curd to the onion. Mix well and add finely chopped coriander leaves.
  5. Mix well and serve with biryani or pulao !
METHOD - STEP BY STEP PICTURES
  • Wash and peel the onion. Slice it thinly in lengthwise or chop it finely.

  • Take it in a bowl and add the required salt. Mix well and set aside. In the mean time, whisk the thick curd till smooth without adding water.

  • Add the whisked curd to the onion mixture. Add finely chopped coriander leaves. Mix well and serve immediately for best taste. (If you want to serve later, refrigerate the raita in a closed container up to one day).

  • For variations, you can temper some mustard seeds and curry leaves. Add to raita and mix well. Enjoy !

Note

  • For variations and to make it more healthy, you can add grated carrot, finely chopped cucumber, finely chopped tomato.
  • Mixing onion and salt leaves water. So do not add water in the raita. If you feel the raita is too thick after mixing with onion, you can add a tsp of water.
  • If you add water, raita will become watery over the time.

Easy, yummy, simple onion raita is ready to serve with biryani, pulao and paratha !


Continue Reading...


September 1, 2020

Beans Mezhukkupuratti - Kerala Style Beans Stir Fry Recipe

Beans mezhukkupuratti
Beans mezhukupuratti is one of the easy and yummy Kerala style side dish for rice. Its a stir fry recipe without coconut. I have tried many side dish recipes for every Onam sadya menu. But I love this one as the onion garlic masala adds a nice flavor and taste to this mezhukupuratti. I have been following this recipe for the past few years. I have also tried with red chilli ans chilli powder. Both comes out well. But mezhukkupuratti with chilli powder is my personal favorite. You can follow the same recipe and use raw banana, potato or long beans instead of green beans. Friends, do try this yummy Kerala style beans mezhukupuratti / beans stir fry recipe following the step by step pictures and share your feedback.

Check out my other Kerala recipes too.

Beans mezhukkupuratti recipe

Kerala style beans stir fry - Beans mezhukkupuratti


Kerala style beans stir fry - Beans mezhukkupuratti

Kerala special stir fry for rice - Beans mezhukkupuratti recipe


Cuisine: Kerala
Category: Side dish
Serves: 2
Prep time: 10 Minutes
Cook time: 20 Minutes
Total time: 30 Minutes


INGREDIENTS
  • French Beans - 2 cups (cut into 1cm length)
  • Salt and water - as needed
To grind to coarse paste
  • Small onions- 8 
  • Garlic cloves – 5 
  • Chilli powder or red chilli – 1 tsp or 2
  • Turmeric powder - 1/4 tsp
To temper
  • Coconut oil – 2 tbsp
  • Mustard seeds - 1/2 tsp
  • Curry leaves - few
HOW TO MAKE BEANS MEZHUKUPURATTI
  1. Wash and chop beans to 1 inch length. Cook till soft and firm. Set aside.
  2. Grind onion, garlic, chilli powder and turmeric powder to a coarse paste without adding water.
  3. Heat coconut oil in a kadai. Temper mustard seeds, curry leaves.
  4. Add the ground masala and saute for few minutes. Add cooked beans and mix gently.
  5. Cook till it raw smell vanish, beans look dry and shiny.
  6. Switch off the flame and serve with rice.
METHOD - STEP BY STEP PICTURES
  • Wash and chop the beans to 1 inch length. Pressure cook in high flame for 2 whistles adding less water or cook in a pot till its soft but firm in shape. Drain the excess water and set aside.
  • In the mean time, grind onion, garlic cloves , red chilli powder or red chilli to a coarse paste without adding water. Wipe the sides of  mixie and grind again till you make a coarse paste. Set aside.
    Beans mezhukkupuratti recipe
  • Heat coconut oil in a kadai. Splutter mustard seeds, urad dal and curry leaves.
  • Add the ground masala, cooked beans and saute for few minutes. If its sticking to the pan and looks too dry, sprinkle few drops of oil or water.
    Beans mezhukkupuratti recipe
  • Add required salt, turmeric powder and mix well in low flame. Sprinkle little water if needed and cook till raw smell of onion garlic masala vanish.
    Beans mezhukkupuratti recipe
  • Saute till beans looks dry and shiny. It gives a nice smell too. Now switch off the flame. Rest for sometime and then serve with rice, sambar. Enjoy !

Note

  • For variations, you can use raw banana, potato, long beans and follow the same procedure.
  • You can use red chilli powder or red chilli while grinding.
Easy, yummy Kerala style beans stir fry is ready to enjoy with rice.
 Beans mezhukkupuratti kerala style

Continue Reading...


August 26, 2020

Cabbage Thoran - Kerala Style Cabbage Stir Fry Recipe

cabbage thoran recipe
Kerala style cabbage stir fry / cabbage thoran with coconut is our family favorite side dish for rice. This sadya style cabbage thoran is a very easy recipe that is prepared with simple ingredients like coconut, cumin, ginger, small onion and green chilli ground to a coarse paste, mixed to the finely shredded cabbage and stir fried to cook it. It tastes so good and tastes much better than my regular cabbage poriyal. Even cabbage haters would love this  Kerala thoran recipe.

Usually cabbage thoran can be prepared without onion too. But some people use onion, carrot for variations. Some also make it without coconut. I will try to post that version too. Here is the most popular, Onam sadya style cabbage thoran recipe with step by step pictures.

Cabbage Thoran Recipe


Cabbage Thoran Recipe Kerala Onam Sadya style cabbage thoran recipe / Cabbage stir fry for rice.

Cuisine: Kerala
Category: Onam recipes
Serves: 4
Prep time: 10 Minutes
Cook time: 20 Minutes
Total time: 30 Minutes


INGREDIENTS
1 cup = 250ml
  • Shredded or finely chopped cabbage - 3 cups (I used half of medium sized cabbage)
  • Turmeric powder - 1/2 tsp
  • Salt - as needed
  • Water - Few tbsp ( optional, use only if needed)
To Grind
  • Grated coconut - 1 /2 cup
  • Green chilli - 2 to 3
  • Small onion - 6 or big onion - 1
  • Cumin seeds - 1 tsp
  • Ginger - 1 inch piece
To Temper
  • Coconut oil - 1.5 tbsp
  • Mustard seeds - 1 tsp
  • Urad dal - 2 tsp
  • Red chilli - 1
  • Curry leaves - Few
HOW TO MAKE CABBAGE THORAN RECIPE
  1. Wash and shred/ chop the cabbage finely or slice it thinly.
  2. Grind coconut, green chilli, ginger and cumin seeds to a coarse paste without adding water.
  3. Take the chopped cabbage, ground coconut paste, turmeric powder and salt. Mix well.
  4. Heat coconut oil in a kadai. Splutter mustard seeds, urad dal, red chilli and curry leaves.
  5. Add the cabbage mixture and saute in low to medium flame.
  6. Cover and cook in low flame till cabbage turns soft. Remove and serve hot with rice.
METHOD - STEP BY STEP PICTURES
  • Wash and remove the thick white, central part of cabbage. Shred / finely chop the cabbage or chop into thin slices by cutting in the corners.  Collect in a big plate or bowl.
  • cabbage thoran recipe

  • Grind coconut, green chilli, ginger and cumin seeds to a coarse paste without adding water.
  • cabbage thoran recipe

  • Add this coarse paste to the finely chopped cabbage, turmeric powder and required salt. Mix well and set aside.
  • cabbage thoran recipe

  • Heat oil in a kadai and when it gets heated, splutter mustard seeds, urad dal, red chilli and curry leaves. Add the cabbage mixture and saute in medium flame for few minutes. Cover it with a lid and cook in low flame till its soft and well cooked. (If necessary you can sprinkle little water and cover cook it).
    cabbage thoran recipe cabbage thoran recipe
  • Switch off the flame and serve with rice, sambar. Enjoy !

Note

  • For variations, you can crush onion, cumin seeds and green chilli and add to cabbage. In that case, you can add grated coconut at the end and mix it.
  • You can also try sauting onion, green chilli and then add shredded cabbage to make this thoran.
  • To make it more colorful, you can add some finely chopped carrot along with cabbage.

Try this easy, yummy Kerala style cabbage thoran recipe and share your feedback with me.
cabbage thoran recipe
Continue Reading...


April 26, 2020

Potato Kara Kari – Urulaikilangu Kara Curry Recipe

Potato kara kari
Potato curry / potato roast can be prepared in many ways. This Tamilnadu brahmin style potato kara kari recipe without onion, garlic is one of the easiest method of making it. It tastes so good with sambar, rasam and curd rice. You can also serve it with lemon rice. This type of potato curry is usually served in weddings ( Kalyana veetu urulaikilangu poriyal)

 Kids would love this potato kara kari if you make it less spicy. If you have boiled potatoes in hand, you can make this kara kari under 10 minutes. No grinding and very less chopping works is needed for this recipe.

I have already shared a Tamil brahmin style urulaikilangu fry recipe in my blog. But this recipe is completely different from that version. I followed this potato kara kari recipe from Jeyashri’s blog and a YouTube video. This kara curry is served in traditional Tamil brahmin weddings( Kalyana veedu). Yesterday I prepared this curry for the first time with slight modifications. I used both besan flour and rice flour along with spice powders.

The smell and the texture of roasted potatoes coated with masala was so appealing and drool worthy. We all loved it. Friends, do try this Tamil nadu style potato roast i.e urulaikilangu kara kari for rice and enjoy !

Check out my another version of no onion, no garlic brahmin style potato fry too!

Also check out my MIL's style potato curry I make for my guests.

And my mom's style potato poriyal with onion, garlic.


Potato kara kari


Potato Kara Kari / Urulaikilangu kara curry recipe


Potato Kara Kari / Urulaikilangu kara curry recipe

Potato Kara Kari / Urulaikilangu kara curry recipe - Tamil brahmin style potato roast recipe for rice.


Cuisine: Tamilnadu
Category: Side dish
Serves: Serves 3
Prep time: 10 Minutes
Cook time: 10 Minutes
Total time: 20 Minutes


INGREDIENTS

  • Boiled potato – 2 big
  • Cooking oil - 2 tbsp
  • Mustard seeds - 1/2 tsp
  • Urad dal - 1 tsp
  • Chana dal – 1 tsp
  • Curry leaves - Few
  • Red chilli powder - 1 tsp
  • Turmeric powder – 1/4 tsp
  • Hing / Asafetida - 1/4 tsp
  • Salt – as needed
  • Rice flour – 1.5 tsp
  • Besan flour – 1.5 tsp
HOW TO MAKE POTATO KARA KARI
  1. Wash and pressure cook potatoes in high flame for 2 to 3 whistles adding required water.
  2. Peel the skin and chop into big cubes. Set aside.
  3. Mix the spice powders, flours and salt. 
  4. Heat oil and splutter mustard seeds, urad,chana dal and curry leaves.
  5. Lower the flame completely. Add the mixed powders.
  6. Mix quickly without burning. Add the potato cubes and mix well.
  7. Cook in medium flame tossing at regular intervals till potatoes get roasted.
  8. Switch off the flame. Serve with sambar, rasam or curd rice.
METHOD - STEP BY STEP PICTURES
  • Wash the potatoes. Cut into two pieces. Take in a pressure cooker and add sufficient water to cover the potato. Pressure cook in high flame for 2 to 3 whistles. Remember potato should not become too soft or mushy. It should be cooked but firm in shape.

  • Open the cooker after the steam is released naturally. Take the potatoes and keep in cold water till it cools down. Peel the skin and cut into cubes as shown in the picture. You can also chop into small sized cubes if you like. 
  • Potato kara kari

  • Mix the rice flour, besan flour, red chilli powder, turmeric powder and salt. Mix well. Heat oil in a kadai. Splutter mustard seeds, urad, chana dal and curry leaves. Lower the flame completely.
  • Potato kara kari
  • Add the spice mix and mix quickly. Add the potato cubes immediately and mix to coat well. Keep the flame medium and toss the potato gently. Keep tossing and cooking in medium flame till potato is roasted well with a nice golden color on top. Besan and rice flour coating turns crispy. If the curry sticks to the bottom of kadai, scrape it and add to the curry. It tastes so good. I used non-stick kadai, so mine was not sticking to the pan.
  • Potato kara kari Potato kara kari
  • Switch off the flame. Serve hot with sambar, rasam and curd rice.  Enjoy !!
 

Note

  • Adjust the quantity of chilli powder as per your taste.
  • For variations, you can add besan flour and rice flour at the end, roast till crispy and golden.
  • Make sure you don't burn the spice powders while adding to the hot oil. Keep the flame completely low and add it. Immediately add the potato cubes to avoid burning. 

Easy yummy potato kara kari is ready to enjoy with rice !
urulaikilangu kara kari
Continue Reading...