Search Chitra's Food Book

Showing posts with label STARTER RECIPES. Show all posts

July 16, 2015

Air fryer Spring Rolls Recipe Vegetarian | Vegetable Spring Rolls Recipe - Baked | Airfryer Recipes

Vegetable spring rolls baked

Recently I won a Bajaj air fryer in Mother’s recipe contest and shared the pictures on my Facebook & Google plus pages. Some of my readers told me to post some airfryer recipes. I tried french friesBitter gourd chips, Lady’s finger fries and bread rolls in my air fryer. Everything came out very well but I couldn’t post them here as everything vanished even before I click.

Yesterday evening I tried vegetable Spring rolls using store bought spring roll pastry sheets for the first time. I baked a few in air fryer and deep fried the remaining to compare the results. I prepared a simple and easy vegetable stuffing using cabbage, carrot and capsicum. I made everything quickly and finished clicking before Raksha and Sendhil came home. Believe me, I loved the air fryer version more than the deep fried ones. Air fried ones were very very crispy compared to the other. Moreover its crispness was maintained for long time. Sendhil came 2 hours after I made the spring rolls. Even then they were crispy. I think you can make the same using convection oven too.
Air fryer

I was very happy that I served him a low calorie,oil less evening snack recipe. Friends, if you have any plans to buy an air fryer, just go for it without any hesitation. I am sure you won’t regret for the buy. These spring rolls can be served as a starter for small birthday parties and family functions. Everything can be prepared ( including rolling) well in advance and refrigerated. So here you go, my first recipe using air fryer – Crispy Veg Spring rolls !

Vegetable spring rolls baked

Vegetable Spring Rolls Recipe


Vegetable Spring Roll Recipe Vegetable Spring rolls recipe - Yummy starter recipe!!
Cuisine: Indian
Category: Starter
Serves: 8 nos
Prep time: 15 Minutes
Cook time: 25 Minutes
Total time: 40 Minutes


INGREDIENTS
For Stuffing
  • Shredded cabbage - 2 cups
  • Carrot - 1 big
  • Big onions - 2 nos ( optional)
  • Capsicum - 1/2 no
  • Ginger - 2 inch piece
  • Garlic - 8 nos
  • Sugar – a big pinch
  • Pepper powder - 1 tbsp
  • Soya sauce - 1 tsp
  • Salt - as needed
  • Cooking oil - 2 tbsp
  • Spring onion – to garnish
For the sheet
  • Spring roll sheet – 10 nos
  • Corn flour or maida – 2 tbsp
  • Water – as needed
METHOD
  • Take out the spring roll sheet from the freezer and keep it outside for 1 hour. In the mean time, prepare the stuffing part.
  • Grate the cabbage thinly. Chop the carrot and onion into thin strips.Slice the capsicum thinly. Chop the ginger and garlic very finely. Make sure everything should be of same size and thickness. Try to chop them as thin as possible to ensure quick cooking.
Vegetable spring rolls recipe

  • Heat oil in a kadai and saute all the chopped vegetables adding some salt and sugar. Sugar helps to maintain the color of veggies. Saute in high flame continuously for 2-3 minutes.Veggies would get cooked and reduce in quantity. Lastly add the soya sauce and pepper powder. Mix well and switch off the flame. Garnish with finely chopped spring onions if you have it. Stuffing for the spring roll is ready.
Vegetable spring rolls recipe

  • In a wide bowl, take the maida or corn flour and add some water to make a cream like paste.
  • Now the spring roll sheet must be ready to use. Take a sheet and cut into 4 if you want to make small sized spring rolls. Cover the remaining sheets with a wet cloth to avoid drying. If you want big spring rolls as in the picture, no need to cut the sheet.
Vegetable spring rolls recipe
  • Place a tbsp of stuffing in one corner of the sheet. Roll it tight and fold the sides as shown in the picture. If you don’t roll it tight, spring roll becomes flat.
  • Apply the corn flour paste in the other corner and stick it. Repeat the same process with all the sheets and arrange them in a plate.
Vegetable spring rolls recipe
  • Heat oil to deep fry. Put the spring rolls and cook them in medium flame till they turn golden brown.Turn it whenever needed. Remove in a tissue paper and serve with tomato sauce. Enjoy !
Vegetable spring rolls recipe

    AIR FRYER VERSION
    Preheat the air fryer in 180c for 5 minutes. Roll the sheets as mentioned above and arrange them. Brush the spring rolls with some oil. Place the sheets in the Air fryer basket.
    Vegetable spring rolls recipe
    Set the timing to 20 minutes and temperature to 180c.Bake it for 10 minutes. Remove the basket and flip the spring rolls to bake the other side. Bake for the remaining 10 minutes and check the color of spring rolls. If it remains white, bake it for another 2-3 minutes or more. Remove and serve hot ! It stays crispy for long time. So you can store the baked spring rolls in the air fryer basket till you serve.
Vegetable spring rolls recipe
Note
  • Do not keep less stuffing and roll it tight. Keep the stuffing according to the size of sheet.
  • To make the stuffing more spicy, add some chilli sauce.
  • Jain readers can skip the onions, garlic and use more cabbage. There won’t be much difference in taste.

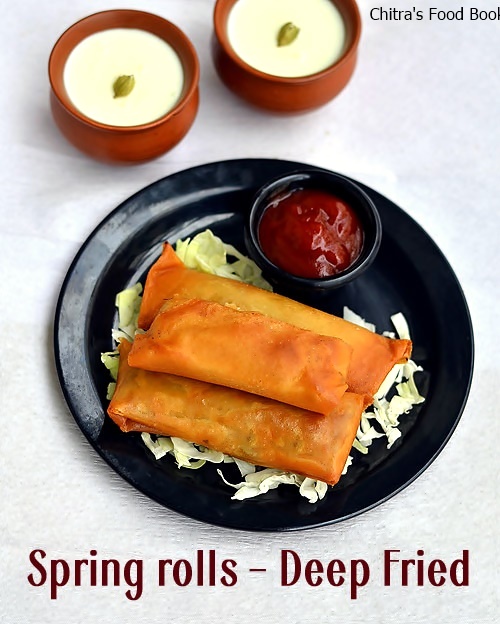
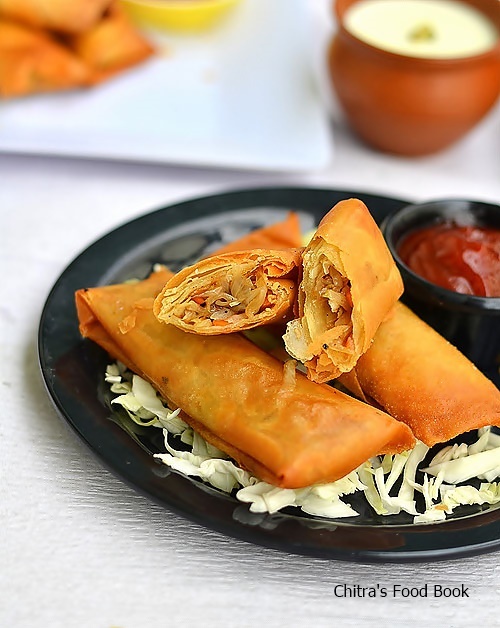
Pictures of deep fried vegetable spring rolls. 


Try this kids friendly starter recipe this weekend and enjoy your tea time !


Continue Reading...


May 21, 2015

Paneer Tikka Recipe on Tawa , Green Chutney With Curd - Stove Top Version

Paneer tikka recipe on tawa
Last week, I made paneer tikka  on tawa for the first time using gas stove .Even though I have an oven with microwave, convection and grill options, I din’t want to make use of it as it was my first attempt. So I tried in my new non-stick tawa. It came out very well. Paneer was perfectly browned & soft. I watched Sanjeev kapoor channel’s youtube video hosted by my favourite Chef Harpal singh. I had already tried Corn cheese balls following his recipe and it was a super hit among my family and friends. So I tried this recipe without any hesitation. He demonstrated the recipe using gas tandoor but I made the same in tawa.


Sendhil loved it and relished the tikka with green chutney adding curd. I became very happy and confident enough to try this recipe for my guests too. Soon I must try the same using my oven’s grill option and make a post here. Now lets see how to make paneer tikka using gas stove on tawa with green chutey as side dish.


Paneer tikka recipe

green chutney for tandoori

Paneer tikka recipe-Stove top version & Green chutney


Paneer tikka recipe-stove top version & Green chutney Paneer tikka recipe using Tawa in Gas stove and its most popular side dish - Green chutney
Cuisine: Indian
Category: Side dish
Serves: 2
Prep time: 10 Minutes
Cook time: 10 Minutes
Total time: 20 Minutes


INGREDIENTS

  • Paneer - 100 gms
  • Tomato - 1 no ( deseeded,optional,i dint use)
  • Green capsicum - 1/2 no (u can use colourful bell peppers too)
  • Big onion - 2 nos
  • Cooking oil – 2 tbsp
For marination
  • Hung curd or thick curd - 1/2 cup
  • Kashmiri Red chilli powder - 1/2 tsp
  • Tandoori masala powder - 1.5 tsp
  • Ginger&garlic paste - 1/2 tsp
  • Chat masala powder- 1/2tsp
  • Kasoori methi - 2 pinches
  • Lemon juice - few drops
  • Salt - as needed
To roast
  • Butter – 1.5 tbsp
  • Besan flour - 1.5 tsp
  • Ajwain - 1/8 tsp

Mustard oil or cooking oil – 2 tbsp + 2 pinch of turmeric powder

Green Chutney with curd
  • Mint+coriander leaves – 1/2 cup
  • Green chillies – 1or 2 no
  • Thick fresh Curd – 1/4 cup
  • Roasted cumin powder – 1/8 tsp
  • Chat masala – a pinch
  • Garlic cloves – 2 nos
  • Ginger – 1/2 inch piece
  • Black salt – 2 pinches
  • Sugar - 1/4 tsp
  • Salt – as needed
HOW TO MAKE PANEER TIKKA ON TAWA - METHOD

  • Heat butter in a kadai and roast the ajwain & besan flour. Roast well in medium flame for 2-3 minutes till u get a nice aroma. It will turn like a thick paste. Set aside and let it cool.
  • Soak the skewer in water for 30 minutes to avoid getting burnt.
Paneer tikka recipe
  • Take the hung or thick curd in a wide bowl. Add 1 tbsp of roasted besan mix. Mix the spice powders, g&g paste, salt , kasoori methi and few drops of lemon juice. Check for taste and set aside.
    • Heat 2 tbsp of mustard oil & when it starts to smoke, add turmeric powder. Switch off the flame immediately & add the oil to the marinated masala. 
Paneer tikka recipe on tawa
  • Cut the paneer ,tomato, capsicum and onion into square shared pieces as shown in the pic. Now add all the veggies to the masala and allow it to marinate for minimum 2 hours or over night in refrigerator.
Paneer tikka recipe on tawa
Paneer tikka recipe
  • Arrange the marinated pieces in a skewer or tooth pick. I placed paneer, then onion, capsicum and I repeated the same order. I finished it with a paneer piece. You can order them as per your wish. Heat 2 tbsp of oil in a non-stick tawa. After the oil is heated, turn the flame to low. Keep the skewer and cover the tawa with a lid. Let it cook for 2-3 minutes.
Paneer tikka recipe on tawa
  • Then turn the skewer and cook the other side till it turns golden brown. Keep turning every now and then till you achieve the color. Onions, capsicum, paneer would be roasted well and will give a nice smell. Remove in a plate and serve it really hot with green chutney to enjoy its best taste.
Alternate method : Instead of skewing all the veggies, you can saute each vegetable separately in oil and then arrange them in toothpick or skewer.
Green chutney for paneer tikka : Wash and take mint+coriander leaves in a mixie jar. To this, add all the other ingredients.Grind it to a smooth paste adding curd. Do not add water. Remove the chutney & serve with tikka.

Green chutney for paneer tikka


Note


  • Adjust the spices as per your taste.
  • If you don’t have tandoori masala, add garam masala instead. But tandoori masala works the best.


Paneer tikka recipe stove top

Paneer tikka is ready to relish with green chutney & garam garam Chai. Enjoy !!
Paneer tikka recipe

Continue Reading...


April 15, 2015

French Fries Recipe | Crispy Homemade French Fries

 French fries recipe
Recently I saw my friend buying a packet of frozen french fries to fry it using her newly bought air fryer. It tempted me to try french fries at home. The success of my McDonalds Veg Burger recipe & KFC style veg strips recipes made me confident enough to try this most popular, kids favourite french fries recipe too. I googled so many recipes & videos to make a perfect homemade french fries. As I mentioned in my homemade potato chips post, you need to use the right potatoes to get crispy McDonalds style french fries. People in abroad can use Russets or baking potatoes. 

In India, we get red colored potato covered with mud. It is called as chips potato. U have to use that variety for best results. If you have these potatoes in hand,just carry on with this recipe. You can make it perfect as shown in the picture. Here I have just sprinkled salt like in restaurants. U can also season them with organic spices if you wish. And if you are health conscious, you can opt for baked version too. I have given the temperature settings in the method section. 

When I tasted these fries, I reminded my daughter Raksha. She is in Salem for vacation. She loves these fries a lot and today I missed her very badly. I should make it again as soon as she come here. Ok, Lets see how to make crispy,homemade french fries recipe with the picture of potato I used.

Russet potatoes

French fries

Homemade french fries recipe


Homemade french fries recipe How to make crispy french fries at home easily using 3 methods.
Cuisine: Indian
Category: Snacks
Serves: Serves 3
Prep time: 10 Minutes
Cook time: 10 Minutes
Total time: 20 Minutes


INGREDIENTS

  • Red colored potatoes - 2 nos (Big oblong shaped)
  • Salt - as needed
  • Ice cold water or water at room temperature – as needed
  • Cooking oil - to deep fry
HOW TO  MAKE FRENCH FRIES - METHOD

  • Wash and peel the skin of potatoes.Cut them into 1/2 inch thick slices and then into thin strips of uniform size.
French fries recipe
  • Wash the strips in plain water or ice water for 2 –3 times to remove the excess starch content. Boil 2 cups of water in a pan. Switch off the flame and soak the potato strips in it for 5 minutes. No need to cover the bowl. Drain the water completely. Pat it dry in a clean kitchen towel. Leave it open for 5 minutes. Make sure there is no water in the strips and it should be completely dry.
French fries recipe
French fries recipe
  • Heat oil till medium hot and deep fry the potato strips for 2 minutes in medium flame. It would be oily and soft. Make sure the colour of potatoes are white.Remove & drain them in a tissue paper. Let it cool down completely. Store in zip lock bags and freeze them for later use. If making immediately, follow the next step.
French fries recipe
French fries recipe
  • Again heat oil till its well heated but not smoky. Now deep fry the potato strips for the second time till it becomes crispy and golden. Keep tossing them for uniform cooking. Remove in a tissue and sprinkle some salt. Serve with tomato sauce.
French fries recipe

  • NOTE : If  you want to make them in bulk and store it for later use, after frying for the first time, remove and cool down completely. Store them in a zip lock cover and freeze it till use.Whenever you want to make it, heat oil well and deep fry them. Oil may sizzle & splutter as the potatoes are frozen and coated with ice. So fry them carefully till golden and crispy and serve hot.
  • Baked version : Follow the same steps till  you pat dry the potato strips in kitchen towel. Preheat the oven in convection mode at 200c. No need to cook the potatoes. Arrange the strips in a baking plate and drizzle some oil all over them. Sprinkle some salt or organic seasoning. Bake them at 200c for 25-30 minutes OR till they become crispy. Remove and serve hot.Soon I will try to make a separate post for this baked version.
    Enjoy !


Note
  • Follow any of the above discussed methods based on your liking.You will get crispy french fries.
  • To make these fries more flavourful, you can sprinkle garlic powder, thyme, basil etc.
  • Use Red colored mud coated potatoes for best results. Other potatoes may turn brown quickly while roasting.
  • Washing the potatoes twice is to remove the extra starch content in the potatoes. It helps you get nice color to the fries.


Homemade french fries
Try these yummy, crispy french fries at home for your kids. They will love it for sure.!!
French fries
Continue Reading...


January 23, 2015

Gobi Manchurian Recipe-How To Make Crispy Gobi Manchurian

Gobi manchurian

I usually make Gobi Manchurian following my baby corn manchurian recipe. This time, for a change I tried crispy gobi manchurian recipe from Bharatz kitchen after getting tempted by the title. He had mentioned as “Crispiest Gobi Manchurian” with a clear video recipe. Usually in manchurian, Gobi turns soggy & soft immediately after mixing with gravy/sauce. But as he mentioned, this one stayed crispy for 30 minutes i.e till my photo session was over. This recipe really works well and tastes similar to the restaurant ones.

Some pre preparation work is needed for this recipe but its all worthy. If you don’t want to make gravy , simply skip the corn flour in sauce part and make it as gobi Manchurian dry version. It tastes even more crispy like street style ones. Soon I will post that recipe too. As Bharat explained, the secret of making crispy Manchurian lies in 2 things. 

One, you have to use small sized florets for deep frying. Do not use bigger size florets. This makes a great difference in the texture. The second thing is, you have to deep fry the florets twice. Anything when deep fried twice gives you the best crispiness. My MIL usually tell this to me and I have experimented the same with my masala vada & urad dal vada too. Deep frying twice helps to maintain the crispiness for long time. The same formula is applied here. But one thing, I should warn you here. Oil absorption will be slightly more than the usual deep frying as we are doing it twice. So use oil absorbent/Tissue paper & keep changing it whenever needed. Also work out more to burn the additional calories ;).

Friends, do try this recipe confidently even if you are a beginner. Try this for your family and kids as an evening snack or as a starter for dinner. I am sure everyone will appreciate you. Lets see how to make gobi manchurian at home easily !

Gobi manchurian recipe

Gobi manchurian recipe


Gobi manchurian recipe Gobi manchurian - An yummy starter recipe !
Cuisine: Indian
Category: Starter
Serves: 2
Prep time: 35 Minutes
Cook time: 15 Minutes
Total time: 50 Minutes


INGREDIENTS

  • Cauliflower florets/Gobi pieces – 25-30 nos ( small sized)
  • Corn flour - 2 tbsp
  • Ginger-garlic paste - 1 tsp
  • Pepper powder - 1 tsp
  • Salt - little
  • Water, turmeric powder & salt - as needed to boil gobi
  • Cooking oil - to deep fry
For the batter
  • Maida/All purpose flour - 1/2 cup
  • Corn flour – 1/4 cup
  • Red food color – a pinch ( optional, I dint use)
  • Salt & water -as needed ( I used 1/2 cup water)
For the sauce/Gravy
  • Cooking oil - 1 tbsp
  • Finely chopped garlic cloves - 5 nos
  • Ginger - 1/2 inch piece ( finely chopped)
  • Big onion - 1 nos (-do-)
  • Spring onion - 2 sprigs (-do-)
  • Capsicum - 1/4 no (-do-)
  • Red chilli powder - 1/2 tsp ( use 1 tsp to make it very spicy)
  • Pepper powder – 1/2 tsp
  • Sugar – 1/4 tsp
  • Salt - as needed
  • Sauce mix ( Recipe follows)
Sauce mix ingredients
  • Corn flour - 1.5 tsp
  • Water - 1/2 cup
  • Tomato sauce - 1 tbsp
  • Soya sauce - 1 tsp
  • Chilli sauce - 1/2 tsp
HOW TO MAKE GOBI MANCHURIAN - METHOD

  • Remove small sized florets from the cauliflower. Suppose, if you have removed them big,just cut them into small sized florets ( not too small). This is very important to get crispy gobi manchurian. Now boil the gobi in water mixed with turmeric powder & salt for 3 minutes. Remove and drain all the water immediately using a colander. Show it under running water to stop the gobi being cooked. It should stay firm.
Gobi-manchurian-recipe-1
  • Now add pepper powder, corn flour, G&G paste and little salt to the washed cauliflower florets. Mix it well & refrigerate it for 30 minutes. In the mean time, finely chop all the ingredients needed for sauce & keep the sauce mix ready by mixing corn flour & other mentioned ingredients in water & keep it lumps free.
Gobi manchurian recipe-2Gobi manchurian recipe-3
  • Take a wide bowl and add maida, corn flour, salt and mix well. Add water to make a slightly thin batter like dosa batter. Now remove the florets from fridge & mix it with batter. Make sure all the florets are well coated with the batter.

Gobi manchurian recipe-4

  • Heat oil in a kadai and when it gets heated, put the florets one by one and deep fry them in medium flame for 2 minutes till they are 3/4 th cooked. Do not toss for one minute. Then stir well and cook till its 3/4th cooked. Do not wait for the bubbles to cease or the cauliflower turns golden brown because we are going to deep fry again. So remove the florets when they are still white in color. Drain in a tissue.
  • Again heat the oil for some more time but not smoky and add the florets now. Deep fry them till they turn golden brown & crispy. Bubbles will cease now. Now remove & drain in another tissue. You will find the gobi to be super crispy now. Have a bite n see, hehe (if you don't want to deep fry twice, just fry it till it becomes golden brown and crispy & proceed). 
Gobi-manchurian-recipe-5
Gobi-manchurian-recipe-6
  • In another pan, heat 1 tbsp of oil & saute all the finely chopped veggies. Mix well adding some salt & sugar. Now add the sauce mix, red chilli powder & pepper powder and let it boil till the gravy reduces to half. Lastly add the deep fried gobi pieces, saute quickly and coat it well. Switch off the flame. Garnish with finely chopped spring onions & remove.
Gobi-manchurian-recipe-7
Gobi-manchurian-recipe-8

Serve hot & Enjoy !

Note
  • Deep frying twice is very important to get crispy manchurian. But it absorb more oil . So use tissue/absorbent paper.
  • If you don’t want to feep fry twice, you can just fry it once but you should do it till gobi turns golden brown & bubbles in the oil ceases.
  • If you want to try this as gobi machurian dry version, omit the sauce mix and add a tbsp of tomato sauce, 1/2 tsp of soya sauce & 1 tsp of red chilli powder after sauteing the onions & capsicum. Mix well & add the gobi pieces, mix well & serve immediately. Do not use corn flour paste here.


Try this yummy gobi manchurian recipe for your family. Have it along with veg fried rice. Tastes yummmm !!
Gobi manchurian recipe
Continue Reading...