Search Chitra's Food Book

Showing posts with label VADA / VADAI RECIPES. Show all posts

September 25, 2015

Anjaneyar Kovil Milagu Vadai | Hanuman Temple Vada Recipe

Anjaneyar kovil vadai
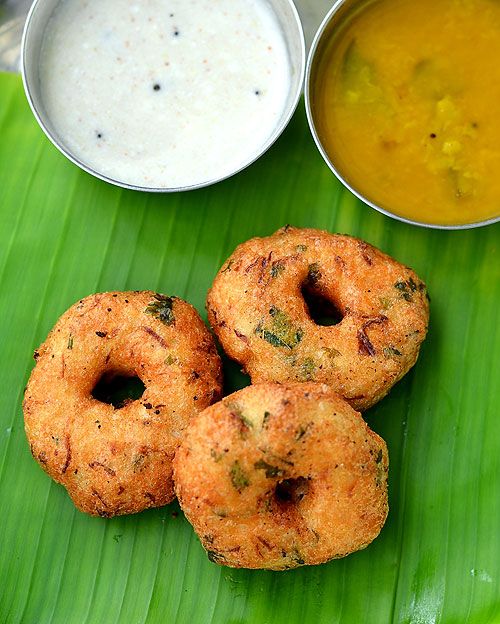
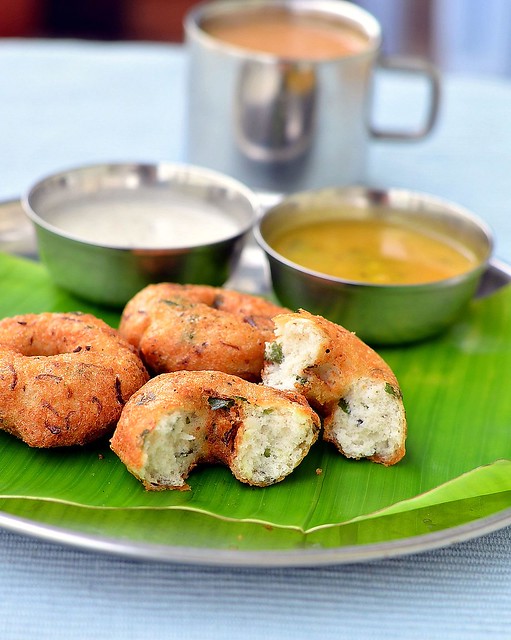
Anjaneyar kovil vadai/Hanuman temple vada is something very special than our usual urad dal vada with pepper. Its crunchy taste and its awesome pepper flavor makes anyone fall for it. More than all, it’s a special prasad prepared in temple kitchen/madapalli and offered in the form of Vadai malai for Anjaneyar. Prasadam given in temples always tastes great and unique with its own flavor. To mention specifically, Chennai Nanganallur Anjaneyar temple vadai malai is most famous in Tamil nadu.

 Generally South Indian temples are famous for its puliodharaisakkarai pongal and vadai. Most of us try to recreate Kovil puliodharai and kovil vadai at home. And if we get the taste close to temple version,we feel very happy and excited. I too got the same feel when I made this Anjaneyar temple vada successfully and that too in my very first attempt. I used to try temple puliogare very often in my kitchen but I couldn’t match the taste which was very disappointing for me. But when I prepared this vadai malai for Purattasi sani thaligai last week. I was completely satisfied with the output. Anyone even a beginner can make this crispy vada if you follow the steps carefully. So lets check out how to make this Hanuman temple style pepper vada with step by step photos.

Anjaneyar kovil milagu vadai malai

Anjaneyar Kovil Vadai Recipe


Anjaneyar Kovil Vadai Recipe Anjaneyar kovil milagu vadai with urad dal-Hanuman temple pepper vada
Cuisine: Indian
Category: Snacks
Serves: 12
Prep time: 20-60 Minutes
Cook time: 5 Minutes
Total time: 25-65 Minutes


INGREDIENTS

  • Round white or black urad dal - 1 cup
  • Rice flour - 1.5 tsp
  • Hot oil - 1 tsp
  • Milagu/Pepper corns - 1 tsp
  • Salt - as needed
  • Hing/Asafetida - 1/4 tsp
  • Water - add only if needed ( 1 -2 tsp)
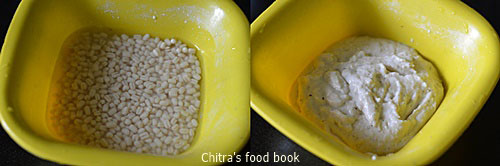
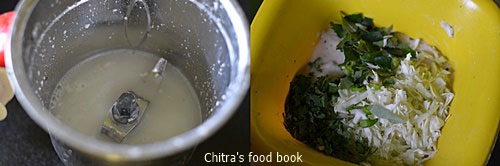
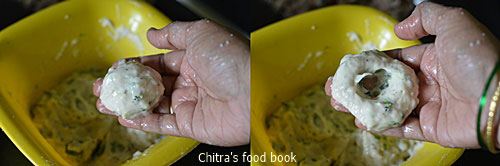
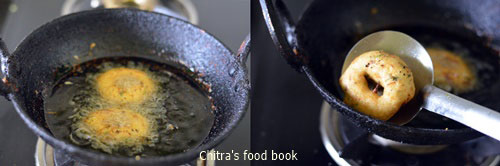
HOW TO MAKE ANJANEYAR TEMPLE VADA - METHOD
  • Wash and soak the urad dal for 30 minutes to one hour. You can also soak it for 15 to 20 minutes and proceed if you have less soaking time.
  • After soaking drain all the water completely using a colander/Strainer. Make sure there is no water left in urad dal. Let it sit in colander for 5 to 10 minutes.
  • Now take the mixie jar, put the pepper corns, hing and then top with urad dal. If you put urad dal first and then pepper corns,pepper may not grind properly. So put the pepper and then add the urad dal. Grind it twice for short interval and grind the batter coarsely. Take care batter should not become too smooth. Add 1-2 tsp of water only if needed. Do not add salt.

    How to make anjaneyar vadai recipe

  • Remove the coarse paste into a bowl and add rice flour, salt and hot oil. Mix well. Take two thick polythene sheets or banana leaf or zip lock covers. Grease with oil generously. Take a big gooseberry sized ball and keep in it one greased sheet. Place the other sheet on top of it. Take a small bowl with flat surface and press the ball with it.
How to make anjaneyar vadai recipe
  • It will flatten to a thin roundel. Make a hole in the center using your finger. Pat it in uniform thickness else vada may turn crispy in thinner side and soggy in thick portions.
  • Grease the sheet every time you pat the vada else vada may break while you remove.If vada breaks while you remove it, grind it little more and proceed.
How to make anjaneyar vadai recipe
  • Heat oil in a kadai to deep fry the vada. Put a drop of batter to check the oil temperature. If it rises immediately, oil temperature is just right. Now simmer the flame completely and carefully remove the vada from the sheet. Drop in oil and fry in medium flame till it turns golden brown and crispy.
  • Flip the vada and cook the other side too. When the bubbles cease, remove the vada into a tissue and drain the excess oil. If the batter is properly ground without adding water,vada will not absorb oil.( Deep fry the vada patiently in medium flame because the color of vada turns black very soon and it remains uncooked when done in high flame)
How to make anjaneyar vadai malai recipe
  • I deep fried the vada one by one by keeping less oil. So its your choice of frying one by one or in a batch. Make 11 or 21 numbers and tie them in a thread. Make vada malai and offer to Lord Anjaneyar. Get his blessings !
How to make anjaneyar vadai malai recipe
Note

  • Soaking time of urad dal can be varied. 30 minutes minimum soaking time is needed. But you can get the same result even if you soak the dal for less than 30 minutes.
  • Crispness of vada completely depends on proper grinding of batter, thin size and frying the vada patiently in low to medium flame.
  • Never skip the rice flour & hot oil. It helps to make the vada crispy.
  • Add more pepper for spicy vada.
Offer this crunchy pepper vada to GOD and Enjoy !
Hanuman temple vada recipe
Continue Reading...


June 18, 2015

Cabbage Vada Recipe | Urad Dal Vada With Cabbage - Muttaikose Vadai

Few years ago I posted Mixed vegetable Urad dal vada. But I have not tried Urad dal vada adding cabbage alone / Muttaikose vadai in Tamil. Yesterday I made this cabbage vada for our No moon Day No onion No garlic lunch menu. I was scared whether vada would get the raw smell of cabbage. But to my surprise, it was so crispy and superb in taste. It’s a nice tea time snack. I couldn’t even find the trace of cabbage smell in it. Infact cabbage acted as a binding agent and made the batter thick enough to shape the vada easily too. It’s a great replacement for onion. Just give a try. You will come to know. Lets see how to make cabbage vadai in detail.


Please refer my urad dal vada/Medhu vadai video recipe for better understanding of grinding and shaping the batter.

check out this recipe with video for grinding vada batter using grinder.

Cabbage Vada Recipe


Cabbage Vada Recipe Cabbage vada recipe - Urad dal vada adding cabbage
Cuisine: Indian
Category: Snacks
Serves: 10 
Prep time: 40 Minutes
Cook time: 10 Minutes
Total time: 50 Minutes


INGREDIENTS

  • Round Urad dal - 1/2 cup
  • Finely chopped Cabbage - 1 cup
  • Curry leaves - few
  • Green chilli - 2 nos ( finely chopped)
  • Coriander leaves - few
  • Ginger - 1/2 inch piece
  • Hing /Asafetida - 1/4 tsp
  • Salt & water- as needed
  • Cooking oil - to deep fry
HOW TO MAKE CABBAGE  VADA WITH URAD DAL - METHOD
  • Wash and soak the urad dal for at least 45 minutes and maximum 4 hours. Drain all the excess water and take the urad dal in a mixie jar. First grind the dal adding very little water( 2 tbsp). Grind the dal to the maximum by wiping the sides of jar. No need to add salt. Wipe the sides of jar and add a tbsp of water. 
  • Again grind the dal till it turns smooth and thick. Add water only in a tbsp at a time. So add more if needed. The batter should be stiff and smooth. Just drop a pinch of batter in a bowl of water. If the batter floats, the consistency is right. If it drowns, it shows you have added more water. Please refer my Urad dal video grinding for better understanding.
  • Remove the batter in a bowl. Add little water to the mixie jar and grind it. Collect that water and use it for dipping your hands before shaping the vada. 
  • Beat the batter with your hands for few minutes to remove air bubbles. This helps to prevent vada from bursting in oil. To the batter, add finely chopped cabbage, green chillies, curry leaves, coriander leaves and ginger bits. Mix well. Add the required salt. After you mix all these ingredients, batter would become thick and you will be able to shape the vada easily.

  • Heat oil to deep fry. Drop a pinch of batter in oil. If it rises immediately to the top, oil is just right. Now keep the flame medium. Take a golf sized ball from the vada batter. Pat it slightly and make a hole in the center.
  • Drop the vada in the oil and deep fry till cabbage turns golden brown. The color of vada may vary based on the time you cook. I love to take my vada golden brown. So I always cook the vada in high flame for few seconds before removing from oil.
    Serve hot with chutney.Enjoy !
Note
  • Grinding urad dal in mixie yields less batter than grinding in grinder. But you can make 10 medium sized vada for this quantity.
  • You can also add coarsely ground pepper along with other ingredients.
  • For kids you can grind green chillies along with ginger and add to batter.
  • If u feel the batter is too watery and if you are not able to make shapes, add little rice flour. But consume the vada when it is hot because adding rice flour makes the vada hard when it cools down.
  • My MIL adds a tsp of toor dal while soaking urad dal to avoid oil absorption. But proper grinding of batter with right amount of water gives you oil free vada.


Try this no onion Urad dal vada recipe for your tea time. Tastes yummy !


Continue Reading...


January 28, 2015

Vada Pav Recipe-Mumbai Batata Vada With Garlic Chutney Recipe

Vada Pav Recipe
Vada pav needs no introduction. As you all know, its a very famous street food which was born in Mumbai, Maharashtra. Here in Bangalore, I have tasted vada pav only in Goli outlets. Recently I went to Goli with my school moms friends just for a kitty party. There were nearly 7 varieties of vada pav. We ordered one each in all the varieties, we shared & relished it. Everything had its own taste & flavor.
I loved masala vada pav more than all.

In Goli, they use readymade frozen batata vada & the moment we order, they just deep fry the vadas in oil using an electronic fryer for 6 minutes at 180c and serve us really hot. The one I tasted in Goli tempted me to try at today.  As my daughter is a very big fan of pav recipes, she told me to make & keep it ready for her evening snacks after she is back from the school. 

For this recipe, I watched the making of vada pav in you tube videos & browsed through few websites too. Believe me, it came out awesome! I made Batata vada, Sukha (Lehsun)/dry garlic chutney, Green chutney and everything came out really well. I was very happy with the outcome. Now I can make yummy vada pav at home easily for my family & guests as well. But still I wish to taste the original Vada pav from Mumbai fast food corners at least once in my life time.

Vada Pav Recipe

Vada Pav Recipe


Vada Pav Recipe Vada pav recipe - Batata vada with dry garlic chutney & Green chutney.
Cuisine: Indian
Category: Snacks
Serves: Serves 4
Prep time: 20 Minutes
Cook time: 15 Minutes
Total time: 35 Minutes


INGREDIENTS
For batata vada
  • Boiled Big potato - 2 nos
  • Green chillies - 2 nos ( finely chopped)
  • Cumin seeds - 1/2 tsp
  • Salt - as needed
  • Coriander leaves - few
  • Lemon juice - 1/2 tsp
  • Ginger&Garlic paste - 1 tsp
  • Turmeric powder - 1/4 tsp
  • Hing/Asafetida - 1/8 tsp
  • Cooking oil – 2 tsp
  • Mustard seeds – 1/2 tsp
  • Curry leaves - few
For dry garlic chutney
  • Dry coconut powder - 3 tbsp (Kobbari podi)
  • Red chilli powder - 2 tsp
  • Garlic cloves - 6 nos
  • Salt - as needed
For green chutney
  • Coriander & Mint leaves - 1/2 cup
  • Green chillies - 2 nos
  • Lemon juice - 1/2 tsp
  • Ginger - Small piece
  • Garlic - 2 cloves
For Batata Vada Batter
  • Gram flour/Besan – 1 cup
  • Rice flour – 1 tbsp
  • Cooking soda – a pinch
  • Salt – as needed
  • Red chilli powder – 1 tsp
  • Turmeric powder – 1/8 tsp
  • Water – as needed ( to make bajji batter consistency)
Pav buns – 6 nos
Butter – as needed
METHOD

  • Wash & pressure cook potatoes. Peel the skin and mash it well. Set aside. Now take the mashed potatoes & add finely chopped green chillies, turmeric powder, salt, coriander leaves and G&G paste. Mix well. 
Vada pav recipe
  • Grind the ingredients given under “ Dry garlic chutney” to a powder adding required salt. Keep it ready in a bowl. Again grind the ingredients for “Green chutney” and keep aside.
Vada pav chutney recipe
  • Now heat oil in a pan and splutter mustard seeds & curry leaves. Add the mashed potato mixture & mix well until everything comes together as a mass. Remove & let it cool. Then make golf sized balls and keep it ready. U can make it flat or round balls.
Vada pav recipe

Vada pav recipe
  • Now prepare the bonda batter by mixing all the ingredients in a bowl. Mix well and dip the potato balls.
Vada pav recipe
  • Heat oil and put a pinch of batter for testing the heating point of oil. If the batter rises up immediately, heat is just right. Simmer the flame & drop the bonda in batches, cook them both the sides. Remove & drain the oil. While you deep fry the bondas, you may get some tail portions, collect them together, crush it using your hands and mix with dry garlic chutney. They are nothing but besan crumbs. But this step is completely optional. If you don’t want to follow this,just remove them and have it as such. It tastes super crispy.
Vada pav recipe
  • Take the pav buns and slit it like an open book using a knife.
Pav bun
  • Now heat the dosa pan and add 2 tbsp of butter.Sprinkle some dry garlic chutney powder and place the pav buns over the chutney powder.Grease it well in the inner part.
Vada pav recipe
  • Take the roasted buns and sprinkle some more garlic chutney powder if needed. Then apply green chutney on one side of pav and place the batata vada. Cover it and serve immediately with fried green chillies on side.
Vada pav

Enjoy !


Note


  • Add more chillies in potato mixture if you want more spicy vada.
  • Some poeple add roasted & crushed peanuts & sesame seeds to dry garlic chutney. But its completely optional. U can also add a pinch of tamarind piece while grinding.
  • This dry garlic & green chutney stays good for a week if refrigerated in an air tight box.
  • Make sure u use fresh pav buns for best taste. I used Nilgiris brand pav buns here.
  • Green chutney is optional here. In Goli, they din’t add green chutney for classic vada pav recipe. So its your choice.

Mumbai vada pav recipe

Enjoy this mumbai style vada pav recipe with hot masala chai. Tastes heavenly !!
Vada-pav-recipe
Continue Reading...


September 2, 2014

Medhu Vadai Recipe | How to make Urad Dal Vada In Grinder

Medhu vadai
Medu vada aka Urad dal vada / Ulundu vadai is a famous South indian snacks and breakfast recipe especially in Tamil nadu. We generally make medhu vadai for festivals or for guests. Last month I got a request from a reader to post crispy medhu vadai recipe using grinder. As I myself have not tried medu vada using grinder, I was hesitant to make this post. 

Usually I make medu vada only using mixie. But then I took this as an opportunity to try out vada batter using grinder & I did it. But my vada drank so much of oil but still it was light n crispy.Then I found I have added more water which made my vada absorb more oil. So I tried it confidently for the second time and got it perfect. For some recipes, I feel video would give better understanding. So I wanted to capture vada batter making.

Last week my in-laws were with us. I told my MIL to grind vada batter and I captured it. Hope the video looks good & clear. But the vadas in the pictures what you see here are made by me. If I can make a good shaped vadas, then anyone can make it easily. So do follow this recipe carefully. U will get it right. To make a perfect medu vada, there are some points to be noted while grinding the batter. I have shared them below. Do read it before watching the video or trying this recipe. Hope these points would help all the beginners. Lets see how to make crispy medu vada at home with some tips & tricks!


Urad dal vada

TIPS & TRICKS TO MAKE CRISPY VADA
  • Always soak the white, round urad dal for 45 to 60 minutes maximum. If you are grinding in mixie, then you can soak it for 2-3 hours.
  • When you are grinding the batter using grinder, do stand nearby. U have to spend 12-15 minutes near the grinder by sprinkling water and wiping the sides every now and then which is most important.DO NOT ADD SALT WHILE GRINDING. Add salt just before frying the vada.
  • Never pour all the water in one stretch. Just add little water every 2-3 minutes by wiping the sides of grinder with a spatula. Batter should not get stuck in the sides.
  • Vada batter should not be too light & airy. It should be tight to hold. If the batter is too light,vada will absorb more oil.
  • Also the batter should be non-sticky when u touch it by dipping your hands in water.
  • To check the right consistency of vada batter,drop a small ball of batter in a bowl of water. It will float to some extent. Also when you try to drop the batter, it should form a stiff peak ( Refer picture ).
  • Keep the batter covered in refrigerator till use. Add salt & onions only before frying the vada. Beat the batter before frying to provide aeration which is very important to get crispy, light vadas. Then add onions and other spices.
  • Add 1/2 tsp of toor dal for 1/2 cup of urad dal while soaking. It helps the vada to prevent oil absorption.
  • U can also add 1 tsp of rice flour to get super crispy vadas like in restaurants.
  • But if you grind vada batter properly, then no need to add rice flour or toor dal. Vada will come out super crispy by itself.
  • To keep the vada crispy for hours,just pre heat the oven in the least temperature & place your vadas in a tray inside the oven. By this way,vada stays crispy. I got this tip from Vahchef’s site but I have not tried it personally though.
Medu vadai batter tips

Medhu vadai recipe/Urad dal vada


Medhu vadai recipe/Urad dal vada South Indian breakfast special Urad dal vada aka Medhu vadai recipe with stepwise pictures & video !
Cuisine: Indian
Category: Snacks
Serves: 10
Prep time: 60 Minutes
Cook time: 15 Minutes
Total time: 75 Minutes


INGREDIENTS
1 cup - 250ml
To soak
  • White round urad dal - 1/2 cup
  • Toor dal - 1/2 tsp (optional )
  • Water - as needed
To mix in the batter
  • Small onion - 10 nos or big onion - 1 
  • Curry leaves - few
  • Green chillies - 1  ( finely chopped)
  • Hing/Asafetida - 1/8 tsp
  • Crushed pepper - 1/2 tsp
  • Cumin seeds/Jeera - 1/2 tsp (optional)
  • Salt - as needed
  • Cooking oil - to deep fry
Rice flour – 1 tsp, to add in the batter before making vada ( optional )
METHOD

  • Wash and soak the urad dal & toor dal ( if using ) in enough water for 1 hour minimum and 4 hours maximum. Keep the soaking urad dal inside the refrigerator. Drain all the water completely and use this water for grinding. Add the soaked urad dal to the grinder. Switch on & start running. Do not add water.
How to make medu vada
  • Do not add water in the beginning. Let the grinder run for few seconds without water. When the dal starts to stuck in the sides,add little water ( say 1/8 cup ). Take a spatula and wipe all the sides and center part. Again sprinkle little water and stand nearby wiping the sides. Make sure there are no dals visible or stuck up in the sides. Repeat this by adding water & wiping sides for 12-14 minutes. Batter will become fluffy and the quantity would be more.
How to make medu vada recipe
  • Now remove a small portion of batter in the spatula, when you drop the batter, it should form a pointed tip. Also check the batter by dropping a small ball in a bowl of water. It should not settle down or dissolve instead it should float.
How to make medu vada crispy
  • Remove the batter from the grinder completely and keep in a vessel. If you are making vada immediately proceed OR store the batter in the refrigerator till use. Do not keep it outside.
  • Before deep frying the vada,remove the batter from the refrigerator. Beat the batter well with your hands. It provides aeration and helps to give you crispy & light vada.
  • Now add salt , finely chopped onion, hing, chillies, curry leaves, pepper corns & cumin seeds. Mix well.
How to make medu vada 1
  • Heat oil in a kadai , check the temperature of oil by dropping a pinch of batter. If it rises immediately, oil is just right. Shape the vada using your palm. Make a hole in the center using the thumb finger. Drop the vada into the oil by slightly tilting your fingers. Flip both the sides and cook the vada till the bubbles ceases. Remove & drain in a tissue paper.
How to make medu vada 2
Serve hot & Enjoy !


Medhu vadai recipe

Enjoy this hot & crispy medu vada as breakfast or as an evening snack with coconut chutney !

Medu vada recipe

Continue Reading...


July 22, 2014

VAZHAIPOO VADAI RECIPE/BANANA FLOWER VADA–BANANA FLOWER RECIPES

Banana flower vadai
As I mentioned in my Vazhaipoo kuzhambu post, I made vazhipoo vadai for the first time with the tender banana flowers.It was so nice and crispy. Basically we love anything when deep fried. So when I made this Vazhaipoo vadai, Sendhil & Raksha were double happy to have a healthy deep fried snack for their tea time. It was a good change for me from the usual vazhaipoo usili or poriyal & I am happy that I’ve  got yet another yummy banana flower recipe in my list. I got this vazhaipoo vadai recipe from my MIL. I made few changes to make it in an easier way & prepared this vada. Ok, lets see how to make this vazhaipoo vadai easily.
Vazhaipoo-vadai

Vazhaipoo vadai recipe


Rava payasam recipe Vazhaipoo vadai - Healthy, yummy snack recipe using Banana flower. 
Cuisine: Indian
Category: Snacks
Serves: 8
Prep time: 3 Hours
Cook time: 15 Minutes
Total time: 3H 15M


INGREDIENTS

  • Banana flower/Vazhaipoo – Two handful (approx 40nos) 
  • Chana dal – 1/2 cup
  • Toor dal – 1 tbsp (optional)
  • Red chillies – 3-4 nos
  • Ginger – 1 inch piece
  • Hing/Asafetida – 1/4 tsp
  • Water – As needed
  • Fennel seeds – 1/4 tsp
  • Small onions/Big onion – 20 nos / 1 no
  • Curry leaves - few
  • Cooking oil – to deep fry
HOW TO MAKE VAZHAIPOO VADAI - METHOD

  • Wash and soak chana dal & toor dal for 3 hours.
  • Wash and clean Vazhaipoo. Remove the stamen part in the flower and keep the flowers immersed in buttermilk till use. No need to chop them.
  • First coarsely grind the banana flowers along with pinched red chillies, hing, ginger , fennel seeds and salt.
vazhaipoo vadai step1
  • Drain the water in the soaked chana dal and grind it without adding water. The water content in vazhaipoo itself is enough to grind.
vazhaipoo vadai step2
  • Take the vada batter in a wide bowl. Finely chop onions,curry leaves & add to the batter. Mix well. Take a lemon sized ball and pat it to make masala vada shape
vazhaipoo vadai step3
  • Heat oil to deep fry. Add a pinch of batter. If it rises immediately,oil is ready. Now drop the vada and deep fry both sides till the onions turn golden brown.
vazhaipoo vadai step4
  • Remove and serve with sauce or coconut chutney !
NOTE
  • Do not add water while grinding.Soak chana dal for minimum two hours.
  • Adjust the quantity of chillies based on your taste.U can also use green chillies in place of red chillies.
  • Adding soambu/Fennel gives a nice flavor to the vada. U can also skip it if you don’t like.
  • No need to chop the banana flowers as we are grinding it coarsely.
  • The color of vada is generally black.
  • Check out my detailed post on “How to clean Vazhaipoo” with stepwise pictures soon.

Enjoy this crispy vazhaipoo vadai with Ginger Tea or Coffee ! Tastes yum !
Vazhaipoo vadai

Also check out my other vadai recipes


Continue Reading...