Search Chitra's Food Book

March 28, 2011

MIXED VEGETABLE VADA - VEGETABLE VADAI

VADA COLLAGE

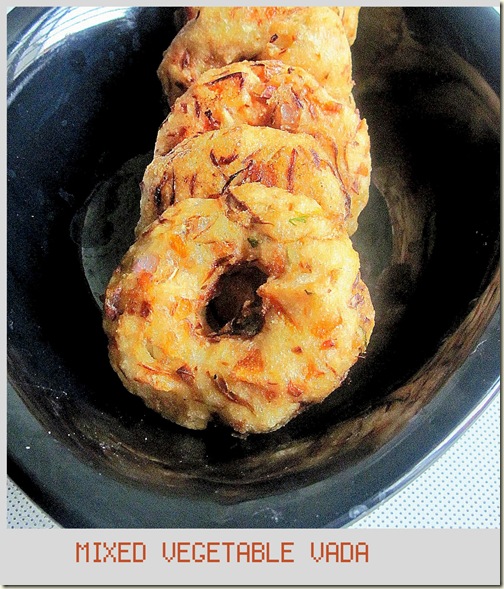
I googled so many recipes, referred some cookbooks and finally came up with this vegetable vada recipe. Some have suggested to make this vada with gram flour &  rice flour and some recipes are with urad dal. I felt recipe with urad dal would be better and healthy. If you want to make mixed Veg bonda, then gram flour /besan would be the best option. 

Mixed vegetable vada / Vegetable vadai recipe


Mixed vegetable vada / Vegetable vadai recipe

Mix vegetable vada/ vadai for evening snacks !


Cuisine: Indian
Category: Snacks
Serves: 8
Prep time: 10 Minutes
Cook time: 20 Minutes
Total time: 30 Minutes


INGREDIENTS
For the batter :
  • White round urad dal – 1/2 cup
  • Salt - as needed
  • Water – 2 - 3 tbsp ( upto 1/4 cup)
  • Asafetida / hing – 1/4 tsp
  • Ginger – 1 inch piece
  • Green chilli – 1 no
To mix :
  • Carrot – 2 nos
  • Grated Cabbage – 1/4 cup
  • Green chilli – 1 no
  • Small onion – 10 nos
  • Curry leaves - A few
  • Coriander leaves – A few
HOW TO MAKE VEGETABLE VADA
  • Wash and soak urad dal for 1 hour.
  • Grind all the ingredients given under ‘for the batter’ in a mixie. Add water gradually.
  • Make a thick, smooth batter. 
  • Chop or grate the carrots. Chop the small onions, green chillies, curry leaves finely.
  • Grate the cabbage. Mix all the veggies to the batter. Check for salt.
  • Heat the oil in a kadai and deep fry vadas in batches. Serve hot !!
  •  
    vegetable vada1
    NOTE
    • We don’t have to worry about the shape of vada. U’ll get a nice perfect shape. The batter mixed with vegetables would be very thick.
    • Suppose if the batter is watery, add little rice flour to get the proper shape. But this step won’t be needed.
    vegetable vada collage

    Continue Reading...


    March 24, 2011

    KAZHANI KUZHAMBU | RAW MANGO KUZHAMBU - MANGO RECIPES


    This is my MIL’s special recipe.We bought some sour raw mangoes and i told my MIL to make something special with it. she told me about this kuzhambu and we tried on the same day. It was excellent .Its very simple to do. If u get sour mangoes, do try this .I am sure u’ll love it.It got a similar taste of puliodharai /puliyogare.Thanks a lot to my MIL for teaching me this yummilicious gravy / kuzhambu.I loved it.. Red heart.

    INGREDIENTS


    • Sour Raw mango – 2 nos (medium sized, Slit cut into 3.Hope the above picture gives u a  clear idea )
    • Tamarind – One seed / Small Berry size
    • Turmeric powder –1/4 tsp
    • Curry leaves – A few
    • Salt – As needed.
    • Arisi Kazhani – 2 cups ( Drain the water after washing the rice and take it in a bowl ..The water would be white in color.Its called Kazhani in tamil )
    To roast and Powder
    • Oil – 1 tsp
    • Methi seeds – 1/2 tsp
    • Channa dal – 1tbsp
    • Urad dal – 1 .5 tsp
    • Toor dal – 1 tbsp
    • Red chillies – 6 – 7 nos
    • Hing /Asafetida – 1/4 tsp
    To temper :
    • Mustard seeds – 1/2 tsp
    • Urad dal – 1/2 tsp
    • Curry leaves  - a few
    METHOD
    • In a wide mouthed kadai or bowl take the arisi kazhani and add the turmeric powder ,salt & one seed of tamarind.( We call this as ethir puli)
    • Wash the raw mangoes and slit cut into 3 pieces. Please refer the above picture .
    • Add these mangoes into the kazhani and cover cook till the mangoes cook nicely. Take care it should not be overcooked and becomes mushy.
    • Add 1/4 tsp of hing & curry leaves while boiling.
    • Now in a kadai , add a tsp of oil and roast the items in the same order.
    • Grind it to a coarse powder . ( run the mixie once or twice)
    • Once the mangoes are cooked , add the  coarse powder and allow it to boil for 5 mins. u’ll get a nice flavor.
    • The gravy should be watery as in picture.(like rasam)
    • Finally temper the kuzhambu & give some 30 mins standing time before serving ..
    Enjoy with plain rice & papad.U can add a tsp of sesame oil in plain rice for additional taste.

    Kazhani kulambu         

    NOTE
    • Please grind the powder in a coarse form to get the kuzhambu in  watery consistency.If u grind it fine , u’ll get a  thick gravy. Please make it the way u want the gravy to be.
    • Hing should be twice here. One time in raw and another time while roasting.
    • Dont forget to add a pinch of tamarind. No need to soak & extract.. it will dissolve in the gravy.If u have the ready made paste , just add a drop of it.
    Continue Reading...


    March 21, 2011

    OATS BUTTERMILK PORRIDGE | OATS KANJI

    I think most of  u know and  make this porridge .U all may wonder if i say this is the first time i am making this .Yes, for the first time i prepared this quick , delicious porridge and enjoyed for breakfast today.I got this recipe from a blog , made some additions and relished with pickle Tongue out
    Oats kanji

    INGREDIENTS
    1 cup - 200ml
    • QUAKER OATS – 1 /2 CUP
    • Butter milk –2 cups or half cup of sour curd
    • Water & Salt – As needed
    To temper :
    • Oil – 1 tsp
    • Mustard seeds – 1 tsp
    • Urad dal – 1 tsp
    • Red chilly – 1 no ( Pinched into two )
    • Curry leaves – a few
    • Asafetida – 2 pinches
    • Ginger – a small piece ( finely chopped)
    Coriander leaves –Little ( chopped )
    METHOD
    • Soak the oats in water for 15 mins . This step is purely optional.
    • Pressure cook the oats till one whistle.Mash it well with a ladle.
    • Now add the buttermilk and salt. ( Add less buttermilk if it is too sour)
    • Temper all the items given above and add it to the oats mixture.
    • Mix well.Garnish with coriander leaves.

    TIPS
    • If u feel the porridge is too sour, add milk or water to reduce the sourness and adjust the salt accordingly .
    • U can add finely chopped raw mango pieces to get a nice flavor and taste. 
    Continue Reading...


    March 15, 2011

    BADAM KHEER / ALMOND KHEER

    I wanted to try this kheer for a long time.Yesterday I prepared this for my hubby,. I refrigerated the kheer ,thawed & had it .So it was slightly warm not very cool.The taste was awesome. We loved it..I referred so many blogs for the recipe and finally came out with my version.Picture dint come out good.
    Badam kheer 1

    INGREDIENTS
    • Almond – 12 nos (**Blanched)
    • Milk – 1/2 litre ( I used low fat milk )
    • Sugar – 3 - 4 tbsp
    • Hot Water – 1/2 cup ( to soak almonds)
    • Saffron threads – A few (soak in little warm water before use )
    • Cardamom powder – 1/2 tsp ( Optional. I used it )
    METHOD
    • Soak almonds in hot water for 10-15 mins.
    • The skin comes out easily. Peel the skin and blanch the almonds.
    • Grind it to a smooth paste adding little milk.
    • In  a broad pan, heat the milk. When the milk starts to boil, add the almond paste and simmer the flame.
    • The milk has to boil for 10-15 mins  in very low flame and the quantity gets reduced .
    • By this time, the raw smell of almond also disappears and  milk gets thickened slightly.
    • Now add the required sugar and mix well.
    • Allow it to boil for 5 mins.
    • Finally add the saffron milk. The color of the kheer gets changed .
    • Add cardamom powder if necessary.
    Refrigerate & serve chill or enjoy it warm. The choice is urs !!

    Continue Reading...


    March 11, 2011

    VEGETABLE PYAZ MASALA / KAIKARI VENGAAYA MASALA

    I tried this from Mallika badrinath’s cookbook.We had with chapathi / Roti. It was very nice. It got a similar taste of mixed vegetable masala in restaurants. Try this for ur guests.. I am sure they’ll enjoy it.

    Vegetable pyaz masala 2

    INGREDIENTS
    1 cup - 250ml
    • Potato – 3 nos (medium sized)
    • Carrot – 2 nos
    • Peas – 1/2 cup
    • Big onion – 2  nos (slice cut)
    • Salt  & oil – As needed.
    To grind
    • Tomato – 2 nos
    • Big onion – 2 nos
    • Grated coconut – 1/4 cup
    • Green chilly – 3 nos ( Saute in little oil ..Please increase the number of green chilly if u want spicy gravy. The original recipe calls for 5nos )
    • Coriander seeds – 1/2 tbsp
    • Jeera / cumin seeds – 1 tsp
    • Pepper – 5  nos ( dry roast in a kadai separately)
    • Cinnamon – 1 inch piece
    • Cardamom – 1 no
    • Cloves – 2 nos
    • Ginger – A small piece.
    • Khus khus – 1/2 tbsp
    To garnish
    • Chopped Curry & coriander leaves – Few
    METHOD
    • Chop all the vegetables and pressure cook for 1 whistle. ( vegetables should not be mushy )
    • Slice cut onions and keep aside.
    • Now grind all the items given under “to grind” to a smooth paste adding required water.
    • In a kadai , add  1tbsp of oil and saute the sliced onions.
    • Add the ground masala & cooked vegetables.
    • Add the required water , salt and simmer the flame.
    • Let the gravy boils for 10- 15 mins to ooze out the raw smell of the ground masala.
    • Add water if necessary & stir in between. After sometime u get a nice smell and the gravy gets thickened.
    • Remove and serve hot garnished with curry leaves & coriander leaves.
    We relished with chapathi ..

    Vegetable pyaz masala 1

    Continue Reading...


    March 8, 2011

    Carrot Puttu Recipe

    Carrot puttu

    We make this carrot puttu as side dish for sambar rice. Sambar Sadam , Carrot puttu & appalam (papad) is a divine combination.. I learnt this recipe from my mom. Its very easy to prepare. Try this for kids. I am sure they’ll love it. Its always better to eat the carrots raw to get the complete nutrition . If not possible, its good to steam to retain the nutrition. Here I ‘ve steamed the carrot. So I feel this side dish is good for growing children who doesn’t eat raw carrot.


    INGREDIENTS
    • Carrot – 3 nos ( Grated)
    • Big onion – 1 no (Finely chopped)
    • Green chilly – 1 no ( slit into 2 )
    • Grated coconut – 2 tbsp (optional)
    • Salt – As needed.
    To Temper :
    • Mustard seeds – 1/2 tsp
    • Urad dal – 1/2 tsp
    • Curry leaves – Few
    HOW TO MAKE CARROT PUTTU - METHOD :
    • Grate the carrot. Spread the grated carrot in the idly plate and steam it for 10 –15 mins in idli pot.( This method retains the nutrition in carrot )
    • Finely chop the onions and slit cut the green chillies.
    • Now in a kadai , add oil and temper the items given above .
    • Add the onions & chillies . Saute till onion turns transparent.
    • Now add the steamed carrot , salt and toss well.
    • Keep in low flame for sometime by tossing in between.
    • Now add the grated coconut, stir for sometime and switch off the flame.
    Yummy carrot puttu is ready to go with sambar rice !!
    Continue Reading...


    March 4, 2011

    TOMATO THOKKU FOR IDLI, DOSA

    TOMATO THOKKU

    This is a tasty side dish for idli dosa.Whenever I have ripe tomatoes in my hand, the first side dish that comes to my mind is this tomato thokku. I learnt this from my mom. Very easy to prepare . U can try this for chapathi too. Ideal side dish for trip / travel .

    INGREDIENTS :
    • Ripe tomatoes – 1/4 kg
    • Big onion – 2 nos (finely chopped )
    • Tamarind – 1 small piece ( Optional )
    • Red chilly powder – 1.5 - 2 tsp
    • Turmeric powder – 1/4 tsp
    • Salt & water – As needed
    To temper :
    • Oil – 1 tbsp
    • Mustard seeds – 1/2 tsp
    • Urad dal – 1 tsp
    • Channa dal – 1tsp
    • Curry leaves – A few
    Coriander leaves – To garnish
    METHOD :
    • Cube cut tomatoes and finely chop the onions.
    • In a kadai,add oil and temper the items given above. 
    • Now add the onions and saute till transparent.
    • Then add the tomato pieces and saute till it becomes mushy.
    • Add the turmeric & red chilly powder along with salt.
    • Mix well and add the required water to cook. Cover with a lid.
    • After sometime ,check whether the onion & tomato gets cooked.
    • Once the mixture thickens, add the coriander leaves and serve hot..
    Tastes divine with hot idlies ;)
    tOMATO THOKKU WITH IDLY

    Continue Reading...


    March 1, 2011

    Kathirikai Podi Curry / Brinjal Podi Curry / Eggplant Podi Curry

    Today's recipe is one of my most favorite side dish for rice. Yes, its brinjal podi curry which we call as Kathirikai podi curry in Tamil. Its a no onion, no garlic recipe. Its a popular poriyal recipe in Tamil nadu. This is my mom’s special recipe too. It goes well with More kuzhambu and Rasam rice. I can have with plain rice as well. The flavor of freshly ground spice powder coated over the perfectly cooked and roasted brinjal make this dish loved ny everyone. Friends, you too try this kathirikai podi curry recipe and share your feedback with me :) .

    KATHRIKAI PODI CURRY

    INGREDIENTS 
    • Small brinjal – 7 nos ( Choose small brinjal for best taste)
    • Salt and water – As needed.
    To roast & grind :
    • Cooking Oil – 1 tsp
    • Coriander seeds – 1.5 tsp
    • Chana dal – 1 tbsp
    • Red chilly – 4 nos (use 3 for less spice)
    • Grated coconut – 2 tbsp
    To temper:
    • Gingely Oil / Sesame oil – 2 tbsp
    • Mustard seeds – 1/4 tsp
    • Urad dal – 1/4 tsp
    • Curry leaves - Few
    METHOD :
    • Wash and cut each brinjal lengthwise into 4 pieces and soak in water to avoid change of color.
    • In a kadai , add a tsp of oil and roast the coriander seeds, chana dal, red chillies till golden in color. Keep the flame low. 
    • In the same kadai add the grated coconut and roast for a minute. If you are using coconut pieces, you can roast it along with dals and red chillies. Make sure you don't burn anything. 
    • Grind all the roasted items to a coarse powder. ( not too fine or too coarse )
    • Now in a kadai add gingely oil , temper the mustards & urad dal . Add the brinjal pieces . Saute till the brinjal is cooked soft but retains the shape. Do not add water, keep the flame low and cover cook the brinjal till its skin shrinks and cooks well. 
    • It takes nearly 10 to 15 minutes in very low flame based on the size of brinjal. Cover the kadai with a lid. Open in the middle and stir it whenever needed. Make sure brinjal doesn't get burnt.  
    • Lastly add the roasted powder , salt and mix well for few minutes in low to medium flame. Make sure the brinjal pieces don't break. Swicth off the flame.  
    • Poriyal is ready to serve hot !!
    We enjoyed with my mom’s more kuzhambu :)

    KATHRIKAI PODI CURRY 1

    NOTE 

    As we cook the brinjal , its shrinks in size but the color is retained. My mom makes this curry in other way too.She slit cut the brinjal into 4 pieces , stuff this podi , use lot of oil and saute it till brinjal gets cooked in oil. Since this method consumes more oil and also the color of the brinjal turns black , we avoid making this way. For kids , you can try this method..
    Continue Reading...


    February 23, 2011

    PHIRNI RECIPE – MILK PUDDING USING RICE FLOUR

    Phirni

    PHIRNI, a famous North Indian dessert is usually made with rice soaked & grind to a smooth paste. For a change I tried with rice flour suggested by MB in her cookbook. Its very easy to make and tasted great . Its a very good replacement for Payasam.

    Usually Phirni looks thick. I made it little thin as per our taste. Please make it as you like. I have updated this recipe as per the suggestions given by an anonymous reader. If you want to make badam phirni, soak few badams in water , blanch & chop them finely. Add the chopped badam at the end after switching off the flame. I used badam just to garnish.

    INGREDIENTS :
    • Milk – 1/2 litre ( around 2 cups )
    • Rice flour – 3/4 tbsp
    • Sugar – 1/2 cup
    • Cardamom powder – 1/4 tsp
    • Cashewnuts , pista & badam – Few (finely chopped)
    • Rose water  or kewara - 1/2 tsp (for additional flavor , I dint use)
    METHOD :
    • Mix rice flour in 1/2 cup of milk and without forming any lumps.
    • Heat rest of the milk in a heavy vessel.
    • When it starts to boil, add the rice flour paste and cook stirring constantly.
    • It takes nearly 15-20 minutes to thicken. Keep the flame medium low - high to avoid spilling. Stir now & then..
    • When the milk becomes thick add sugar & switch off the flame..
    • Stir well till the sugar dissolves completely. Check for sweetness .
    • Mix cardamom powder , rose water & chill in refrigerator (* Do not freeze )
    Serve in small cups with fried nuts on top !!
    NOTES :
    • I made it slightly thin. Add milk if you want more diluted. Adjust sugar accordingly.
    • Thickening time of milk may vary according to the heat. 
    • U can add saffron soaked in warm milk instead of cardamom powder & name it as “ kesar phirni “. 
    • We can use fine chiroti rawa for thickening of milk instead of rice flour.

    Phirni collage
    Continue Reading...


    February 17, 2011

    GOOSEBERRY PICKLE/ NELLIKAI OORGAI


    Though i have posted some pickles from my MIL’s hand , I feel this post is somewhat special as i made it on my own using less oil for first time.The result was completely satisfactory.Click here to see another healthy , quick side dish  for rice using gooseberry if u r interested..


    gooseberry pickle


    INGREDIENTS

    • Big gooseberry  - 12 nos
    • Red chillies – 8 –10 nos (Long variety , adjust )
    • Turmeric powder – 1/4 tsp
    • Asafetida / hing – 1/4 tsp
    To dry roast
    • Methi seeds – 1 tsp
    • Cooking oil – 1.5 tbsp
    • Mustard seeds –1 tsp
    • Urad dal – 1/2 tsp
    To temper
    Sesame oil – 1 tbsp
    METHOD
    • Dry roast methi seeds in a kadai till it turns brown with a nice aroma.Powder it along with asafetida and turmeric powder.Set aside.
    • Grind the red chillies to a coarse powder. Keep aside.
    • In a pressure cooker or in an idly pot ,steam cook the whole big gooseberries without adding water.After it cools down ,cut the gooseberry into bite sized pieces .( It will come off easily when u press it with ur fingers.)
    • Then in a wide mouthed kadai add a tbsp of oil and temper the items given above.Add the gooseberry pieces and the coarse red chilly powder.
    • Mix well for few minutes till raw smell disappears.Add the salt and toss well.
    • After sometime , add the ground methi seeds mixture and mix well .
    • Make sure everything gets combined well.
    • Keep in medium flame for 2-3 minutes .Finally add the sesame oil , mix well.
    • Switch off the flame. Let the pickle cool down .
    • Transfer it to an air tight container.
    • Tastes best the next day !!
    Enjoy with curd rice !!

    Continue Reading...