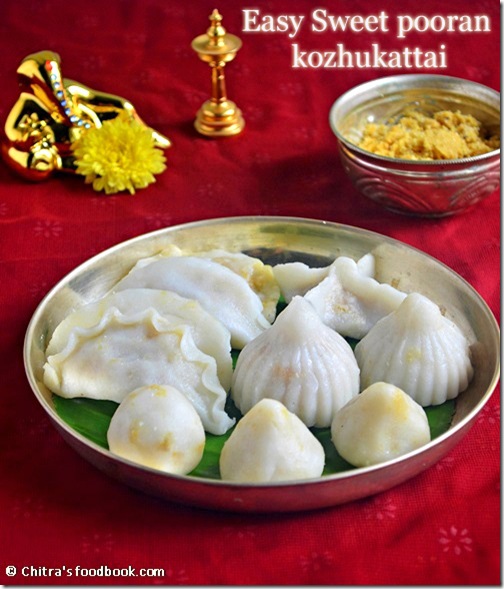
Last year i posted 3 varieties of kozhukattai recipes with tips for crack free kozhukattaiafter Ganesh chaturthi. This year i wanted to post some ganesh chaturthi special recipes in advance. I was asking my MIL for some kozhukattai varieties which can be done easily. She suggested this easy , no cook sweet pooranam recipe with pottukadalai.
We make this kind of stuffing for sweet samosa/Karjikai. This pottukadalai pooranam kozhukattai is ideal for beginners in cooking. Without any delay , I tried it on the same day and I made the kozhukattai in the next 15 minutes. I was so happy with result. It was tasting great. Thanks to my MIL for teaching me this yummy n easy kozhukattai recipe. Do check out this VIDEOfor making kozhukattai dough & shaping modak.
Please click HEREto know Ganesh chaturthi Celebration Procedures & this LINK for Ganesh chaturthi recipes collection with Video
Here comes the recipe of easy sweet pooran kozhukattai
INGREDIENTS
Prep time for dough – 5 minutes
Prep time for pooranam – 2 minutes 1 cup - 240ml
FOR OUTER COVERING/DOUGH
Rice flour / kozhukattai flour or idiyappam flour – 1 cup
Water - 1.5 cup ( approx) (may be 1 – 1.5 tbsp less)
Salt – as needed
Gingely oil – 1 tsp
For pooranam/stuffing
Fried gram dal/Pottukadalai – 1/4 cup
Grated coconut – 1/4 cup ( Add 2 tbsp if you want less coconut)
Grated jaggery – 1/4 cup (adjust )
Cardamom – 3 nos (or) 1/2 tsp powder
METHOD
FOR POTTUKADALAI POORANAM
In a mixie jar grind all the ingredients given under “ for pooranam/stuffing “ to make a semi dry paste without adding water. Remove and set aside. Pooranam is ready !
In a bowl , boil water till it starts to roll boil well. Add this water little by little to the rice flour and mix well with a ladle. When the dough becomes warm , knead it well to make a non-sticky ball.
Cover the dough with a wet cloth till use. Make small lemon sized balls out of the dough. Grease your hands with oil and make a cup shape with the dough ( U can also use a mould) , keep 2 tsp of pooranam and close it to make a coconut shape or half moon shape.Grease the idli plate with little oil and keep the arrange the dumplings/kozhukattai.
Heat water in an idli pot.When the water starts roll boiling , keep the idli plate arranged with kozhukattai and Steam it for 10 minutes.When the kozhukattai becomes shiny and slightly turns its color , its done. Do not remove immediately.Remove after a minute when it becomes warm using a flat spoon..
Enjoy eating hot !!
TIPS FOR CRACK FREE KOZHUKATTAI
Use good quality rice flour. If u r planning to make by grinding rice, buy raw rice ( in tamil nadu we call as “maavu arisi) ie. the rice used for making rice flour..Its a different quality , not the one we use for pongal.It is cheaper in cost too..
I used store bought rice flour - Idiyappam flour or Kozhukattai maavu. I always add 1.5 cups of water and a tsp of oil for making dough. For home made rice flour , more water may be needed. ie around 1.5-2 cups..
Always add the required water while making the dough.If the dough becomes sticky or dry , modak will get cracks. Keep the unused dough covered with a wet cloth & then with a lid while u make mothagam.
Its always better to prepare the outer covering after making pooranams/ stuffings to prevent the dough sitting for long time.
U can refrigerate the unused dough be keeping in an air tight box & use the next day or the same evening.
Pooranam can be prepared the previous day and refrigerated.
Apply sesame/gingely oil in ur hands every time when u make the shape.
Last but not the least , do not cook the kozhukattai in idli pot for long time which may lead to cracks.( maximum of 8-10 mins is enough)
Always place the idli plate arranged with kozhukattai after the water in the idli pot starts roll boiling.. This helps for quick cooking & also the kozhukattai remains white in color and crack free..
U can identify the cooked kozhukattai by its shining look. Always remove the kozhukattai after it becomes warm. Do not remove when it is hot. Kozhukattai may break.
Please click HEREto know Ganesh chaturthi Celebration Procedures & this LINK for Ganesh chaturthi recipes collection with Video.
As you all know, Chilli paneer is an Indo-Chinese recipe which has got an awesome blend of Indian & Chinese ingredients. I made this for my daughter’s lunch along with fried rice. She liked it a lot. I usually makegobi 65 and very rarely I make deep fried paneer recipes. But after trying this, I thought to prepare this very often in my kitchen. Its a great side dish for fried rice & dal rice. My daughter relished it with tomato sauce. U can have this as evening snack or as a starter recipe for lunch/dinner. Do try this for your kids , they’ll love it a lot.
Soak paneer pieces in hot water for sometime. In a wide bowl , take the flour , g&g paste , salt & pepper powder. Add little water to make a thick batter. Drain all the water completely and then add the paneer cubes & make sure the batter coats the paneer pieces very well. Leave it aside.
In a kadai , heat oil and saute the onions, green chillies and garlic. Now add all the tomato sauce, soya sauce, salt & mix well. Lastly add the capsicum pieces & saute for a minute. Capsicum should be crunchy. So don’t saute too much. Add the pepper powder.
At the same time deep fry the paneer pieces & add them immediately to the above sauteed mixture & toss well for few seconds. By doing this way paneer pieces can retain its crispness for sometime while eating. ( For more crispness , deep fry paneer pieces twice before adding to the onion mixture (i.e first deep fry the paneer pieces &set aside. After it becomes warm again deep fry & add them to the sauteed mixture ) I got this tip from a road side chaat shop )
Serve immediately.Enjoy eating hot with fried rice or as starter !
I got this Chettinad paruppu urundai kuzhambu recipe from Aval vikatan’s supplementary. It is also known as Kola urundai kuzhambu. This recipe was given by “Mrs. Revathy shanmugam”. So I tried it confidently. I had already tried milagu kuzhambu/pepper kuzhambu from that book and it was a hit in my home. Usually paruppu urundai kuzhambu is made by cooking lentil balls in tamarind sauce adding sambar powder and other spices. This recipe is also very similar but it has chettinad touch. I’ve used soambu/saunf/ fennel seeds here.
In Chettinad, people call this paruppu urundai as veg kola urundai. For variations, you can always omit the saunf, use cumin seeds and try it. There will not be much difference in taste & flavor. We loved the urundai a lot. It was soft yet firm. This gravy tastes great when mixed with plain rice adding ghee. I made the gravy slightly thick. Adjust the consistency as per your need.. Do try and let me know how you liked it. Here is my Iyengar style paruppu urundai kulambu.
Wash & soak the dal for 2 hours. Drain all the water & set aside.
In a mixie jar, grind the red chillies, hing, salt, saunf or cumin seeeds & coconut coarsely. Now add the dal & grind it to a coarse, thick paste without adding water.
Grind Coconut, fennel seeds, big onion to a smooth paste and set aside.
To that paste , add finely chopped onions , garlic cloves , curry leaves, rice flour and coriander leaves. Add a pinch of cookings soda. Mix well and make big gooseberry sized balls out of it. You can either steam the balls in an idli plate for 15 minutes OR you can cook in the tamarind extract as I did. Beginners please choose the steaming method. If you steaming the balls in idli plate, you should add it the end i.e after adding ground coconut paste.
In a kadai , heat oil and splutter mustard seeds ,methi seeds , jeera. Then add the finely chopped garlic cloves & onions. Saute well for a minute. Now add the chopped tomatoes & saute till mushy. Add turmeric & sambar powder. Mix well , boil for a minute in low flame.
Then add the tamarind extract , salt with 2 cups of water.Allow it to roll boil for 5 minutes. Now drop the lentil balls one by one into the gravy. Do not stir immediately. Let the gravy boil for 2-3 minutes in low flame. Now stir the gravy carefully so that the balls are not broken.
Cover & cook it in medium flame for 5-8 minutes till the balls get cooked & float on top.Take a ball, break it & see whether it is cooked completely. Now add the ground coconut paste , stir well & allow it to boil for 5 minutes. This gravy thickens as time proceeds. So add water accordingly..
Transfer to the serving bowl & enjoy with plain rice adding a drop of ghee !
NOTE
For variations, you can add 1/4 tsp of jeera instead of fennel seeds while grinding along with coconut.
Beginners who dont want to cook the lentil balls directly in the tamarind sauce can steam the balls in an idli pot and add them at the end.
Last month when i went for grocery purchase , i happened to see this recipe in quaker oats packet.I memorized the recipe & came home ..But i couldn’t try immediately.Yesterday,suddenly i reminded about this & tried with the recipe i had in my mind vaguely.I am not sure whether this is the exact recipe given in the packet.But it came out very flavourful , yummy & tasty.So i thought of posting here.Addition of oats made it more healthy.Do check out my Neer more/spiced buttermilk recipe in interested.
INGREDIENTS 1 cup - 200ml
Instant oats – 1/4 cup
Thick curd – 1 cup
Water – 3 - 4 cups ( add more if needed)
Roasted jeera powder – 1/4 tsp
Salt – as needed
To grind
Ginger – 1 inch piece
Mint leaves & coriander leaves – 2 tbsp (together)
Green chilli – 1-2 nos
To temper
Mustard seeds – 1/2 tsp
Coriander leaves – to garnish
METHOD
Grind all the ingredients given under “to grind “ to a smooth paste adding required water.Dry roast oats for 2-3 minutes & powder well.
In a wide bowl,take the powdered oats , curd , salt , ground paste , jeera powder and water. Mix it well with a whisk..Temper mustard seeds ..
Garnish with coriander leaves if desired ! Serve chilled !
Note
For variations u can use either coriander leaves or mint leaves alone for grinding.
Adjust the amount of curd & water as per ur liking.
U can also add more chillies if u want it more spicy.
Uppu seedai / Uppu Cheedai / Salt seedai is the most important prasadam for Gokulashtami. People in Tamil nadu never fail to make this for Krishna Jayanthi festival. Many people especially beginners worry about bursting of seedai. So I have shared all the possible tips and tricks to avoid bursting. I have given my MIL’s traditional recipe of making uppu cheedai with homemade processed rice flour and urad dal flour. I follow this recipe every year. It comes out very well without bursting. Along with the normal round seedai we also make 2 small rod shaped “Seepankuzhal” for baby krishna. Do refer my fail proof sweet seedairecipe too !
I know seedai must be the favorite snack for everyone just like murukku. Yes, Uppu cheedai / salt seedai is my family's favorite snacks. Whenever we visit Adayar Anandha Bhavan hotel, we buy a packet of seedai without fail. I am trying to make white colored seedai just like shops. I will share that recipe once I get it right.
Friends, do try this easy uppu seedai recipe for Gokulashtami or during weekends for your kids. Do not worry about bursting. Just follow this recipe and make perfect seedai.
Watch out the full detailed video recipe for uppu seedai making with homemade processed flour and roasted urad dal flour preparations before you start. Hope you will find it useful :) Lets see how to make this Gokulashtami special recipe uppu seedai with step by step photos and video !
If you want to make seedai using store bought rice flour, please check THIS POST !
Uppu seedai - Video recipe
Uppu seedai recipe / Salt seedai
Uppu seedai recipe / Salt seedai for Gokulashtami / Krishna jayanthi festival
Grind the grated coconut in a dry mixie jar and make a powder.
If you are using homemade rice flour, first you should dry roast the flour for few minutes in low flame till vapour starts to come. Its a must & should step to get seedai without bursting.
Take the roasted rice flour and urad flour in a bowl. Sieve once or twice. Add sesame seeds, hing and ground coconut powder. Lastly add the butter and blend it well with the flour using your fingers. Do not give too much of pressure to the flour.
Add water and make a non-sticky dough. Make sure there are no cracks. Roll the dough into small balls roughly in a paper or cloth. Do not roll very tightly. Use first three fingers to make balls.
Allow the balls to dry for 15 to 20 minutes before frying. Heat oil in a kadai and deep fry them in batches in medium flame. Keep tossing the seedai to get a uniform color.
Remove when all the bubbles cease. Store in a box after it cools down. Stays good for a week.
NOTE - TIPS AND TRICKS TO AVOID BURSTING OF SEEDAI
Dry roast the wet rice flour for few minutes slightly if you are using homemade processed rice flour.
First important thing to avoid bursting is to “SIEVE” the flour once or twice. U should sieve all the flour ( urad dal flour , rice flour and fried gram flour if u use). Sieving the flour properly reduces 90% of bursting.
Secondly u should not roll the seedai very tightly. U should roll it to a loose ball using three fingers. No problem if its not a proper round.
Dry the seedai in a paper or towel for 30 minutes before frying. If you want to deep fry immediately, prick the seedai with a small needle to avoid bursting. Most of the time pricking may not be necessary because by the time you finish rolling all the seedai, it would have dried.
Beginners can try deep frying few seedai in “small tempering kadai” . If it comes out well , proceed in a big kadai. Color variations may be there slightly. But you can check whether it bursts or disperses in oil..
If this seedai breaks or dissolves in oil, it means fat ( ghee / butter) content may be more or oil temperature is too high or too low.
If seedai bubbles too much after you drop into oil , it shows the ghee or butter or oil content is more. So add more rice flour to the dough and make again.
The color of seedai depends on the color of urad dal flour. If you roast the dal to golden brown, seedai will also turn brown.
Uniform heating is also important. In my observation, low to medium flame is sufficient to get a well cooked, nice color seedai. Keep tossing every now and then.
Vella Seedai / Sweet Seedai recipe with jaggery ( updated with video and step by step photo) is a must and should neivedyam recipe for Gokulashtami in Tamil nadu houses. I never knew about vella seedai till my marriage and now this has become my favourite. Every year I follow my MIL’s traditional and authentic recipe for vella cheedai and uppu cheedai using homemade rice flour. It comes out very well without bursting.
Please refer the “Note” section for tips to avoid bursting. Usually we make the size of this sweet seedai bigger than uppu seedai. We also make 2 “Seepaankuzhal “ (small rod shaped) in each variety which is specially meant for baby Krishna. I give this to my daughter every year. Every year I make seedai with homemade processed rice flour . This year , for a change I tried with store bought rice flour which I use for making idiyappam. I followed same recipe for both and I didn't find any big difference in taste and color. Deep frying part is important to get a nice color and uniform browning. I have given in detail under “Method”. But cracks are unavoidable.
First picture is with home made rice flour and the second one with store bought rice flour . I have made a full video on how to make vella cheedai just for beginners. Please watch it before you start doing. Hope you find it useful :)
In a pan dry roast the flour till vapor comes out lightly. Do it in low to medium flame. Do not over roast the flour. Sieve and set aside.
In a bowl , take 1 cup of roasted rice flour and 2 tsp of urad dal flour. Sieve them once or twice. (This step is very important to avoid bursting) . Grind the grated coconut finely to a coarse powder.
In a pan take the grated jaggery & add little water to cover it. Heat & melt it to make a thin syrup. No need to boil it. Remove & filter the syrup to discard the impurities.
Strain & add this syrup to the flour , cardamom powder, sesame seeds & grated coconut, softened butter. Mix well to make a dough. Make sure the dough should be not be sticky. It should not have cracks. It should be thick. Add syrup accordingly. Sometimes syrup itself would be sufficient to make the dough OR you may have to add little extra water to make the dough.
Make small balls out of the dough. Prick the balls with a needle or toothpick to avoid bursting. This is for additional safety. Allow the balls to dry in a cotton cloth or paper for 15-20 mins before frying.
Before deep frying check the heat of oil by dropping a pinch of dough. If it rises immediately, oil temperature is just right. Lower the flame to low & drop the seedai 4 to 5 at a time.
After you drop the seedai , do not disturb it for few seconds.( stand 2 feet away from the kadai for safety, luckily it didn’t burst for me so far). If you start to stir immediately, seedai may break and dissolve in oil. After few seconds, turn it once to prevent sticking. (For beginners, try to fry one or two seedai with little oil in a mini tadka kadai to check if it disperse or burst. Then you make in large batches.)
Always deep fry in low to medium flame to get a nice color. Keeping the flame high turns the seedai black & inside portion will not be cooked properly. U don’t have to wait till all the bubbles cease. Once the seedai turns golden brown, remove & drain in a tissue paper. Cracks are normal in vella seedai. Don’t worry.
Initially sweet seedai tends to be soft, but it hardens & becomes crispy when it cools down.
Crunchy Sweet seedai is ready !
NOTE
First important thing to avoid bursting is to “SIEVE” the flour once or twice. U should sieve all the flour ( urad dal flour , rice flour & gram flour if u use). Sieving the flour properly reduces 90% of bursting..
U must roast the flour slightly for few minutes in low flame if you are using homemade rice flour.
Secondly u should not roll the seedai very tightly. U should roll it to a loose ball using three fingers.No problem if its not a proper round.
One more tip is to prick the seedai with a small needle or toothpick to avoid bursting. Dry the seedai in a paper or towel for 20 mins before frying..
Beginners can try deep frying few seedai in “small tempering kadai” . If it comes out well, proceed in a big kadai. Color variations may be there slightly. But you can check whether it bursts or disperses in oil.
If sweet seedai breaks or dissolves in oil, it means jaggery may be more or oil temperature is too high or too low.
If Seedai bubbles too much after you drop into oil, it shows the fat ( ghee or butter or oil) content is more. So add more rice flour to the dough & make again.
The color of seedai depends on the color of urad dal flour. If you roast the dal to golden brown, seedai will also turn brown.
Uniform heating is also important. In my observation, I feel low to medium flame is enough to get a nice color and crispy seedai.
This is an instant version of Nei appam recipe (ghee appam). Traditionally nei appam is prepared using raw rice and jaggery. Usually I make sweet appam using wheat flour & banana in paniyaram pan. My MIL also makes an sweet paniyaram using raw ricewhich is our family favourite. But I wanted to try a quick sweet appam recipe without soaking rice and without banana. Yes this sweet appam is prepared without banana but still it comes out soft and spongy.
This recipe uses rice flour, wheat flour, jaggery and rava/sooji. When I was going through my cook books, I got this recipe given by Mrs. Mallika badrinath. I tried the recipe as such but I was not happy with the result. It came out crispy & tasty but it looked dry & a bit hard. So I just added little cooking soda & it made a great change to the recipe. It came out super soft n fluffy with crispy outer layer. I was very happy & thought of blogging it for gokulashtami and Karthigai deepam festival.
With superb flavor of ghee, it was awesome. If you are ghee conscious like me, use cooking oil or gingely oil for frying. It tasted good for both. I used paniyaram pan for shallow frying. U can also try deep frying it looks like chettinad vellai paniyaram with flower edges. U can see that picture in step by step pictures. Friends, do try this easy, instant nei appam recipe for krishna jayanthi & Karthigai deepam and let me know your feedback.
Fine Rava or Upma Rava/ sooji – 1/2 cup ( use fine rava for nice texture)
Wheat flour OR Maida – 1/3 cup
Grated jaggery – 3/4 cup
Grated coconut – 3 tbsp
Cardamom powder – 1/4 tsp
Cooking soda / Baking soda – 1/4 tsp
Salt – a pinch
Cooking oil or ghee – As needed
Water –As needed ( I used 1 cup water)
HOW TO MAKE INSTANT NEI APPAM
In a wide bowl , take all the ingredients mentioned above except cooking soda & mix well adding required water.The consistency of batter should be semi thick & pourable. (If the jaggery has impurities, you should boil and melt it adding 1:2 ratio of water and jaggery. Then strain it through a metal filter and add that water to the mixture.)
Add cooking soda 10 minutes before making appam. Mix well and let it sit.
In a paniyaram pan , add 1 tsp of ghee in each hole & pour the batter. Cover cook for few minutes in low to medium flame. Flip it using a spoon or a small stick like thing. Cook again for few minutes till you get a nice golden brown color.
If u want to deep fry , heat a pan with little oil & pour the batter using a small ladle. Deep fry one by one to get a nice shape.Splash the oil over the appam while it cooks to get a nice flower shape with frills in the sides.
Remove & serve hot or cold.
Note
Consistency of batter is important. It should not be too thick or thin.
U can also use cooking oil instead of ghee. I used ghee for my daughter & oil for ourselves. But add it generously.
Always cook in medium flame else it will be burnt. I felt the color of appam turned darker for ghee than oil.
This appam stays soft for long time. It tastes crispy when hot & soft when cold..
If you want to skip baking soda, you have to add 1 ripen mashed banana OR you should mix the batter in the morning and make appam in the evening so that batter gets fermented.
If you want the appam to be crispy, cook in low flame for long time. You can also try skipping soda. But you should eat the appam really hot otherwise it will look dry.