Search Chitra's Food Book

September 11, 2013

CURRY LEAVES KUZHAMBU | KARUVEPPILAI KULAMBU – LUNCH RECIPES

Curry leaves kuzhambu

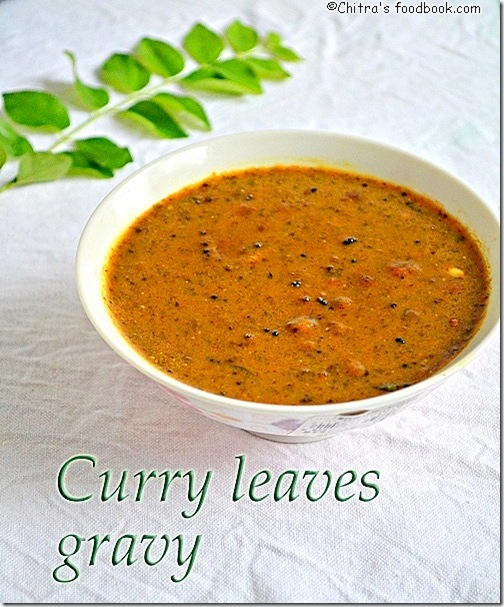
Curry leaves kuzhambu / Karuveppilai Kulambu is a very healthy and tasy kuzhambu recipe that tastes great with plain rice adding sesame oil. My in-laws were with me for the past 15 days.We had a nice time together. I tried some interesting and tasty kuzhambu, poriyal varieties by asking my MIL. I wanted to have a record of all those recipes. So I have planned to post them in this week. Let me start with this curry leaves kuzhambu /karuveppilai kulambu. Initially I used to grind the raw curry leaves and make this gravy like my MIL. Recently I started to saute the curry leaves and grind. It comes out very flavorful..

Usually the color of this kuzhambu looks blackish green. This time I used sambar powder with kashmiri chillies. So it was brownish. The color of gravy may vary depending on the sambar powder you use.. It tastes the best when done in advance. Standing time of 2-3 hours is needed to enjoy its actual taste. It stays good for two days even without refrigeration. So Bachelors can make this kulambu and have it for 2-3 days and its apt for travel too..


Do check out my curry leaves podi if interested !


Karuveppilai kulambu

INGREDIENTS
1 cup - 250ml
  • Fresh curry leaves  - 1/2 cup heaped
  • Tamarind – A lemon size
  • Turmeric powder – 1/4 tsp
  • Sambar powder – 2 tbsp
  • Pepper powder – 1 tsp
  • Salt , water – as needed
To temper
  • Cooking oil – 2 tbsp
  • Mustard seeds – 1 tsp
  • Fenugreek seeds – 1/2 tsp
  • Urad dal – 1/2 tsp
  • Jeera –1 tsp
  • Toor dal -  1.5 tsp
  • Small onion – 10 nos(finely chopped)
  • Garlic cloves – 7-8 nos  (-do-)
HOW TO MAKE CURRY LEAVES KUZHAMBU - METHOD
  • Take 1/2 cup heaped curry leaves and saute them in a tsp of oil till it shrinks little. Soak tamarind in little water. Grind curry leaves along with tamarind to a smooth paste adding required water.
curry leaves kuzhambu
curry leaves kuzhambu 
  • Transfer the ground mixture to a bowl and add 2 cups of water. Add sambar powder, turmeric powder and salt. Mix well. Check for taste.Set aside.
curry leaves kuzhambu
  • In a kadai , heat oil and temper mustard seeds , fenugreek seeds , urad dal ,jeera and toor dal..Roast them till golden brown. Next add the finely chopped small onions and garlic cloves and saute till transparent.
curry leaves kuzhambu
  • Lastly add the tamarind mixture and allow it to roll boil in medium flame for 10 –15 minutes till oil starts to float on top and gravy thickens. Add water in the middle if necessary..
curry leaves kuzhambu
  • Before switching off the flame add pepper powder, mix well and transfer to a serving bowl. Close it with a lid to retain its aroma.The gravy thickens when time proceeds.
Mix with plain rice adding gingely oil and enjoy !!

NOTE
  • My MIL usually says the amount of curry leaves and tamarind should be equal. If you add more curry leaves , gravy gets a raw smell. If you add more tamarind , gravy tastes more tangy. So balance them and add.
  • U can also grind the raw curry leaves without sautéing in oil if you have fresh , flavorful curry leaves in hand. I saute and grind because the curry leaves I get here are mostly dry and flavorless .
  • Allow the kulambu to boil well for 10-15 minutes for all the raw smell to leave.
  • This gravy tastes the best the next day. So I make them in more quantity, refrigerate it and enjoy for two days. It stay good for two days even without refrigeration..
Technorati Tags: ,,,,,,,,,
Continue Reading...


September 10, 2013

Soya Chunks Kurma For Rice, Roti - Meal Maker Gravy - Soya Chunks Recipes

Meal maker kurma

Hi friends, hope you all celebrated Ganesh chaturthi very well. We too had a great celebration with my in-laws :)  and back to routine.

I got this soya chunks kurma recipe ( meal maker gravy) from a magazine. It was mentioned that this gravy can be had with dosa , appam , roti and rice. Basically I love soya chunks/meal maker a lot. My Mom used to add them in biryani & kurma. But my MIL never uses it as my husband is not fond of it.
 
Though I like it very much, I couldn’t make often in my kitchen. Recently a reader in Facebook mailed me to post some soya chunks recipe for rice. As I have not yet posted any soya recipes, I really wanted to post one.. So I started searching for some recipes & finally I got this Tamil nadu style soya chunks kurma recipe from Aval vikatan. I have tried this South Indian meal maker gravy twice so far and I loved it with rice, roti and dosa.
 
Basically I like to mix kuruma kind of gravy with rice. I have already posted cauliflower gravy for rice and tiffin, my mom’s recipe very long back. This is also one such kind. Try this Soya chunks gravy and serve it as a side dish for rice, roti / chapathi and dosa !

soya chunks kurma

Soya chunks kurma / Meal maker gravy for rice and chapathi


Soya chunks kurma / Meal maker gravy for rice and chapathi

Soya chunks kurma / Meal maker gravy for rice and chapathi


Cuisine: Indian
Category: Side dish
Serves: 3
Prep time: 10 Minutes
Cook time: 20 Minutes
Total time: 30 Minutes


INGREDIENTS

  • Meal maker/soya chunks – 1 cup ( I used big chunks)
  • Big onion – 2 to 3 (use 3 if small in size)
  • Tomato – 3  
  • Green chillies – 2 to 3 (slit)
  • Red chilli powder – 1/2 tsp
  • Dhania powder – 1 tsp
  • Ginger&Garlic paste – 1/2 tsp
  • Turmeric powder – 1/4 tsp
  • Garam masala powder – 1/2 tsp (optional)
To grind
  • Grated coconut – 1/4 cup
  • Khus khus/poppy seeds – 1/2 tsp (soak in little hot water)
To saute
  • Cooking oil – 2 tbsp
  • Cinnamon – 1 no
  • Cloves – 2 nos
  • Biryani leaf - 1 no
  • Kalpasi / Black stone flower - 1
  • Coriander leaves – to garnish
HOW TO MAKE SOYA CHUNKS KURMA
  1. Wash and soak meal maker / soya chunks in hot water for 20 minutes.
  2. Grind coconut mixture to smooth paste. Set aside.
  3. Heat oil and add whole spices, onion, gg paste, green chilli and saute well.
  4. Saute tomato till mushy. Add spice powders and mix well. 
  5. Add water and cook well. Add coconut paste and some water.
  6. Squeeze the soya chunks and add to gravy. Boil well till thick.
  7. Garnish with coriander leaves and serve with rice, roti, dosa !
METHOD - STEP BY STEP PICTURES
 
  • Wash and soak meal maker in hot water for 20 minutes. It will double in size.  Squeeze the chunks and drain the excess water. Grind coconut and khus khus to a smooth paste and set aside.
soya chunks kurma
  • In a kadai, heat oil. Saute bayleaf, cinnamon and cloves. Then add g&g paste. Saute till raw smell leaves in low flame. Then add onions and slit green chillies. Saute well. Lastly add tomatoes and saute till mushy. Add turmeric powder, dhania powder,  red chilli powder, garam masala powder and salt. Mix well .
soya chunks kurma
  • Add 1 cup of water and allow the onions and tomatoes to cook. Lastly add the ground coconut paste.  Add some water to bring in gravy consistency.
soya chunks kurma
  • Boil for sometime. Squeeze the soaked soya chunks well without water and add them to the gravy. Boil for sometime. Adjust the consistency by adding water if necessary. Garnish with coriander leaves.
soya chunks kurma
Enjoy mixing with rice or as an accompaniment for idli , dosa and roti !

NOTE
  • If you want to make for chapathi, add 1/2 tsp of garam masala powder for more flavor. Otherwise it is completely optional.
  • Always soak in water and squeeze the meal maker before adding to the gravy for all the taste to incorporate.
Continue Reading...


September 7, 2013

Moong Dal Kozhukattai - Paasi Paruppu Poornam Kozhukattai Recipe

dal-kozhukattai-001
Every year we used to make pooranam with channa dal. This year I wanted to try kozhukattai with moong dal poornam. My MIL told this paasi paruppu pooranam comes out more flavourful than channa dal. So I gave a try. It was very nice & we all loved it.. I think people in Andhra makes this kind of poornam for Ganesh chaturthi.  For variations, you can also use cooked green moong dal instead of yellow moong dal. If you are really bored of making chana dal pooranam / Kadalai paruppu poornam, try this moong dal kozhukattai for a change. U’ll love it..

I wish all my friends a very happy vinayagar chaturthi.

moong dal poornam

INGREDIENTS
1 cup - 250ml
  • Rice flour -  1 cup
  • Water - 1.75 cups (water quantity varies for home made rice flour)
  • Salt – A pinch
  • Gingely oil -  1tsp
For pooran
  • Yellow moong dal – 1/4 cup
  • Grated jaggery – 1/3 cup
  • Grated coconut – 2 tbsp
  • Cardamom powder – 1/4 tsp

METHOD
  • In a pressure cooker base , dry roast the moong dal till it becomes golden brown with a nice aroma.Pressure cook it adding 1 cup of water.After the steam is released , open the cooker & mash the dal well with a ladle.
moong dal poornam kozhukattai
  • To this mashed dal , add grated coconut & jaggery and mix well till it becomes thick & leave the sides of the cooker.
moong dal poornam kozhukattai
  • U can check its consistency by making a small ball out of the stuffing. If u r able to roll a ball , consistency is just right..Keep the pooran aside and start making kozhukattai dough.
moong dal pooran tile3
  • Heat water in a bowl adding gingely oil. When the water starts to roll boil, switch off the flame. Add this water to the measured rice flour and mix well with a ladle.Make a non-sticky dough and apply sesame oil. cover it with a wet cloth till use.
moong dal poornam kozhukattai
  • Make small balls out of the dough , grease ur hands with oil and press it to make a cup shape..Keep a tsp of stuffing and close it to make a modhagam shape.
moong dal poornam kozhukattai
  • Steam in idli pot after the water starts to roll boil. Cook for 10 minutes.
moong dal kozhukattai
Kozhukattai is ready !

moong dal poornam kozhukattai


HOW TO SHAPE KOZHUKATTAI USING MOULD
  • Take the mould , grease it with oil.Close it and hold in ur left hand.
how to shape kozhukattai using mould
  • Take a dough ball and keep it inside. Press on all the sides to spread the dough.Make a dent in the center.
how to shape kozhukattai using mould
  • Keep the stuffing ball and close the kozhukattai with a small piece of dough.
how to shape kozhukattai using mould
  • Open the mould and remove the kozhukattai carefully.Proceed similarly..
how to shape kozhukattai using mould

paasi paruppu poornam kozhukattai

Continue Reading...


September 6, 2013

KOZHUKATTAI RECIPE WITH VIDEO - GANESH CHATURTHI RECIPES

PILLAYAR IDOL-001

In this post, I have shared all the videos related to Ganesh chaturthi special recipes. I should have posted this video before posting Ganesh chaturthi recipes . But I couldn’t do it. Better late than never.. Only few days are left for Ganesh chaturthi and the blogosphere is being filled with chaturthi special recipes. Hope you guys are busy in buying Ganesh idols & other things for pooja.

For people who can’t buy an idol, I have shared a video on how to make Ganesh using kozhukattai dough made by my MIL. Hope it will be interesting. My MIL usually says ganesh idol can be made in clay , turmeric powder , Rice flour dough and even cow dung. It has its own power however it is made. Always fix the eyes after you r ready with offerings/neivedyam because ganesh ji should not wait too long.. After you fix the eyes , idol gets its power & it stays for 4 hours. So make the idol on ur own by watching this video. Decorate it as per your wish. I used toothpick dipped in rangoli colors ..

I have also shared 3 basic videos on kozhukattai making.. One is for making  kozhukattai dough with water measurement. Second one is for making kozhukattai soppu/cup and the third one is about how to shape sweet modak & half moon shape with spirals.. I hope all these videos are useful..

INGREDIENTS
HOW TO MAKE KOZHUKATTAI DOUGH
(1 cup - 240ml )
  • Store bought idiyappam flour or kozhukattai flour – 1 cup
  • Water - 1.5 to 2 cups
  • Gingely oil – 1 tsp
  • Salt – as needed
METHOD
  • Heat water adding gingely oil  for 1.5 –2 minutes till it roll boils for a second. Add this water to the measured rice flour mixed with salt. Mix well with a ladle till you get a thick , non-sticky dough. Add little more hot water if you feel the dough is too dry. Then grease your hands with oil and knead well for few minutes. Make small balls and set aside. Cover the unused dough with oil & wet cloth till use..U can also make the dough by adding rice flour directly to the boiling water. Please watch the video below to see that method.
Check out this link for detailed stepwise pictures !

Check out the full video recipe for kozhukattai making


KOZHUKATTAI - 3 VARIETIES

SWEET POORANAM KOZHUKATTAI


SPICY URAD DAL POORANAM / 
ULUNDU POORANAM KOZHUKATTAI


HOW TO MAKE KOZHUKATTAI DOUGH
TRADITIONAL METHOD


HOW TO MAKE KOZHUKATTAI MAAVU 
USING STORE BOUGHT RICE FLOUR


Last but not the least ,

HOW TO MAKE GANESH USING KOZHUKATTAI DOUGH


TIPS FOR CRACK LESS KOZHUKATTAI
  1. Use good quality rice flour. If you are planning to make by grinding rice, buy raw rice ( in tamil nadu we call as “maavu arisi) ie. the rice used for making rice flour..Its a different quality , not the one we use for pongal. It is cheaper in cost too..
  2. The water quantity I have given above is for store bought idiyappam flour & Anil kozhukattai maavu. For home made processed rice flour , water quantity may vary from 1.5-1.75 cups.
  3. Always add the required water while making the dough.If the dough becomes sticky or dry , you’ll get cracks. Keep the unused dough covered with a wet cloth or a lid while u make modakam.
  4. Its always better to prepare the outer covering after making pooranams/ stuffings to prevent the dough sitting for long time.
  5. U can refrigerate the unused dough be keeping in an air tight box & use the next day or the same evening.
  6. Pooranam can be prepared the previous day and refrigerated.
  7. Apply sesame/gingely oil in ur hands every time when you make the shape.
  8. Always place the idli plate arranged with kozhukattai after the water in the idli pot starts roll boiling.. This helps for quick cooking & also the kozhukattai remains white in color and crack free..
  9. Last but not the least , do not cook the kozhukattai in idli pot for long time which may lead to cracks.( maximum of 8-10 mins is enough)
  10. U can identify the cooked kozhukattai by its shining look..Always remove the kozhukattai after it becomes warm.Do not remove when it is hot. Kozhukattai may break.
Technorati Tags: ,,,,,,,,
Continue Reading...


September 5, 2013

EASY ULUNDU KOZHUKATTAI RECIPE – GANESH CHATURTHI RECIPES

உளுந்து கொழுக்கட்டை

We usually make ulundu kozhukattai by stuffing ulundu pooranam .But my MIL makes an easy , no stuffing version too. I wanted to share this recipe for beginners to make in this Ganesh chaturthi. I couldn’t click step by step pictures . Soon i’ll update it. This method is very easy.No stuffing job is needed. So it takes less time to prepare.. This kozhukattai is not only easy to make but also a healthy , protein packed recipe. 

Do check out my Easy , no cooking sweet pooranam recipe if interested !

ulundhu kozhukattai-002


INGREDIENTS
 1 cup - 200ml
  • Rice flour – 1 cup
  • White round urad dal – 1/3 cup
  • Green chillies – 2 - 3 nos
  • Ginger – 1 inch piece
  • Hing –1/4 tsp
  • Grated coconut – 2 tbsp
  • Salt  – as needed
  • Water – 1.5 –2 cups
To temper
  • Coconut oil – 1tbsp
  • Mustard seeds – 1tsp
  • Curry leaves – few
  • Hing – A big pinch

METHOD
  • Wash n soak urad dal for 30 minutes. Drain the water & grind it along with green chillies , ginger , salt & hing to a coarse paste without adding water.Set aside
  • In a kadai , heat oil and temper mustard seeds ,curry leaves & hing. Add 1.5 – 2 cups of water & required salt. Add the ground urad dal paste and grated coconut.Allow it to boil for few minutes.
  • When the water starts to roll boil , simmer the flame and add 1 cup of rice flour and mix well to make a dough without lumps. The dough will leave the sides and thickens.
  • Remove & let it warm. Grease ur hands with oil and knead the dough.Take a lemon sized ball and pat it slightly to make it flat.
  • Arrange them in a greased idli plate & steam it for 10-15 minutes .
Remove & serve !

ulundhu kozhukattai easy copy-001


NOTE
  • Addition of coconut oil gives a nice flavor for this kozhukattai. U can also use cooking oil for tempering.. Adding hing gives a nice smell  . So add it generously..
  • Water quantity may vary.Please consider the above quantity as reference & adjust as per the flour.

ulundhu kozhukattai bite-001

Continue Reading...


September 4, 2013

EASY SWEET POORANAM KOZHUKATTAI | POTTUKADALAI POORANAM KOZHUKATTAI – GANESH CHATURTHI RECIPES

sweet kozhukattai-picture final

Last year i posted 3 varieties of kozhukattai recipes with tips for crack free kozhukattai after Ganesh chaturthi. This year i wanted to post some ganesh chaturthi special recipes in advance. I was asking my MIL for some kozhukattai varieties which can be done easily. She suggested this easy , no cook sweet pooranam recipe with pottukadalai. 

We make this kind of stuffing for sweet samosa/Karjikai. This pottukadalai pooranam kozhukattai is ideal for beginners in cooking. Without any delay , I tried it on the same day and I made the kozhukattai in the next 15 minutes. I was so happy with result. It was tasting great. Thanks to my MIL for teaching me this yummy n easy kozhukattai recipe. Do check out this VIDEO for making kozhukattai dough & shaping modak.

Please click HERE to know Ganesh chaturthi Celebration Procedures & this LINK for Ganesh chaturthi recipes collection with Video

Here comes the recipe of easy sweet pooran kozhukattai

sweet--kozhukattai pciture

quick pooranam-001


INGREDIENTS

Prep time for dough – 5 minutes
Prep time for pooranam – 2 minutes

1 cup - 240ml

FOR OUTER COVERING/DOUGH
  • Rice flour / kozhukattai flour or idiyappam flour – 1 cup
  • Water - 1.5 cup ( approx) (may be 1 – 1.5 tbsp less)
  • Salt – as needed
  • Gingely oil – 1 tsp
For pooranam/stuffing
  • Fried gram dal/Pottukadalai – 1/4 cup
  • Grated coconut – 1/4 cup ( Add 2 tbsp if you want less coconut)
  • Grated jaggery – 1/4 cup (adjust )
  • Cardamom – 3 nos (or) 1/2 tsp powder

METHOD

FOR POTTUKADALAI POORANAM
  • In a mixie jar grind all the ingredients given under “ for pooranam/stuffing “ to make a semi dry paste without adding water. Remove and set aside. Pooranam is ready !
kozhukattai pooranam tile
  • In a bowl , boil water till it starts to roll boil well. Add this water little by little to the rice flour and mix well with a ladle. When the dough becomes warm , knead it well to make a non-sticky ball.
kozhukattai dough tile1
kozhukattai dough tile2 
  • Cover the dough with a wet cloth till use. Make small lemon sized balls out of the dough. Grease your hands with oil and make a cup shape with the dough ( U can also use a mould) , keep 2 tsp of pooranam and close it to make a coconut shape or half moon shape.Grease the idli plate with little oil and keep the arrange the dumplings/kozhukattai.
kozhukattai cup tile1
kozhukattai cup tile3
kozhukattai cup tile2 
  • Heat water in an idli pot.When the water starts roll boiling , keep the idli plate arranged with kozhukattai and Steam it for 10 minutes.When the kozhukattai becomes shiny and slightly turns its color , its done. Do not remove immediately.Remove after a minute when it  becomes warm using a flat spoon..
kozhukattai steam tile
Enjoy eating hot !!

sweet-kozhukattai single-001

TIPS FOR CRACK FREE KOZHUKATTAI
  1. Use good quality rice flour. If u r planning to make by grinding rice, buy raw rice ( in tamil nadu we call as “maavu arisi) ie. the rice used for making rice flour..Its a different quality , not the one we use for pongal.It is cheaper in cost too..
  2. I used store bought rice flour - Idiyappam flour or Kozhukattai maavu. I always add 1.5 cups of water and a tsp of oil for making dough. For home made rice flour , more water may be needed. ie around 1.5-2 cups..
  3. Always add the required water while making the dough.If the dough becomes sticky or dry , modak will get cracks. Keep the unused dough covered with a wet cloth & then with a lid while u make mothagam.
  4. Its always better to prepare the outer covering after making pooranams/ stuffings to prevent the dough sitting for long time.
  5. U can refrigerate the unused dough be keeping in an air tight box & use the next day or the same evening.
  6. Pooranam can be prepared the previous day and refrigerated.
  7. Apply sesame/gingely oil in ur hands every time when u make the shape.
  8. Last but not the least , do not cook the kozhukattai in idli pot for long time which may lead to cracks.( maximum of 8-10 mins is enough)
  9. Always place the idli plate arranged with kozhukattai after the water in the idli pot starts roll boiling.. This helps for quick cooking & also the kozhukattai remains white in color and crack free..
  10. U can identify the cooked kozhukattai by its shining look. Always remove the kozhukattai after it becomes warm. Do not remove when it is hot. Kozhukattai may break.
Please click HERE to know Ganesh chaturthi Celebration Procedures & this LINK for Ganesh chaturthi recipes collection with Video.


 sweet kozhukattai open-001

Continue Reading...


September 2, 2013

CHILLI PANEER DRY – PANEER RECIPES

chilli paneer dry picture copy
As you all know, Chilli paneer is an Indo-Chinese recipe which has got an awesome blend of Indian & Chinese ingredients. I made this for my daughter’s lunch along with fried rice. She liked it a lot. I usually make gobi 65 and very rarely I make deep fried paneer recipes. But after trying this, I thought to prepare this very often in my kitchen. Its a great side dish for fried rice & dal rice. My daughter relished it with tomato sauce. U can have this as evening snack or as a starter recipe for lunch/dinner. Do try this for your kids , they’ll love it a lot.

chilli-paneer

INGREDIENTS
1 cup - 200ml
To marinate
  • Paneer cubes – 1/2 cup (10 pieces)
  • Ginger–garlic paste – 1/2 tsp
  • Maida – 2 tbsp
  • Corn flour/rice flour – 2 tbsp
  • Cooking soda – A pinch
  • Pepper powder – 1 tsp
  • Water , Salt – as needed
For the sauce
  • Cooking oil – 2 tbsp
  • G&G paste – 1 tsp
  • Green capsicum – 1/2 no
  • Big onion – 1 no (chop roughly)
  • Green chilli – 1 no (finely chopped)
  • Garlic cloves – 5 nos (-do-)
  • Tomato sauce – 1.5 tbsp
  • Soya sauce – 1/8 tsp 
  • Pepper powder or red chilli powder – 1/2 tsp
  • Spring onions – to garnish

METHOD
  • Soak paneer pieces in hot water for sometime. In a wide bowl , take the flour , g&g paste , salt & pepper powder. Add little water to make a thick batter. Drain all the water completely and then add the paneer cubes & make sure the batter coats the paneer pieces very well. Leave it aside.
DSC_0417chilli paneer tile1
  • In a kadai , heat oil and saute the onions, green chillies and garlic. Now add all the tomato sauce, soya sauce, salt & mix well. Lastly add the capsicum pieces & saute for a minute. Capsicum should be crunchy. So don’t saute too much. Add the pepper powder.
chilli paneer tile3
chilli paneer tile4
  • At the same time deep fry the paneer pieces & add them immediately to the above sauteed mixture & toss well for few seconds. By doing this way paneer pieces can retain its crispness for sometime while eating. ( For more crispness , deep fry paneer pieces twice before adding to the onion mixture (i.e first deep fry the paneer pieces &set aside. After it becomes warm again deep fry & add them to the sauteed mixture ) I got this tip from a road side chaat shop )
chilli paneer tile2
chilli paneer tile5
Serve immediately.Enjoy eating hot with fried rice or as starter !

I served like this for my daughter !
chilli paneer tooth pick
Continue Reading...