Basically Iam a great fan of tomato recipes especially tomato thokku. I can have more than 10 idlis when my mom makes this as a side dish.After marriage,i have tried it many times following my mom’s recipe using Bangalore tomatoes. Sendhil & Raksha used to have it by showing odd faces. So I completely stopped preparing it for years.
Recently I watched Vijay tv’s samayal samayal with Chef Venkatesh Bhat in which he showed Neer dosa with this chutney (he mentioned this recipe as onion tomato chutney) as side dish. At that time, my in-laws were here in my place & they had brought ripe naatu thakkali ( Tangy tomatoes ) from Salem, Tamilnadu. My MIL told me to try this thokku for breakfast as they love it very much like me. I too tried hopelessly thinking Sendhil & Raksha won’t like it. But to my surprise, they both loved it a lot and Sendhil said “ Its good & tasty” for nearly 4-5 times and had two more idlis too.
I was wondering what made the difference between this version & my mom’s version. Is it the addition of garlic or the tangy Tamilnadu tomatoes,something has made the magic and this recipe was a super hit among my family. Thanks a lot Chef. I have done it thrice so far but only with naatu thakkali (In Bangalore they call it as “Naatti”).
Friends do try this recipe using naatu thakkali if you have in hand, even thokku haters would love it for sure. For tomato lovers, Bangalore tomatoes would do !!
Check out my Easy tomato thokku recipe without onion & garlic if interested !

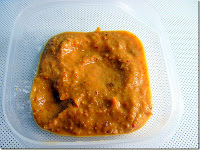
Onion tomato thokku recipe
 Onion tomato thokku recipe - A very tasty side dish for idli,dosa n chapathi !
Cuisine: Indian
Category: Side dishes
Serves: Serves 3
Prep time: 10 Minutes
Cook time: 15 Minutes
Total time: 25 Minutes
INGREDIENTS
|
METHOD - HOW TO MAKE TOMATO ONION THOKKU

 Enjoy with idli, dosa and chapathi ! |
Note
|


Very good recipes Tags: Onion tomato thokku recipe, Onion tomato thokku, thokku recipes, tomato thokku, onion tomato chutney recipe, Side dish for idli, side dish for idli, dosa, side dish for chapati


![Vazhaipoo kuzhambu step1_thumb[3]](http://lh6.ggpht.com/-n849KJCQb_g/VGhwzLz1HDI/AAAAAAAAij0/-qldyG_Xhio/s1600-h/Vazhaipoo%252520kuzhambu%252520step1_thumb%25255B3%25255D%25255B4%25255D.jpg "Vazhaipoo kuzhambu step1_thumb[3]")
![Vazhaipoo kuzhambu step2_thumb[2]](http://lh4.ggpht.com/-buTEZ_-m87I/VGhw6c_SS4I/AAAAAAAAikE/wmwSnCSNdJM/s1600-h/Vazhaipoo%252520kuzhambu%252520step2_thumb%25255B2%25255D%25255B4%25255D.jpg "Vazhaipoo kuzhambu step2_thumb[2]")


 .Thanks to my friend
  .Once Megha told me about Veg Rice Bowlz and Veggie burger varieties of KFC and suggested me try once.We went in the same weekend and now we have become an ardent fans of those dishes.More than me Sendhil & Raksha have become crazy for its taste and they are ready to go there anytime of the day.U won’t believe if i say that we have visited KFC nearly 6-7 times in past two months
 .And nowadays Raksha started demanding me to try KFC’s recipes at home too.When i was browsing for the same,i got some ideas from facebook’s Chef at large group posted by some members.I collected all those recipes & googled few more too.Inspired by all the pictures and recipes,i tried veg strips for the first time last week and i was very happy with the results.It was sooo crispy and Raksha loved it a lot with tomato ketchup.I won’t say its the exact replica of KFC’s original recipe(hope u know its a secret recipe) but i am sure it tastes pretty close and your family will enjoy it for sure.
 .She tasted and said “Wow,mummy its awesome” and she had 5 of them
 .
.