Before going to this recipe,let me tell you,this is not North Indian style Chana masala. This is purely South Indian style kuruma type chana masala (Kondakadalai kurma in Tamil). I followed my Saravana bhavan kurma recipe with small changes and made this korma adding kondakadalai/Chickpeas. You can use black chana as well. It was very flavorful and the addition of chana made it more healthy too.
As suggested by my friend Shalini, I serve this kurma garnished with chopped onions. It adds a great taste and goes well with chapathi, poori & dosa. If you like, you can mix this kurma with plain rice and enjoy. Soon I will post North Indian restaurant style chana masala.
Wash and soak the chana / kondakadalai over night. Pressure cook for two whistles in low flame. You can also add the soaked chana directly to the kurma and pressure cook it. Both works.
Wash and chop the vegetables finely. Chop the onion and tomato. Grind all the ingredients given under “To grind” to a smooth paste adding enough water.
Heat a pressure cooker base and add oil + ghee.Saute the bayleaf and black stone flower/Kalpasi. Splutter cumin seeds. Add onions, g&g paste and saute till it turns transparent & raw smell goes off. Add mint leaves. Then add the tomato pieces and saute until mushy. Add the ground coconut paste,turmeric powder, red chilli powder and Garam masala powder. Add the required salt and saute well till the raw smell of masala vanishes. Do in medium flame.
Lastly add the soaked chana( Here I used boiled chana). Mix well and add a 2cups of water. Mix well and add a pinch of kasoori methi and curd. Stir well and pressure cook in low flame for just one whistle. Chana kurma is ready to serve !!
Enjoy with chapathi ,poori or parota.It tasted great with dosa too!
Note
Grinding part is the highlight of this kurma. So please don’t omit any ingredient from it. No worries if you don’t add khus khus. But the remaining are must.
Adjust the quantity of chillies and red chilli powder based on your taste.
You can try to replace Red chilli powder with chana masala powder if you have. But adjust the quantity as per your wish.
Try this yummy channa kurma for roti/Parota, enjoy your food !!
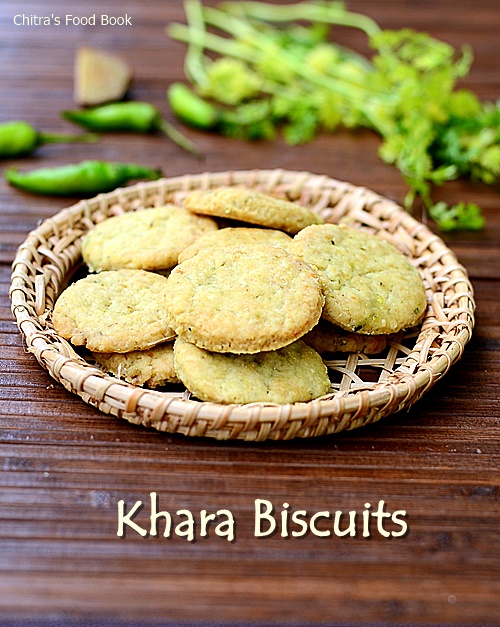
I love Bangalore Iyengar Bakery’s Khara buns & Khara biscuits more than Benne biscuits.But I usually bake benne biscuits/Nankhatai as its my family’s favorite.This morning I tried savory biscuits/Masala biscuits for the first time by referring this recipe.Actual recipe called for using butter or Vegetable shortening.In bakeries,they use vanaspati/Dalda.But I halved the recipe & used cooking oil(refined oil) to cut down the calories.I was really skeptical about the result.But good biscuits came out very well with melt in mouth texture & crispiness.I was so happy about this bake and enjoyed it with my tea.Friends,do try this bakery style Masala biscuits/Khara biscuits and enjoy your tea time ! Color of this biscuit may vary slightly based on the time of baking and quantity of spices used.But the taste would be gr888 !
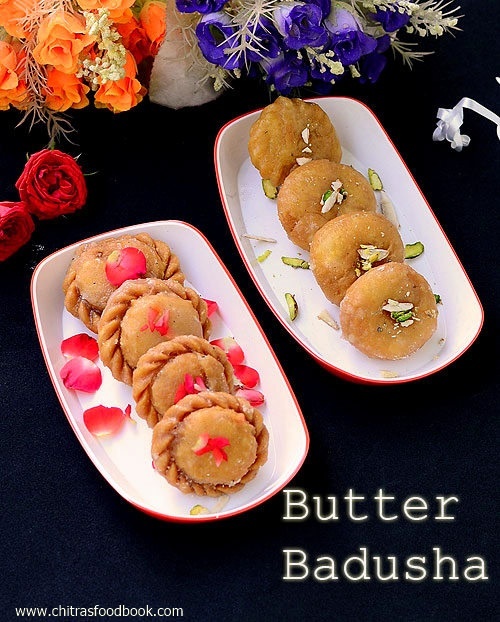
Badusha/Balushahi recipe is one of the must try sweets recipes during Diwali or any occasions. Most of the people in India make badusha for Diwali. So I thought of starting my diwali recipes with this most popular sweet recipe.
Basically I am not a big fan of sweets. But there are very few sweets for which I don’t say NO. Badusha is one among them. I love it for its flaky, layered texture with mild sweetness. Every year during Diwali, my MIL makes Maida burfi and Badusha without fail. She is my inspiration to try sweets on my own. She usually adds Dalda/Vanaspati or butter to make badusha.
Based on my MIL’s recipe and after few trial & errors, I am making badusha successfully for the past two years. I have shared some tips, do’s & don’ts below for beginners. I took a complete video for badusha preparation and shared the same below. I love the traditional doughnut shaped badusha more than the swirled ones. But still swirled badusha looks more attractive like suryakala.
In this post, I have just shared a small video of how to make badusha swirls for beginners to learn. Hope it is easily understandable. Lets see how to make the most popular Indian sweet balushahi aka badhusha in detail with a video on how to shape the badusha.
How to shape badusha
TIPS TO MAKE PERFECT BADUSHA
Generally beginners complaint about badusha disperses/dissolves in oil. It is due to the addition of more cooking soda or fat content ( ghee or butter). If the oil temperature is too low, badusha may dissolve in oil.
Sometimes you may get more cracks in badusha after frying. It may become shapeless too. It is also due to the quantity of cooking soda.So please be very careful while adding soda.
The secret of getting flaky, layered badusha lies in slow deep frying in low flame. Adding curd doesn’t make the difference. My MIL never add curd. Still it comes out flaky. But curd helps to give softness to Badusha. So do not skip it.
You can replace butter with melted ghee. But use melted ghee or butter only at room temperature. It should not be hot.
No need to knead the dough very hard or beat as you do for chapathi dough. Its enough to make a soft, crack free dough to get good badusha.
The recipe I have shared here gives badusha which may be slightly hard as soon as you prepare. But it will become soft the next day and tastes much better.
Butter badusha recipe
How to make butter badusha - Diwali sweets recipes
Cuisine:Indian
Category:Sweets
Serves:9
Prep time:30 Minutes
Cook time:20 Minutes
Total time:50 Minutes
INGREDIENTS
All purpose flour/Maida - 1 cup (tightly packed & levelled)
Melted butter - 1/4 cup ( at room temp, butter should not be hot)
Curd - 1 tbsp
Cooking soda / Baking soda - 1/8 tsp
Water - as needed ( I used 2-3 tbsp)
Salt - a small pinch
For sugar syrup
Sugar - 3/4 cup
Water - 1/3 cup
Cardamom powder - 1/2 tsp
Lemon juice - 1/2 tsp
Saffron threads & dessicated dry coconut,nuts - for decoration
HOW TO MAKE BADUSHA - METHOD
Take a wide bowl and add the melted butter,cooking soda & curd. Mix well with a whisk till it becomes a creamy paste.It will take 1-2 minutes. Take sugar in a bowl and add water. Mix well & set aside. Let it dissolve for making syrup.
To this paste, add maida and a pinch of salt. Mix well and make a crumbly mixture. Butter & curd mixture should spread well with the flour. The mixture should resemble bread crumbs. Sprinkle some water and make a soft, non-sticky dough ( I used around 2-3 tbsp of water. It may vary based on the water content in curd)
Rest the dough for 30 minutes. After the resting time, the dough would be very soft. Smoothen it using your hands to remove cracks by just pressing it gently. Do not knead it. Take small ball sized dough and make a crack free smooth ball. Flatten it using your palm and make a dent in the center using your pointer finger. Make a deep impression.
For making swirl shaped badusha, take a ball from the dough and pinch in a corner. Fold it and again pinch the swirled end. Repeat this to make a circle. Refer video for more reference.
Heat oil in a kadai and when it gets heated, drop a pinch of batter. As soon as the batter rises to the top, drop 3-4 badusha and switch off the flame. Let the badusha cook in off fire till it floats on top of oil. After it starts to float, flip the badusha and switch on the flame. Keep the flame medium and cook the badusha till it turns golden in color. One batch takes nearly 8-10 minutes.
The swirled badusha takes more time to cook and looks dark in color compared to the donut shaped ones. Don’t panic.It also tastes little more crispy compared to the round ones. Deep frying patiently is more important to get layers in badusha. So please follow this carefully.
While frying badusha, you can make sugar syrup. Boil the syrup till one string consistency. i.e when you take a drop of syrup between your fingers & release, it will form a single string. Add cardamom powder & lemon juice and switch off the flame. Lemon juice prevent crystallization of sugar syrup. Referthis postfor detailed sugar syrup consistencies.
Remove the badusha in a tissue. Drop them into the warm syrup. Let it soak for 5-10 minutes. Flip them in the syrup for even coating. In the mean time, deep fry the next batch of badusha. Remove the badusha from the syrup and arrange in a plate. Once it cools down, sugar syrup with crystallize and make a nice coating. Store it once badusha is cooled down completely. Enjoy ! It stays good for 3-4 days if properly done.
If the sugar syrup is crystallized while you soak the badusha, add few drops of water, heat it. Bring the one string consistency & then drop the badusha.
Try this yummy sweet for Diwali and have a great celebration !
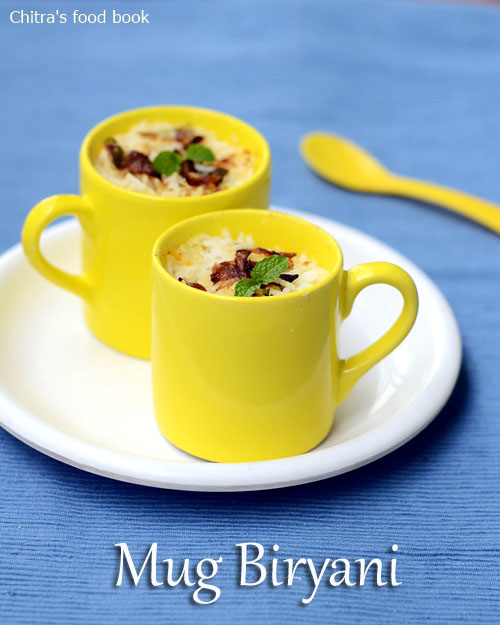
Recently I came across veg biryani recipe in a coffee mug. I loved the idea and tried it for our Sunday lunch yesterday. Mug biryani is nothing but the usual layer biryani assembled and baked in a microwave safe mug. I followed my vegetable layer DUM biryani for gravy recipe and adapted the outer covering recipe fromHERE. Raksha was so happy and fascinated to see the biryani in a bowl. She was eagerly waiting with me in the kitchen to see the output.
As I wished, the result was awesome. We all loved it. I reserved a bowl of biryani for myself & had it for dinner too. Friends, do try this biryani for a change & attract your family members. Lets check out this week’s Sunday Lunch Recipes Series no 32– Flavorful Mug biryani adding mixed vegetables!!
Vegetable biryani in a coffee mug-Sunday lunch recipes series 32
Cuisine:Indian
Category:Lunch ideas
Serves:Serves 3-4
Prep time:30 Minutes
Cook time:30 Minutes
Total time:60 Minutes
INGREDIENTS
1 cup = 200 ml
Basmati rice - 1 cup
Water - 5 cups
Whole spices ( 1 cinnamon,2 cloves,1 black stone flower,1 bayleaf,1cardamom)
Salt - as needed
Cooking oil or ghee - 1 tsp
For gravy
Cooking oil + ghee - 1 tbsp+1 tbsp
Whole spices -1 each
Big onion - 1 no
Green chilli - 1no
G&G paste - 1/2 tsp
Mixed vegetables ( 1 carrot,a handful of green peas,1 potato) - 1/2 cup
Curd - 1/2 cup
Turmeric powder - 1/8 tsp
Red chilli powder - 1 tsp
Biryani masala powder - 1 tsp
Salt & water - as needed
For dough
Maida/All purpose flour - 1/2 cup
Salt – a pinch
Baking powder – 1/4 tsp
Baking soda – a pinch
Warm milk – 1 tbsp
Water -as needed to knead the dough
For layering
Mint+coriander leaves - 2 tbsp
Browned onions - a handful
Saffron soaked milk - 1/4 cup
Cooking oil or ghee - to grease the mug
METHOD
Wash and soak the basmati rice for 30 minutes. In a wide kadai or vessel, boil 6 cups of water adding cinnamon, cloves, cardamom and black stone flower. Add some salt. When the water comes to a roll boil, add lemon juice. Drain the water from the soaked basmati rice and add to the boiling water.
Cook the rice in open pan for nearly 8 minutes. Stir it once or twice in the middle. Make sure you don’t over cook the rice. Rice should be firm and soft. It should be 3/4 th cooked.
Remove the kadai and pass it through a colander/sieve. Run the tap water over the rice to stop cooking process. Drain all the excess water and keep the rice in the colander. Spread it in a wide plate and let it cool completely.
Heat 2 tbsp of oil and caramalize the onions by sauting in high flame for a minute. Remove in a plate.
Now prepare the gravy. Heat oil+ghee in a wide kadai and saute the cinnamon, cloves, cardamom and bayleaf. Add the ginger-garlic paste and saute for a minute till raw smell goes off. Now add sliced onions and saute till transparent.
Add the mixed vegetables and saute well. Add salt.
Now add the curd and mix well in low flame. Add the red chilli powder, turmeric powder, biryani masala powder and salt. Mix well.Lastly add some water and cook the mixture very well till veggies are completely cooked and oil floats on top. It will become a semi solid gravy.
Remove the kadai and keep the gravy aside. Take a bowl and make the chapathi dough adding the ingredients given under “ For dough” OR make a plain chapathi dough using wheat flour & salt to seal the mug.
Take the microwave safe mugs and grease with a tsp of oil.
Spread a small ladle of cooked rice as first layer. Now layer the gravy over the rice and sprinkle some chopped mint+coriander leaves.
Layer with rice now. Repeat the same till the brim of mug. Lastly sprinkle some saffron soaked milk and caramelized onions. Seal the mug with a small round disc made of dough. Preheat the oven in 180c and bake the biryani for 15 minutes. Remove & serve hot !
Enjoy with raita !
Note
Adding green chillies is optional. U can add more red chilli powder for spicy biryani.
You can replace biryani masala powder with garama masala powder too.
Addition of mint+coriander leaves is very important.
Replace curd with lemon juice for variations but add lemon juice only before putting in DUM. In that case, add 2 tomatoes along with onions and saute until mushy.
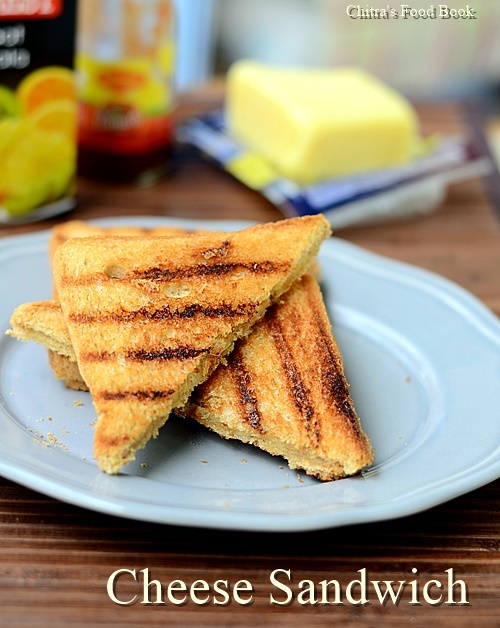
Grilled Cheese Sandwich is one of the sandwich recipes I make often for my daughter’s breakfast, mostly on Sunday mornings. She loves it a lot. For my daughter I use milk bread and mozzarella cheese whereas I make the same for myself and Sendhil using cheddar cheese & whole wheat bread. My family likes this sandwich in Indian style adding chopped green chillies, coriander leaves and chat masala powder. Sometimes I add tomato ketchup and mayonaise too. This sandwich can be prepared with many variations as per our family’s preference. Whatever be the stuffing, it’s finally the cheese that make the kids love this sandwich.
Before going to the recipe, I would like to mention a few lines about online grocery shopping. Recent days I have been purchasing groceries Online Via Bigbasket. Mostly I buy the ingredients which are not found near my house. Recently I bought cheddar cheese , blueberries, Flax seeds, millets , millet flour and some organic foods. I am very much satisfied with their customer service. You too give a try.
Lets see how to make this yummy Indian style perfectly grilled Cheese Sandwich recipe. Also check out this comprehensive article on how to choose the grill in Globo surf. If you don’t own a grill sandwich maker, you can try the same in oven or tawa.
Grilled Cheese Sandwich Recipe
How to make grilled sandwich recipe using sandwich maker
Cuisine:Indian
Category:Breakfast
Serves:Serves 3
Prep time:10 Minutes
Cook time:5 Minutes
Total time:15 Minutes
INGREDIENTS
Wheat bread or milk bread- 16 nos (Makes 8 pairs)
Grated Cheddar cheese or mozarella cheese-2 cups (200gms)
Finely chopped Green chillies - 2 nos
Chat masala powder - 2 tsp (Adjust as per the taste)
Coriander leaves - 2 tbsp
Tomato sauce & Mayonnaise - as needed(optional topping)
Salt - as needed
Butter - to brush the bread
HOW TO MAKE GRILLED CHEESE SANDWICH - METHOD
Grate the cheese and mix the chopped chillies, coriander leaves , salt and chat masala powder. Replace green chillies by pepper powder or red chilli powder as per your taste. Add as per your taste.
Take 2 bread slices and brush one side of the bread with butter at room temperature.Spread the cheese mixture on the other side of one bread slice.Cover it with another slice.Make sure the buttered side is facing up.
Take the grill sandwich maker and place the sandwich with buttered side touching the hot plate.
Toast the slices till its done.Serve hot !
Note
You can add an additional topping of tomato sauce or mayonnaise.
You can skip chillies or pepper powder and use chat masala alone if making for kids.
Enjoy this yummy,cheesy grilled sandwich for your breakfast !
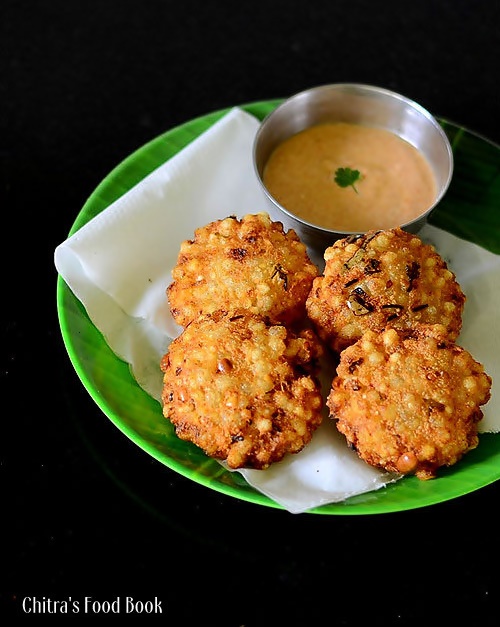
Sabudana vada with peanut chutney is one of the most popular vrat / fasting dish in North India. Navratri is around the corner. I am sure most of you would look for no onion no garlic fasting recipes. Sago/Tapioca pearls(Sabudana in Hindi, Javvarisi in Tamil) is considered to be one of the most important ingredient used for cooking vrat recipes.
People usually make Sabudana khichdi, Kheer in North India and Javvarisi Upma, Payasam in South during fasting days either for breakfast or for dinner. I always wonder why sabudana is consumed on Vrat days even though it is high in carbohydrates & Calories. I browsed few websites and found some health benefits like Sabudana gives quick energy. It is very easy to digest & gives a cooling effect on the system. It is quite low in fat, protein and does not have any minerals or iron. So milk, peanut & potatoes are added with sago to increase its nutrtious value.
Basically I love sabudana kheer/Javvarisi Payasamprepared with sugar or jaggery more than other sabudana dishes. But this year during this Navratri festival, I wanted to explore varieties of sabudana recipes. So I started with Maharashtrian style Sabudana vada/Sago fritters and made a quick video along with step by step pictures. Even though I tried it for the first time, its result made me felt as if I am making it regularly at home.
Yes, it came out super crispy and tasted great with this easy peanut curd chutney. This chutney is one of the best side dishes for sabudana vada as mentioned HERE. I too loved this combo very much. I have tasted sabudana vada only once in GOLI VADA PAV outlet. But its taste and appearance was completely different than this one. I will try to experiment that vada and post it here.
Now lets see how to prepare Sabudana Vada recipe for Vrat snacks. You can try shallow frying or Air fry it for diet version. Serve & eat it hot to enjoy its best taste !
How to make crispy Sago vada/Sabudana vada for vrat and teatime snacks.
Cuisine:North Indian
Category:Sweet
Serves:4
Prep time:10 Minutes
Cook time:15 Minutes
Total time:25 Minutes
INGREDIENTS
1 cup = 240ml
Sago/Sabudana/Javvarisi - 1/2 cup ( Big variety,NO nylon)
Medium sized potato - 1 no
Roasted peanuts - 2 tbsp
Arrowroot powder or rice flour or corn flour - 1/2 tbsp ( I used corn flour)
Green chillies - 1 no ( Finely chopped)
Ginger - 1/2 inch piece ( -do-)
Coriander leaves - 2 tbsp (-do-)
Cumin seeds/Jeera - 1/2 tsp
Sugar-1/4 tsp
Lemon juice – 1/2 tsp
Salt - as needed
Oil - to deep fry
Peanut chutney for sabudana vada
Fresh curd – 1/4 cup
Roasted Peanut powder – 2 tbsp
Red chilli powder – 1/2 – 1 tsp
Turmeric powder – 1/8 tsp
Cumin powder – 1/4 tsp
Sugar – a pinch
Salt – as needed
HOW TO MAKE SABUDANA VADA - METHOD
Wash & soak the sabudana overnight Or 4-5 hours adding enough water to cover it. Soak till it becomes soft. Drain all the excess water & squeeze the sabudana. Take in a bowl.
Pressure cook potato, peel the skin and mash it well. Powder the roasted peanuts coarsely. Chop the green chilli, ginger & coriander leaves.
Take the squeezed sabudana,mix the mashed potato, peanut powder, Corn flour or arrowroot powder, chopped green chilli, ginger, coriander leaves, sugar & salt ( Use arrow root powder during fasting days). Mix it well & make a dough. DO NOT ADD WATER. Soaked sabudana & mashed potato along with rice flour makes a non-sticky dough.(TIP: If sago has more water content,vada will absorb more oil. If sago is too dry, vada may crumble or dissolve in oil. So take care and bind the mixture well)
Take a small ball sized batter and make a round. Pat it to bring vada shape. Arrange in a plate.
Heat oil in a kadai and put a pinch of batter. If it rises to the top, Oil is right. Keep the flame medium. Now drop the vada and cook in batches. Flip the vada and cook both sides till golden brown. This vada takes more time to turn golden brown. So keep flipping it until u get the color (TIP: Deep fry the vada patiently in medium flame else it may turn brown faster leaving the inner portion uncooked. Slow frying helps to bring crispy exterior. Make sure the temperature of oil is correct, else vada will absorb more oil)
Keep the unused batter in refrigerator because vada may absorb more oil if kept outside for long time.
PEANUT CHUTNEY FOR SABUADANA VADA
Powder the roasted peanuts.Take the curd,powdered peanuts, red chilli powder, turmeric powder, salt, sugar. Mix well and check for taste. Serve hot vada with peanut chutney !
Note
For variations replace green chilli with a tsp of red chilli powder.
You can skip rice flour/corn flour with arrow root powder during fasting days.
Add more green chillies for spicy vada.
You can also add garam masala powder for more spicy flavor. But its not the authentic recipe.
Enjoy crispy sabudana vada with peanut curd chutney ! Tastes yum !!


 Chana Masala / Chana kurma for chapathi/Roti and Parota


 .Friends,do try this bakery style Masala biscuits/Khara biscuits and enjoy your tea time ! Color of this biscuit may vary slightly based on the time of baking and quantity of spices used.But the taste would be gr888 !