Search Chitra's Food Book

September 9, 2018

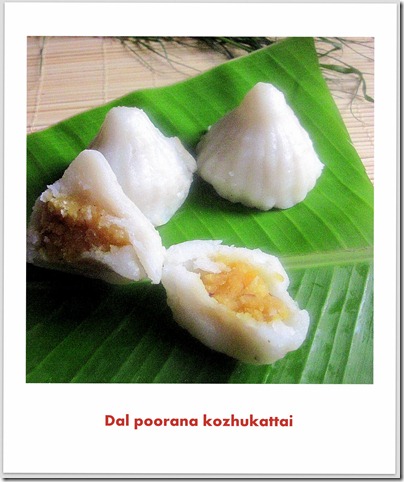
Kadalai Paruppu Pooranam Kozhukattai – Chana Dal Sweet Poornam Kozhukattai With Video

Kadalai paruppu pooranam kozhukattai

Every year on Ganesh Chaturthi festival, we make chana dal sweet poornam kozhukattai / kadalai paruppu poorana kozhukattai for neivedyam. Basically sweet kozhukattai can be prepared by stuffing kozhukattai with chana dal pooranam, moong dal poornam or with coconut/ thengai pooranam. But we all love Kadalai paruppu purana kozhukattai more than other stuffing. 

As this pooranam can be refrigerated and used up to 2 weeks, I make it in large quantity and use the same for making sweet poli/ obbattu, suzhiyan and sweet paratha.

To make soft poorna kozhukattai, there are certain points to remember. I have shared all the points as tips in the end of this post. Do read them before you start making this kozhukattai.  Also check out the detailed video on how to make chana dal sweet pooranam, making kozhukattai maavu using idiyappam flour and shaping modagam with and without kolukattai mould. Lets see how to make chana dal sweet pooranam kozhukattai with step by step pictures and video.
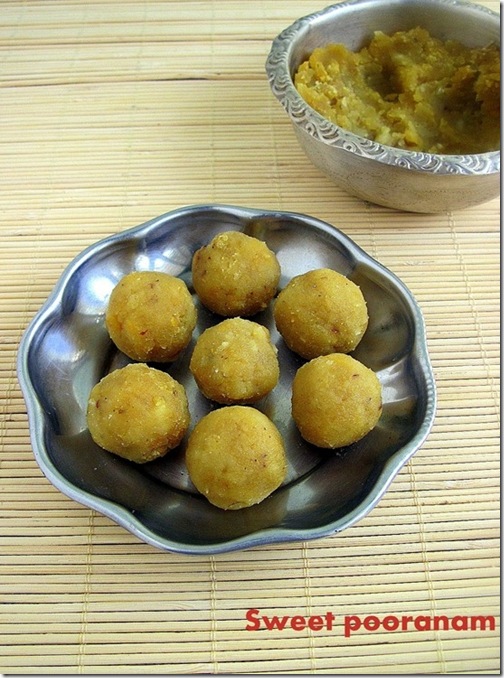


Kadalai paruppu pooranam


Chana dal pooranam kozhukattai / Kadalai paruppu poorana kozhukattai recipe


Chana dal pooranam kozhukattai / Kadalai paruppu poorana kozhukattai recipe

Chana dal pooranam kozhukattai / Kadalai paruppu poorana kozhukattai recipe - Sweet kozhukattai for Ganesh chaturthi


Cuisine: South Indian
Category: Dessert
Serves: 15 
Prep time: 10 Minutes
Cook time: 20 Minutes
Total time: 30 Minutes


INGREDIENTS

For chana dal pooranam ( 1 CUP - 240ML)
  • Chana dal / Kadalai paruppu – 1/2 cup
  • Water – 2 cups ( to pressure cook dal)
  • Powdered jaggery – 3/4 cup
  • Grated coconut – 1/4 cup
  • Cardamom – 3 nos (powdered)
  • Water – 1/3 cup ( to make jaggery syrup)
  • Salt – a pinch (optional)
For kozhukattai maavu
  • Idiyappam flour / Kozhukattai flour - 1 cup
  • Water - 1.5 to 2 cups
  • Salt - 1/2 tsp
  • Cooking oil - 1 tsp

HOW TO MAKE KADALAI PARUPPU POORANAM KOZHUKATTAI

  1. Take the chana dal / Kadalai paruppu in a pressure cooker.
  2. Add water, few drops of cooking oil. Pressure cook in low flame for 2 whistles. 
  3. Drain the excess water. Mash or grind the dal. 
  4. Melt jaggery in water. Strain the syrup. Boil and add the dal paste, grated coconut, cardamom.
  5. Mix till thick. Transfer the pooranam to a box. Cool down and then make balls.
  6. To make kozhukattai dough, boil water adding salt and cooking oil. Add to idiyappam flour.
  7. Make soft, smooth dough without cracks. Cover with a wet cloth till use.
  8. Make modagam shape by stuffing the chana dal pooranam. Steam it for 8 minutes.
  9. Remove when warm. Offer to Lord Ganesh and Enjoy !
KADALAI PARUPPU POORANAM – STEP BY STEP PICTURES.
  • Pressure cook chana dal by adding the required water and a drop of oil. Drain the water. Grind without water or mash it well to make a paste without adding water and set aside.
Kadalai paruppu pooranam
  • In a bowl, take the powdered jaggery and add little water to cover it.When its melted , strain to remove impurities OR if the jaggery is pure, add it directly to the mashed dal along with grated coconut.
Kadalai paruppu pooranam
  • If using syrup, strain it. Wash the kadai and add the syrup, grated coconut and cooked dal, cardamom powder( please do not add water, the coconut itself leaves water which will be enough.)
  • Mix well until the mixture leaves the sides and becomes a thick whole mass. ( Do not add water while adding the dal paste because the lesser you add the water , sooner the pooranam will start to leave the sides and becomes thick.. Stuffing will be ready)
Kadalai paruppu pooranam
  • Make small balls out of the stuffing and keep ready.
  • The unused stuffing can be refrigerated and used for 10 to 15 days.
Kadalai paruppu pooranam


TO MAKE SWEET POORANAM KOZHUKATTAI


  • I used a ready made kozhukattai mould to make a good shape. U can also try the shape which is shown in the video to make mothagam/ coconut shape.
  • in the pictures below, I’ve explained using kozhukattai mould. Take the mould, open it and grease it with gingely oil. Take a small ball from the Kozhukattai dough and keep it inside the mould. Just spread it all the sides till 3/4 of the mould by keeping the center empty. Now close the mould and press it with ur left hand fingers.
Kadalai paruppu pooranam kozhukattai
  • Now place the dal pooranam in the center.Take a small berry sized ball and place it on the top of the dal pooranam and seal it well.
Kadalai paruppu pooranam kozhukattai
  • Now open the mould , u’ll get a nicely shaped kozhukattai.
  • Follow the same for the remaining. Grease an idli plate with oil. Arrange the kozhukattai.
  • Boil water in an idli pot.. Keep the idli plate and steam it for  8 to 10 minutes. Cooked kozhukattai looks shiny. Switch off the flame and eemove the kozhukattai from idli plate after it becomes warm. If you try to remove it hot, kozhukattai may break.  
Kadalai paruppu pooranam kozhukattaisweet pooranam kozhukattai
TIPS TO MAKE SOFT KOZHUKATTAI 
  • The same pooranam can be done using coconut alone. For that channa dal is not needed. Just make the jaggery syrup , add the grated coconut , cardamom powder & mix till it leaves the sides.
  • Remove & stuff it using the above said procedure.
  • For thengai pooranam , jaggery can be less.ie 1:1 would be enough.
  • To make soft kozhukattai, always use good quality idiyappam flour. Homemade processed rice flour gives the best result. 
  • Add the right quantity of hot water to make the kozhukattai dough. If the water is less, kozhukattai may break while shaping and tastes hard and chewy.
  • If the water is more, dough becomes too sticky. Shaping would be difficult and kozhukattai will break after cooking. 
  • Always make the stuffing part / Pooranam first. Do not make kozhukattai dough in advance. Make it just before making kozhukattai else dough will dry and gives hard kozhukattai.
  • Make the kozhukattai maavu smooth without cracks. Do not add more water and make it sticky. If the dough is sticky, grease with oil and knead for 5 minutes.
  • Before steaming the kozhukattai, make sure water in the idli pot is roll boiling. It helps to cook the kozhukattai soon and keeps it soft. 
  • Do not remove the kozhukattai from the idli plate when it is hot. Remove after kozhukattai becomes warm. It will come out easily without cracks else kozhukattai may break. 
chana dal pooranam kozhukattai
Continue Reading...


September 8, 2018

Tomato Poha – Thakkali Aval Upma Recipe

Tomato poha

Tomato poha / Thakkali aval is an easy, instant Indian breakfast and dinner recipe. Poha recipes (Pressed rice/ rice flakes recipes in English, avalakki uppittu in Kannada) makes it appearance at least twice in a week in my kitchen as it can be cooked quickly and instantly in jiffy morning hours. It would be ideal for breakfast. As Iam trying different poha recipes in South Indian and North Indian versions, I wanted to make this easy tomato poha (Thakkali aval upma in Tamil) for our breakfast today. 

This is the first time I am making poha with tomato. Basically tomato poha can be prepared in 2 ways. One by adding onion, green chilli and tomato and other one by adding spice powders and garam masala. Today I have followed the second method by adding tomato, onion, red chilli powder and garam masala powder as I love my poha to be slightly spicy and flavorful. 

Bachelors and working women would love this recipe as it can be prepared under 15 minutes. You can whip up your breakfast or late night dinner instantly. Optionally you can use frozen green peas and vegetables like carrot, capsicum to make it colorful and healthy. Ok, Lets see how to make tomato poha recipe with step by step pictures.

Check out my Maharashtrian Kanda poha, Gujarati Batata poha, Tamilnadu style aval upma, Lemon poha and Instant poha mix recipe.


Tomato poha recipe

Tomato poha recipe / Thakkali aval upma


Tomato poha recipe / Thakkali aval upma

Tomato poha /Thakkali aval upma - Easy, instant breakfast recipes.


Cuisine: Indian
Category: Instant breakfast recipes
Serves: 2
Prep time: 10 Minutes
Cook time: 10 Minutes
Total time: 20 Minutes


INGREDIENTS

1 cup - 250ml
  • Thick poha / Getti aval / Thick rice flakes - 1 cup
  • Water – 1/2 to 3/4 cup (to soak poha)
  • Salt - as needed
To Temper
  • Cooking oil - 1 tbsp
  • Mustard seeds - 1/2 tsp
  • Urad dal - 1/2 tsp
  • Chana dal - 1 tsp
  • Cumin seeds - 1/4 tsp
  • Big onion - 1 (Finely chopped)
  • Ripe tomato - 1 (finely chopped)
  • Green chilli - 1 small
  • Curry leaves - Few
  • Turmeric powder - 1/4 tsp
  • Red chilli powder - 1/2 tsp
  • Dhania powder /coriander seeds powder - 1/2 tsp
  • Garam masala powder - 1/4 tsp
  • Sugar – a pinch
  • Coriander leaves - To garnish

HOW TO MAKE TOMATO POHA

  1. Wash the thick poha twice or thrice. Add water to immerse it.
  2. Soak for 10 minutes. Chop onion, chilli, tomato.
  3. Heat oil in a kadai. Temper and saute onion, tomato till mushy.
  4. Add chilli powder, turmeric, coriander seeds powder, garam masala powder, salt and sugar.
  5. Mix well till raw smell goes off. Lastly add soaked poha. Mix gently.
  6. Cover cook in low flame till poha becomes soft. Mix and garnish with coriander leaves. Serve hot ! No side dish is needed.

TOMATO POHA RECIPE - STEP BY STEP PICTURES

  • Wash the thick poha twice or thrice to remove the debris. Drain the washed water completely. Add the water required to immerse the poha ( I used 1/2 cup water). Soak for 10 to 15 minutes. Poha absorbs all the water and becomes soft.
  • Tomato poha recipe
  • In the mean time, chop the onion, tomato finely. Heat oil in a kadai. Splutter mustard seeds, urad dal, chana dal, curry leaves, finely chopped onion, slit green chilli and saute till onion becomes transparent.
  • Tomato poha recipe
  • Add finely chopped tomato and saute till tomato turns mushy. Add salt, sugar, turmeric powder, red chilli powder, coriander seeds powder and garam masala powder.
  • Tomato poha recipe
  • Mix well and cook for a minute till its raw smell vanishes. Now add the soaked poha without any water. (Drain the water in a colander if any).

  • Mix gently using a fork without making it mushy. Keep the flame low and cover cook the poha for 5 to 10 minutes till poha is heated well and becomes soft. Mix it once or twice in the middle to avoid burnt bottom.
    • Tomato poha recipe
  • Switch off the flame. Garnish with finely chopped coriander leaves. Mix well and serve hot. Enjoy ! You can have it with aloo bhujia or any pickle if you like.

Note

  • For variations and healthy options, you can add finely chopped carrot, capsicum, frozen peas along with onion and saute till its cooked.
  • You can replace red chilli powder and coriander seeds powder with finely chopped green chilli for less flavor.
  • You can use sambar powder to replace red chilli and Dhania powder.
  • You can also make it without onion on vrat days/ fasting days.
  • If you like more tangy taste, add few drops of lemon juice at the end.

Yummy, tasty, easy tomato poha is ready to enjoy with your cup of tea !
thakkali aval


Continue Reading...


September 5, 2018

Saravana bhavan Hotel Style Coconut Chutney For Idli, dosa

hotel style coconut chutney
Hotel style coconut chutney (thengai chutney in Tamil) popularly known as white chutney is a very simple chutney recipe with minimum ingredients. In Tamil nadu, it is served as side dish for idli, dosa, pongal, vada and other South Indian tiffin recipes. After going through so many websites and YouTube videos, I tried this restaurant style coconut chutney recipe at home. As I expected, it looked and tasted very similar to the hotel white chutney

In popular hotels like Saravana bhavan, Adayar Ananda bhavan they serve this kind of coconut chutney. It looks super white in color and slightly loose in consistency. It doesn't taste spicy at all instead it tastes mildly sweet too. Many people says coconut chutney in hotels is prepared using Thengai punnakku (Coconut oil cake/ coconut residue) , Kadalai Punnaku( Groundnut oil cake) and pottukadalai / roasted chana dal as they are low in cost when compared to fresh coconut and yield of the chutney is more. Yes it may be true with small food joints where the chutney looks pale white in color. 

Some hotels use milk or coconut milk to grind the chutney which helps to bring white color even with the same ingredients. Some people also add a dash of ginger or garlic and small onion for flavor enhancements. However it is prepared, we all love hotel type coconut chutney recipe, isn’t it ??  So today I have shared the basic white colored coconut chutney recipe without roasted chana dal.  

Lets see how to make it with step by step pictures. I have also shared few tips at the end of this post to make white colored coconut chutney. Very soon I will share Karnataka hotel style coconut chutney recipe which is completely different from this recipe.

If you are interested, please check my hotel style Kara chutney recipe / Red chutney too !


hotel style coconut chutney

Hotel style coconut chutney recipe - Restaurant style thengai chutney


Hotel style coconut chutney recipe - Restaurant style thengai chutney

How to make Tamilnadu hotel style coconut chutney recipe


Cuisine: Tamilnadu
Category: Chutney Recipes
Serves: Serves 2
Prep time: 5 Minutes
Cook time: 5 Minutes
Total time: 10 Minutes


INGREDIENTS

1 cup - 240ml
  • Freshly grated coconut - 1/2 cup (Do not use the brown part)
  • Green chilli - 1 ( Small in size)
  • Cashewnuts – 2
  • Tamarind – A pinch (optional)
  • Salt - as needed
  • Water - to grind the chutney
To Temper
  • Cooking oil - 1 tsp
  • Mustard seeds - 1/4 tsp
  • Urad dal - 1/4 tsp
  • Curry leaves – Few (optional)
  • Red chilli – 1 no (optional)

HOW TO MAKE HOTEL COCONUT CHUTNEY 

  1. Grate the white part of fresh coconut.
  2. Take grated coconut, green chilli, cashews, salt and water.
  3. Grind to a thick, smooth chutney.
  4. Temper mustard seeds and urad dal in oil.
  5. Add to coconut chutney. Mix well and serve with idli, dosa.

HOTEL COCONUT CHUTNEY - STEP BY STEP PICTURES

  • Grate white part of the coconut. Do not use the brown part.

  • In a mixie jar, take the grated coconut, green chilli, pinch of tamarind (optional), cashew nuts, salt. Grind to a coarse paste without water.

  • Now add the required water and grind to a thick, smooth chutney. Transfer to a bowl.
    • Hotel coconut chutney recipe
  • Heat oil in a small kadai. Temper mustard seeds, urad dal and add to chutney. If you like you can temper red chilli and curry leaves too. Mix well and serve with idli, dosa !
  • It stays good for 2 to 3 hours without refrigeration if you do not use your hands while grinding and mixing. It stays good for 2 days under refrigeration.Enjoy ! 
  • Hotel style coconut chutney

Note

  • For variations you can skip cashewnuts and add 1 tsp of pottukadalai / roasted chana dal.
  • You can add 1 garlic clove or 1/4 inch ginger for more flavor.
  • In some hotels, coconut chutney is tempered with red chilli and curry leaves. But I din’t use them.
  • You can also add a pinch of sugar if you like sweet taste in coconut chutney.
TIPS TO MAKE WHITE COLORED COCONUT CHUTNEY 

DO’s:
1. Always use freshly grated coconut.. Do not grate the brown part. More coconut less pottukadalai/Fried gram  is also a must for white chutneys.
2. Add less water for getti (thick )chutney, add the quantity necessary to run your mixie.
3. Indian mixer mate or small jars are a must. American Oster mixer comes with a small jar attachment which also works well.
4. Use small green chillies and always use less green chilies for white color chutney and increase the spiciness by tempering with more red chilies. This answers the question "Why my chutney looks green"?
Don’ts:
1. Ready made flakes or desiccated flakes or frozen grated coconut will work but don't except taste and color. Mostly pale white color with oily look.
2. No microwaving for reheating, just thaw to bring back to room temperature. Reheating makes it release more oil and which results in stinky coconut smell.
3. Blender will not work for thick chutney and adding more water will make it thin but consistency will be still coarse.
4.In cold places , coconut leaves oil while grinding chutneys. To avoid this , use hot water or warm water for grinding chutneys. It comes out white & smooth without leaving oil.

Try this easy, yummy Tamilnadu hotel style coconut chutney / Thengai chutney for idli, dosa !
restaurant style coconut chutney


Continue Reading...


September 4, 2018

Paneer Noodles Recipe – Maggi Paneer Masala Noodles

Paneer noodles
Recently I tasted this Maggi paneer masala noodles in Bannerghatta Meenakshi mall food court. Its a popular street food. In the restaurant menu card, this dish was titled as Paneer noodles delight. I was expecting hakka noodles with paneer masala. But they served Instant Maggi noodles with onion, tomato masala and paneer. Sendhil and Raksha were kidding me that I spent 100rs to eat 10 rs Maggi 😉. 

Yes, even though it was a bit disappointing I really liked the way they dressed up a simple Maggi to a spicy, tasty paneer masala noodles. I tried to recreate the same at home for our Sunday breakfast. It came out very well and similar to the one I tasted. If you feel, Maggi noodles is unhealthy, you can try the same with any other instant noodles like Top Ramen, Yipee or use plain noodles too. Finally it is your choice. 

I used Maggi veg atta noodles. So I did not add carrot, green peas or capsicum. I made it in a simple way by adding onion, tomato masala and paneer soaked in water.  I did not even roast the paneer pieces in oil as it may make the paneer chewy and hard. So this version of Maggi paneer masala noodles is very easy and quick to prepare in busy mornings just like restaurant ones. 

Bachelors and working women who loves to eat Maggi can try this yummy version. Make your own variations by adding more vegetables or tofu instead of paneer. to make it vegan and healthy.  If you don’t want to use tastemaker, you can add garam masala powder and some chat masala powder. You can pack this masala noodles for lunch box as well. It stays good. Ok friends, lets see how to make Maggi paneer masala noodles with step by step pictures.

Check out my Maggi Noodles Patties recipe too.


Maggi paneer masala noodles


Maggi paneer masala noodles recipe


Maggi paneer masala noodles recipe

Instant Maggi paneer masala noodles recipe for breakfast / dinner and lunch box


Cuisine: Indian
Category: Maggi recipes
Serves: 3
Prep time: 10 Minutes
Cook time: 20 Minutes
Total time: 30 Minutes


INGREDIENTS


  • Maggi veg atta noodles packet - 3 small ( Use any instant noodles)
  • Paneer / cottage cheese - 100gms ( chop into small cubes)
  • Cooking oil  or butter - 2 tbsp
  • Cumin seeds - 1/2 tsp
  • Big onion - 1 (Finely chopped or thinly sliced)
  • Ripe tomato - 2 (Finely chopped)
  • Red chilli powder - 1/2 tsp
  • Maggi taste maker powder - 3 packets
  • Turmeric powder - 1/4 tsp
  • Sugar - a pinch
  • Salt - little for masala
  • Water - 3.5 cups ( 3 + 1/2 cup)
  • Coriander leaves – to garnish

HOW TO MAKE MAGGI PANEER MASALA NOODLES

  1. Chop paneer into small cubes. Soak in hot water till use.
  2. Heat oil and splutter cumin seeds. Add chopped onion, tomato and saute well.
  3. Add chilli powder, turmeric powder and little salt, sugar.
  4. Add water, noodles tastemaker powder and bring to boil.
  5. Break the noodles and to boiling water. Cook till soft.
  6. Lastly add paneer cubes and chopped coriander leaves. Mix well and switch off the flame.
  7. Remove and serve hot immediately.

MAGGI PANEER MASALA NOODLES - STEP BY STEP PICTURES

  • Boil 2 cups of water. Switch off the flame. Chop paneer into small cubes as shown in the cover picture. Soak the paneer pieces in hot water till use. It helps to keep the paneer soft. Alternately you can shallow fry paneer cubes in little oil and add to the noodles at the end. 

  • Take 3 packets of any instant noodles along with taste maker powder. Finely chop onion, tomato into small pieces.
  • Maggi paneer masala noodles
  • In a wide kadai, heat oil. Splutter cumin seeds. Add finely chopped onion and saute till it becomes transparent. Add tomato pieces, required salt, sugar, turmeric powder, red chilli powder, garam masala powder(optional) and saute till tomato becomes mushy.
  • Maggi paneer masala noodles
  • Now add water and tastemaker powder. Let it roll boil. Now break the noodles into two parts and add to the boiling water.
  • Maggi paneer masala noodles
  • Keep the flame medium and let the noodles boil in open flame for 5 to 10 minutes till 80% of water is drained off. Toss in whenever needed to avoid burnt bottom. Now cover the noodles with a lid and cook in low flame for 2 minutes to cook till soft. But make sure it doesn’t become mushy.

  • Lastly add the soaked paneer pieces and finely chopped coriander leaves. Mix gently, switch off the flame and serve immediately. Enjoy !  ( I cut the paneer pieces into small cubes after adding to the noodles. So paneer looks big in step by step pictures than main picture)Maggi paneer masala noodles

Note

  • Adjust the quantity of chilli powder as per your taste.
  • You can also add 1/2 tsp garam masala powder for more masala flavor.
  • If you are using plain noodles instead of Maggi, you can replace tastemaker with more red chilli powder, coriander powder, garam masala powder and chat masala powder. 
Enjoy Paneer masala Maggi noodles at home. Kids would love it !
Maggi paneer masala

Continue Reading...


August 31, 2018

Thattai Murukku Recipe – Thattai Recipe - Thattu Vadai Recipe

Thattai recipe

Thattai @ thattu vadai @ thattai murukku @ elladai @ nippattu  @ chekkalu ( ppaahh, so many names 😃) is one of my most favorite South Indian snacks recipe. Usually thattai is prepared with rice flour, urad dal flour, butter or oil. But nowadays in many snack shops, thattu vadai is prepared using maida/ all purpose flour, pottukadalai maavu (fried gram dal flour), vanaspathi and cooking soda to make it white, crispy and melt in mouth. But I followed a traditional Tamil style thattai recipe from one of my old cookbooks. It comes out golden brown in color and tastes crispy, slightly hard just like the way it should be. 

Traditionally thattu vadai is prepared using homemade processed rice flour but today I have shared the same recipe using store bought idiyappam flour to ease the job. In my family, we don’t have the practice of making thattai for Krishna jayanthi. But many people make elladai / thattai for this festival. So I thought of sharing this easy, crispy thattu vadai recipe with you all as my Gokulashtami special recipe. Lets see how to make Tamilnadu style thattai recipe with step by step pictures.  

Check out my other Gokulashtami recipes in THIS LINK.

thattai murukku

Thattai recipe / Thattu vadai Recipe


Thattai recipe / Thattu vadai Recipe

How to make thattai / thattu vadai with store bought rice flour, urad dal flour and butter


Cuisine: South Indian
Category: Snacks
Serves: 25 nos
Prep time: 10 Minutes
Cook time: 5 Minutes
Total time: 15 Minutes


INGREDIENTS

1 cup = 250ml
  • Idiyappam flour - 1 cup
  • Roasted urad dal flour - 3 tsp / 1 tbsp
  • Melted butter - 1 tbsp
  • Soaked chana dal or fried gram dal/ pottukadalai - 1 tbsp
  • Red chilli powder - 1 tsp
  • Asafetida / Hing - 1/4 tsp
  • Black sesame seeds - 1 tsp
  • Chopped curry leaves - 2 tsp
  • Salt & water - as needed
  • Cooking oil -  to deep fry

HOW TO MAKE THATTAI

  1. In a wide bowl, mix all the ingredients, butter.
  2. Mix well. Add water gradually and make a smooth dough.
  3. Take a big gooseberry sized ball. Pat in a greased zip lock cover.
  4. Prick with a toothpick. Arrange the thattai in a cloth and rest for 10 minutes.
  5. Deep fry both sides till bubbles cease. Remove and drain in a tissue paper.
  6. Store in a box after it cools down. Stays crispy for one to 2 weeks.

THATTAI MURUKKU RECIPE - STEP BY STEP PICTURES

  • Wash and soak 1 tbsp chana dal in required water for an hour. In a wide bowl, take the rice flour, roasted urad dal flour, salt, sesame seeds, hing, chopped curry leaves, soaked & drained chana dal or fried gram dal.

  • Add melted butter and mix well. Make sure butter is mixed well with the flour.

  • Add water gradually and make a smooth, non- sticky dough.  Make big gooseberry sized balls and keep it covered with a wet cloth till use.
  • thattai recipe thattai recipe

    • Take 2 zip lock covers or any thick sheets. Grease with oil and place a dough ball over one sheet. Cover with another sheet. Take a small bowl and press the dough to make a flat and thin circle. To make crispy thattai, pat it thin. You can cut the thattai into perfect round shapes with the bowl if you like.
    • thattai recipe
    • Shape all the balls into thin circles.  Carefully remove the thattai. If the thattai breaks while patting or removing it, dough is dry. So sprinkle little water to the dough and then make shapes. Remove the thattai from Zip lock cover and arrange them in a cotton cloth to absorb extra moisture. Let it rest for 10 minutes.
    • thattai recipe
    • Heat oil to deep fry. Drop a pinch of dough into hot oil. If it rises to the top immediately, oil temperature is right. Now keep the flame medium and drop the thattai. Cook both the sides till bubbles cease and becomes golden brown. Drain in a tissue and store in an air tight box after it cools down.Stays good for 2 weeks !thattai recipe

    Note

    • Prick the thattai with a fork without fail. It prevents the thattai from puffing up.
    • Oil temperature should be perfect. If the oil is too hot, thattai becomes golden brown without cooking properly.
    • Cook slowly in medium flame. Remove the thattai only after the bubbles cease completely else it will become chewy.
    • Pat it thin and even else it won’t cook perfect.
    • To make crispy thattu vadai, pat it thin.


    Try this crunchy thattai murukku and enjoy !
    thattu vadai
    Continue Reading...


    August 27, 2018

    Raw Papaya Pickle (Instant) – Green Papaya Sweet and Sour Pickle Recipe

    Raw papaya pickle
    Raw papaya / Green Papaya / unripe papaya is a healthy miracle fruit that is rich in vitamins, enzymes and phytonutrients. I have tasted ripen papaya very few times in my life even though I know its health benefits like it is good for eyes, helps in weight loss etc. Somehow I don’t like its smell and taste. But recently when my neighbor gave me a big raw papaya, I had no clue of what to make with it or how to consume it. So I asked my instagram friends and readers to suggest me some raw papaya recipes. Among the recommendations, I tried raw papaya kootu, Gujarati Sambharo, and this instant raw papaya pickle.  I tried this sweet and sour green papaya pickle recipe from Tarla Dalal' ji’s website by making some small changes in the method of cooking. It came out finger licking good. Basically I love pickles with sweet and tangy taste.  As raw papaya has a natural sweet taste, this pickle suited me very well. Friends do try this instant raw papaya pickle, you will love it for sure. It tastes good for rice, roti and paratha. Lets see how to make instant raw papaya pickle with step by step pictures.
    Green papaya pickle

    Raw Papaya Pickle - Instant Green Papaya pickle recipe


    Raw Papaya Pickle - Instant Green Papaya pickle recipe

    Sweet and sour raw papaya pickle for rice, roti and paratha.


    Cuisine: North Indian
    Category: Pickle recipes
    Serves: 1 cup
    Prep time: 10 Minutes
    Cook time: 20 Minutes
    Total time: 30 Minutes


    INGREDIENTS

    1 cup - 250ml
    • Chopped raw papaya / green papaya - 1 cup
    • Turmeric powder / haldi - 1/2 tsp
    • Kashmiri red chilli powder - 2 tsp
    • Tamarind/ imli - Big gooseberry size
    • Salt - as needed
    • Powdered Jaggery - 2 to 3 tbsp (adjust based on your taste)
    • Vinegar or lemon juice - 1 tsp (optional)
    To Temper and saute
    • Cooking oil - 2 tbsp
    • Mustard seeds (Rai / Sarson ) - 1 tsp
    • Fenugreek seeds (Methi) - 1/4 tsp
    • Asafetida / Hing - 1/4 tsp
    • Curry leaves (Kadi patta) - 5 nos
    • Chopped garlic (Lehsun) - 2 tbsp
    • Chopped Ginger( adrak) - 2 tbsp

    HOW TO MAKE RAW PAPAYA PICKLE

    1. Wash and peel the skin or raw papaya. Remove the seeds and scrape the thread parts.
    2. Chop the green papaya into small cubes. Soak tamarind in water and take 1/2 cup extract.
    3. Heat oil in a kadai. Splutter mustard seeds, methi seeds, hing and curry leaves.
    4. Saute garlic, ginger for a minute. Add papaya pieces. Mix well.
    5. Add salt, turmeric powder, tamarind extract, red chilli powder and jaggery.
    6. Boil till thick in medium flame. Switch off the flame. Add lemon juice or vinegar.
    7. Cool down and store in a box. Tastes sweet and sour. Enjoy with rice, roti and paratha !

    RAW PAPAYA PICKLE RECIPE - STEP BY STEP PICTURES

    • Wash and peel the skin of raw papaya. Remove the seeds and scrape the thread like portions in the middle of raw papaya else it will taste bitter. Chop the green papaya into small cubes and set aside. Soak tamarind in 1/2 cup warm water for 15 minutes. Take the extract and set aside.
    • raw papaya pickle
    • Heat oil in a kadai, splutter mustard seeds, fenugreek seeds, hing and curry leaves. Add chopped garlic and ginger. Saute for a minute.
    • raw papaya pickle
    • Now add the chopped raw papaya and saute for a minute. Add 1/2 cup of tamarind extract, turmeric powder, red chilli powder, jaggery, salt and hing. Add little more water if needed. 
    • raw papaya pickle
    • Let it boil till pickle becomes semi thick, papaya becomes soft and cooked.  Check for taste and add more chilli powder or salt if needed. Do not over cook or mash the papaya.
    • raw papaya pickle
    • Cool down the pickle and transfer it to a jar or glass bottle. Store in a refrigerator up to one week. It tastes both sweet and spicy. It goes well with dal rice, curd rice, roti and paratha.
            
    • Enjoy !

    Note

    • Adjust the quantity of chilli powder and jaggery as per your taste.
    • You can also use 1/4 tsp of roasted fenugreek seeds powder instead of fenugreek seeds.
    • For variations, you can saute the chilli powder in oil before adding raw papaya.

    Try this yummy raw papaya pickle. You will like it for sure !
    Papaya pickle recipe


    Continue Reading...