Search Chitra's Food Book

December 23, 2020

Neureos / Nevri – Goan Neuros Recipe - Goan Christmas Sweets

nevris recipe

Neureos/ Nevris / Nevri / Neuro is a Goan special Christmas sweet. In Tamil nadu we call this as sweet somas. In North India, its popularly known as Gujiya. But the fillings and method varies for all these sweets.

This Goan special neureos in a must and should try sweet for Christmas in Goa and other parts of India. Its tastes crispy outside with a sweet filling inside. Filling for neureos can be prepared in two ways. One with desiccated coconut and another one with roasted moong dal.

As this is my first attempt in making this sweet, I tried stuffing with desiccated coconut, rava / semolina and nuts. It came out so well. We all loved it. I have made it thrice so far. Every time it came out well without disappointing me. You can store this sweet in an air tight container for a week and consume it. But I would recommend to use it before 2 to 3 days.

Every year I am trying some Goan Christmas sweets and posting in my blog. I am happy that I tried this yummy sweet this year.

Friends, do check out my Kormolas and 

Kulkul sweets too !


Goan nevris


Neureos / Nevri Recipe


Neureos / Nevris Recipe

Neureos / Nevri recipe - Goan Christmas sweet !


Cuisine: Goan
Category: Sweet
Serves: 8
Prep time: 1 Hour
Cook time: 20 Minutes
Total time: 1 Hour 20 Minutes


INGREDIENTS
For dough (1 cup = 250ml)
  • All purpose flour / Maida - 1 cup
  • Semolina / Coarse rava / Bombay rava - 1 tbsp (roasted or unroasted)
  • Clarified butter /ghee - 1 tbsp
  • Salt - 2 pinches
  • Water - as required
For filling/ stuffing
  • Semolina / coarse rava - 1/4 cup
  • Sugar - 1/3 cup
  • Grated coconut / Desiccated coconut - 1/4 cup
  • Clarified butter /ghee - 1 tbsp
  • Dry grapes / raisins - 2 tbsp
  • Finely Chopped cashew nuts - 2 tbsp
  • Cardamom powder - 1/4 teaspoon
  • White sesame seeds - 1 tbsp (optional) 
  • Khus khus / poppy seeds - 2 tbsp (optional)
HOW TO MAKE NEUREOS/ NEVRIS
  1. Mix maida, rava, ghee and salt. Add required water to make a thick, smooth dough.
  2. Cover and rest for an hour. Make stuffing in the mean time.
  3. Heat ghee in a kadai. Roast cashews and raisins. Add rava, khus khus, sesame seeds and roast for few minutes.
  4. Add sugar, desiccated coconut / dry coconut powder, cardamom powder and mix well in low flame for a minute. Switch off the flame and cool down completely.
  5. Take the dough and shape lemon sized balls. Roll it to a small disc. Keep the stuffing in the center. Apply water on the corners. Fold into half moon shape.
  6. Cut the edges and make shapes. Heat oil to deep fry.
  7. Add 2 to 4 nevri and cook in medium flame till golden brown on both the sides.
  8. Remove from oil and drain in a perforated vessel. Fry the remaining and set aside to cool.
  9. Store in an air tight box and consume within 2 to 3 days for best taste. 

Goan neuros

METHOD - STEP BY STEP PICTURES
  • Take a bowl and mix maida, rava, ghee and a pinch of salt. Mix well to spread the ghee with flour. Add water gradually and make a smooth but thick dough. Dough should not be too soft or sticky. Please remember this point. Thick dough gives you crispy neureos.
  • Goan neureos recipe
  • Cover the dough with a cloth and let it rest for an hour. In the mean time, lets make the stuffing / filling part.
  • Goan neureos recipe

  • To make neureos filling, heat ghee in a kadai. Roast the cashew pieces and dry grapes till golden. Add the rava,  khus khus, sesame seeds (optional) and roast for few minutes in medium flame. Make sure you don’t burn anything.
  • Add sugar and mix well in medium flame. Add dry coconut powder or desiccated coconut powder and mix quickly. Switch off the flame. You don’t have to melt the sugar. If you mix quickly and switch off the flame, stuffing will be in powder form only. Let it cool down completely else stuffing will ooze out while frying.( If you want to use powdered sugar, add at the end after switching off the flame. Rava and coconut should not be hot while adding sugar). 
  • Goan neureos recipe
  • Now take the dough and make lemon sized balls. Take one ball, dust in maida or apply little oil and roll to make small disc of palm size. Place 1 tbsp stuffing in the center. Apply water in the corners and fold the nevri into half moon shape.
  • Goan neureos recipe
  • Now use a samosa cutter or pizza cutter or a knife and remove the extra portions. You can press with a fork to make designs or make it simple like half moon shape. Make all the nevri and arrange in a plate without touching each other.
  • Goan neureos recipe

  • Heat oil in a kadai. Drop a pinch of dough and check if it rises to the top immediately. Now keep the flame completely low and drop 2 to 3 nevris based on the size of kadai and quantity of oil. You can also fry one at a time like I did.
  • Increase the flame to medium and cook patiently till it turns golden on one side. As soon as you drop the neureos in oil, it puffs up. Splash oil over the top of neureos and cook in low to medium flame till it turns golden in the bottom.
  • Now flip and cook the other side till golden and bubbles cease completely. Make sure you cook it patiently in low to medium flame till golden in color to make crispy neureos. It will also stay crispy for few days when stored in an air tight box.
  • Remove from oil and keep in a perforated vessel to drain excess oil. Let it come to room temperature. Then store in an air tight box and handle with clean hands to avoid becoming soggy. It stays good for 2 to 3 days at room temperature. Do not refrigerate. 
  • Goan neureos recipe
    Enjoy !


Note

  • For stuffing, you can also use powdered sugar. In that case, you should not add while the rava and coconut is hot. You should mix when its cold after roasting.
  • Do not make the dough soft and sticky. Neuroes will become soft after frying. Make a tight, thick dough.
  • Deep fry patiently in low to medium flame to make crispy nevris.
  • Khus khus/ poppy seeds and sesame seeds are ususally used. But you can skip if you don''t have it.


Try this yummy, Goan special Neureos for this Christmas and enjoy !

Neureos recipe

    
Continue Reading...


December 11, 2020

Kalavai Chutney Recipe | Tamilnadu Hotel Style Kara Chutney

Kalavai chutney recipe

I had bookmarked this Kalavai chutney from Mullai’s blog long back. Being a chutney lover, I was so tempted to try this recipe by seeing the rave reviews in her Instagram page.

Actually I was thinking Kalavai chutney and Kadamba chutney are one and the same. I have already shared a kadamba chutney recipe in my blog. But there are slight differences in the ingredients and method of both the chutney.

After tasting this chutney, I reminded about a kara chutney recipe in a hotel in Thiruvannamalai, Tamilnadu. My MIL and myself loved that chutney a lot. We started to smell and lick the chutney to know the ingredients that went inside. But we couldn't spot on. Now I am so happy that I could recreate the same taste after so many years. Many thanks to Mullai for this wonderful chutney recipe. I have shared more than 70 chutney recipes in my blog. I would say this is one of the best chutney recipes. You must give a try !

Ok friends, lets see how to make this yummy Kalavai chutney recipe for idli dosa with step by step pictures and the video.


Kalavai chutney recipe


Kalavai chutney recipe - Hotel style kara chutney


Kalavai chutney recipe - Hotel style kara chutney

Kalavai chutney recipe for idli dosa. It tastes similar to hotel style kara chutney. 


Cuisine: South Indian
Category: Chutney recipes
Serves: 4
Prep time: 10 Minutes
Cook time: 20 Minutes
Total time: 30 Minutes


INGREDIENTS
To saute and grind
  • Tomato – 2
  • Big onion – 2 ( medium sized)
  • Green chilli – 1
  • Red chilli – 2 to 3
  • Byadgi chilli / Kashmiri chilli – 1 (for bright red color)
  • Ginger – 1/2 inch
  • Garlic cloves – 5
  • Coriander leaves – 1/4 cup
  • Mint leaves – 1/4 cup
  • Curry leaves – 5
  • Grated Coconut – 2 tbsp
  • Tamarind – a small piece
  • Salt & water - as needed
  • Cooking oil - 2 tbsp
To temper
  • Cooking oil - 1 tsp
  • Mustard seeds - 1/2 tsp
  • Curry leaves - few
HOW TO MAKE KALAVAI CHUTNEY
  1. Wash and chop the onion, tomato, green chilli, ginger and garlic.
  2. Wash the coriander, mint and curry leaves. Pat it dry.
  3. Heat 1 tbsp cooking oil in a kadai and saute the coriander leaves, mint leaves and curry leaves till crispy. Remove in a plate.
  4. Add 1 tbsp more cooking oil and add the chopped onion, green chilli, red chilli, ginger, garlic and saute for few minutes.
  5. Add chopped tomato and coconut. Saute till tomato turns mushy. Add salt too
  6. Switch off the flame and let it cool down. Add a piece of tamarind and grind everything to a smooth paste.
  7. Lastly add the sauteed coriander, mint and curry leaves. Pulse twice to make it coarse. Remove and transfer the kalavai chutney to a bowl.
  8. Temper mustard seeds, curry leaves in oil and add to chutney. Mix well.
  9. Serve with hot idli, dosa !
METHOD - STEP BY STEP PICTURES
  • Wash and chop onion, tomato, green chilli, ginger and garlic cloves. Wash the coriander leaves, mint leaves and curry leaves. Pat it dry and set aside to dry.

  • Heat 1 tbsp oil in a kadai. Add the dried mint+coriander+curry leaves. Saute well till it becomes crispy without changing the color. Remove in a plate.
  • Kalavai chutney
  • To the remaining oil, add 1 tbsp more oil. Saute the chillies, ginger, garlic cloves and onion. Saute till onion turns transparent.
  • Kalavai chutney
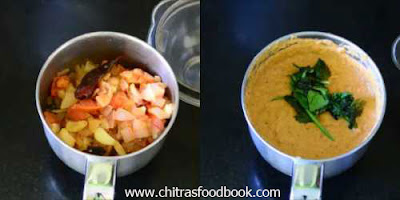
  • Add chopped tomato and coconut. Saute till tomato becomes mushy. Add the required salt, tamarind piece and saute it. Switch off the flame. Let it cool down.
  • Kalavai chutney
  • Take them in a mixie jar and grind to a coarse paste without adding water. Then add water and grind to a smooth paste. Lastly add the sauteed coriander+mint+curry leaves and pulse  it twice or thrice. Do not grind smooth after adding the greens. It should be visible in the chutney as shown in the picture.
  • Kalavai chutney
  • Heat 1 tsp oil in a kadai. Temper mustard seeds and curry leaves. Add to chutney and mix well. Serve with hot idli, dosa. Tastes yumm !
  • Kalavai chutney
    Enjoy !

Note

  • Adjust the quantity of chillies as per your taste.
  • For variations, you can add the greens (coriander, mint and curry leaves) after sauting the tomato.
  • Do not add more ginger and coconut. Flavor of chutney will differ.


Do try this yummy Kalavai chutney for idli, dosa and enjoy !

Kalavai chutney
 

Continue Reading...


December 6, 2020

Set Dosa Without Curd–Sponge Dosa Recipe

Set dosa recipe

Set dosa is one of my most favorite dosa recipes. Most of the time this would be my order in restaurants here. Set dosa served with sagu and coconut chutney tastes absolutely delicious.

Set dosa can be prepared in two ways. One with rice, urad dal, poha and methi seeds without using curd and another version without urad dal where poha and curd is used with rice. Both of them comes out super soft and tastes good. So it is also called as sponge dosa.

Long back I have shared a sponge dosa recipe without urad dal adding curd. Recently I tried this version without curd. It came out so well. I served it with potato kurma and kara chutney as side dish. We all loved it.

I won’t say this recipe makes Karnataka hotel style set dosa. Hotel style dosa batter has rice flour, maida, dals in it. I am still working on it to get the exact taste and texture. This one is just home style set dosa that comes out soft and spongy.

It tastes similar to the one you get in road side small eateries. To make Tamil nadu style set dosa, you can add some turmeric powder in the batter and serve with vada curry.

Friends, do try this yummy, soft and spongy dosa recipe. You will also love it like us ! Lets see how to make spongy dosa recipe without curd with step by step pictures and video. 

Check out my another version of soft dosa recipe if interested !

sponge dosa

Set dosa / sponge dosa recipe without curd


Set dosa / sponge dosa recipe without curd

Set dosa / sponge dosa recipe without curd


Cuisine: Indian
Category: Main course
Serves: 15
Prep time: 16 Hours
Cook time: 5 Minutes
Total time: 16 Hours 5 Minutes


INGREDIENTS
1 cup = 250ml
  • Dosa rice or idli rice - 2 cups (Low quality Raw rice / maavu arisi or parboiled rice)
  • Urad dal - 1/2 cup
  • Poha / Aval / Pressed rice - 1/2 cup (Thin or thick)
  • Methi seeds / fenugreek seeds - 1/2 tsp
  • Salt & water - as needed
  • Cooking oil or sesame oil - to drizzle around dosa
HOW TO MAKE SET DOSA/SPONGE DOSA
  1. Wash and soak rice, urad dal, methi seeds together for 4 hours.
  2. Wash and soak poha separately for 30 minutes till soft.
  3. Take a mixie jar and grind the rice to a smooth paste.
  4. Transfer the batter to a vessel. Grind poha to a smooth paste and add to rice batter.
  5. Mix both the batter with your hands. Ferment overnight or 12 hours.
  6. The next morning, add salt and mix the batter.
  7. Heat dosa tawa, pour a ladleful of batter. Spread slightly.
  8. Cook till porous in medium flame. Drizzle oil and flip the dosa.
  9. Cook the other side too. Remove it. Make 2 or 3 dosa and serve as set.
  10. Serve hot with kurma/sagu and chutney!
METHOD - STEP BY STEP PICTURES
  • Wash and soak the rice, urad dal and methi seeds together for 4 hours. Wash the poha and soak it separately for an hour. Use drinking water for soaking so that you can use the same soaked water for grinding. It helps for fermentation.

  • Take a mixie jar and add the soaked rice along with required soaked water. Grind to a smooth paste and transfer to a big vessel with room for fermentation. You can grind in two batches.
  • set dosa recipe
  • Grind the soaked poha along with the water to a smooth paste. Add to the rice batter and mix well with your hands. Mixing with your hands aids fermentation. Do not add salt while grinding as it delays fermentation during winter.
  • set dosa recipe
  • After mixing the batter, close the vessel with a lid. Ferment it overnight or minimum 12 hours based on the weather in your place. Proper fermentation is the key to make perfect, spongy dosa with more holes. 

  • The next morning, add required salt in the batter. Mix well and check the consistency of batter. If its too thick, add little water. Batter should be like regular dosa batter in consistency.
    • set dosa recipe
  • Heat a dosa tawa, lower the flame. Pour 1/4 cup of water. Wipe with a cloth and pour a big ladleful of batter. Spread it slightly. Keep the flame medium. Pores/ holes will appear all over the dosa. The drizzle with oil all over the dosa. Flip over and cook the other side. Remove when golden. Alternately you can cover and cook the dosa. Remove when its cooked. No need to flip it.
  • set dosa recipeset dosa recipe

  • Serve hot with vegetable kurma or saagu and coconut chutney. Enjoy !

Note

  • Do not reduce the quantity of poha or urad dal. Dosa won’t be soft.
  • For variations, you can use idli rice instead of dosa rice.
  • My dosas were even more good the second day with lots of holes. Please refer the above pictures. The more fermented batter, greater the results would be.
  • You can refrigerate this batter up to 2 days and use it.
  • You can flip and cook the dosa on both the sides as I did OR cover and cook the dosa till holes appear and then remove it.
  • To resemble like Tamil nadu style set dosa, you can add some turmeric powder in the batter. Flip and cook both the sides.

  
Try this easy, yummy set dosa recipe without using curd. You will love it !

Below picture is the dosa made with second day batter !

sponge dosa


Continue Reading...


December 3, 2020

Snake Gourd Dal Recipe – Pudalangai Paruppu Kulambu

Snake gourd dal recipe

Recent days I have been trying varieties of dal recipes for lunch. Snake gourd dal / Pudalangai paruppu kulambu is a simple and easy dal recipe for rice and roti. When I was looking for easy Snake gourd recipes, I came across this snake gourd moong dal recipe in this blog. I loved the simplicity and ease of the recipe and tried it immediately.

Its a quick one pot recipe that can be prepared easily in a pressure cooker. I used both moong dal and toor dal in this recipe. Just add chopped Snake gourd, onion, tomato , ginger, garlic and green chilli to the dals. Pressure cook and mash it. Temper mustard seeds and red chilli in ghee and add to dal. Voila, dish is ready in few minutes !

You can mix this Snake gourd dal in plain rice drizzled with few drops of ghee and have it with any spicy curry as side dish. I prepared Brinjal podi curry and vatha kuzhambu along with it and served with some karasev prepared for Diwali. We had a soul satisfying lunch.

Lets see how to make this simple and quick, one pot Snake gourd dal recipe with step by step pictures.

Snake gourd moong dal

Snake Gourd Dal Recipe - Pudalangai Paruppu Kuzhambu


Snake Gourd Dal Recipe - Pudalangai Paruppu Kuzhambu

Snake Gourd Dal Recipe - Pudalangai Paruppu Kuzhambu for rice


Cuisine: Indian
Category: Side dish
Serves: 3
Prep time: 10 Minutes
Cook time: 20 Minutes
Total time: 30 Minutes


INGREDIENTS
1 cup = 250ml
  • Toor dal - 1/4 cup
  • Moong dal - 1/4 cup
  • Snake gourd - 1 (chop into small slices)
  • Green chilli - 1 or 2 (Use 1 for less spice)
  • Big onion - 1 (roughly chopped)
  • Ginger - 1 inch piece (finely chopped)
  • Garlic cloves - 5
  • Tomato - 1 (finely chopped)
  • Turmeric powder - 1/4 tsp
  • Hing / Asafetida - 1/4 tsp
  • Salt & water - as needed
  • Cooking oil – few drops
To Temper
  • Ghee - 2 tsp
  • Mustard seeds - 1/2 tsp
  • Cumin seeds - 1/2 tsp
  • Curry leaves - few
  • Red chilli - 1
To Garnish
  • Coriander leaves - 2 tbsp (finely chopped)
HOW TO MAKE SNAKE GOURD DAL
  1. Wash the dal and soak in water for 15 minutes.
  2. Wash and chop onion, tomato, ginger finely and Snake gourd into small slices. Set aside.
  3. In a pressure cooker base, take the soaked toor dal, moong dal, chopped snake gourd, onion, slit green chilli, tomato, ginger, garlic cloves, turmeric powder, hing, required salt, few drops of cooking oil and water.
  4. Mix well and pressure cook in very low flame for two whistles.
  5. Open the cooker after the steam is released. Mash it well. 
  6. Temper mustard seeds, curry leaves and red chilli in ghee and add to dal.
  7. Mix well and boil for few minutes till thick. Garnish with coriander leaves.
  8. Serve with plain rice along with a curry / poriyal !
METHOD - STEP BY STEP PICTURES
  • Wash the moong dal and toor dal. Soak in enough water for 15 minutes. In the mean time, wash and chop onion, tomato, ginger finely. Wash and chop Snake gourd into small slices or cubes as you like.

  • In a pressure cooker base, take the soaked toor dal, moong dal, chopped snake gourd, chopped onion, tomato, garlic, ginger, turmeric powder, hing, salt, a drop of oil and drinking water.
  • Snake gourd dal recipe
  • Mix well and pressure cook in low flame for 2 whistles. Open the cooker after the steam is released. Mash it well. 
  • If the dal is too thick, add little water and mix well.

  • Heat ghee in a kadai. Splutter mustard seeds, curry leaves, cumin seeds, red chilli and switch off the flame. Add this to the mashed dal.
  • Snake gourd dal recipe
  • Boil the dal till it thickens slightly. Garnish with coriander leaves and switch off the flame.
  • Snake gourd dal recipe
  • Serve hot with plain rice adding few drops of ghee.

  • Enjoy !


Note

  • Soaking the dal helps to cook it mushy.
  • Use drinking water to cook the dal.
  • Adjust the quantity of green chilli based on your taste.
  • You can use moong dal or toor dal alone in this recipe.
  • If you want to make it for chapathi / roti, make the dal thicker and add a tsp of garam masala powder while the dal boils.


Try this easy, Snake gourd dal recipe and enjoy with plain rice!

Snake gourd dal


Continue Reading...


November 26, 2020

Karthigai appam recipe with rice flour – Instant Sweet appam with rice flour

Karthigai appam

Every year during Karthigai deepam, I try some varieties of sweet appam recipe and nei appam recipes. This year I tried a simple and instant sweet appam recipe using rice flour, jaggery and banana. I followed this recipe from Kamala’s corner blog. Traditional Karthigai appam is prepared by soaking and grinding raw rice with little urad dal. But this is an instant version with just idiyappam flour. Even though this appam is without wheat flour or maida, it came out so well and soft as expected. It was not hard or chewy.

I tried both deep fried version and paniyaram pan version. Deep fried version had a crispy exterior and soft interior whereas paniyaram pan version tasted spongy and soft. I loved both of them equally. We all enjoyed it.

This sweet appam recipe can be prepared instantly without any soaking or grinding job. You can use ghee if you wish to make nei appam. Friends, I am sure you will like this recipe for its ease. I have added jaggery syrup to remove the impurities. If you have pure jaggery, you can just powder and add it directly which makes the job even more easy.

If you want to make sweet appam without banana, please refer this recipe link. I have made a separate post for that. If you wish to skip baking soda, then you can try adding 2 banana instead of one. Still there would be some compromise in softness and texture of appam.

Ok friends, Lets see how to make Karthigai appam recipe with rice flour, jaggery and banana.

Check out my other Karthigai deepam recipes if interested.

Also check out my post on how to celebrate Karthigai deepam at home

Karthigai appam recipe

Karthigai appam recipe


Karthigai appam recipe

Karthigai appam recipe with rice flour, jaggery and banana


Cuisine: Tamil nadu
Category: Sweet
Serves: 12
Prep time: 10 Minutes
Cook time: 20 Minutes
Total time: 30 Minutes


INGREDIENTS
1 cup = 250ml
  • Idiyappam flour / rice flour - 1 cup ( I used idiyappam flour)
  • Powdered jaggery – 1/2 cup + 2 tbsp ( Use 1/2 cup for less sweetness)
  • Ripe banana - 1 (Use 2 if small)
  • Grated coconut - 2 tbsp
  • Cardamom powder - 1/2 tsp
  • Baking soda - 1/4 tsp
  • Water - 1/2 cup for syrup + extra for batter
  • Salt - a pinch
HOW TO MAKE SWEET APPAM WITH RICE FLOUR
  1. In a bowl, peel the banana and mash it well.
  2. Add rice flour, grated coconut, cardamom powder, baking soda and a pinch of salt. Mix well.
  3. Take jaggery in a bowl and add some water to cover it. Boil and melt it completely. Let it cool down.
  4. Strain the syrup and add to rice flour mixture. Add required water.
  5. Make a thick but pourable batter. Heat oil to deep fry.
  6. Pour one appam and cook both sides till golden. Remove and serve.
  7. To make in paniyaram pan with less oil, add oil or ghee in paniyaram pan.
  8. Pour batter, cover cook and flip the other side. Cook both sides till golden. 
  9. Remove and drain in a tissue paper. Serve hot !

Karthigai appam

METHOD - STEP BY STEP PICTURES
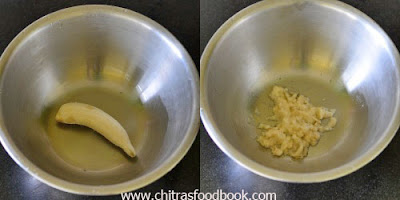
  • In a wide bowl, take the banana. Peel the skin and mash it well. Use 2 banana if very small. I used one big sized yelakki banana. You can use rasthali or poovazhai variety.
  •  Karthigai appam with rice flour

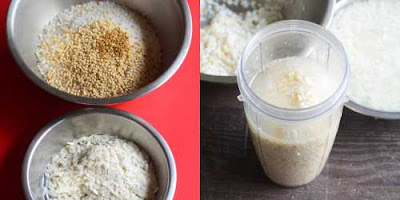
  • To this mashed banana, add rice flour, cardamom powder, grated coconut, baking soda and a pinch of salt. Mix well and set aside.

  • Take powdered jaggery in a bowl or kadai. Add water to cover it. Boil and melt it by stirring with a ladle. Once its completely melted, switch off the flame. Make sure syrup is not thick. If necessary add some cold water and mix well. Set aside to cool down.
  • Karthigai appam with rice flour
  • Take a metal strainer and add the jaggery syrup. Strain and add to the rice  flour mixture. Mix well and add some water to make appam batter. Use a whisk and mix well to avoid lumps.
  • Karthigai appam with rice flour
  • Add required water to make thick batter but it should be pourable. Do not make the batter thin or watery. So add the water carefully. Mix well and rest the batter for minimum 10 minutes.

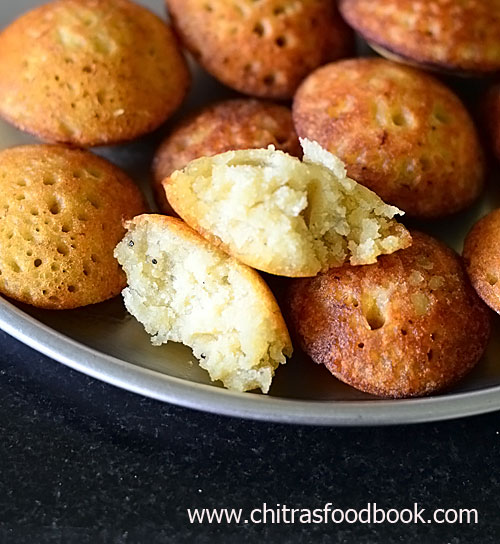
  • Heat oil in a kadai to deep fry appam. Drop a pinch of batter to check if it rises to the top. Once the oil is hot, pour a small ladleful of batter in the oil. Make one appam at a time. Lower the flame and splash some oil over the appam. Once it turns golden in color, flip and cook the other side till golden and bubbles subsides. Remove from the oil and drain in a tissue paper. Initially appam tastes hard with crispy exterior. But it becomes soft as it cools down.Sweet appam with rice flour
  • To make appam in paniyaram pan, heat a paniyaram pan adding oil or ghee in each hole. Pour batter till 3/4th of the hole. Cover with a lid and cook in low to medium flame till bottom turns golden. Flip and cook the other side. Remove and serve hot.Karthigai appam with rice flour
    Enjoy !

Note

  • Add 3/4 cup jaggery for more sweetness.
  • You can add more coconut if you like.
  • Do not skip baking soda as this is an instant version.
  • You can add 2 ripen banana instead of one.
  • For variations, you can add 2 tbsp of wheat flour along with 1 cup rice flour.
  • Do not make the batter watery. Appam will absorb more oil.
  • Do not add more baking soda.
  • My daughter liked the deep fried version whereas we loved the pan ones. I just made 4 deep fried appams and made the remaining in paniyaram pan for us. So you can make based on your liking.


Try this easy and instant sweet appam recipe with rice flour and jaggery. Enjoy !

Karthigai appam with rice flour


Continue Reading...


November 19, 2020

Chinna Vengaya Chutney For Idli dosa, Small Onion Chutney Recipe

Small onion chutney

I love onion chutney recipes more than coconut chutney or tomato chutney varieties. And that too this small onion chutney (Chinna vengaya chutney) is my most favorite side dish for idli dosa next to my my mom’s raw onion chutney.

Small onions also known as sambar onion or shallots is one of the costliest vegetables in Bangalore. Its always priced double when compared to Salem, Tamil nadu. So I buy and use it very rarely in my kitchen. But this is my go to chutney recipe whenever I have small onions in stock.

This onion chutney is without tomato or coconut. So it stays good for travel. You can use it for one day at room temperature and up to one week under refrigeration. Tastes the best with hot idli and dosa. Don’t forget to add some gingely oil while serving because it tastes mildly spicy.

Now lets see how to make small onion chutney / chinna vengaya chutney for idli, dosa with step by step pictures and video !


Small onion chutney

Chinna vengaya chutney recipe / small onion chutney


Chinna vengaya chutney recipe / small onion chutney

Chinna vengaya chutney recipe / small onion chutney for idli dosa


Cuisine: South Indian
Category: Side dish
Serves: 2
Prep time: 10 Minutes
Cook time: 10 Minutes
Total time: 20 Minutes


INGREDIENTS

  • Small onion - 25
  • Garlic cloves - 5
  • Red chilli - 4 or 6
  • Cooking oil – 2 tbsp
  • Tamarind - Berry size (sundakkai alavu)
  • Salt & water - as needed
To Temper
  • Gingely oil - 1 tbsp
  • Mustard seeds - 1/2 tsp
  • Urad dal - 1 tsp
  • Curry leaves - Few
HOW TO MAKE SMALL ONION CHUTNEY
  1. Wash and peel small onion, garlic.
  2. Heat oil in a kadai. Saute onion, garlic and red chilli.
  3. Saute for a minute. 
  4. Lastly add tamarind, salt and saute till onion turns transparent.
  5. Switch off the flame.
  6. Cool and grind everything to a smooth paste.
  7. Temper mustard seeds, urad dal and curry leaves in gingely oil.
  8. Add to chutney. Mix well and serve with idli dosa !
METHOD - STEP BY STEP PICTURES
  • Wash and peel the small onion and garlic cloves. Set aside.

  • Heat cooking oil in a kadai. Saute small onion, garlic cloves and red chilli till onion turns transparent. Keep the flame medium and saute the onions. Do not burn the chillies.
  • Small onion chutney
  • Once onion starts to cook, add tamarind and salt. Mix well and saute till onion turns pinkish and transparent. Switch off the flame. Let it cool down.

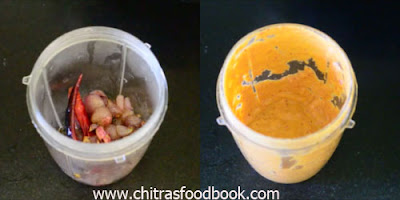
  • Grind to a smooth paste adding required water. Transfer to a bowl. Heat gingely oil. Temper mustard seeds, urad dal and curry leaves. Add to chutney and mix well.
    • Small onion chutneySmall onion chutney
         
    • Serve with hot idli and dosa. Enjoy !

    Note

    • Adjust the quantity of red chillies as per your taste. I used 4.
    • If you add more red chillies, add more tamarind to balance the taste.
    • Make sure you saute the onion properly else chutney smells raw. 
    • For variations, you can add 2 tbsp of grated coconut or saute one big tomato along with onions.

    Try this easy, yummy small onion chutney for idli dosa and enjoy !

    Chinna vengaya chutney

    Continue Reading...