Broad beans poriyal / Avarakkai poriyal in Tamil is an easy, healthy broad beans recipe I make in my kitchen at least once in a week. Its a Tamilnadu style avarakkai poriyal recipe I learnt from my MIL. We make this poriyal without onion and garlic. Its one of the easy avarakkai recipes that can be prepared in a pressure cooker directly. You can use pattai avarakkai / thick variety broad beans or sanna avarakkai / thin broad beans to make this poriyal. Both tastes good. I have used 1 carrot as I had less broad beans in hand. Its optional. In some hotels, they add carrot too. I have used moong dal in this recipe. You can either skip it or use chana dal instead.
Friends, do try this easy Tamilnadu style avarakkai poriyal recipe directly in a pressure cooker. You will love it. For variations, you can add onion. Instead of grated coconut , you can use roasted peanut powder or even roasted flax seed powder. Its a healthy option too. Ok, lets see how to make broad beans poriyal with step by step pictures.
Mix well and add moong dal, water. Pressure cook in low flame for one whistle.
Remove the lid and boil the excess water if any. Lastly add grated coconut.
Serve with sambar, curd rice.
METHOD - STEP BY STEP PICTURES
Wash and remove the fiber part by trimming the edges of broad beans. Slice it thinly. Set aside. ( I also used 1 chopped carrot as I had less broad beans). Carrot is optional though.
Heat oil in a pressure cooker. Splutter mustard seeds, urad dal, cumin seeds and curry leaves.
Add the chopped broad beans. Add turmeric powder, sugar and salt. Mix well. Add sambar powder and saute for a minute.
Lastly add the moong dal and 1/2 cup of water. Mix well and cover the pressure cooker. Cook in very low flame for one whistle.
Open the cooker after the steam is released. Mix well and boil excess water if any. Lastly add the grated coconut and cook for a minute.
Serve with sambar rice, curd rice. Enjoy!
Note
For variations, you can add chana dal instead of moong dal.
You can add red chilli powder instead of sambar powder but flavor varies.
If you want to avoid coconut, you can add roasted groundnut powder or flax seeds powder.
Try this easy, yummy broad beans curry / avarakkai poriyal for rice and enjoy !
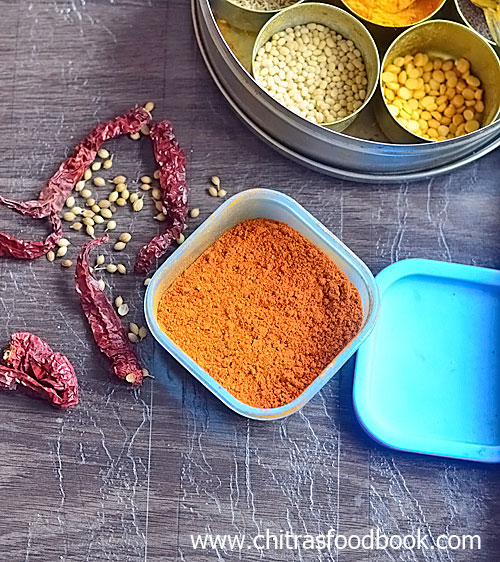
Idli podi / Gun powder is an inevitable side dish in my house. Though I make varieties of chutney and sambar recipes for idli, dosa we have the habit of eating at least one last idli with idli podi. So I always keep idli powder also known as chutney powder in stock. And I love to try varieties of idli podi recipes. Its been a long time I used flax seeds in my cooking.
Flax seeds (Linum usitatissimum) also known as common flax or linseeds (Aali vithai in Tamil,
Alsi ke Beej in Hindi,
Agase bījagaḷu in Kannada, caṇa vittukaḷ in Malayalam, Avise gin̄jalu in Telugu ) are small oil seeds that originated in the Middle East thousands of years ago. Lately, they have gained popularity as a health food. This is due to their high content of heart-healthy omega-3 fats, fiber, and other unique plant compounds. Flax seeds have health benefits such as improved digestion and a reduced risk of heart disease, type 2 diabetes, and cancer. They can be easily incorporated into your diet. Roasting and grinding them is the best way to make the most of their health benefits. (source : https://www.healthline.com/nutrition/foods/flaxseeds).
Earlier I used to add roasted flax seeds powder in my poriyal and kootu. This time, I wanted to include it in the form of idli podi.
This Flax seeds idli podi is a healthy chutney powder recipe prepared with urad dal, chana dal, flax seeds and curry leaves. Garlic flavored idli podi is our family’s favorite. So I have added some garlic cloves in this flax seeds podi. You can skip if you don’t like it.
Friends, do try this healthy flax seeds idli podi recipe / flax seeds chutney powder for idli, dosa. You will love it. Check out the video too !
Red chilli – 12 to 15 (6 spicy chilli, 6 byadge or Kashmiri chilli)
Curry leaves - 1 sprig
Asafetida / Hing – 1/4 tsp
Garlic cloves with skin - 10
Salt - as needed
Cooking oil – 2 tsp
HOW TO MAKE FLAX SEEDS IDLI PODI
Heat a kadai and dry roast flax seeds till it starts to pop.
Remove in a plate. Add 1 tsp cooking oil in the kadai.
Roast chana dal and urad dal. Roast till golden in low to medium flame.
Remove in a plate. Heat 1 tsp oil. Add red chilli, curry leaves, hing and roast till crispy.
Add salt and switch off the flame. Let everything cool down.
Firstly grind the red chilli to a coarse powder.
Now add the roasted dals, flax seeds and grind to powder.
Lastly add the garlic cloves. Grind to a fine powder.
Remove in a bowl. Cool down and store in a box.
Enjoy with idli, dosa adding sesame oil.
METHOD - STEP BY STEP PICTURES
Heat a kadai and dry roast the flax seeds till it starts to pop. Do in low to medium flame without burning them. Transfer to a plate.
In the same kadai, add 1 tsp of cooking oil. Add chana dal, urad dal and keep roasting them till both the dals turn golden in color. Do it patiently in low to medium flame. It takes 5 to 7 minutes.
Transfer to the flax seeds plate. Now add 1 tsp of oil and add the red chillies, hing and curry leaves. Roast it till crispy without browning the chillies. Roast in low to medium flame patiently. Lastly add salt.
Switch off the flame and let it be in the kadai for some time. It helps to make the chillies more crispy.
Firstly grind the red chillies (use Byadge or Kashmiri chilli for bright color), curry leaves coarsely. Then add the roasted dal, flax seeds together to a powder. Lastly add garlic cloves with skin. Grind to a smooth powder by mixing the powder from the bottom. Don’t worry, garlic will be ground well.
Now transfer the idli podi to a bowl. Let it cool down. Then store in an air tight box. Use up to 2 weeks to 1 month. Enjoy with idli dosa drizzling with sesame oil.
Note
For variations, you can skip garlic cloves and add asafetida alone.
You can also add 2 tbsp of dry roasted sesame seeds and add it while grinding. It adds a nice flavor.
Grinding red chillies firstly gives a nice, bright color to idli podi.
For healthy variations, you can add roasted horsegram too.
You can also add 2 tsp of roasted coriander seeds for variations.
Healthy and tasty flax seeds idli podi is ready to enjoy with idli dosa !
Recent days my sleep got disturbed because of my lower back pain. I was unable to sleep continuously due to anxiety and panic attacks. Apart from meditation and other natural sleeping techniques, I was looking for some home remedies and foods to include in my diet. I came across this khus khus milk / khas khas milk (poppy seeds in English) / Kasakasa paal/ Gasagasa paal recipe in Gowri samayalarai YouTube channel. I tried it on the same day as all the ingredients were readily available with me. It came out so well with a nice flavor of poppy seeds and cardamom.
Basically poppy seeds are used in baked goods and traditional dishes worldwide. Both the seeds and their oil are said to offer various health benefits including promoting digestion, boosting skin and hair health, treating headaches, coughs to curing asthma and insomnia. As poppy seeds are derived from the opium poppy, its banned in some countries. In India, people use khus khus in their cooking regularly for grinding masala. It helps to give a thick and creamy texture to kurma and other gravies.
To powder the poppy seeds, I dry roasted them first which was not mentioned in the original recipe. I also added some cloves for flavor. It smells and tastes so good. Everyone in my home including Raksha loved it. I am taking this milk at night 30 minutes before going to bed. My sleep quality is improved. I am planning to take this milk for another week till I go back to my normal sleep. But do not consume more. For adults, you can give 1/2 cup of milk.
Friends, do try this khuskhus milk / Poppy seeds milk / Gasagasa paal at home for a good night’s sleep. Remember this milk alone doesn’t make wonders. You have to do meditation, try to divert your mind by listening to good music, watch movies or do your favorite activity that relaxes your mind.
Ok, lets see how to make this easy and yummy Khas khas milk with step by step pictures.
Khus khus milk / Kasakasa paal recipe
Poppy seeds milk - Khus khus / khas khas milk recipe for good sleep and added health benefits.
Nutmeg / jathikai - 1 small piece ( I used 1/4 th of one nutmeg)
Cardamom - 5
Pepper corns - 10
Turmeric powder - 1/2 tsp
Cloves - 2
HOW TO MAKE KHUS KHUS MILK / KASAKASA PAAL
Heat a kadai and dry roast the poppy seeds in low flame for few minutes.
Add cardamom, cloves, nutmeg and roast it for a minute.
Switch off the flame and allow to cool down completely.
Now add pepper corns and turmeric powder.
Grind everything to a smooth powder. Remove and store in a box.
To make khus khus milk : Boil 1/2 liter milk. Add 1 tbsp of this powder.
Mix well and boil for few minutes till it changes color. Strain the milk and serve hot or warm !
METHOD - STEP BY STEP PICTURES
Heat a kadai and dry roast the poppy seeds in low to medium flame for few minutes. Make sure you don’t burn it.
Add cloves, nutmeg and cardamom and roast it along with poppy seeds for a minute. This helps to powder easily. Switch off the flame.
Allow to cool down completely. Add them to mixie jar and add in pepper corns, turmeric powder.
Grind to a fine powder. Do not run the mixie continuously for long time. Poppy seeds releases oil and looks like paste. So grind it carefully. Mix in regular intervals and check if it becomes a powder.
Now transfer the powder to an air tight box. You can store up to a week at room temperature.
To make khus khus milk : Boil 500 ml milk in a bowl. Add 1 to 1.5 tbsp of this poppy seeds powder. Boil for few minutes till it changes color. Strain the milk using a metal filter. Serve the milk hot or warm. Enjoy !
Note
Dry roasting poppy seeds is optional but it helps to powder it well.
If you want to wash the poppy seeds, wash it and spread them in a cotton cloth. Let it dry completely. Then you can roast it.
Try this healthy khus khus milk at home and enjoy its health benefits.
My daughter Raksha is an ardent fan of Karnataka hotel style idli sambar. She loves the sweet and spicy taste of this sambar which is very unique across South Indian sambar recipes. Whenever I visit Jayanagar or old Bangalore, a parcel of Mysore masala dosa with chutney and sambar ( I request the parcel section to pack some extra sambar for me 😀) is a must for Raksha. Usually I buy from Krishna bhavan, Ganesh Bhavan, SLV and Upahara Darshini. Raksha always tells me to make this at home to pair with idli rava idli.
I have tried so many versions of Bangalore hotel idli sambar at home. But nothing came up to my expectation. Recently I tried a Karnataka hotel style idli sambar recipe from Rekha aduge and Anvika Youtube channel. I prepared a idli sambar powder as suggested and tried this sambar. It was so close to the restaurant ones. Raksha gave a big thumbs up and told me to follow this recipe every time.
Before posting the hotel style idli sambar recipe, I wanted to share this sambar powder recipe which plays a vital role in sambar preparation. Its definitely different from our usual sambar powder in certain ingredients. Cinnamon and dry coconut are the secret ingredients here. You can always use fresh coconut and roast it instead of dried coconut / kobbari but do not skip cinnamon. I also used a clove/ lavang to give more flavor which is optional in the original recipe.
Friends, do try this Karnataka idli sambar powder. I feel making this sambar powder is the only time consuming work in sambar preparation. If you make it once, you can store this powder and prepare sambar for 2 to 3 times. Lets see how to make Karnataka style idli sambar powder recipe with step by step pictures.
Roast everything together in low to medium flame for few minutes till you get nice roasted smell. Do not burn any.
Switch off the flame and let it cool down completely. Grind them to a smooth powder and store in an air tight box. It stays good for 2 weeks. You can make sambar twice or thrice with this quantity.
Note
You can use more chilli based on the taste. Use up to 15.
Use byadgi chilli or Kashmiri chilli for bright color.
Cloves is optional.
Easy, Karnataka hotel style idli sambar powder is ready !
Making frozen green peas at home was in my DIY list for long time. Usually I buy frozen peas packets from Reliance fresh or Metro. But sometimes, the peas is not so fresh and smells bad too. So I stopped buying them.
Instead of using store bought frozen peas, every year I think about making frozen peas at home during the season. But the laziness in me never allowed to take up this work. This year, somehow I managed to do it at home and blog here.
I tried two methods to make this frozen peas. One by freezing the fresh green peas directly and another way by cooking partially, washing in cold water (blanching) and then freezing it.
I found both the methods work well in terms of storage. Both stays good for months together. But blanched frozen peas stayed better in terms of freshness, color and smell. Also cooking is easier in blanched frozen peas than the raw ones.
Friends, do try this easy, homemade frozen peas. You will stop buying from the markets.
Zip lock covers or tupperware box - to freeze the peas
HOW TO MAKE FROZEN GREEN PEAS AT HOME
Method 1 : Remove the green peas from the pod and wash well.
Spread in a towel and let it dry. Store in a zip lock cover in batches.
Freeze and use upto a month. While cooking, take the required amount of frozen peas. Thaw it and cook in boiling water till soft.
For method 2 : Take the deshelled peas. Wash well.
Roll boil water and add peas to the boiling water. Boil till peas starts to float on top.
Switch off the flame and drain it. Wash in cold water. Spread in a towel. Let it dry.
Store in batches in zip lock covers. Freeze it and use up to 3 months.
To cook this frozen peas, take the required amount. Thaw it and boil for 2 minutes to become soft or saute in a kadai with little oil.
METHOD - STEP BY STEP PICTURES
Method 1 : Remove the raw green peas from the pod. Wash well and spread in a towel. Let it dry completely. Then store in batches in a ziplock cover. Freeze it. Stays good up to 2 months.
Whenever needed take the required amount of frozen peas. Thaw it and cook in boiling water till soft. It takes some time to cook as it is raw.
Method 2 : Remove the raw green peas from the pod. Wash well. Boil water in a pot adding sugar, turmeric powder (helps to get bright green color).
Boil for 2 minutes or till the peas starts to float on top. Switch off the stove. Immediately drain the excess water from the peas and wash it under cold water to prevent over cooking and shrink.
Now spread the peas in a towel and let it dry completely. Then store in a ziplock cover or in some plastic boxes in batches. Freeze it. You can store this up to 3 months.
To use this frozen peas, take the required amount and thaw it (i.e bring to room temperature). Then saute in oil in a kadai for few minutes or boil in water till soft.
Note
Freezing peas can be done in both the ways. Both are efficient.
Blanched peas looks bright in color and stays good for more time than the raw ones.
It is easy to cook blanched peas than the raw ones.
This method doesn’t work for dry peas.
Friends, do try any of these methods based on your liking to store the peas.
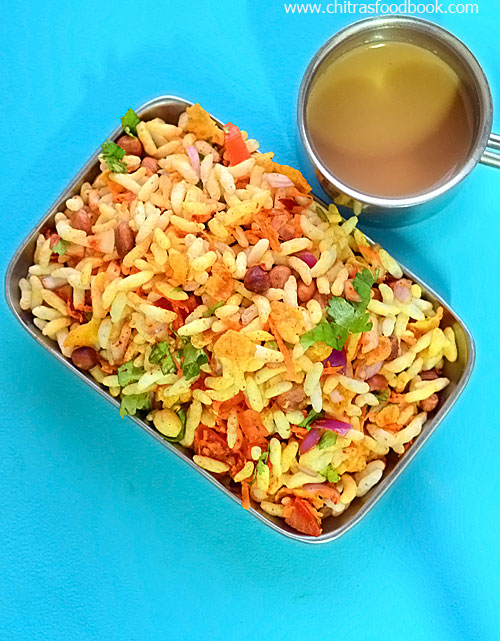
I came across this Mangalore style Churumuri recipe in a YouTube video when I was looking for puffed rice snacks for our weekend evening. Puffed rice is known as Mandakki in Kannada/Karnataka and Kurlari in Mangalore. Churumuri is a popular street food in Mysore, Mangalore Karnataka. This recipe is more like Tamil nadu beach style kara pori recipewith puffed rice mixed with vegetables like carrot, onion, raw mango, tomato, coriander leaves spiced with chilli powder and salt. Its a simple snack recipe but tastes amazing. Usually plain sev and Congress Kadalae / spicy masala peanuts is added to churumuri. But I used roasted peanuts and corn flakes mixture.
During mango season, finely chopped raw mango pieces are used. For variations, you can add some chat masala too.
Friends, do try this easy and yummy Mangalore style churumuri recipe. Enjoy your teatime with this low calorie snack.
Puffed rice – 2 to 3 cups (Use fresh and crispy puffed rice)
Tomato – 1(finely chopped)
Big onion – 1 (finely chopped)
Coriander leaves - 2 tbsp
Carrot – 1 (Grated)
Raw mango – 2 tbsp (chopped finely)
Red chilli powder – 1 to 2 tsp (adjust)
Salt - 1/4 tsp
Coconut oil – 1 tbsp
Chat masala – 1/2 tsp (optional)
Lemon juice - few drops (optional)
Roasted peanuts or Congress Kadale/ spicy peanuts – 1/4 cup
Corn flakes mixture or Plain sev – 1/2 cup
HOW TO MAKE CHURUMURI RECIPE
Wash and chop onion, tomato, coriander leaves finely.
Wash and grate carrot. In a wide bowl, mix all the veggies.
Add red chilli powder, salt, lemon juice and coconut oil.
Lastly add the puffed rice, roasted peanuts and plain sev/corn flakes.
Mix quickly and serve immediately.
METHOD - STEP BY STEP PICTURES
Wash and chop onion, tomato, coriander leaves finely. Grate carrot and set aside. If the puffed rice is soggy, first roast the puffed rice in a hot kadai till crispy or microwave in high power for one minute. Roast peanuts in a hot kadai till skin crackles OR microwave in high power for 2 minutes. Keep everything ready and set aside.
In a wide bowl, take the finely chopped onion, tomato, grated carrot, coriander leaves, lemon juice, red chilli powder, salt and coconut oil. Mix well.
Lastly add crispy puffed rice ( I used 3 cups), roasted peanuts or Congress Kadale / spicy masala peanuts, plain sev or corn flakes ( I used corn flakes mixture). Mix quickly and serve immediately.
Puffed rice turns soggy soon after mixing. So serve immediately. If you want crispy churumuri, add 3 cups of puffed rice. But add more red chilli powder if you it spicy.
Enjoy with tea/ coffee !
Note
Adjust the quantity of chilli powder as per you taste.
You can add more or less onion, tomato, carrot based on your need.
Always add puffed rice at the end as it gives you crispy churumuri.
Try this easy, yummy Mangalore style churumuri recipe and enjoy !
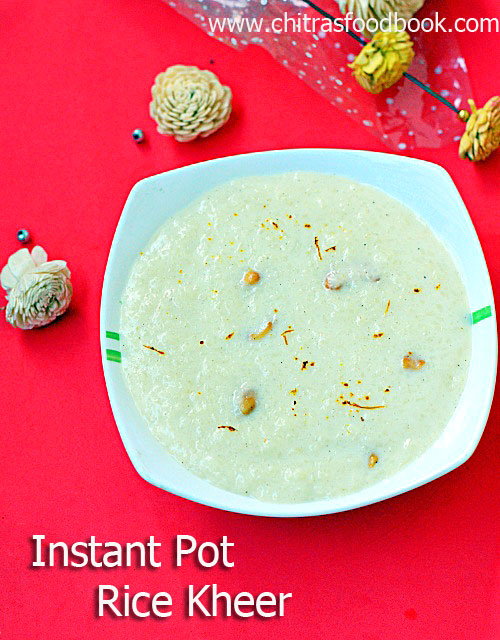
Rice kheer / rice pudding (arisi payasam in Tamil) was the very first recipe I tried in my instant pot for Thursday Guru pooja prasad. Rice kheer is a creamy Indian dessert recipe that is prepared for festivals and special occasions at home. The ease of this recipe has made me prepare this dish almost every week Thursday or Friday poojai. All we have to do is to just add in roasted basmati rice, water, milk, sugar, cardamom powder and few saffron threads. Cook in pressure cooker mode in instant pot for just 12 minutes and your creamy rice kheer is done ! It tastes more like restaurant style rice kheer.
Before making this rice kheer in instant pot, I referred so many recipes for perfect measurement, procedure and cooking time. Most of the recipes called for cooking rice in milk (in porridge mode or pressure cook mode) and then add sugar or condensed milk, flavoring ingredients like cardamom, saffron, nuts etc. But I wanted a recipe like one pot one shot just like my pressure cooker semiya payasam.
When I was discussing about this with my friend Shalini, she suggested me to try this method. She has been doing making rice kheer in instant pot for the potluck, get togethers and weekend party following this procedure. Its a hassle free and easiest method to make this yummy Indian dessert even in the last minute. You can serve 10 people easily with just 1 cup of rice.
In Instant pot rice kheer, most of the people complain about curdling of milk or rice sticking to the bottom of instant pot or kheer getting burnt in the bottom. Don’t worry, this method doesn’t disappoint you in any way. Addition of water is the key here. You will get a rich, super creamy, thick and yummy rice kheer all the time.
I have used basmati rice, sugar and milk in this recipe. You can use raw rice, condensed milk or soy milk, Almond milk, coconut milk( for Vegan options) instead. You can also use evaporated milk.
Friends, do try this easy and creamy rice kheer in instant pot. You will love it and make it more often like me. Lets see how to make Indian rice pudding / rice kheer in instant pot with step by step pictures.
Instant pot rice kheer / rice pudding in Instant pot
Rice kheer / Rice pudding - Rich and creamy Indian dessert recipe using Instant pot
Add the rice and roast for a minute. Firstly add water, mix well.
Then add milk, sugar, cardamom powder, saffron threads. Mix well.
Press CANCEL. Press PRESSURE COOK and set the time to 12 minutes in normal pressure.
Make sure pressure valve is in SEALING position. Let the pressure release NATURALLY (NPR). Open the cooker and mash the rice well.
Add more milk and sugar if needed.
Add roasted cashews. Mix well and serve hot. Enjoy !
METHOD - STEP BY STEP PICTURES
Take basmati rice and grind coarsely using pulse button in mixie. Wash it well and set aside.
Wash the instant pot vessel and the inner ring portion of the lid thoroughly. Dry it completely. This helps to prevent curdling of kheer.
Switch on the instant pot and press SAUTE button. Heat 1 tbsp ghee in the instant pot base vessel. Add cashew nuts and roast it till golden in color. Remove in a plate.
Add washed rice and roast for a minute. Add water (DO NOT SKIP WATER) and mix well. Add boiled milk (at roon temperature), sugar, cardamom powder and saffron threads. Mix well to scrape the rice sticking to the bottom of the vessel.
Now press CANCEL button and press PRESSURE COOK button. Set the timer to 12 minutes in NORMAL pressure. Close the instant pot lid and keep the pressure valve in SEALING position.
After 12 minutes, instant pot goes to warm mode and pressure releases. Let the pressure release naturally (NPR). Open the lid after the pressure button drops down. Mix well. Do not release the pressure forcefully. Milk will be splashed everywhere and make a mess. I removed it after 40 minutes. Kheer would be well cooked and looks thick. Mix well and check for taste and consistency. Add more milk and sugar if needed. I used 1/2 cup more milk. So totally I used 4.5 cups milk. Lastly add roasted cashewnuts. Mix well and serve hot.
Enjoy !
Note
Wash the instant pot vessel, lid and dry it properly before cooking . It helps to avoid curdling of kheer.
Do not skip water. It helps to avoid the kheer burning in the bottom.
Make sure your scrape the bottom of vessel to avoid the rice sticking to the vessel and getting burnt.
You can also use PORRIDGE Mode in instant pot but it takes longer time to cook.
You can make the kheer thick or thin as per your wish.
For variations, you can use condensed milk instead of sugar.
Do not use JAGGERY. Kheer will curdle. If you want to use jaggery, make a thin syrup. Add it only after cooking the rice in milk and water.
You can also make vermicelli kheer in the same way. You can set the cooking time even lesser as it cooks quickly.
Do not try to quick release because hot milk spills from the vent.
Try this easy, yummy rice kheer in instant pot. You will love it !