Karnataka style coconut dosa / Kayi dosa (Thengai dosai in Tamil) is a flavourful, yummy dosa variety. It is prepared with rice, poha and coconut as main ingredient. It comes out super soft and spongy without adding urad dal.
Last week when I was looking for dosa batter recipe without urad dal, I came across this coconut dosa in Veg recipes of Karnataka blog. I loved its soft and porous texture. So I tried it by doubling the recipe. As expected, it came out very well. We all loved it. I served it with red coconut chutney and garlic chutney. Both went well with this dosa.
Friends, do try this Karnataka style Coconut dosa / Kayi dosa recipe and share your feedback with me.
Coconut dosa - Kayi dosa | Thengai dosai recipe
Coconut dosa - Kayi dosa | Thengai dosai recipe for breakfast and dinner.
Thin Pressed rice / Thin Poha - 1 cup (Use 3/4 cup for thick poha)
Grated coconut - 1 cup
Fenugreek seeds / methi seeds - 1/4 tsp
Salt & water - as needed
HOW TO MAKE COCONUT DOSA
Wash and soak rice, poha and fenugreek seeds together in water for 4 hours.
Grind everything together adding grated coconut and required water.
Grind the batter till smooth and semi thick like dosa batter. Transfer to a vessel and ferment it over night.
The next day morning, batter would have raised well. Add required salt and mix well.
Heat a dosa pan and pour a ladleful of batter. Do not spread it thin.
Let it be small and thick. Cover and cook in medium flame for few minutes.
Dosa will be cooked well and soft with lots of pores. Remove and serve hot with chutney.
Tastes best with tomato chutney, garlic chutney or spicy coconut chutney.
METHOD - STEP BY STEP PICTURES
Wash and soak the dosa rice, poha and fenugreek seeds together in water for 4 to 5 hours.
Grind the rice mixture in a wet grinder or mixie adding some water. When it is half ground, add the grated coconut and grind the batter till smooth and semi thick like dosa batter in consistency. Make sure you do not grind the batter thin because dosa will become flat and thin if the batter is thin.
Transfer the batter to a vessel and cover with a plate. Let it ferment over night or minimum 10 to 12 hours based on the weather.
The next day morning, batter would have raised well. Add required salt and mix well. If the batter is too thick, add little water to bring dosa batter consistency.
Heat dosa tawa. Pour a ladleful of dosa batter and do not spread it. Make it small and thick. Drizzle oil and cover cook in medium flame till its cooked well. No need to flip it.
Remove the dosa and serve hot with spicy coconut chutney or tomato chutney or garlic chutney.
Enjoy !
Note
Do not make the batter thin. Grind it semi thick like dosa batter consistency.
No need to use cooking soda / baking soda or Eno to the batter.
Try this Karnataka style coconut dosa for breakfast / dinner and enjoy !
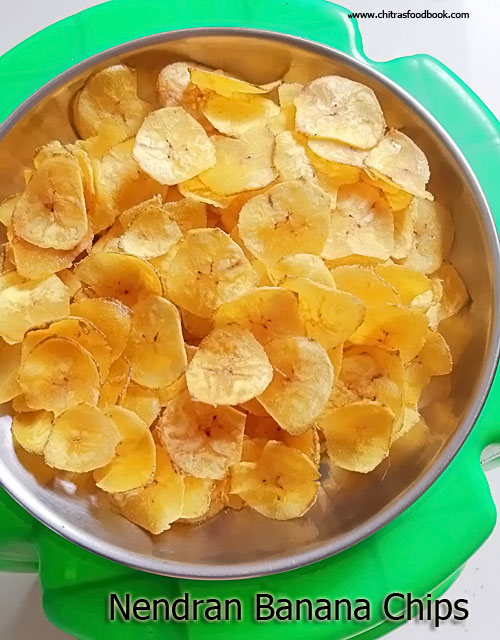
Kerala Nendran Banana chips is our family favorite. Usually I buy from Kerala stores nearby my house and give it for Raksha’s school snacks box. This time, I saw some fresh, raw nendran banana in the shop and took few to try this chips at home.
Traditionally, this Nendran chips is fried in coconut oil whereas I used refined oil. As its my first try, I told my MIL to make it for me. I took a short video and uploaded it in my Youtube channel too. Please watch it for your reference.
It stays good for a week if properly fried. Addition of turmeric powder gives a nice color to the chips. So do not skip it. Make sure you toss the chips every now and then for uniform cooking. Also make sure the bubbles stop before you remove from oil. This helps you to make a perfect Nendran banana chips at home. Ok, lets see how to make Kerala special Nendran banana chips at home with step by step pictures.
Nendran chips recipe
Kerala Nendran chips recipe - How to make Nendran Banana Chips at home
Heat oil and slice the banana over the hot oil using a thin slicer.
Cook both the sides till bubble cease. Keep tossing and cook in medium flame.
Lastly sprinkle the turmeric water and mix well to coat all the chips.
Remove when bubbles cease. Drain in a tissue paper and store in a box after it cools down.
Stays good upto one week.
METHOD - STEP BY STEP PICTURES
Wash and peel the skin of raw nendran banana. Trim the edges and keep immersed in water till use to prevent discoloration.
In a small bowl, mix turmeric powder, salt and water. Set aside. Heat oil to deep fry. Take a slicer.
Slice the banana over the hot oil in batches. Toss and cook in medium flame. Cook both the sides till bubbles cease.
Lastly sprinkle turmeric water and mix well to coat all the chips. Toss till bubbles cease and then remove from oil.
Drain in a tissue paper and set aside. Kerala nendran banana chips is ready to serve. Store in a box once cools down. Enjoy with sadya or as a evening snack ! Stays good upto a week.
Note
Adjust the quantity of turmeric powder based on the color.
After sprinkling the turmeric water, toss well to coat in all the chips.
Do not remove before bubbles cease. Chips will become soggy.
Kerala special Nendran banana chips is ready to enjoy with rice !
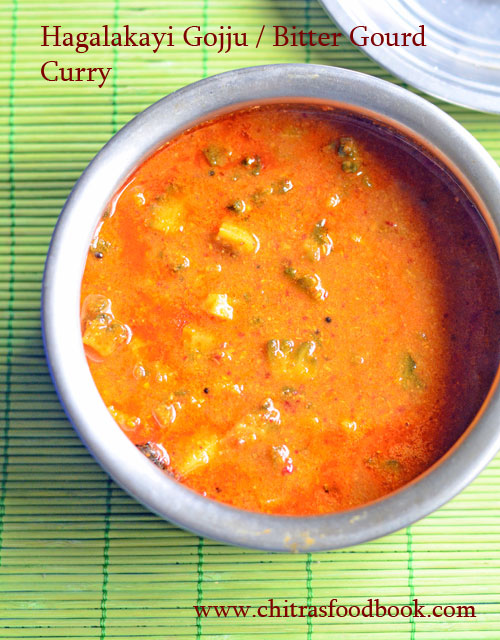
Karnataka brahmin style bitter gourd curry / Hagalakayi gojju is an yummy gravy for rice. This is the first time I am trying this recipe. It came out so well and yummy. There are many versions for this recipe. But this is a no onion, no garlic Udupi Brahmin style Hagalakayi gojju. I followed this recipe from a YouTube channel.
I am happy to include this recipe in my bitter gourd recipes list. I am sure I will make it often. Even Raksha had this gojju without any complaints as it has a mild sweet taste. Friends, if you are a bitter gourd lover, you must try this recipe for sure. Ok, lets see how to make Karnataka Brahmin style Hagalakayi gojju /Bitter gourd curry recipe with step by step pictures.
Heat a kadai and dry roast all the ingredients giver under “ roast and grind”.
Cool down and grind to a smooth paste. Set aside.
Heat oil in a cooker. Splutter mustard seeds, red chilli, hing and curry leaves.
Add finely chopped bitter gourd and saute for few minutes.
Add the ground masala, tamarind extract, jaggery, salt and water. Pressure cook in low flame for 2 whistles.
Open the cooker and check the consistency. Boil till it becomes thick but pourable.
Serve with plain rice adding ghee and enjoy !
METHOD - STEP BY STEP PICTURES
Wash and chop bitter gourd finely. Heat a kadai and dry roast all the ingredients given under “roast and grind”. Lastly add coconut, roast for few minutes and switch off the flame.
Cool down and grind to a smooth paste. Set aside.
Heat oil in a pressure cooker base. Splutter mustard seeds, red chilli, curry leaves, hing and asafetida.
Add finely chopped bitter gourd and saute for few minutes till bitter gourd shrinks in quantity. Now add tamarind extract, jaggery, salt and ground masala paste. Add required water and mix well.
Pressure cook in low flame for 2 whistles. Open the cooker after the steam is released naturally. You can see a layer of oil floating in top. Check the consistency. If its watery or thin, boil for few minutes to become thick but pourable.
Serve with plain rice adding few drops of ghee. Enjoy !
Note
Adjust the quantity of tamarind and jaggery as per the bitterness of bitter gourd.
Consistency of this gojju should be thick.You can adjust it as per your preference.
Try this Karnataka, Brahmin style Hagalakayi / Bitter gourd gojju.
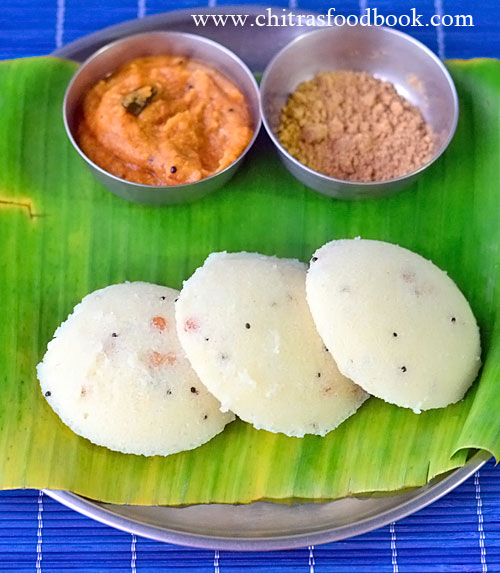
Instant Rava idli without ENO, baking soda was in my try list for years (Suji ki idli in Hindi). Some of my readers and friends were also asking me to try and share this recipe in my blog. After so many trial and errors, I am hooked up with this recipe. Usually rava idli batter without ENO, Baking soda needs to be fermented at least for 1 to 4 hours to get soft idli. It may be helpful for people living in hot places. For me, being in Bangalore, this trick never worked. I always end up making hard idli even after resting the batter for few hours.
Usually we use rava and curd in same quantity. Once I tried adding the leftover sour curd which is double the quantity of rava. i.e I used 2 cups of sour curd for 1 cup of roasted rava. Voila ! Idli came out super soft and fluffy. We all loved it. From then, this instant rava idli recipe without using ENO and baking soda has become my go to recipe. I make this idli at least once in a week for our dinner.
Bachelors and working women can make it easily. As its ENO and Soda free, we can have it without any guilt. To me coconut chutney is the best side dish for rava idli. You can also have it with tomato chutney or sambar if you like. Friends, do try this easy, yummy, instant Rava idli recipe without ENO, baking soda and enjoy! Check out the video below.
Dry roast rava/ semolina in a hot kadai in low flame for 5 minutes without changing its color.
Transfer to a bowl. Heat oil in the kadai. Splutter mustard seeds, urad dal, chana dal, green chilli, curry leaves, ginger.
Saute till dal turns golden. Add to the roasted rava. Add salt and mix well.
Add curd and mix well to make thick and pourable batter. Add little water if necessary.
Grease idli plate with oil and pour the batter. Steam in idli pot for 15 minutes or till tooth pick comes out clean.
Remove the idli plate and rest for 2 minutes. Scoop out the idli and serve hot with coconut chutney.
METHOD - STEP BY STEP PICTURES
Heat a kadai and dry roast rava in low flame for 5 minutes without changing its color. Transfer to a bowl.
Heat oil in the kadai. Splutter mustard seeds, urad dal, chana dal, curry leaves, finely chopped green chilli, ginger(optional) and saute well till dals turn golden brown in color.
Add this to roasted rava. Add required salt and 2 cups of sour curd. Mix well to make thick and pourable batter. If necessary add little water based on the thickness of curd.
Grease idli mould with little oil. Pour the batter. Boil water in idli pot and steam the idli for 15 minutes or till inserted tooth pick comes out clean.
Switch off the flame and remove the idli plate. Rest for 5 minutes. Scoop out the idli and serve hot with coconut chutney.
Enjoy !
Note
Use sour curd for best results.
Steam it for 10 to 15 minutes based on the size of mould. Make sure water starts to roll boil before you place idli plate.
Try this easy, healthy, instant rava idli without Eno and baking soda. Enjoy !
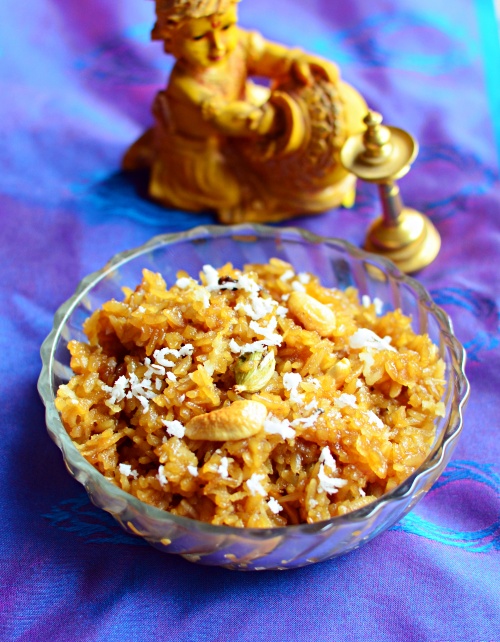
Wishing you all a very happy and prosperous new year 2022 💓😍. Vella aval recipe / sweet poha can be prepared in different methods. Usually people make it for Gokulashtami festival. Its one of the easiest Gokulashtami recipes. I too prepared this vella aval for Many of you would have tasted this as evening snack in your childhood days after coming from school. Yes, my mom used to make it in a very simple way by washing the thin poha, mix with powdered jaggery, grated coconut and cardamom powder. Even my MIL makes the same for Sendhil. We love this instant sweet aval recipe.
Today I have made this sweet poha recipe in a slightly different method. I used boiled and strained jaggery syrup instead of powdered jaggery as mine had lot of impurities. If your jaggery is pure, you can directly add grated jaggery to the soaked poha like my mom does it.
Soon I will try to post Kerala style sweet aval recipe. In the mean time, do check out my easy sweet aval – a no cook recipe I learnt from my MIL and also my aval puttu recipe. You can make any one of these recipes for Gokulashtami prasadam.
Wash and soak the thick aval for 10 to 15 minutes adding water 1 inch above it.
Boil and melt jaggery adding 1/2 cup of water. Strain the syrup and add to a kadai.
Let it boil till frothy. Switch off the flame and add soaked aval, coconut, cardamom powder. Mix well.
Aval becomes thick by absorbing the syrup. Lastly roast cashews, dry grapes in ghee and add to aval.
Mix well and serve hot ! Offer God and enjoy.
METHOD - STEP BY STEP PICTURES
Wash and soak the thick aval for 10 to 15 minutes adding water 1 inch above the aval. Aval absorbs all the water and becomes fluffy. Set aside.
Heat a kadai and add powdered jaggery, 1/2 cup of water. Boil and melt the jaggery. Strain the syrup and add to a kadai.
Boil the syrup till frothy and switch off the flame. Add the soaked aval, grated coconut, cardamom powder. Mix well and leave the mixture in the kadai till it becomes thick.
Heat ghee in a small kadai. Roast cashew nuts, dry grapes, cloves and add to aval. Add a pinch of edible camphor and mix well. Offer God and enjoy !
NO COOK VERSION : Take the soaked poha in a bowl. Add powdered jaggery, cardamom powder, grated coconut and a pinch of edible camphor. Mix well and serve immediately.
Note
You can use thin poha / paper aval too but no need to soak it. Just wash it thrice, drain all the water and use it.
Do not cook the soaked aval after adding to the jaggery syrup. It may become hard and chewy. So switch off the flame and add to the syrup.
Adjust the quantity of jaggery as per your taste. You can use 1/2 cup for mild sweetness.
Try this easy, yummy, sweet aval / vella aval and enjoy !
Paneer bhurji is a simple, quick and tasty side dish for chapathi / roti. It can be prepared easily under 15 minutes. All you need is some onion, tomato for the base along with whole spices and spice powders. You can serve this paneer bhurji as side dish for roti / chapathi or stuff and roll it to make paneer frankie and enjoy ! You can also stuff this paneer bhurji in two bread slices, toast to make it a sandwich. Sometimes, I use this paneer bhurji to make paneer masala dosa too.
Friends, do try this easy and yummy Paneer bhurji and enjoy as you like.
Wash and scramble the paneer into small pieces using your hands.
Heat oil and splutter cumin seeds. Saute onion till transparent.
Add ginger garlic paste and saute till raw smell goes off.
Add tomato and saute till mushy. Add red chilli powder, turmeric powder, garam masala powder, salt and sugar. Mix well.
Lastly add the scrambled paneer. Mix gently and switch off the flame.
Add crushed kasoori methi and finely chopped coriander leaves.
Mix and serve with roti/ chapathi.
METHOD - STEP BY STEP PICTURES
Wash the Paneer and scramble into small pieces or grate it using a big holed grater. Do not make it mushy. Set aside.
Heat oil in a kadai. Splutter cumin seeds. Saute onion, ginger garlic paste till raw smell goes off.
Now add the tomato and saute till mushy. Add turmeric powder, red chilli powder and garam masala powder. Add salt and sugar.
Mix well and lastly add the scrambled paneer. Mix gently and add crushed Kasoori methi. Switch off the flame and garnish with finely chopped coriander leaves.
Remove and serve hot with chapathi / roti.
Enjoy !
Note
For variations, you can saute 1/4 cup of chopped capsicum along with onion.
You can also add 1/2 tsp of coriander seeds powder if you like.