Search Chitra's Food Book

Showing posts with label MICROWAVE. Show all posts

December 23, 2016

Easy, 2 Ingredient Chocolate Fudge Recipe With Condensed Milk

Chocolate fudge with condensed milk
I have never thought that making homemade chocolate fudge is so easy until I come across THIS easy, microwave chocolate fudge recipe with just 2 ingredients. As I wanted to share some easy recipe for Christmas & New year celebrations,  I thought of posting this simple dessert recipe with you all. Basically old fashioned homemade fudge is made using cocoa powder, sugar, milk, butter and vanilla extract from scratch. But this is an easy and quick Chocolate fudge recipe with just 2 ingredients - Sweetened Condensed milk & Choco chips. It came out really well with soft, chewy texture. I have used microwave to melt the Choco chips. It can be done on stove top as well.You can make any number of variations in this recipe by adding nuts, raisins, variety of choco chips like dark, milk choco chips etc. Do try this easy homemade vanilla chocolate fudge recipe with condensed milk. I am sure you will love it a lot. Lets see how to make this easy chocolate fudge using 2 ingredients with step by step photos and a video !


easy chocolate fudge

Easy chocolate fudge recipe


Easy chocolate fudge recipe Easy chocolate fudge recipe with condensed milk and Choco chips - 2 ingredient fudge recipe in microwave
Cuisine: Indian
Category: Dessert
Serves: 20 nos
Prep time: 5 Minutes
Cook time: 1 Minutes
Total time: 6 Minutes


INGREDIENTS
1 cup - 200ml or 250ml
  • Choco chips - 1 cup ( Dark or milk Choco chips)
  • Sweetened condensed milk - 1/2 cup
  • Vanilla extract - 1/2 tsp ( optional)
METHOD


  • Line a baking pan with parchment paper or thermal foil sheet.
  • In a bowl, take choco chips ( I used 1/2 cup of dark choco chips & 1/2 cup of milk choco chips) and sweetened condensed milk. Mix well
    easy chocolate fudge
  • Microwave in high power (800w) for just 1 minute. Remove the bowl and mix well with a spatula till all the Choco chips melt completely. Add Vanilla essence and mix quickly. Mixture will start to thicken.
    easy chocolate fudge
  • Immediately transfer the mixture to the baking pan. Level it with a spatula and pat it twice. Refrigerate the fudge for 1 hour.
    easy chocolate fudge
  • Invert the fudge in a plate and peel the butter paper. Cut into squares and serve ! It stays good for 2-3 days without refrigeration.
    easy chocolate fudge
Enjoy !

Note
  • I used a combination of dark & milk Choco chips in this recipe. You can use any as u wish.
  • Do not replace sweetened condensed milk with evaporated milk.It won’t work
  • Do not cook the mixture for more than 1 minute in microwave. Its enough for the Choco chips to melt. If not, keep for  just 30 seconds more.
  • For variations, you can add finely chopped nuts, raisins, pecans to the melted chocolate.Just play around.

Enjoy this easy, yummy chocolate fudge for Christmas & New year celebrations !!
The below picture is fudge after a bite !
2 ingredient chocolate fudge
Continue Reading...


November 23, 2016

Masala Peanuts Recipe – Masala Kadalai (Microwave & Deep fried Versions)

masala peanuts recipe
When I was young, my dad used to buy this besan coated, red colored, deep fried, spicy, dry masala peanuts( masala kadalai in Tamil) and roasted green peas ( Kara Pattani ) that is sold in small packets along with cone ice cream in cinema theatres to munch on during interval time Nowadays we could find mostly popcorn & boiled sweet corn ( butter cup corn) in most of the theaters which I am not fond of. So we buy it only for my daughter Raksha. She likes Haldirams masala peanuts and moong dal as well. But I feel the quantity of salt is high in it. So I started making them at home either in microwave or by deep frying in oil depending on the time in hand. Mostly I make it for Raksha’s school snack box or for her evening snacks after coming back from school. Yesterday I prepared this masala peanuts for our teatime. I took a video recipe by making one batch in microwave and deep frying the other batch. Both came out really well, equally crunchy and tasty. Kids would like the deep fried version more than microwave ones. For people under diet or calorie conscious, you can opt for baked version in oven to cut down the calories.I have shared both of them with step by step pictures and a video below. Do try this easy, quick and yummy evening snack for your kids & elders in your family. Enjoy your teatime ! Now Lets see how to make this yummy South Indian Masala peanuts / masala kadalai at home.
microwave masala peanuts recipe


Masala Peanuts Recipe - Microwave & Deep Fried Versions


Masala Peanuts Recipe - Microwave & Deep Fried Versions How to make besan coated masala peanuts - Deep fried version & microwave versions !
Cuisine: Indian
Category: Snacks
Serves: Serves 2-3
Prep time: 20 Minutes
Cook time: 20 Minutes
Total time: 40 Minutes


INGREDIENTS
1 cup - 250ml
  • Raw peanuts - 1/2 cup
  • Besan flour / Kadalai maavu - 3 tbsp
  • Rice flour - 1.5 tbsp
  • Red chilli powder - 1 tsp ( Add 1.5 tsp for spicy taste)
  • Garam masala powder - 1 tsp
  • Ginger & Garlic Paste - 1/2 tsp
  • Salt & water - as needed
  • Asafetida/ Hing – 2 pinches
  • Cooking oil - 1 tsp ( to mix in the batter)
  • Cooking oil - to deep fry
METHOD

  • Wash and soak raw peanuts in water for 15 minutes. Soaking helps to skin to remain intact with peanuts while frying. The masala won’t come off with the skin after frying. After soaking drain the soaked water completely.
    masala peanuts recipe
  • Take them in a wide bowl and add the besan, rice flour, red chilli powder, Garam masala powder, Ginger & garlic paste, hing and required salt. Mix well. Then add water little by little and mix well till all the peanuts are well coated with the masala. Do not make the batter too thick or too thin. Now add 1 tsp of cooking oil all over the batter. Mix well and set aside.
    masala peanuts recipe
    masala peanuts recipe
  • For deep frying : Heat cooking oil to deep fry and drop a pinch of batter to check its temperature. When its hot, it will rise to the top immediately. Now sprinkle the masala coated peanuts in oil and deep fry till it becomes golden in color and crunchy. Cook in medium flame and toss them in oil whenever needed, cook till bubbles cease. Remove in a tissue paper.
    masala peanuts recipe
  • For microwave version : Grease a microwave plate with oil and spread the masala coated peanuts in the plate.You can spread them directly on the glass plate inside the microwave.  Microwave in high power for 6-7 minutes and cook till its roasted. Keep an eye to avoid burning of peanuts. You should remove the plate once in the middle( after 3 minutes) and flip them to cook the other side as well. Again microwave for 3-4 minutes. Mine took totally 7 minutes in 800w power. Roasted Peanuts will be soft to touch when hot. But it will become very crispy once it cools down. So let it cool down completely before you munch. Serve with tea !
    Microwave masala peanuts recipe
Enjoy !

Note
  • Adjust the quantity of spice powders as per your taste buds.
  • If you don’t have enough time for soaking, just wash the peanuts and mix all the flours in the wet peanuts and proceed as given above.
  • Timings in microwave depends on the power of microwave. So please keep an eye. It will burn off suddenly.
Microwave masala peanuts recipe
Enjoy this crunchy masala peanuts for your teatime !
Masala peanuts recipe
Continue Reading...


November 10, 2016

Microwave Dhokla Recipe | How To Make Instant Khaman Dhokla in Microwave

Easy dhokla recipe in microwave
Gujarati special snack Khaman Dhokla recipe was in my try list for years. Once I had tried steamed dhokla recipe using my pressure cooker but it was not up to the mark. Then I left the idea of trying dhokla at home. 

Recently my friend Shalini took me to a chat shop in BDA complex, Banashankari where Khaman dhokla is very popular. After tasting there, I got tempted to try it again. But this time, I tried an easy Instant dhokla in microwave. Yes, I watched this 4 minutes microwave dhokla recipe in a YouTube video and prepared it for our teatime snack yesterday. I made green chutney as well. 

Actually I halved the original recipe, made a slight change and tried it. Its so easy to make. It came out soft, porous, spongy and fluffy. This is really a good recipe for instant. Microwave dhokla under 5 minutes. I am very happy with the result.

 In this recipe, ENO fruit salt is used to bring the softness. You can replace it with equal quantity of baking powder and baking soda if you want to make it without ENO. Friends do try this easy, microwave dhokla recipe at home and share your feedback with me. Ok, Now lets see microwave dhokla recipe with step by step photos and a detailed video!


Microwave khaman dhokla recipe

Microwave dhokla recipe


Microwave dhokla recipe Khaman dhokla recipe in microwave in 4 minutes
Cuisine: Indian
Category: Snack
Serves: 6 pieces
Prep time: 5 Minutes
Cook time: 4 Minutes
Total time: 9 Minutes


INGREDIENTS
1 cup - 250ml
  • Besan flour - 1/2 cup
  • Curd - 1/4 cup ( semi solid)
  • Water - 3 tbsp
  • Lemon juice - 1/2 tsp
  • Cooking oil - 1/2 tbsp ( 1.5 tsp)
  • Turmeric powder - a pinch
  • Sugar - 1/2 tsp
  • Salt - as needed
  • Chilli+Ginger paste - 1 tsp OR Green chilli -1 no ( finely chopped) + Ginger - 1/2 inch piece ( finely chopped)
  • Plain ENO - 1/2 tsp (Use fresh, active ENO)
To Temper
  • Cooking oil - 1/2 tbsp
  • Mustard seeds - 1/2 tsp
  • Green chilli - 1 no ( small, finely chopped)
  • Curry leaves - few
  • Coriander leaves - 1 sprig
  • Sugar - 1 tsp
  • Water - 1/2 cup
  • Grated coconut - to garnish
METHOD

  • Keep all the ingredients ready before you start making. Take a microwave safe bowl ( Preferably square pan to make pieces) and grease it with oil. I used a thermal foil box as shown in the picture. Make sure the sides of box doesn’t touch the walls of microwave oven while cooking. Sparks may appear. So use any microwave safe dish if you have it or follow as I did.
  • In a wide bowl, add besan flour, curd, water, turmeric powder, chilli+ginger paste or finely chopped green chilli and ginger, salt, sugar and cooking oil. Mix everything well using a whisk. Batter should be of bajji batter consistency. So If needed add 1 tbsp water extra. Do not make the batter runny or too watery. Dhokla won’t cook properly. So add only the mentioned quantity of ingredients.
    Microwave dhokla recipe
  • To the dhokla batter, add ENO fruit salt and mix well. Batter will become fluffy and becomes almost double in quantity. Pour the batter immediately to the greased microwave bowl. Microwave in high powder ( I Kept in 800W) for 4 minutes.(Check it once at 3 minutes). After 4 minutes, remove the dhokla and insert the back of a spoon. If it comes out clean, dhokla is done else keep it for another 30 seconds or 1 minute. Run a knife in the corners and invert the dhokla in a plate after it becomes warm. Cut into pieces.
    Microwave dhokla recipe
    Microwave dhokla recipe
  • Heat oil in a kadai and splutter mustard seeds, curry leaves and finely chopped green chillies and coriander leaves. Add water, sugar. Boil for 2 minutes. Add this water over the dhokla pieces and serve with green chutney. Garnish with grated coconut if you like !
    Microwave dhokla recipe
    Microwave dhokla recipe
  • For Green chutney : Grind a handful of coriander leaves, 1-2 green chilli, 3 garlic cloves, 1/2 tsp sugar, few drops of lemon juice and required salt to a smooth paste. You can add a tbsp of grated coconut of you wish. Make this chutney and serve it as a side dish for dhokla. Enjoy ! ( Once you get this recipe perfect, you can double the quantity of ingredients and try it. Please follow the mentioned quantity if you are a beginner)

Note
  • Use all the ingredients of mentioned quantity not less than that. It will give you perfect result.
  • Do not skip ENO. If you don’t have ENO, add 1/4 tsp baking powder + 1/4 tsp baking soda. Mix the batter and cook immediately.
  • Do not rest the batter for long time after adding ENO.
  • The quantity of water may vary slightly as per the thickness of curd. I used semi solid curd not thick.
  • You can use vinegar instead of lemon juice. But do not avoid it.
  • If your microwave high power is more than 800w, reduce the cooking time.

Try this easy, instant microwave dhokla recipe at home and enjoy your teatime ! In the chat shop, Dhokla with green chutney was served in a paper plate. So I too did the same. 
Microwave dhokla recipe
Continue Reading...


February 5, 2016

Chocolate Covered Strawberries Recipe – Valentine’s Day Recipes

Chocolate covered strawberries recipe
Valentine’s Day is fast approaching. Many of you might have started thinking about gifting ideas and to make some special recipes on Valentine’s day. Before 10 years,when our marriage date was fixed, 2005 Valentine’s day was very special to us. He gifted me ruby stone gold stud with a chocolate box and I gave him a T Shirt. From then, every year on Valentines day, he gives me some special gifts like Camera, mobile phones, dress, jewelleries, handbags etc whereas me as a wife shower all my love by making some interesting, new dishes for him as he loves to eat varieties of food. 

This year, when I was thinking about Valentines day recipes, my friend Shalini told me about this Chocolate covered strawberries ( Strawberries dipped in chocolate sauce). I browsed for this yummy dessert recipe & found it is a traditional gift for Valentine's Day in the United States. I became double happy & tried it this morning to start off Valentines day special recipes in my blog.

For this recipe,i referred few youtube videos for tips and tricks. I won’t say I made it perfect but still as a first timer,Iam happy with the outcome.Here i have showed you how to melt chocolate using microwave but i’ve discussed the other methods of melting as well. I used dark sweetened compound chocolate for melting.You can use white compund chocolate too. Even though the preparation is easy,there are few points you should keep in mind. 

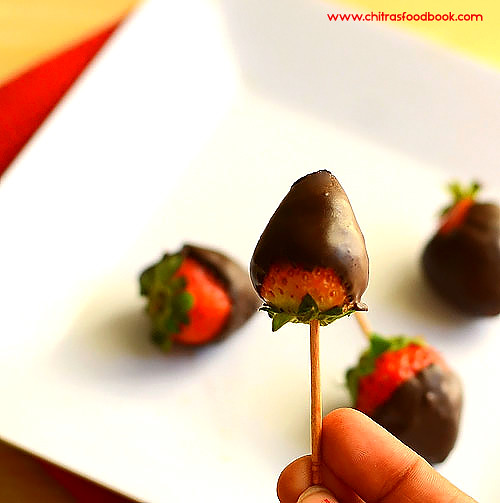
Please refer “Notes” section for tips before you start. For variations,you can make homemade chocolate covered banana and other fruits like blueberries, prune, chocolate covered almond and even chocolate covered oreos. I decorated them with sprinklers,rice crisps. Run your imagination and play with it. Lets see how to make chocolate covered strawberries at home easily. 
Chocolate covered strawberries

Chocolate Covered Strawberries Recipe


Chocolate Covered Strawberries Recipe How to make Chocolate Covered Strawberries at home using microwave 
Cuisine: Indian
Category: Sweet
Serves: 4
Prep time: 10 Minutes
Cook time: 5 Minutes
Total time: 15 Minutes
INGREDIENTS

  • Compound Chocolate - 100 gms ( I used Vanleer brand, sweetened)
  • Fresh Strawberries - 10 nos
  • Sprinklers,rice crisps - for decoration
**Please refer”Notes”section before you start..
HOW TO MAKE CHOCOLATE COVERED STRAWBERRIES - METHOD

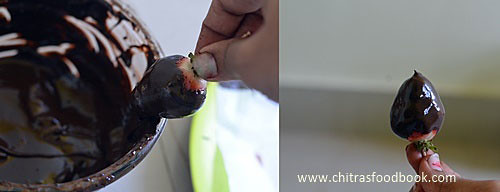
  • Wash & pat dry the strawberries completely. Make sure strawberries are completely dry because chocolate will not be coated over wet strawberries.
  • Break the compund chocolate into small pieces. Take them in a clean, dry, microwave safe bowl ( make sure there is not even a single droplet of water). Heat in medium power ( I kept 450W) for 30 seconds. Remove the bowl and stir it with a clean, dry spoon.
chocolate covered strawberries
  • Again microwave in medium power for 1 minute. Remove and stir well. Repeat this process until the chocolate is melted. No issues if there are minute pieces of chocolate. It will melt in the residual heat. Remove the bowl and keep mixing to melt completely. It took approximately 2.5 minutes to melt in my microwave. But this time may vary. So keep an eye. Over doing may stiffen the chocolate.Take care !!
chocolate covered strawberries
  • Now take the dry strawberries and insert a toothpick in the head part. Hold the toothpick and dip 3/4th or whole strawberry ( as per your wish) in the melted chocolate. Swipe it in the rim of bowl or pat it to remove the excess chocolate. Arrange the strawberries on a plate. Do this process quickly before the chocolate hardens.
chocolate covered strawberries
  • Suppose if the chocolate is hardened before you finish the work, microwave them in medium power for 30 seconds to melt them. If you are not able to bring the correct consistency for chocolate, add 1 tbsp of odourless cooking oil  for 100gms of chocolate and then melt in microwave. Chocolate will melt properly. Serve after few minutes once the chocolate sets.Enjoy !
Other methods of melting chocolate
  • Direct heat: This method is easy and convenient. Place the chocolate in a heavy saucepan over very low heat, stirring constantly till the chocolate begins to melt. Immediately remove the pan from the heat and stir the chocolate until it is smooth. Be careful while using this method because there are many chances for the chocolate to scorch. To avoid this,do the process in very low flame with constant stirring.
  • Double boiler: This method takes a little longer than the direct-heat method but eliminates the possibility of scorching the chocolate. Place water in the bottom of the bowl  and chocolate pieces in another bowl that fits the water bowl.The top of the water should be 1/2 inch below the upper pan. Then place the double boiler over low heat. Stir the chocolate constantly until it is melted. The water in the bottom of the double boiler should not come to boiling while the chocolate is melting.Stir chocolate occasionally as it softens. When you have just a few small unmelted chunks, remove bowl from heat (residual heat will melt the rest).


Note
Points you should keep in mind
1. There should be no water in strawberries or chocolate. So pat the strawberries and dry them completely before you dip them in the chocolate.
  • Make sure all equipment is completely dry. Any moisture on the utensils or in the container may cause the chocolate to seize/stiffen. If this happens, stir in 1/2 to 1 teaspoon shorteningor odourless cooking oil (not butter) for every 30 gms of chocolate.
  • Be careful to keep water from splashing into the chocolate. A single drop will cause the chocolate to seize.
  • Keep heat low to avoid scorching if using double boiler method.
  • Always stir chocolate during melting.
2.Melt the chocolate very carefully. Be patient and stir the chocolate every 30 seconds for best results.
  • If the chocolate becomes rock hard before completing the dipping process,add a tbsp of cooking oil  for 100gms of chocolate and melt to bring it to the right consistency.
Enjoy this easy, yummy deseert for your special day ! Have a fun filled celebration !!

Continue Reading...


April 17, 2015

EGGLESS VANILLA MUG CAKE RECIPE-MICROWAVE RECIPES

Vanilla mug cake recipe

Its been a long time I shared an eggless mug cake recipe in microwave. After trying some one minute & 5 minute cake successfully, Iam much more comfortable & confident in trying out recipes like this. Its my long time wish to try out one minute vanilla cake as it is my most favourite flavour. I have been searching for the same and I finally found it here. It came out super soft and spongy with a lovely vanilla flavor. Try this easy cake recipe for your kids during this summer vacation. It is going to be an instant hit in your family. Let me know your feedback ! 

Note: You should consume the cake immediately after baking because the bottom of cake may turn slightly chewy due to the heat of the bowl. So please keep this in mind.
Eggless vanilla mug cake recipe

1 Minute Vanilla Mug Cake Recipe


1 Minute Vanilla Mug Cake Recipe 1 Minute Vanilla Mug Cake Recipe - Easy,Instant & tastes delish !
Cuisine: Indian
Category: Cakes
Serves: Serves 1
Prep time: 5 Minutes
Cook time: 1 Minute
Total time: 6 Minutes


INGREDIENTS

  • All purpose flour/Maida - 2 tbsp
  • Sugar - 1.5 tbsp
  • Cooking oil - 3/4 tbsp  (any odourless oil, I used sunflower oil)
  • Milk - 2 tbsp
  • Baking powder-1/4 tsp
  • Vanilla essence- 1/4 tsp ( Increase based on your taste)
  • Salt – a small pinch
METHOD

  • In a bowl,take maida,sugar,baking powder and salt. Mix well. To this add the wet ingredients like Milk, oil and vanilla essence. Mix well without lumps and make sure sugar is melted. The batter will fall like a ribbon. It is the right consistency of batter.
Vanilla mug cake
  • Now pour the batter into a microwave safe bowl. I used a porcelain/ceramic mug. The size of mug should be at least double the size of batter. Microwave it in high power ( 800w) for 1 minute. Adjust the timings based on the power of your microwave.The batter will rise till the brim and again goes in. So don’t scare. It won’t spill.
Vanilla mug cake
  • Check with a tooth pick. If it comes out clean or with little crumbs, cake is done. If you find wet batter in the tooth pick, bake it for 10-15 seconds more. 
  • Serve it warm and enjoy !
Note : You should consume the cake immediately after baking else the bottom of cake may turn slightly chewy due to the heat of the mug. If you don’t want to consume immediately, transfer the cake to another bowl and use it later.


Note

  • Make sure sugar is melted completely before you bake. So mix well for 2-3 minutes.
  • U can use powdered sugar but I am not sure with measurements.
  • U should consume the cake immediately to enjoy its best taste.


Eggless vanilla mug cake recipe

Try this instant, one minute vanilla mug cake. Treat your kids and loved ones. 
Eggless vanilla mug cake

Continue Reading...


February 13, 2015

Eggless Red Velvet Cake In A Mug(1 min microwave cake)-Valentine’s Day Recipes

Eggless red velvet cake recipe

Valentine’s day is around the corner .I am sure you all would be scratching your head about what to make something special for your loved ones. Here you go, a super easy , soft n spongy, eggless one minute red velvet cake in a mug using microwave under one minute. Last year I have shared some easy, instant microwave cake recipes( refer side bar) and I am really happy that I am getting rave reviews about those recipes from my readers. This has been a real boost which inspires me to try more microwave recipes especially one minute mug cakes.

When I was looking for Valentine’s day recipes ideas, I found home made Chocolates & Red Velvet Cake are the most wanted recipes on lover’s day. As I have already posted an easy, no cook, 3 ingredient home made chocolate recipe here, I wanted to share this easy red velvet cake recipe without using eggs & buttermilk for you all to try out on this Valentine’s day. 

Here I have used red food color as I din’t want to take chance with beetroot in my first attempt. Soon I will try and share this recipe replacing artificial color. You can make this cake in the next few minutes just after reading this recipe & surprise your sweet heart/Husband.
\
Yesterday, my Husband Sendhil had left to Norway for a short official trip. So we celebrated our Valentine’s day in advance with this yummy, super soft, romantic Red velvet cake recipe. We both enjoyed this cake with one spoon in one mug, hope you can understand what I mean here. 

Friends, do try this easy cake for your loved ones. I am sure it will be a great choice for this celebration ! And don’t forget to share your feedback about this cake with me. Lets see how to make this easy red velvet cake recipe for two on this special Valentine's day !

Easy red velvet cake recipe

Easy Red Velvet Cake in a mug using microwave


Easy Red Velvet Cake in a mug using microwave Microwave red velvet cake under 1 minute - Eggless, butterless recipe.
Cuisine: Indian
Category: Cake
Serves: 2
Prep time: 5 Minutes
Cook time: 1 Minutes
Total time: 6 Minutes


INGREDIENTS

  • All purpose flour - 4 tbsp
  • Sugar – 2.5 tbsp
  • Baking powder - 1/4 tsp
  • Salt - a pinch
  • Cocoa powder- 1 tsp
  • Red food color - 2 pinches or 2 drops
  • Vanilla essence - 1/4 tsp
  • Vinegar/Lemon juice - 1/2 tsp
  • Milk - 3 tbsp (Use  boiled milk at room temp)
  • Vegetable oil/cooking oil - 1.5 tbsp ( use odourless oil)
HOW TO MAKE EGGLESS RED VELVET MUG CAKE - METHOD

  • Take all the dry ingredients ( maida, sugar, cocoa powder, baking powder and salt) in a big mug or bowl. Mix it well adding food color.
  • Then add the milk, oil and vinegar, vanilla essence. Mix well without any lumps and make sure sugar is dissolved well.
Red velvet cake
  • The consistency of batter will be semi solid & it should fall like a thick ribbon. Make sure the batter is filled till half of the mug because this cake will double while cooking.
  • Now microwave the mug in high power for 1 minute. Cake will raise & its size would be doubled.( mine is 800w. Please adjust the timing as per the power of your microwave) Check with a toothpick or back of a spoon. If it comes out clean,cake is done. Else keep it again for 10 secs.
  • For simple decoration, you can put sprinklers on top as I did OR dust it with powdered sugar. If you apply frosting, it would be even more rich. Make your choice & variations !
Easy red velvet cake recipe
  • Serve with any frosting or just sprinkle powdered sugar & enjoy !
Happy Valentine’s day !!

Note
  • Do not mix everything together. First mix the dry ingredients & then go for mixing wet ones.
  • Adjust the time based on the power of your microwave.
  • It tastes mildly sweet. So add more sugar based on your tastebuds. But make sure sugar is dissolved before you microwave.
Red velvet cake recipe


Try this easy red velvet cake on Valentine’s day & have a fun filled day with your loved ones !
Wish you all a very happy Valentine’s day!
Easy red velvet cake recipe

Continue Reading...