I have been making this instant ragi idli with ragi flour(finger millet flour in English) and rava/suji / sooji(Semolina in English) at least once in a week for the past few months. Usually I make instant ragi dosa or ragi adai. As I got bored of those dishes, I wanted to try some varieties of ragi recipes. As a result of this, I tried Instant ragi idli, ragi idiyappam and ragi mudde these days. All the dishes came out well in the first attempt itself. Still I wanted to blog them after few trials.
So today I am confidently sharing this instant ragi idli which can be prepared under 10 minutes. In this recipe, I have used equal amount of ragi flour (Nachni in Hindi, finger millet in English), unroasted suji/ Bombay rava/ Semolina along with curd, baking soda and salt. If you want to make this ragi idli without soda, you can use Eno fruit salt instead. Similarly if you want to make this idli without curd or with less curd, you should use more water and baking soda. But I would strongly recommend to use curd and use less baking soda which is good for health. Its a diabetic friendly and diet friendly recipe. People who look for weight loss can have this for dinner. It keeps your tummy full over the night.
I have tried this instant ragi idli with many side dish combination. But I felt tomato based side dishes suits well for this ragi idli as it tastes bland. So you can make tomato chutney, tomato mint chutney, tomato capsicum chutney or tomato thokku. I make one of these side dishes regularly. If you like, you can try with coconut chutney, tiffin sambar or idli podi / gun powder too.
Ok friends, lets see how to make instant ragi idli recipe with ragi flour and rava with step by step pictures and video.
Instant Ragi Idli
Instant ragi idli recipe
Instant ragi idli recipe using ragi flour , rava / suji, curd and baking soda
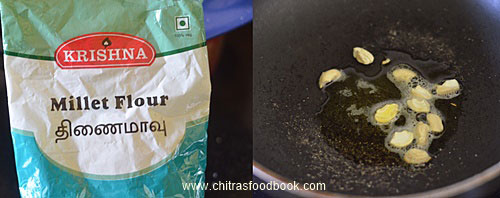
In a wide bowl, mix ragi flour, unroasted rava/suji, salt and curd.
Mix well and add little water to bring into thick idli batter consistency.
Add baking soda at the end. Mix well and rest for 5 minutes.
In the mean time, roll boil water in idli pot and grease the idli plate.
Pour idli batter in greased mould and steam it for 10 to 15 minutes till tooth pick comes out clean.
Remove the idli plate and rest for few minutes. Now scoop out the idli using a ladle or spoon.
Serve hot with tomato, onion chutney as side dish. Tastes great !
METHOD - STEP BY STEP PICTURES
In a wide bowl, mix ragi flour, unroasted rava/suji, salt and curd. Mix well.
Add required water gradually and mix to make a thick batter. Do not use more water. I used 3/4 cup water but its quantity differs based on the consistency of curd. Add baking soda and mix well.
Rest the batter for 5 to 10 minutes. Mix well and check the consistency of batter. It should be thick but pourable.
Do not make the batter thin or watery. Idli becomes sticky and flat.
In the mean time, boil water in idli pot. Grease idli plate with gingely oil. Pour idli batter in each mould. You can also make this idli by spreading cloth in idli plate.
When the water starts to roll boil, keep the idli plate. Steam it for 10 to 12 minutes till toothpick comes out clean.
Remove the idli plate, rest for 2 minutes. Then remove the idli using a spoon or ladle.
Serve hot with tomato chutney, tomato mint chutney, tomato capsicum chutney or tomato thokku. We love these side dishes. Enjoy !
Note
For variations, you can ENO fruit salt instead of baking soda. Use 1/2 tsp for this recipe.
Do not reduce the quantity of semolina. Equal amount of ragi flour and rava helps.
The most important point to note is : batter should be thick and pourable. Do not make thin batter. Idli becomes sticky and flat.
Enjoy this healthy, Instant ragi idli and share your feedback with me!
Black rice idli, dosa and sweet paniyaram was my recent try using black rice/ Karuppu arisi (Kavuni arisi). Black rice / Karuppu arisi popularly known as kavuni arisi is a rice variety with amazing health benefits. Recently I shared Chettinad special Kavuni arisi sweet recipe. When I shared that recipe, some of my readers asked me to share more black rice recipes. So I made black rice sweet paniyaram and idli, dosa. Both came out well in the first attempt.
I thought of starting black rice recipes with this soft and spongy black rice idli, dosa recipe. Next week I will try to post the paniyaram recipe. Here I have used idli rice and black rice in equal quantities. The quantity of rice and urad dal is important to get a soft and spongy idli. I have also used some poha / pressed rice for additional softness. Friends do try this healthy black rice idli / karuppu arisi idli and dosa. You will love it.
Wash and soak idli rice, black rice, urad dal, methi seeds and poha for 6 hours.
Black rice takes longer time to soak.
Grind everything to a smooth paste adding required water and salt.
Transfer the idli batter to a vessel. Mix the batter with hands.
Cover and ferment over night. The next morning mix the batter well.
Steam in idli pot till done. Remove and enjoy with chutney, sambar !
BLACK RICE IDLI DOSA - STEP BY STEP PICTURES
Wash the black rice thrice in a wide bowl. Add idli rice, urad dal, methi seeds and poha. Wash everything together for once or twice. Soak it for 6 hours minimum because black rice takes longer time to soak.
Grind everything to a smooth paste in a mixie or grinder. Use ice cold water for grinding if you use mixie. While grinding you can add salt if you like OR add it the next day before making idli.
After grinding the batter, transfer to a big vessel. Mix it with hands to aid fermentation. Cover the vessel and leave the batter overnight or 8 hours minimum to ferment. Consistency of batter should be like regular idli batter.
The next day, batter would have raised well. Mix it well and pour the batter in a greased idli plate.
Boil water in idli pot. Place the idli plate and steam it for 10 to 15 minutes in high flame till idli is cooked well. Cracks may form on top of idli. But it will be soft.
Remove the idli plate and rest it for 5 minutes before removing the idli. Take the idli and serve hot with chutney or sambar. I made dosa the next day. For making dosa, add little water to the batter if needed. Heat dosa pan, pour a ladleful of batter and spread it. You can make it thin or thick as you like. Flip and cook both the sides. Remove and serve hot !
Enjoy !
Note
For variations, you can soak and grind black rice, idli rice, methi seeds together. Soak urad dal separately and grind it first. Mix both the batter and ferment it. In that case, skip poha.
Color of idli may vary based on the color of black rice. Some rice looks reddish.
This batter stays good for 3 days in refrigerator but it turns sour the next day. You can make dosa with it.
Healthy black rice idli dosa is ready to enjoy with chutney and sambar !
This is my second post under Quinoa recipes. I had already shared Instant quinoa idli without rice. Today I have posted how to make Indian style, soft idli and crispy dosa batter with quinoa by fermentation method. As I always say, quinoa is not thinai in Tamil. Quinoa and foxtail millet/ Thinai are completely different. Quinoa should be pronounced as Keen-wah. This millet is widely available in US and abroad.
In India, you can find it in organic stores in all major metropolitan cities and is available online in Amazon. But It is costly. In this quinoa idli dosa batter recipe, I have used a combination of quinoa, idli rice (Salem rice) and urad dal in the ratio of 2:1:3/4. You can try this recipe without idli rice but idli may be sticky to taste.
Addition of rice helps to keep the idli non-sticky and gives a proper shape. Even though its my first attempt, I am completely happy with the output. Idli came out very well, soft and spongy with a mild nutty flavor. Idli looks pale white in color like quinoa and not pure white. I tried making dosa too. It was crispy in the sides and soft in the center. You can make thin dosa or thick uthappam adding onion, chilli as you wish.
One thing you should remember about this batter is , it becomes sour quickly. After fermentation, you should refrigerate the batter till use. Also It is better to finish the batter in 2 days by making idli, dosa, uttapam or paniyaram. This idli tastes slightly sticky when hot. But it tastes perfect when eaten warm. You can serve this idli with any chutney or sambar. I had it with coconut chutney and idli podi. It was yumm !
After trying this quinoa idli successfully, I am confident of exploring more quinoa recipes. I will post it whenever I make any. Ok, now lets see how to make quinoa idli dosa batter with rice with step by step pictures.
Wash and soak quinoa, idli rice, urad dal together for 7 to 8 hours.
Grind to a smooth paste in mixie or grinder adding required water.
Transfer the batter to a big vessel and ferment it over night.
Next morning batter would have doubled in quantity.
Add salt and mix well with a ladle. Grease idli plate and fill the batter.
Steam in an idli pot for 10 minutes. Check if its cooked well by inserting a wet finger.
Remove the idli plate once its done. Let it rest for 2 to 3 minutes. Then remove the idli and serve with chutney or sambar.
You can also make thin or thick dosa with this batter.
QUINOA IDLI DOSA RECIPE - STEP BY STEP PICTURES
Wash the quinoa twice or thrice. Along with it add idli rice, urad dal. Wash it well. Soak them together for 7 to 8 hours.
Grind the batter in a wet grinder or mixie ( in batches) to a smooth paste adding required water. Do not add salt.
Transfer the batter to a vessel. Ferment it over night or minimum 10 hours. The next morning, batter would have doubled in quantity based on the weather. Add salt and mix the batter well with a ladle. Add little water if the batter is too thick.
Grease an idli plate with oil. Pour the batter till 3/4th of each hole. Boil water in an idli pot. Place the idli plate when the water comes to a roll boil. Steam it for 10 minutes or till cooked.
Check the idli by inserting your wet finger. If it comes out clean idli is cooked else cook for more time. Remove the idli plate from the pot and rest it for 3 minutes.
Remove the idli using a spoon and serve it with your desired chutney or sambar. You can also make thin or thick dosa by adjusting the consistency of batter. But cook in low flame because this dosa turns brown quickly.
Enjoy !
Note
If you have quinoa flour, you can use it and mix with rice, urad dal batter.
This batter stays good upto 3 days under refrigeration.
As I told, this idli tastes slightly sticky when very hot but it becomes perfect when warm. It stays good for few hours. So you can pack for lunch box too.
Try this easy, healthy quinoa idli dosa recipe and enjoy !
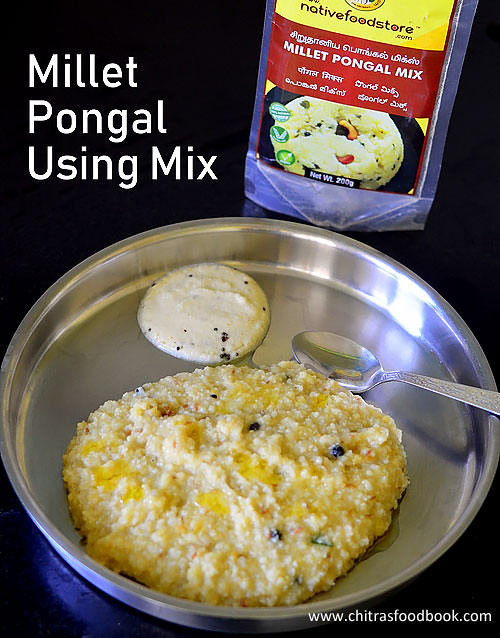
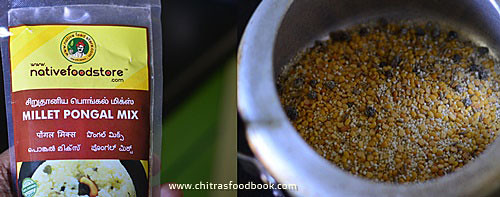
Recently I got a packet of Millet Ven Pongal Mix / Siruthaniya pongal mix & Millet Sambar rice mix from Native Food Store. I tried Pongal mix for my weekend breakfast as I got up late. Its so easy and quick to make. Our breakfast got ready under 15 minutes. This millet pongal mix is a combination of roasted moong dal, varieties of millets, pepper corns, jeera, salt and cashews. I just followed the instructions given in the pack.
All we need to do is to add the mentioned amount of water and cook this mix in a pressure cooker. We can also season it with curry leaves and hing in ghee at the end to make it more flavorful. It came out very soft, flavorful & tasty just like homemade ven pongal. Sendhil & Myself loved it very much. We enjoyed it with coconut chutney.
Friends, Native food store products are available online and they deliver their products all over India. I would strongly recommend to buy this pongal mix from them. I am sure you will love its taste and buy it often. Working women and bachelors can buy this product to make a quick and healthy breakfast/ dinner. Ok, now lets see how to make Millet ven pongal using Native food store’s millet pongal mix.
In a pressure cooker base, take the millet pongal mix.
Add the mentioned amount of water given in the pack.
Cook for 2 whistles in very low flame.
Open the lid after steam is released. Mix well.
Season curry leaves, ginger and hing in ghee. Add to pongal.
Mix well and serve hot with coconut chutney !
METHOD - STEP BY STEP PICTURES
Take 1 cup of pongal mix in a pressure cooker. Add 4 cups of water, mix well. Close the lid.
Pressure cook in very low flame for 2 whistles. Remove the lid after steam is released. Mix well. Its consistency would be just right. Heat ghee & temper ginger bits, curry leaves & hing. Add to pongal, mix well.
Serve hot immediately with coconut chutney. You can add a tsp of ghee while serving If you like. This pongal tastes very soft & flavorful !
Enjoy !
Try this healthy, yummy, quick millet pongal with pongal mix. You will love it.
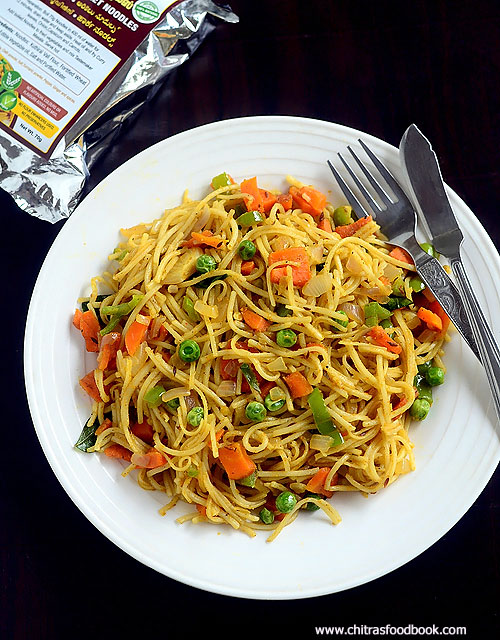
Recently I got a mail from Native Food Store – An Online millet stores in Chennai, to try their millet products and share few recipes with them. I visited their website Nativefoodstore.comand found wide range of millets and their products like Instant millet mix, millet flour, millet flakes, instant millet noodles and many more. Rates are also reasonable when compared to other online stores. I found millet noodles, millet flakes are interesting and new to me. So I decided to try their instant millet noodles recipe and asked them to send me the products.
As I haven’t shared any millet recipe in my blog for long time, I wanted to take this as a chance to make varieties of millet recipes in my kitchen and share with you all. My contact at Native food store was very much responsive and sent me the products immediately. They sent me Samai/Little millet noodles, Kuthiravali/Barnyard millet noodles, Varagu/kodo millet noodles, thinai aval /foxtail millet flakes and Kambu aval/ Pearl millet flakes. I tried Samai veg noodles recipe for the first time in Indian style. They had also given their own tastemaker masala along with the noodles just like Maggi and other branded noodles.
As its my first attempt, I just followed the recipe given in the packet, added all the colorful vegetables and made this millet noodles for our breakfast. It came out really well and I couldn’t find any difference in taste, color or flavor from our regular, plain noodles.We loved it to the core. I feel the tastemaker does the magic to the recipe. It can be prepared in less than 15 minutes. So bachelors and working women can make this healthy as well as quick recipe for their breakfast, lunch box or for dinner. I am sure its a very healthy choice for kids and adults as well.
You can try varieties like hakka noodles, Schezwan noodles, vegetable Chinese style noodles and much more. I will try to make some interesting recipes with it and share here soon. I strongly recommend all my readers to try these products from their online stores. They deliver their products in Chennai, all over Tamil nadu, Karnataka and Andhra as of now. They told they will be expanding their service all over India and abroad. Now lets see how to make Instant Veg Millet Noodles recipe with step by step photos !
*This is not a paid post. But I got the products for free. I have shared a honest review.
Veg Millet noodles recipe - How to make Millet noodles at home
Veg Millet noodles recipe - How to make Millet noodles at home - Indian style !
Mixed vegetables - 1/2 cup ( Carrot 1 small, capsicum 1 tbsp chopped, Green peas fistful)
Big onion - 1 no
Curry leaves - Few
Tastemaker - 1 packet OR Red chilli powder + Garam masala powder - 1 tsp each
Salt & water - as needed
Cooking oil – 2 tbsp
Lemon juice - few drops ( optional)
HOW TO MAKE MILLET NOODLES - METHOD
Heat 2 cups ( 500ml) of water adding few drops of cooking oil and little salt. Let the water come to roll boil. Then add the noodles and cook for 12 to 15 minutes. In the mean time, you can chop onion and vegetables into small pieces and saute them to make the masala.
In 12 minutes, noodles will turn soft but stays firm in shape. All the water will be evaporated. Now take one noodle and try to mash it. If it breaks and mushes, noodles is cooked soft. Switch off the flame and drain the noodles in a colander or sieve. Discard the excess water and wash the noodles in cold water. This helps to keep the noodles non-sticky and avoids excessive cooking.
Heat 2 tbsp cooking oil in a kadai and saute the finely chopped onion,curry leaves and mixed vegetables. Add the salt required for vegetables and mix well. Add 1/2 cup of water and cover cook till the vegetables are soft. Boil and drain the excess water if any.
Now add the tastemaker and mix well. Add the cooked noodles and toss it to coat the masala. Check for taste and add more salt if needed. Lastly sprinkle some lemon juice if you wish and mix well. Switch off the flame and serve hot immediately !
Enjoy !
Try this healthy mixed veg millet noodles at home and enjoy !
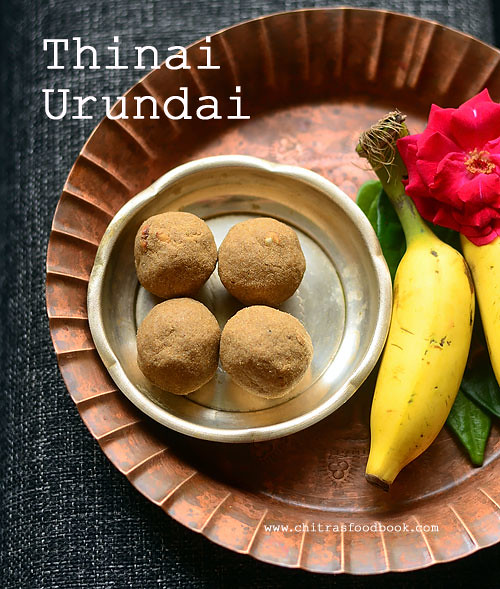
Thenum Thinai Maavum is one of the most popular neivedyam recipes offered to Lord Muruga in Tamil nadu. Yesterday I made Thinai maavu urundai ( Foxtail millet flour laddu in English)for the first time on account of Skanda shasti. You can offer this for Karthigai deepam festival too. I should thank my neighbor for suggesting me to try this.
Traditionally speaking, foxtail millet (Thinai arisi) is dehusked, roasted, ground to a fine powder and then mixed with honey. But nowadays we get readymade foxtail millet flour( Thinai maavu) in all the organic & popular departmental stores. As I had a pack of flour in hand, I made these balls/ urundai very quickly and easily.I referred Viji’s blog for the idea.
For variations, thinai urundai can be made with jaggery instead of honey.It is called as thinai maavu laddu. Honey or jaggery, both make this dish more healthy when combined with Thinai flour. Do try this healthy Thinai urundai/ Foxtail millet balls with honey for a change. You will like it !
In a kadai, melt ghee and roast the cashew pieces. When it starts to turn golden brown, add the measured 1/2 cup of thinai maavu /Foxtail millet flour and roast in medium flame for few minutes. Let it cool down completely. ( If you don't have foxtail millet flour, you can dry roast whole foxtail millet till aromatic. Powder , sieve and use it).
Do not add honey when the flour is hot. The balls will become chewy to taste. After the flour is completely cooled down, add honey to the roasted flour. Mix well and make balls.
Arrange in a plate and offer to Lord Murugan. Get his blessings!
Enjoy !
Note
Do not add honey when the roasted flour is hot. It should be cooled down completely.
Add more honey based on your liking.
In place of honey, you can use powdered jaggery.
If you don’t want to make as balls, you can just mix the flour with honey and eat as it is.
Healthy, Thinai urundai with honey. You can make this at least once in a while to reap its health benefits !