Asparagus, I have heard about this vegetable from my friends in US. I have also seen them in big supermarkets here in freezer section but never bought it and tasted it. Recently when my friend was sharing about Asparagus stir fry recipe, I got tempted to try it in Indian style. its more like our keerai thandu poriyal recipe. I was amazed to know the health benefits of Asparagus.
Asparagus is a good source of antioxidants like Vitamin A and Vitamin E. These antioxidants help the body fight off free radicals or oxygen particles that cells produce as waste. Free radicals can damage the DNA of nearby cells, leading to cancer, heart disease, and other health problems. I also read this vegetable is available fresh during Spring season. Check out my Broccoli stir fry recipe too.
Without any delay, I bought them in an online app and used it for the first time. I watched few YouTube videos on how to clean and chop Asparagus. Its so easy and simple to make too. It tasted more like keerai thandu poriyal. We loved it. Friends, do try this poriyal. You will love it for sure. Lets see how to make asparagus poriyal with step by step pictures. I have shared a Shorts Video in my Youtube channel for this recipe.
Please CLICK HERE to watch it.
Asparagus poriyal | Indian style Asparagus stir fry
Asparagus poriyal | Indian style Asparagus stir fry recipe for rice
Wash and cut the stem part of Asparagus. Chop Asparagus finely and set aside.
Heat oil in a pressure cooker and splutter mustard seeds, urad dal, chana dal, curry leaves, red chilli, hing.
Add the chopped asparagus and saute for a minute. Add turmeric powder, salt.
Mix well and add water. Pressure cook in low flame for one whistle.
Open the cooker after steam is released. Boil till extra water drains.
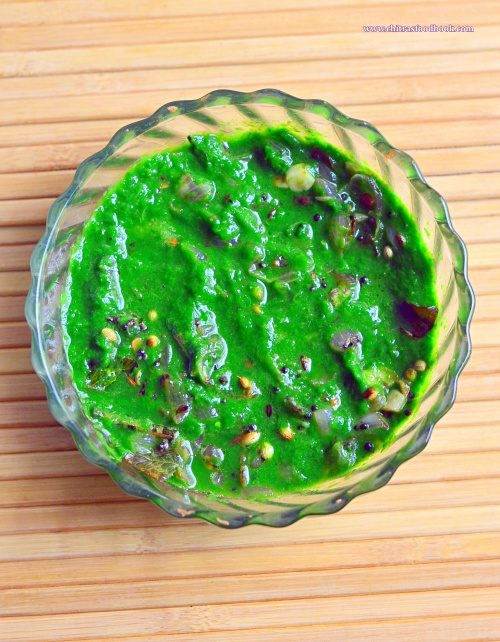
Add grated coconut and mix well. Serve with rice.
METHOD - STEP BY STEP PICTURES
Wash and cut the asparagus. Break and discard the asparagus stem part and then chop into fine pieces (When you bend the asparagus, it breaks at one part. You have to discard the stem part). Set aside.
Heat oil in a pressure cooker. Splutter mustard seeds, urad dal, chana dal, curry leaves, red chilli and hing.
Add the chopped asparagus and saute for a minute. Add turmeric powder, salt and mix well.
Add little water and pressure cook in low flame till one or two whistle. Switch off the flame. Open the cooker after the steam is released.
Mix well and boil for sometime till the excess water is drained. Lastly add the grated coconut. Mix well and serve with rice.
Enjoy !
Note
For variations, you can saute and cover cook in a kadai with lid instead of pressure cooking.
You can saute an onion and add to the poriyal.
Do not skip coconut. It gives a nice flavor, yield and taste.
Try this easy, yummy Asparagus poriyal. You will love it.
Recent days I have been trying out varieties of Keerai masiyal and Keerai kadayal recipes for our lunch. Mostly I try to make a simple keerai masiyal or kadayal recipe without dal and coconut. I feel addition of dal or coconut gives more yield and tastes more like kootu but I wanted to consume more keerai. So I make it plain with simple tempering.
Recently I came across this Kongu style keerai masiyal without dal and coconut in Chef Deena’s YouTube channel. Actually they showed it with Panna keerai but I made it with pasalai keerai i.e Palak. It came out so well and tasty.
Friends, do try this simple and easy Coimbatore Kongu style Keerai masiyal recipe. You will love it like me.
Cook it with green chilli, turmeric powder, sugar and salt.
Cool down and grind to a smooth paste.
Temper mustard seeds, urad dal, red chilli, hing and cumin seeds in ghee.
Saute onion, garlic cloves till transparent.
Add to palak and mix well. Serve with rice adding ghee.
METHOD - STEP BY STEP PICTURES
Wash and chop the palak leaves roughly. Cook it with green chilli, turmeric powder, a pinch of sugar and salt adding required water in a kadai.
Cool down the mixture and grind to a smooth paste. Instead of grinding the keerai, you can mash it with a masher too. Heat ghee in a small kadai.
Splutter mustard seeds, urad dal, cumin seeds, red chilli and hing. Saute onion, garlic cloves till transparent. Add to the ground palak. Mix well and serve with plain rice adding ghee. Enjoy !
Note
Adding a pinch of sugar and turmeric powder while cooking palak helps to retain its bright green color.
Adjust the quantity of green chilli as per your taste.
Try this easy, yummy Pasalai keerai masiyal for rice and enjoy adding ghee.
During my recent trip to Salem, my MIL gave me a handful of baby Bitter gourd that was grown in our house backyard. We call this as midhi pavakkai in Tamil. Some people also call it as Kuruvi thalai pavakkai as it resembles the head of sparrow. This is the first time I am seeing such a small sized Bitter gourd. As I am a big fan of Pavakkai, I was tempted to try some interesting recipes in my kitchen.
Actually my MIL suggested me to make pitlai in a slightly different way from my usual Pavakkai pitlai recipe. Before making that, I tried this simple and easy stir fry recipe to know the actual taste of midhi pavakkai. As expected, this baby bitter gourd is less bitter when compared with our regular bitter gourd. So you don’t need to remove the bitterness by slicing thinly, soaking in curd and squeezing the water. The quantity of onions and other ingredients we use in this recipe helps to make this stir fry tastes less bitter.
Now lets see how to make this South Indian style Midhi pavakkai poriyal recipe. In this recipe, I have pressure cooked baby bitter gourd before making the stir fry to use less oil. For variations, you can saute the bitter gourd in more oil till it shrinks in size and cooks soft in oil. Ok, now lets see how to make this baby bitter gourd stir fry also known as Karela fry in Hindi and Kakarakaya fry in Telugu with step by step pictures and a video.
Wash and chop the head and tail portion of baby bitter gourd.
Slit in the middle till half the way and set aside.
Take them in a pressure cooker along with tamarind water, salt.
Pressure cook in low flame for 1 whistle. Open the cooker after the steam is released. Drain the excess water and set aside.
Heat oil and temper mustard seeds, urad dal, chana dal, curry leaves, onion and saute well.
Add the cooked bitter gourd pieces, sambar powder, turmeric powder, salt and jaggery. Mix well and cook it for few minutes till onions turn golden in color.
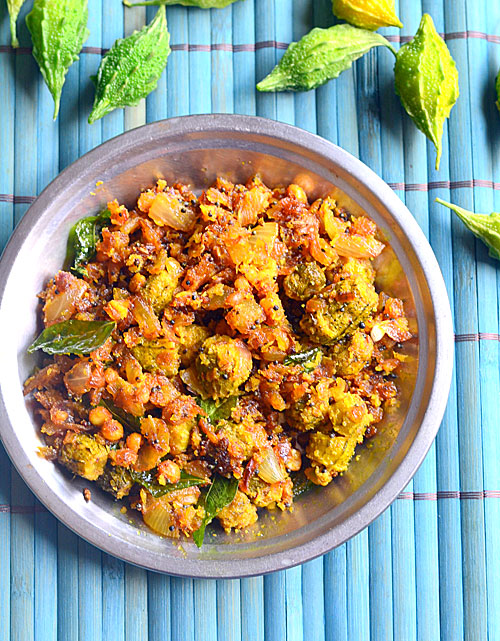
Switch off the flame and add grated coconut. Mix well and squeeze little lemon juice if needed.
METHOD - STEP BY STEP PICTURES
Wash and chop the head and tail portion of bitter gourd. Slit in the middle till half the way through and set aside. Soak tamarind and take 1/4 cup of extract using it.
Take a pressure cooker and add in the slit bitter gourd, turmeric powder, salt and tamarind water. Mix well and pressure cook in low flame for one to two whistles. Open the cooker after the steam is released. Drain the excess water and keep the cooked bitter gourd aside.
Heat oil in a kadai and splutter mustard seeds, urad dal, chana dal, curry leaves and hing. Add onion and saute till transparent.
Add the cooked baby bitter gourd, sambar powder, salt, jaggery and turmeric powder.
Mix well and cover cook in low flame till onion turns golden in color. Switch off the flame. Add lemon juice and grated coconut. Mix well and serve with rice. Enjoy !
Note
You can make the same poriyal with regular bitter gourd as well but make sure you chop the bitter gourd finely or as thin rings for less bitter taste.
Instead of pressure cooking the baby bitter gourd pieces, you can saute in oil till it shrinks in size and becomes soft.
You can also garnish with coriander leaves at the end.
Try this easy and yummy Midhi pavakkai poriyal and enjoy with sambar rice or curd rice.
Palak keerai kadayal or masiyal is a simple, healthy and yummy side dish for rice, idli and dosa. I am happy to add this to my Palak keerai recipes list in my regular cooking. Its procedure is simple but it tastes so good. Usually palak keerai kadayal is prepared with toor dal or moong dal. But this pasalai keerai kadaiyal is without dal. It tastes more like chutney or thogayal.
Friends, do try this palak keerai masiyal / kadayal without dal in this way. You will love it with plain rice, idli and dosa. For variations, you can make the same using arai keerai or mulai keerai.
Palak keerai kadayal / Keerai Masiyal recipe
Pasalai keerai kadayal / Masiyal without dal for rice, idli, dosa.
Wash the keerai several times. Chop roughly and set aside.
Heat oil in a kadai. Saute cumin, onion, green chilli, garlic and tomato till mushy.
Add the washed palak, turmeric powder, sugar and saute till it shrinks in quantity.
Switch off the flame and let it cool down. Add salt and grind to a smooth paste.
Temper mustard seeds, vadagam, curry leaves, red chilli and add to ground palak leaves.
Mix well and serve with plain rice adding ghee.
METHOD - STEP BY STEP PICTURES
Wash the palak leaves and chop roughly. Set aside.
Heat oil in a kadai. Saute cumin seeds, onion, green chilli, garlic and tomato. Saute till tomato turns mushy.
Now add the washed palak leaves, turmeric powder, a pinch of sugar and saute till it shrinks in quantity. Switch off the flame and let it cool down.
Grind to a smooth paste adding required water and salt. Temper mustard seeds, vadagam (optional), curry leaves, red chilli and hing.
Add to the masiyal and mix well. Serve with hot rice adding ghee. Enjoy.
Note
You can use arai keerai mulai keerai / Amaranthus instead of palak leaves.
For variations, use red chilli instead of green chilli.
Addition of turmeric powder and sugar helps to get bright green color.
Tempering vadagam is optional but it gives a nice flavor and taste to this kadayal. If you don't have vadagam, you can saute finely chopped small onion till golden and add to it.
Try this healthy Palak Keerai masiyal recipe and enjoy !
Recent days I started to include some organic traditional rice varieties like Kaatuyanam, Poongar, Maapilai samba for my breakfast and dinner in the form of idli, dosa. Whenever I try a new grain at home, my first preference would be idli and dosa. Based on its taste, flavor and approval from family, I go for pongal, upma, porridge etc. Today I have shared Kattuyanam arisi idli dosai batter recipe without using idli rice.
Kaatuyanam rice (காட்டுயானம் அரிசி) is a traditional rice variety of Tamil Nadu which is used to be a forest yield. It is a 7 Ft tall 210 days yield which is common in tropical land mass. It can provide bone strength equivalent to a “Forest Elephant” . Also the height of this Kattuyanam plant can hide an elephant. That’s why it is named as “Kaatu Yanam”.
Nowadays many people have started using these organic rice varieties in their daily cooking due to their amazing health benefits. They are low in Glycaemic index, rich in fibre and anthocyanin which is a natural detoxifier when compared with our regular white rice. Its also a good source of Vitamin B, Zinc, Calcium and Manganese. So It helps to reverse diabetes, boost immunity, delays aging, reduces cholesterol and lose weight. This Kaatuyanam rice in Tamil, as its name suggests, it strengthens the body like a wild elephant. Its also called as Kattudai Oonan in Tamil.
Now lets see how to make Kaatuyanam rice idli, dosa batter recipe with step by step pictures and video.
Wash the rice several times till the water runs clear.
Take in a wide bowl. Add urad dal and fenugreek seeds.
Wash it once and soak in enough water for minimum 5 hours.
Grind them to a smooth paste adding required water. You can use a mixie or grinder.
Transfer the batter to a big vessel and cover it. Ferment it overnight or 12 hours.
The next day, batter would have raised well. Add salt and mix it.
Boil water in an idli pot. Pour the batter in a greased idli plate.
Steam the idli for 15 minutes or till the tooth pick comes out clean.
Remove the idli plate and rest it for 10 minutes. Serve hot with chutney or sambar.
METHOD - STEP BY STEP PICTURES
In a bowl, take the kattuyanam rice and wash it thrice or several times till the water runs clear. Add urad dal and fenugreek seeds and wash everything once.
Add enough water and soak them for 5 hours. Alternatively you can soak the rice separately and soak the urad dal + fenugreek seeds separately.
After soaking, grind everything to a smooth paste adding required water. Do not grind it too thick or watery. Its consistency should be like our regular idli dosa batter. But the color of this batter would be slightly reddish. Transfer the batter to a vessel and cover it.
Ferment the batter and leave it over night or for 12 hours based on the weather in your place. The next morning, take the batter. It would have raised well. Add required salt and mix well.
Boil water in an idli pot. Grease idli plate with sesame oil. Pour the batter and place in idli pot. Steam it for 15 minutes.
Remove the idli plate and rest for few minutes. Now remove the idli using a small ladle. Serve with chutney and sambar.
Enjoy !
Note
I have not used idli rice in this recipe. If you want to use, add 1/2 cup of rice for this measure.
The ratio of rice and dal is 4:1. You can use 5:1 ratio too.
Do not skip methi seeds as it gives a nice flavor for this idli.
You can use and store this batter for 2 to 3 days.
Try this healthy Idli recipe and enjoy with your favourite chutney, sambar !
Recent days I am trying to include drumstick leaves /Moringa leaves in my cooking at least once in a week as its a super food. Drumstick leaves tree is a miracle tree. It has amazing health benefits. It is one of the richest plant sources of Vitamin A, B, C, D, E, K, Anti-oxidants and vital minerals like Calcium, Copper, Iron, Potassium, Magnesium, Manganese and Zinc. The leaves, pods, seeds, gums, bark and flowers of Moringa are useful to treat mineral and vitamin deficiencies, support a healthy cardiovascular system, promotes normal blood-glucose levels, neutralise free radicals, provide excellent support of the body's anti-inflammatory mechanisms, enrich anaemic blood and support the immune system. It is also known to improve eyesight, mental alertness and bone strength. It has potential benefit in malnutrition, general weakness, lactating mothers, menopause, depression and osteoporosis.
Usually I make drumstick leaves soup or poriyal with it. For a change, I tried Murungai keerai podi for rice, idli and dosa so that I can pack it for Raksha’s lunch box as well. I asked my MIL for the recipe and tried it for the first time. It came out so well. This drumstick leaves chutney powder tastes yummy when mixed with plain rice adding few drops of ghee.
Friends, do try this Murungai keerai podi / Drumstick leaves powder for rice, Idli, dosa and enjoy. This podi stays good without refrigeration for a month. Lets see how to make Murungai keerai podi with step by step pictures.
How to use this powder : Take a tsp of this powder, mix with plain rice adding a tsp of ghee and enjoy it. You can also add a tsp of this powder in rice varieties like tomato rice, lemon rice, curry leaves rice or any vegetable rice. You can also have this powder as side dish for idli, dosa like our usual chutney powder. But use in moderation. Mix with ghee or sesame oil and enjoy with idli, dosa. Alternatively, you can sprinkle this powder over the dosa and enjoy it like podi uthappam. You can add this powder while making sambar or vathakulambu and enjoy its benefits. Tastes different and flavorful too.
Murungai keerai podi / Drumstick leaves powder recipe for rice
Turmeric powder – 1/4 tsp ( to get bright green color)
Salt - as needed
Cooking oil - 2 tsp
HOW TO MAKE MURUNGAI KEERAI PODI
Take out the leaves from the stem and discard the yellow and wilted ones.
Remove the small stalks and stems from the leaves and discard them.
Wash them and spread the leaves in a cotton towel. Let the leaves dry in shade for 2 days.
Heat 1/2 tsp oil in a kadai. Roast urad dal till golden in color. Transfer to a plate.
Add 1/2 tsp oil in the kadai and roast chana dal till golden in color. Transfer to the plate.
Again add oil and roast the red chilli, curry leaves, pepper corns, cumin seeds till crispy. Do everything in low to medium flame patiently.
Add the roasted chillies to the plate. Lastly add the black sesame seeds and dry roast till it splutters. Add the coriander seeds and roast for a minute.
Switch off the flame and add the hing. For variations, you can roast all the above ingredients together in low to medium flame patiently and grind it.
Firstly grind the chillies and salt till coarse powder. Then add the roasted dals, pepper and cumin seeds. Grind to a smooth powder.
Lastly add the dried moringa leaves along with turmeric powder, salt and grind to a smooth powder.
Transfer to a box and store it. It stays good up to a month.
Enjoy mixing with plain rice adding ghee. Tastes great with idli, dosa too.
METHOD - STEP BY STEP PICTURES
Take the drumstick leaves bunch and seperate the leaves from the stalk.
Discard the yellow and wilted leaves. Remove the small stalks as well.
Now wash the leaves and drain the water completely. Spread the leaves in a cotton cloth and leave it dry under the shade for 2 days. For instant version, dry it for 2 hours and then dry roast in hot kadai for few minutes till it turns crispy. Switch off the flame and let the leaves be in hot kadai for sometime.
Heat 1/2 tsp oil in a kadai. Roast urad dal till golden with nice flavour. Transfer to a plate. Similarly roast the chana dal till nice and crispy. Transfer to the dal plate.
Now add 1/2 tsp oil and roast the red chilli till crispy. Remove and transfer to the plate.
Dry roast sesame seeds and coriander seeds till sesame seeds splutters. Add to the plate. Let everything cool down.
Firstly grind the red chilli, salt to a coarse powder and then grind the dals and seeds. It gives a nice color to the podi. Lastly add the moringa leaves and turmeric powder, grind it smooth. Transfer to a box and store it. Use up to a month.
Enjoy !
Note
Adjust the quantity of moringa leaves as per your taste.
Alter the quantity of red chilli as per your taste.
For variations, you can roast all the above ingredients together in low to medium flame patiently and grind it. But do it patiently without burning any.
Enjoy this healthy Moringa podi with rice, idli and dosa.
Vazhaithandu inippu Pachadi – Banana Stem sweet Pachadi Recipe is our family favourite recipe using banana stem. Usually we make Vazhaithandu poriyal, Vazhaithandu sambar and Kerala style Vazhaithandu pachadi with curd. But among all these recipes, we love this banana stem sweet pachadi more. It tastes so good with sweet and mildly sour taste. Its a good side dish for sambar and rasam.
Recently I went to Salem and stayed with my in-laws for a month. We made few banana stem recipes. I asked my MIL and prepared this sweet pachadi easily in a pressure cooker. It tasted so good. I enjoyed it with sambar sadam and appalam.
Friends, do try this Vazhaithandu sweet pachadi for a change and enjoy with your family.
In a pressure cooker, drain and take chopped vazhaithandu, green chilli, tomato, salt and little water.
Pressure cook in low flame for one whistle. Its cooked well. Mash it slightly and set aside.
Grind coconut and rice flour to a smooth paste. Add to vazhaithandu.
Add grated jaggery and boil everything well till it becomes thick like pachadi.
Lastly temper in oil and add to the pachadi. Mix well and serve with sambar, rasam rice.
METHOD - STEP BY STEP PICTURES
Wash and chop Banana stem into small pieces. Immerse in buttermilk till use to avoid discoloration.
Squeeze the vazhaithandu and add to pressure cooker. Add finely chopped green chilli, tomato, a pinch of salt and little water. Pressure cook in low flame for one whistle.
In the mean time, grate jaggery. Grind coconut and rice flour to a smooth paste adding water.
Open the cooker after the steam is released. Add ground coconut paste and jaggery along with some water if needed. Mix well and boil till thick.
Lastly temper mustard seeds, urad dal and red chilli in little oil and add to pachadi. Mix well and serve hot with sambar rice, rasam rice etc.
Note
You can skip tomato and add little tamarind extract instead.
You can also use sugar instead of jaggery but jaggery gives a better taste and healthy too.
Tempering one red chilli at the end gives a mild spicy taste and flavour to the pachadi.
Try this easy, healthy and yummy Banana stem sweet pachadi. People who don’t like banana stem too eat with pachadi without any complaints !


.JPG "Kattuyanam rice")


