This year I am starting my Diwali recipes with this must try Diwali snack – Mixture recipe. Its basically a South Indian style Mixture recipe which is popularly known as Madras mixture. This Tamilnadu mixture is a combination of Omapodi, Karaboondi, Fried aval, cashew nuts, peanuts , curry leaves mixed with spice powders like salt, red chilli powder and hing.
In this mixture, I have also added small maida biscuits which is fondly called as mixture biscuit. When I was a kid, I used to pick these mixture biscuits alone from the pack of mixture and savor it. Iam not a big fan of South Indian mixture but my husband, daughter and father in law loves it.
So I try to make a batch of mixture just for them during Diwali. Last year I made this mixture recipe and took a video as well. But I couldn’t share it in my blog. So this year, I thought of starting Diwali recipes with this yummy snack. Soon I will try to post a North Indian namkeen recipe.
When it comes to street food in Mumbai, pav bhaji reigns supreme as the most popular and beloved snack. It has been a go-to choice for many, including my daughter, who can't resist its flavoursome charm. Traditionally, I would prepare pav bhaji by cooking the vegetables and masala separately, but recently, I stumbled upon a game-changing technique on YouTube: one pot, one shot pressure cooker pav bhaji. Intrigued by its vibrant colours and tempting texture, I couldn't help but bookmark a few videos to try it out.
During a recent visit to my parents' house, they surprised me with the Prestige Svachh FLIP-ON Pressure Cooker. As a cooking enthusiast, I've always appreciated the convenience and time-saving benefits of pressure cookers. With its gas and induction compatibility, it caters to all kitchen setups. The unique lid design with spillage control caught my attention, making it incredibly easy to handle and maintain. I was particularly impressed by the effortless locking and unlocking mechanism, which even beginners will appreciate.
Excited to put my new cooker to the test, I decided to try making pav bhaji masala using this innovative technique. The results were nothing short of extraordinary! The pressure cooker method allowed me to complete all the tempering, sauteing, and cooking in one go, eliminating the need for multiple pans and saving precious time. The end product was a tantalising plate of pav bhaji that retained its authentic flavours and delightful texture. It was an instant hit with my family, leaving us all craving more.
Tempering, sautéing, cooking are all done in one go without any compromise in taste and texture. In the quest for the perfect pav bhaji, the pressure cooker technique has revolutionised the way we prepare this beloved dish. Thanks to the Prestige pressure cooker and its exceptional features, cooking has become a breeze, with uncompromised taste and texture. So, why wait? It's time to elevate your pav bhaji game and savour the wonders of this delectable dish. Get ready to embark on a culinary journey that will leave you craving for more with each flavourful bite.
Friends, do try this pressure cooker pav bhaji recipe and enjoy with your family. Even bachelors can give this as try. You can make the same in instant pot as well.
Wash and chop onion, tomato and vegetables finely. Set aside.
Heat butter+cooking oil in Prestige pressure cooker.
Splutter cumin seeds. Saute onion till transparent. Add ginger garlic paste and saute well.
Add tomato and saute till mushy. Add all the spice powders , salt and mix well.
Lastly add the chopped vegetables and mix well. Add required water and pressure cook in low flame for one whistle.
Open the cooker after the steam is released. Take a potato masher and mash it well to make a paste like consistency.
Add little water if its too thick. Boil for a minute and switch off the flame.
In a tadka pan, melt butter and add pav bhaji masala powder and Kasoori methi. Switch off the flame and add to pav bhaji masala.
Garnish with coriander leaves. Pav bhaji masala is ready.
For pav buns, take the bun and slit it. Heat butter in a dosa tawa and add the pav bhaji masala powder, a pinch of salt and coriander leaves. Mix well.
Dip the pav buns in this masala and cook both the sides till soft. Remove and serve it.
Serve the pav buns with pav bhaji masala, finely chopped onions and lemon wedges. Enjoy.
PRESSURE COOKER PAV BHAJI RECIPE - STEP BY STEP PICTURES
Wash and chop onion, tomato, vegetables and set aside. Heat butter+cooking oil in a pressure cooker base.
Splutter cumin seeds. Saute onion till transparent and add ginger garlic paste and saute till raw smell goes off. Add chopped tomato and saute till mushy.
Add turmeric powder, red chilli powder, pav bhaji masala powder and salt. Mix well and add the vegetables.
Add required water and pressure cook in low flame for one or two whistles. Open the cooker after the steam is released and mash the cooked vegetables and masala using a potato masher.
After mashing, it looks creamy and thick. Add little more water and boil for a minute. Switch off the flame. Lets do the tadka. Heat butter in a kadai and reduce the flame to low. Add pav bhaji masala powder and crushed Kasoori methi. Add to pav bhaji and mix well. Garnish with coriander leaves and set aside.
To cook pav buns : Melt butter in a dosa tawa and add little pav bhaji masala powder and chopped coriander leaves. Slit the bun like an open book, place over it and spread well. Remove the bun and serve hot with bhaji, finely chopped onion and a lemon wedge.
Enjoy !
Note
For variations, you can skip other vegetables and use potato alone.
Use butter generously for best taste.
Try this easy, one pot one shot, pressure cooker pav bhaji and enjoy !
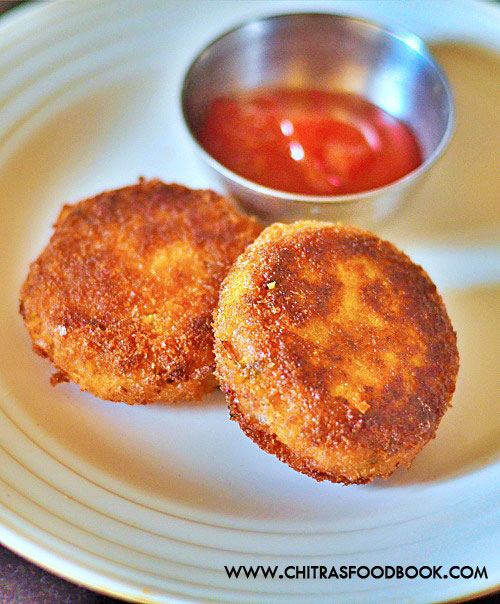
Looking for a quick and easy recipe for a healthy snack or party appetizer? Try making this delicious and flavourful vegetable cutlets, either traditional Indian-style with aloo or mixed veggies or vegan-friendly, baked to perfection and sure to be a hit with kids and adults alike as an evening snack or as a nod to Indian street food.
Yes, Cutlet is one of the most favourite evening snacks for many especially school going kids. Its the most popular birthday party snack too. Samosa or cutlet would be in the birthday party menu for sure. People make cutlet in different ways like plain aloo cutlet, mix veg cutlet with or without beetroot. I have tasted veg cutlet in many hotels and chat shops with beetroot. The colour and taste of beetroot would be dominating which we don’t like it. But bakery style veg cutlet without beetroot is always special to me.
Recently I saw the making of these yummy mixed veg cutlet n a bakery shop nearby my house. Procedure was so simple and quick to make. After watching that, I was searching for a similar recipe in YouTube and found one in Ravinder's home cooking channel. I got so tempted and made it as a weekend snack for Raksha. I deep fried few for Raksha and shallow fried the remaining in a dosa tawa for us. Though both tasted great, my vote is for the deep fried ones which was exactly like the street side shop cutlets.
Friends, do try this easy and yummy mix vegetable cutlet at home and enjoy with your kids and family. With tomato ketchup as side dish, this cutlet will never fail to attract everyone in the family. Lets check out the recipe.
Chat masala OR Aamchoor powder - 1/4 tsp (optional)
Turmeric powder - 1/4 tsp
Tomato sauce – 1 tsp
Salt - As needed
Bread crumbs - 3/4 cup + 1 cup
Corn flour or Maida – 2 tbsp
Lemon juice - 1 tsp
Coriander leaves - 2 tbsp (finely chopped)
Cooking oil - to fry
HOW TO MAKE VEGETABLE CUTLET AT HOME
Wash and pressure cook potato, carrot and green peas.
Peel the skin of potato and take in a bowl. Add boiled carrot, green peas.
Add the spice powders, chopped onion, green chilli, coriander leaves, gg paste, tomato sauce, cashews and salt.
Mash everything well and add 1/2 cup of bread crumbs and 2 tbsp of rice flour or powdered poha.
Mix well to make a non-sticky dough. Make a paste with Maida and keep the bread crumbs ready.
Take the dough and make shapes. Dip into the Maida paste and bread crumbs.
Arrange in a plate. Heat a dosa tawa with oil to shallow fry. Place the cutlet and cook both the sides.
For deep frying, heat oil in a kadai and fry the cutlets on both the sides till golden. Remove in a tissue and serve with tomato ketchup.
METHOD - STEP BY STEP PICTURES
Wash and pressure cook potato, carrot and green peas. Peel the skin of potato and take in a bowl.
Add boiled carrot, boiled green peas to the potato. Add spice powders, chopped onion, green chilli, coriander leaves, ginger garlic paste, cashews, tomato sauce and salt.
Mash everything well and add 1/2 to 3/4 cup of bread crumbs, 2 tbsp rice flour to make a non-sticky dough.
Make Maida paste adding some water and keep in a bowl. Keep the bread crumbs ready in another bowl.
Take the cutlet dough. Make round, heart or oblong shapes. Arrange in a plate. Dip in Maida paste and then in bread crumbs. Arrange in a plate.
To shallow fry the cutlet, heat a dosa pan with oil. Place 3 or 4 cutlets and cook them in medium flame till it turns golden brown. Flip and cook the other side too. Try to hold the cutlet with a tong and cook the corners. Remove in a plate.
To deep fry the cutlet, heat oil in a kadai to immerse the cutlet. Place one cutlet and cook in medium flame till it turns golden in one side. Flip and cook the other side as well. Cutlet looks crispy and golden in color after its cooked well. Remove in a tissue and serve hot with tomato sauce or ketchup. I personally felt, deep fried ones are better and loved by kids.
For calorie conscious people, you can go for shallow fried or Air fried cutlets. This cutlet stays good for one day.
Note
If you want to make it for parties in advance, you can make the cutlet masala, roll and shape it. Dip in Maida paste and bread crumbs. Keep it in a covered tray or in a Ziplock bag and place in a refrigerator. Before frying, dip in bread crumbs again and fry it.
Adjust the quantity of masala powders as per your taste.
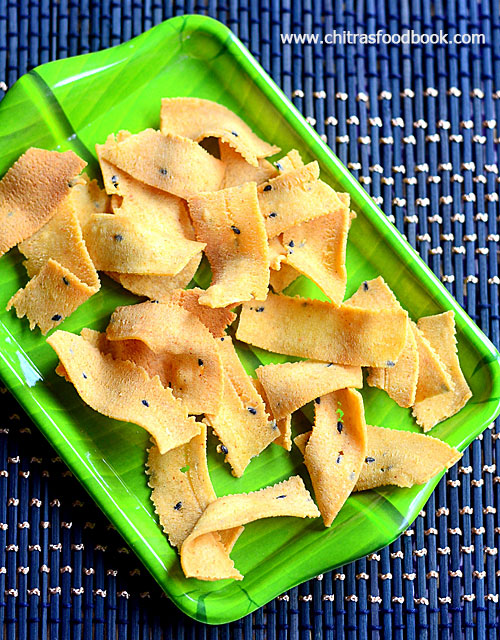
Every year during Diwali I make Ribbon pakoda / Ola pakoda without fail. Usually I make it adding hing. This year, I made ribbon pakoda adding garlic. It turned out so flavourful and crunchy than my usual ones. So I am planning to try this version every year during Diwali.
Generally Garlic ribbon pakoda is prepared by grinding soaked red chilli and garlic cloves to a paste and added to the rice flour. In this method, garlic pieces and red chilli won’t grind properly. So I followed a different method as suggested by Happy homemaker – Tamil YouTube channel video. Thank you so much Jaya. Your tip worked out so well.
Its so easy to make and stays good for a month if handled properly. Friends, lets see how to make this yummy Garlic ribbon murukku recipe with step by step pictures and a short video.
Store bought rice flour or Idiyappam flour - 1 cup
Besan flour or Roasted gram flour / pottukadalai maavu - 1/2 cup
Melted butter - 1 tbsp
Sesame seeds - 1 tsp
Salt - as needed
Red chilli powder - 1 tsp
Water - as needed
Cooking oil - to deep fry
To grind
Garlic cloves - 10
HOW TO MAKE GARLIC RIBBON PAKODA
In a wide bowl,sieve rice flour and besan flour.
Add salt, sesame seeds and Kashmiri chilli powder to it. Mix well.
In a mixie jar, take the garlic cloves and add a handful of rice flour mix to it.
This helps to grind garlic to a powder without any grits. Add the garlic mix to the rice flour mix.
Lastly add melted butter and mix well and spread evenly.
Add water and make a thick dough. Take the ribbon pakoda mould and grease with oil.
Fill the dough. Heat oil and drop a pinch of dough. If it rises to the top immediately, oil temperature is right.
Squeeze the murukku press over the hot oil and deep fry ribbon pakoda in both the sides till bubbles cease. Remove from oil and drain in a tissue paper.
Store in an air tight box once it cools down. Stays good for a month.
METHOD - STEP BY STEP PICTURES
In a wide bowl, sieve the rice flour and besan flour. You can use roasted gram dal flour instead of besan flour. Add Kashmiri red chilli powder, salt and sesame seeds to it. Mix well and set aside.
In a mixie jar, take the garlic cloves without skin and add a handful of above said mixed rice flour to the garlic cloves. Grind well to a smooth powder. ( Tip : Adding rice flour to the garlic cloves helps in even grinding of garlic pieces without any grits. I got this tip from “Happy homemaker – Tamil YouTube channel video”. Thanks Jaya for this nice tip.
Add this ground garlic powder to the rice flour and mix well. Lastly add the melted butter and spread it well with your hands. Try to hold little quantity of flour after mixing. You should be able to hold the shape but it should crumble when you drop it. This shows fat content is enough for the dough.
Take the ribbon pakoda mould along with the murukku press. Grease with oil and fill the dough. Heat oil to deep fry and check the oil temperature by dropping a pinch of dough. If it rises to the top immediately, oil temperature is just right.
Now lower the flame to medium. Hold the murukku press over the hot oil and squeeze it in a circular manner to make ribbon pakoda. Cook till bubbles cease in one side. Flip over and cook the other side till bubbles cease and turns golden in color.
Remove and drain in a tissue paper. Break the ribbon pakoda into pieces and store in an air tight box. It stays good for a month.
Enjoy !
Note
For variations, you can use roasted gram dal instead of besan flour.
You can use 2 tbsp of hot oil instead of butter.
Deep fry ribbon pakoda till the bubbles and Sshh sound ceases.
Store in the box after it comes to room temperature. Do not store when hot because it will sweat and becomes soggy.
Try this easy, yummy Garlic ribbon pakoda and enjoy for this Diwali !
Last year I bookmarked this super crispy and white colored Ulundu murukku / Urad dal murukku recipe from Sakthi samayal Youtube channel. For this year Diwali, I started my sweets and snacks preparation with Instant doodh peda with milk powder and this super white, crunchy Urad dal murukku / Ulundu murkku.
For every diwali, we make thenkuzhal murukku at home by using Idiyappam flour and roasted urad dal flour. We all love it. But this ulundu murukku is prepared by pressure cooking urad dal, ground to a smooth paste and then added to store bought dry rice flour. There is no need to use idiyappam flour as well. It comes out so well even in the first attempt. In fact, I loved this murukku. I am sure I will make this murukku every year for Diwali. But one thing, this murukku absorbs some oil when compared with thenkuzhal. As we are using boiled Urad dal, this murukku absorbs little oil. So it won't come out dry. But there is no compromise in taste, flavor and crunchiness when compared with our thenkuzhal.
Don’t worry even if you are a beginner. You will get it perfect if you follow the steps given below. Lets see how to make this crunchy urad dal chakli / ulundu murukku with step by step pictures.
Wash and pressure cook urad dal adding 1 cup of water in low flame for 2 whistles.
Drain the excess water and grind urad dal to smooth paste.
Sieve rice flour in a wide bowl. Add cumin seeds, hing, salt and butter.
Mix well. Add urad dal paste and mix till crumbly. Sprinkle little water and make non sticky dough.
Fill the dough in murukku press. Squeeze and make shapes in the back of ladle.
Drop in hot oil and deep fry both the sides till bubbles cease. Remove and drain in a tissue paper.
Cool down and store in a tight box. Stays good for 2 weeks.
METHOD - STEP BY STEP PICTURES
Wash the urad dal and take in a pressure cooker. Add 1 cup of water and pressure cook in low flame for 2 whistles.
Open the cooker after the steam is released. Drain the excess water if any and grind the urad dal to smooth paste like butter. You can add little water while grinding if needed.
In a wide bowl, sieve the rice flour. Crush cumin seeds slightly and add to the rice flour. Add salt, hing and melted butter. Mix well.
Add urad dal paste and mix well till crumbly. Add little water to make a smooth, non sticky dough. Cover the dough with a wet cloth till use.
Take the murukku press with 3 or 5 holes mould. Fill the murukku press with the dough. Squeeze and shape murukku in the back of ladle.
Heat oil to deep fry. Drop a pinch of dough to check oil temperature. If it rises to the top immediately, drop 2 to 3 murukku and fry both the sides in medium flame till bubbles cease and murukku settles down in the bottom of oil. Make sure you cook in medium flame to make white colored murukku. Cooking in high flame makes the murukku golden brown in color. If the oil is too hot, switch off the flame. Bring it to correct temperature and then proceed frying.
Remove the murukku and drain excess oil in a tissue paper. Store in an air tight box after it cools down. Stays good for 2 weeks. Enjoy !
Note
I used 1 cup of water for 1/2 cup of urad dal for pressure cooking.
I also used around 1/4 cup of water while grinding urad dal to smooth paste. So please adjust this quantity based on the need.
Do not fry this murukku in high flame because color changes to golden brown. Always cook in low to medium flame.
Try this easy, yummy, ulundu murukku for this Diwali and enjoy !