Search Chitra's Food Book

Showing posts with label TIFFIN RECIPES. Show all posts

September 20, 2021

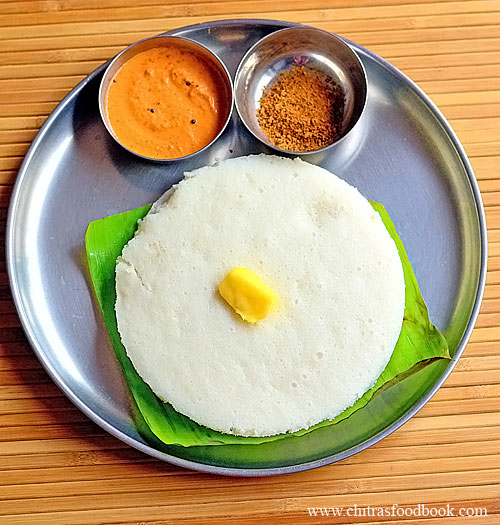
Hotel Style Thatte Idli Recipe– Soft Bidadi Thatte Idli

thatte idli recipe

This is my second version of Karnataka specia thatte idli recipe also known as plate idli in English (In Kannada, Thatte means plate). Long back I shared a fool proof recipe for thatte idli learning from my School moms group friend Priya. I have been following that recipe for years. Recently I was watching some Bidadi special thatte idli from popular hotels in YouTube. Based on the recipes they shared, I tried this recipe from Bagya Tv YouTube channel which is very similar to my Kushboo idli.

Thatte idli came out super soft and spongy. Usually baking soda is added in most of the recipes. But I did not even used baking soda. Still idli came out so well. I have used thatte idli stand that I bought in Amazon. But you can make this idli even without thatte idli stand. You can simply use the lid of steel boxes or make it as normal idli. There will be no difference in texture and taste. 

Friends, If you are looking for a super soft, fluffy thatte idli recipe, you must try this one. I am sure you will love the result. Lets see how to make Karnataka hotel style thatte idli recipe with step by step pictures and a video. 


thatte idli

Hotel style Thatte idli recipe


Hotel style Thatte idli recipe

Karnataka Hotel style Thatte idli recipe


Cuisine: Karnataka
Category: Main course
Serves: 15
Prep time: 10 Minutes
Cook time: 20 Minutes
Total time: 30 Minutes


INGREDIENTS
1 cup = 250ml
  • Idli rice / Salem rice / Boiled rice - 3 cups
  • Urad dal - 1 cup ( I used white, round dal)
  • Fenugreek / Methi seeds - 1/2 tsp
  • Thick Rice flakes / Aval / Poha - 1/2 cup
  • White, big Sago / Sabudana - 1/4 cup
  • Salt & water - as needed
HOW TO MAKE THATTE IDLI
  1. Wash the rice thrice till water is clear.
  2. To the rice, add urad dal and methi seeds. Wash once and soak in enough water for 4 hours. 
  3. In another bowl, wash and soak sago and poha for 4 hours.
  4. Grind everything together till it turns to smooth paste.
  5. Collect the batter in a big bowl and close it with a lid. \
  6. Ferment the batter over night or 12 hours. The next morning, mix the batter well.
  7. Grease thatte idli plate with oil or line with cotton cloth and pour the batter to fill it. Boil water in idli pot.
  8. Steam it for 15 minutes till idli is non sticky to touch.
  9. Remove the thatte idli plate and rest for few minutes. Loosen the sides and remove it.
  10. Serve hot with your favorite chutney and sambar. I served with Kempu chutney/ Red chutney !
METHOD - STEP BY STEP PICTURES
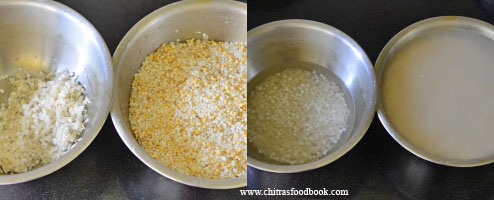
  • Wash the idli rice twice or thrice till the water looks clear. Add urad dal, methi seeds and wash it once. Add required water and soak the rice, dal mixture for 4 hours minimum.

  • In another bowl, wash and soak sago, poha for 4 hours. I soaked in drinking water and used the same water for grinding. 
  • thatte idli recipe
  • Grind the soaked rice, urad dal, methi seeds, sago and poha till smooth. Add required water while grinding. I did not add salt while grinding as it delays fermentation for Bangalore weather.

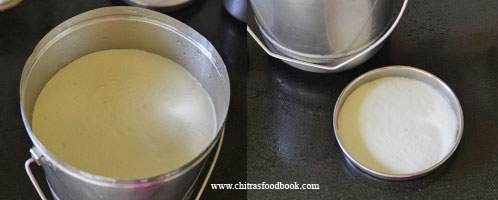
  • Collect the batter in a big bowl. Cover with a lid and ferment the batter over night or 12 to 15 hours.
  • thatte idli recipe
  • The next morning, batter would have raised well. Add salt and mix the batter well. Grease thatte idli plates with oil or line the plate with cotton cloth.
  • thatte idli recipe
  • Pour 2 to 3 ladles of batter and arrange in the stand. Boil water in idli pot and place the thatte idli stand. If you don’t have thatte idli stand, you can use steel box lids and pour the batter. Place the lid over the idli plate and steam it for 15 to 20 minutes till idli is non sticky to touch.
  • Remove the plate and rest for few minutes. Loosen the sides with a knife or spoon. Remove the idli and serve hot with your favorite chutney and sambar. Enjoy !
        thatte idli recipe

Note

  • For variations, you can add a pinch of baking soda, rest the batter for 10 minutes before making idli.
  • Idli should be steamed for 15 to 20 minutes to cook well.
  • If you have not used cotton cloth to line the plate, remove the idli after resting for 5 minutes else idli will break while removing it.

Serve this hot and yummy Thatte idli with butter and red chutney, sambar or sagu.

How to make thatte idli


Continue Reading...


January 6, 2021

Jowar Idli recipe without rice / Cholam Idli Recipe / Sorghum Idli Recipe

Cholam idli recipe

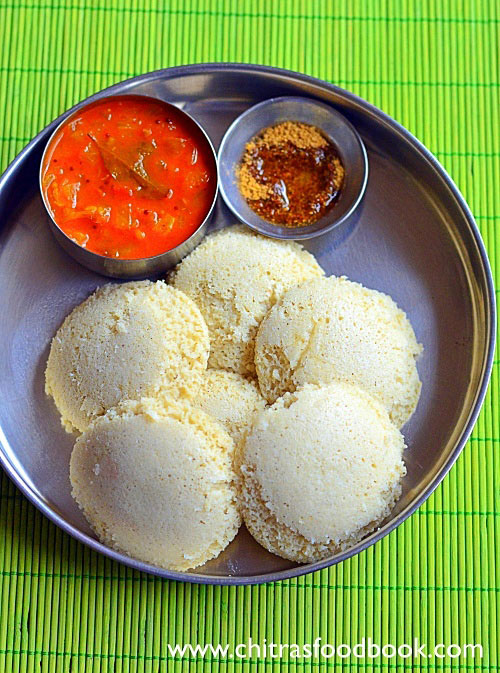
After a long time, I started making millet recipes in my kitchen. My recent try was this jowar idli recipe/ Sorghum idli dosa batter without rice. Jowar is a healthy gluten free millet which is high in fiber, protein and packed with essential minerals and vitamins. Its a great alternative for atta/ wheat flour and all purpose flour / maida. It is good to control diabetics, thyroid and aids weight loss. Sorghum is known as Cholam in Tamil, Jonnalu in Telugu, Jola in Kannada, Jowar in Hindi.

There are two varieties of Jowar in India. One is white in color and other one is red jowar which is called as Irumbu cholam/ Irungu cholam in Tamil and Malayalam. I have used white variety in this recipe.

For all millet idli recipes, I use a combination of millet, urad dal and poha / aval / pressed rice to replace rice. It comes out well and soft every time. Not only idli, you can also make crispy dosa with the same batter. But the only problem I face with all the millet idli batter is, you cannot refrigerate and store the batter for more days like our regular idli dosa batter. Millet idli dosa batter should be used within 2 days for best taste. 

This Jowar idli dosa batter is also the same like other millet idli batter recipes. You have to consume it within a day or two even under refrigeration. Other than this factor, you will not find much difference in taste, flavor from our regular idli dosa. I am sure you will love its spongy and soft texture. 

Jowar idli tastes the best with coconut chutney, tomato and onion based chutneys or tomato thokku. I served it with tomato thokku and idli podi. We loved it. I am happy that I can include this recipe in our regular diet too. Friends, do try this easy and yummy jowar idli / Sorghum idli and enjoy for your breakfast and dinner !

Check out my foxtail millet idli

Kodo millet idli

Ragi idli 

Pearl millet idli

Pearl millet dosa

Jowar idli without rice

Jowar idli / Sorghum idli/ Jonna idli without rice

Jowar idli / Sorghum idli/ Jonna idli without rice

Jowar idli / Sorghum idli/ Jonna idli dosa batter recipe without rice


Cuisine: Indian
Category: Main course
Serves: 15
Prep time:5Hours
Cook time:10Minutes
Total time:5 Hours 10 Minutes


INGREDIENTS
1 cup = 250ml
  • Jowar / Sorghum / Cholam - 2 cups
  • White, round urad dal - 1/2 cup
  • Poha / Pressed rice / Aval - 1/2 cup
  • Methi seeds / Fenugreek seeds - 1/2 tsp
  • Salt & Water - as needed
HOW TO MAKE JOWAR IDLI
  1. Wash the jowar and poha till you get clear water.
  2. Soak in enough water for 5 hours.
  3. Wash and soak urad dal and methi seeds for 2 hours.
  4. First grind urad dal to a smooth, thick batter. Transfer to a big bowl.
  5. Then grind soaked jowar to a smooth paste. Add to urad dal batter.
  6. Mix well with hands. Cover and ferment the batter over night or 12 hours.
  7. The next morning, add salt and mix the batter with a ladle.
  8. Pour in a greased idli plate and steam in a pot for 10 minutes.
  9. Remove and rest for a minute. Then scoop out and enjoy with chutney, sambar !
METHOD - STEP BY STEP PICTURES
  • Wash the jowar, poha together for 3 to 4 times to remove the dust. Wash till you see clear water. Add enough water and soak it for 5 hours.

  • Wash the urad dal + methi seeds together for 2 times and enough water to soak it for 2 hours.
  • Jowar idli without rice
  • First grind urad dal to a smooth, thick batter adding required water. If you are grinding the batter in wet grinder, add water gradually and grind to a smooth, thick paste like butter. If you are using mixie, use ice water to grind the batter. Collect the urad dal batter in a big, wide bowl with space for fermentation. 

  • Now grind the soaked jowar + poha to a smooth, thick paste adding required water. Add the jowar batter to urad dal batter and mix well with your hands to aid fermentation. Cover the batter and ferment it overnight or 12 hours based on the weather in your place. 
  • Jowar idli recipe without rice
  • The next morning, batter would have raised well. Add required salt and mix well. Take idli plate and grease with gingely oil.

  • Roll boil water in an idli pot. Place the idli plate and steam cook for 10 minutes. Check with a tooth pick or with a wet finger. If it comes out clean, idli is done. Remove the idli plate and wait for 2 minutes. Then scoop it with a flat spoon and serve in a plate. Enjoy with sambar or chutney !Jowar idli recipe without rice 

Note

  • You can use cooked rice instead of poha.
  • You can use thick or thin poha/aval for this idli
  • If you are using mixie, use ice cold water for grinding the batter to avoid heating of mixie jar.
  • Soak jowar and dal separately and grind them separately.
  • If you want to soak and grind everything together, use 3:1 ratio of jowar and urad dal. i.e use 1.5 cups jowar and 1/2 cup urad dal. 


Try this easy, yummy and healthy Jowar idli for your breakfast / dinner !

I served it with tomato thokku and idli podi. 

 Jowar idli recipe


Continue Reading...


May 18, 2020

Gojju Avalakki Recipe – Karnataka Gojjavalakki / Huli Avalakki

Gojju avalakki recipe
I love to try varieties of poha recipes for our breakfast and dinner. Last week I tried this Karnataka style gojjavalakki recipe (Tamarind poha) for our breakfast. Its an instant and quick fix recipe for breakfast. This is a no onion no garlic recipe too. If you have tamarind paste or soaked tamarind in hand, gojju avalakki can be prepared under 10 minutes. It doesn’t need any side dish too.

 This recipe would be ideal for bachelors and working women to make a quick breakfast and dinner. I referred few Karnataka blogs and YouTube videos and tried this recipe. Gojju avalakki works the best with thick poha. It is coarsely ground and made. But I used thin poha which is also know as paper avalakki in Karnataka. So I have shared the instructions for both the types of poha.

 Soon I will try to share Tamil nadu style puli aval / tamarind poha recipe which is slightly different from this one. Ok, lets see how to make Karnataka special gojjavalakki recipe with step by step pictures.
Karnataka Gojju avalakki recipe

Gojju avalakki recipe


Gojju avalakki recipe

Karnataka style gojju avalakki recipe


Cuisine: Karnataka
Category: Breakfast
Serves: Serves 4
Prep time: 10 Minutes
Cook time: 20 Minutes
Total time: 30 Minutes


INGREDIENTS
To mix in poha
  • Poha / Avalakki / Aval/ rice flakes - 3 cups ( I used thin poha)
  • Tamarind - Big gooseberry size
  • Karnataka style Rasam powder or sambar powder - 1 tbsp
  • Turmeric powder - 1/2 tsp
  • Jaggery – 2 tsp (powdered)
  • Salt - as needed
  • Water - as needed
  • Grated coconut - 1/4 cup ( to garnish)
To temper
  • Cooking oil - 1.5 tbsp
  • Mustard seeds - 1 tsp
  • Urad dal - 2 tsp
  • Chana dal - 1 tbsp
  • Peanut - 2 tbsp
  • Curry leaves - Few
  • Asafetida / Hing - 1/4 tsp
  • Red chilli – 1 or 2 ( pinched into 2)
HOW TO MAKE GOJJU AVALAKKI
  1. Wash the poha once or twice in water. Drain completely.
  2. Take in a wide bowl. Add tamarind extract, sambar powder, turmeric powder, jaggery, salt and hing. Sprinkle some water if needed and mix gently.
  3. Mix well and set aside for 5 minutes.
  4. In the mean time, heat oil in a kadai. Roast peanuts.
  5. Splutter mustard seeds, urad dal, chana dal and roast well.
  6. Add curry leaves, pinched red chilli and hing. Saute quickly.
  7. Now add the soaked gojju avalakki mixture and mix gently.
  8. Cover cook in low flame for 5 to 10 minutes by tossing once in the middle.
  9. Switch off the flame and garnish with grated coconut. Serve hot !
METHOD - STEP BY STEP PICTURES
  • Take the poha in a bowl. If you are using thick poha, grind it coarsely using pulse option in your mixer grinder. If using thin poha, no need to grind it. Proceed to next step.
  • Wash the poha once or twice in water to remove the debris. Drain the water completely and set aside in a bowl. Soak tamarind in 1 cup of water and take the extract.  Gojju avalakki recipe
  • Add the tamarind extract, turmeric powder, sambar powder/ rasam powder, jaggery, hing and salt. Mix well and rest it for 5 minutes.
  • Gojju avalakki recipe  
  • In the mean time, heat oil in a kadai. Roast the raw peanuts for few minutes. Now add mustard seeds in the same oil. Let it splutter.
  • Add urad dal, chana dal, pinched red chilli, hing and curry leaves. Saute for a minute. Gojju avalakki recipe
  • Add the soaked poha + tamarind mixture to the kadai. Mix gently, check for taste and add more spices, salt if required. Cover cook for 5 to 10 minutes in low flame. Toss it once or twice in the middle. Cook till poha becomes hot. Switch off the flame and garnish with grated coconut. Serve hot and enjoy ! You can eat it as such or serve with coconut chutney.Gojju avalakki recipe

Note

  • Do not add more water while soaking thin poha. If you are using thick poha , grind it coarsely and then soak in tamarind water. It helps to soak the poha quickly in less water. Adding more water makes the dish mushy. 
  • You can use Karnataka style rasam powder or sambar powder in this recipe.
  • For variations, you can also add a tsp of roasted sesame seeds powder and mix at the end.
Try this easy, instant Karnataka special gojju avalakki and enjoy !
Gojju avalakki

Continue Reading...


December 6, 2019

Bansi Rava Upma – Karnataka Bansi Rava Uppittu Recipe

Bansi rava upma
Bansi rava was very new to me till I come to Bangalore. In Tamil nadu, we used to buy Bombay rava for all the dishes like upma, dosa, idli, kesari, pongal and kichadi. Bansi rava is quite popular in Karnataka and in many other South Indian homes. People make uppittu and Kharabath here. When I Googled about the difference between bansi rava and normal white rava / suji , I found both kinds of semolina (rava) are obtained from wheat, albeit different varieties. 

Bansi rava is darker in color than plain semolina / rava. Some people also say Bansi rava is made from corn kernels as its yellow in color. Its healthier than normal rava in terms of nutrition (Source : Quora). We should use 3 cups of water for 1 cup of rava (1:3 ratio of bansi rava and water). It takes more time to cook than Bombay rava. 

This upma tastes similar to Godhumai rava upma / wheat rava upma. It stays soft for hours. So you can prepare it for lunch box as well. Its a tummy filling one. It can be opted for diet recipes too. Ok, lets see how to make Karnataka style bansi rava uppittu with step by step pictures and video.

Check out my Chiroti rava upma and Kharabath recipe !!


Bansi rava upma

Bansi rava upma / Karnataka uppittu Recipe


Bansi rava upma / Karnataka uppittu Recipe

Karnataka style bansi rava uppittu / upma recipe


Cuisine: South Indian
Category: Breakfast
Serves: 3
Prep time: 10 Minutes
Cook time: 20 Minutes
Total time: 30 Minutes


INGREDIENTS
1 cup = 250 ml
  • Bansi rava - 1 cup
  • Big onion - 1 (Finely chopped)
  • Tomato - 1 (Finely chopped)
  • Green chilli - 2 (slit into two)
  • Curry leaves - few
  • Water - 3 cups
  • Salt - as needed
To Temper
  • Cooking oil - 2 tbsp + 2 tbsp for roasting
  • Mustard seeds - 1/2 tsp
  • Urad dal - 2 tsp
  • Chana dal - 1 tbsp
  • Cumin seeds - 1/2 tsp
Coriander leaves & grated coconut - a fistful (to garnish)
HOW TO MAKE BANSI RAVA UPMA
  1. Wash and chop onion, tomato, slit green chilli. Set aside.
  2. In a kadai, heat oil and roast bansi rava in medium flame till golden.
  3. Transfer to a plate. In the same kadai, heat oil.
  4. Splutter mustard seeds, urad dal , chana dal and curry leaves.
  5. Saute onion, green chilli for a minute. Add tomato and saute till mushy.
  6. Add boiling water or cold water and required salt. When it comes to roll boil, add rava.
  7. Mix till water is absorbed. Cover cook for few minutes till done.
  8. Lastly garnish with coriander leaves and grated coconut. Serve hot with coconut chutney !


BANSI RAVA UPMA - STEP BY STEP PICTURES
  • Wash and chop onion, tomato and slit green chilli. Chop the vegetables finely if using. Set aside.


  • Heat 2 tbsp oil in a kadai. Roast bansi rava in low to medium flame for 5 minutes. Remove in a plate. 
  • Bansi rava upma

  • In the same kadai, heat another 2 tbsp oil. Splutter mustard seeds, urad dal, chana dal. Saute for few seconds. Add onion, curry leaves and slit green chilli. Saute till onion becomes transparent.
  • Bansi rava upma
  • Now add chopped tomato and saute till mushy. Add 3 cups of water and required salt. Let it come to a roll boil.
  • Bansi rava upma
  • Keep the flame low and add roasted bansi rava.  Mix well. Take care it splashes. Keep mixing till most of the water is absorbed by the rava. Keep the flame low and cover the kadai with a lid. Cook for 5 to 10 minutes. Open the kadai and stir the upma once or twice.
  • Bansi rava upma
  • Cook till rava is completely soft. Switch off the flame and garnish with coriander leaves and grated coconut. Upma looks mushy when hot but becomes fluffy as it cools down. Enjoy this healthy, yummy bansi rava upma with coconut chutney, chutney podi or sugar. 
  • Bansi rava upma 
    Bansi rava upma

Note

  • For healthy variations, you can use finely chopped vegetables like carrot, potato, beans and green peas. In that case, add the vegetables along with onion, saute for few minutes. You may also need to add 1/2 cup more water for the veggies to cook.
  • Instead of slit green chilli you can use MTR vangi bath powder and make kharabath.
  • Water quantity can be adjusted based on your taste.
  • Coriander leaves and grated coconut adds a nice flavor & taste to this dish. So don't skip it. 

Try this healthy Bansi rava upma and share your feedback with me !
Bansi rava uppittu


Continue Reading...


April 19, 2019

Black Rice Idli Dosa Recipe | Kavuni Arisi Idli Dosai | Karuppu Arisi Idli Dosa

black rice idli

Black rice idli, dosa and sweet paniyaram was my recent try using black rice/ Karuppu arisi (Kavuni arisi). Black rice / Karuppu arisi popularly known as kavuni arisi is a rice variety with amazing health benefits. Recently I shared Chettinad special Kavuni arisi sweet recipe. When I shared that recipe, some of my readers asked me to share more black rice recipes. So I made black rice sweet paniyaram and idli, dosa. Both came out well in the first attempt. 

I thought of starting black rice recipes with this soft and spongy black rice idli, dosa recipe. Next week I will try to post the paniyaram recipe. Here I have used idli rice and black rice in equal quantities. The quantity of rice and urad dal is important to get a soft and spongy idli. I have also used some poha / pressed rice for additional softness. Friends do try this healthy black rice idli / karuppu arisi idli and dosa. You will love it.

Check out my 15+ idli varieties !


karuppu arisi idli


black rice dosa

Black rice idli dosa recipe


Black rice idli dosa recipe

Black rice idli dosa recipe / Karuppu arisi idli dosa using black rice, idli rice, urad dal, pressed rice and fenugreek seeds.


Cuisine: Tamil nadu
Category: Idli varieties
Yields : 20 
Prep time: 12 hours
Cook time: 10 Minutes
Total time: 10Hours 10Minutes


INGREDIENTS
1 cup = 240ml
  • Black rice / Karuppu arisi - 1 cup
  • Idli rice / salem rice - 1 cup
  • White, Round urad dal - 1/2 cup
  • Methi seeds / Fenugreek seeds - 1/2 tsp
  • Thick Poha / Pressed rice / aval - 2 tbsp
HOW TO MAKE BLACK RICE IDLI
  1. Wash and soak idli rice, black rice, urad dal, methi seeds and poha for 6 hours.
  2. Black rice takes longer time to soak.
  3. Grind everything to a smooth paste adding required water and salt.
  4. Transfer the idli batter to a vessel. Mix the batter with hands.
  5. Cover and ferment over night. The next morning mix the batter well.
  6. Steam in idli pot till done. Remove and enjoy with chutney, sambar !
BLACK RICE IDLI DOSA - STEP BY STEP PICTURES
  • Wash the black rice thrice in a wide bowl. Add idli rice, urad dal, methi seeds and poha. Wash everything together for once or twice. Soak it for 6 hours minimum because black rice takes longer time to soak.
  • black rice idli
  • Grind everything to a smooth paste in a mixie or grinder. Use ice cold water for grinding if you use mixie. While grinding you can add salt if you like OR add it the next day before making idli.

  • After grinding the batter, transfer to a big vessel. Mix it with hands to aid fermentation. Cover the vessel and leave the batter overnight or 8 hours minimum to ferment. Consistency of batter should be like regular idli batter.black rice idli
  • The next day, batter would have raised well. Mix it well and pour the batter in a greased idli plate.

  • Boil water in idli pot. Place the idli plate and steam it for 10 to 15 minutes in high flame till idli is cooked well. Cracks may form on top of idli. But it will be soft.
  • black rice idli
  • Remove the idli plate and rest it for 5 minutes before removing the idli. Take the idli and serve hot with chutney or sambar. I made dosa the next day. For making dosa, add little water to the batter if needed. Heat dosa pan, pour a ladleful of batter and spread it. You can make it thin or thick as you like. Flip and cook both the sides. Remove and serve hot ! 
  • black rice idli
    Enjoy !

Note

  • For variations, you can soak and grind black rice, idli rice, methi seeds together. Soak urad dal separately and grind it first. Mix both the batter and ferment it. In that case, skip poha.
  • Color of idli may vary based on the color of black rice. Some rice looks reddish. 
  • This batter stays good for 3 days in refrigerator but it turns sour the next day. You can make dosa with it. 

Healthy black rice idli dosa is ready to enjoy with chutney and sambar !
Kavuni arisi idli
Continue Reading...


March 27, 2019

Kara Dosai Recipe –Toor Dal Dosa Recipe

Kara dosai recipe
I learnt this kara dosai recipe / Toor dal dosa from my friend Shalini. She shared her mom’s recipe with me. This karam dosa looks similar to adai / mixed dal dosa but its different in ingredients and taste. Also the batter needs fermentation. So this dosa cannot be prepared instantly like adai. Idli rice, dosa rice / raw rice and toor dal are the base ingredients for this dosa recipe. It is prepared without urad dal. You can make both super crispy dosa and thick dosa with this batter. But this dosa batter becomes sour quickly. So its better to use it within 2 days by refrigerating the batter. Ok, lets see how to make this yummy, colorful kara dosai  also known as toor dal dosa with step by step pictures.

Check out my other dosa varieties too !
Kara dosai recipe

Kara dosai recipe / Toor dal dosa recipe


Kara dosai recipe / Toor dal dosa recipe

How to make kara dosa / toor dal dosa recipe with step by step pictures.


Cuisine: Indian
Category: Dosa varieties
Serves: 20
Prep time: 10 Hours
Cook time: 5 Minutes
Total time: 10H5Minutes


INGREDIENTS
1 cup = 250ml
  • Idli rice / parboiled rice - 1 cup
  • Dosa rice / Raw rice - 1 cup
  • Toor dal - 1 cup
  • Red chilli - 10 to 12
  • Grated coconut - 1/4 cup
  • Tamarind - small piece
  • Cumin seeds - 1/2 tsp
  • Hing / Asafetida - 1/2 tsp
  • Salt - as needed
  • Cooking oil - to drizzle over dosa
HOW TO MAKE KARA DOSAI
  1. Wash and soak rice and toor dal together for 4 hours.
  2. In a big mixie jar, grind red chilli, coconut, tamarind, salt and hing.
  3. Add rice + dal and grind in batches to a smooth batter adding enough water.
  4. Mix the batter with hands and ferment overnight or 8 hours.
  5. Make thin or thick dosa as you wish. Serve with coconut chutney or jaggery !
METHOD - STEP BY STEP PICTURES
  • In a wide bowl, take the rice + toor dal. Wash it twice. Add enough water and soak them together for 4 hours.

  • In a big sized mixie jar, take the red chilli, grated coconut, tamarind, cumin seeds, hing and salt. Grind to a coarse powder.
  • Kara dosai recipe
  • Add soaked rice + dal and grind in batches to a smooth paste. Mix all the batter together using your hands. Keep the batter covered. Ferment overnight or 8 to 12 hours depending on the weather.
  • Kara dosai recipe
  • The next morning mix the batter. Add little water if needed and bring to dosa batter consistency.
  • Kara dosai recipe
  • Heat a dosa pan. Pour a ladleful of batter. Spread the batter to thin or thick dosa as you like. Drizzle a tsp of oil around the dosa. Cook for few minutes till golden in the bottom.

  • Flip the dosa and cook the other side too. Remove the dosa and serve hot with coconut chutney.
  • Kara dosai recipe
    Enjoy !

Note

  • Adjust the quantity of red chillies as per your taste.
  • You can use either dosa rice or raw rice (Sona masoori) for lunch.
  • If you want you can reduce the quantity of toor dal to 3/4 cup.

Try this yummy kara dosai and enjoy !
Toor dal dosa
Continue Reading...