Search Chitra's Food Book

Showing posts with label COOKING ESSENTIALS. Show all posts

June 8, 2014

HOW TO CHOOSE, CLEAN AND STORE MUSHROOM

 Mushrooms 
This is a very basic post on “"How to choose, buy and clean mushrooms before cooking “. Though most of you know this, I wanted to share this post for beginners who use mushrooms for the first time .Mushrooms have many health benefits.They are a good source of proteins, minerals, vitamins, amino acids and anti-oxidants. They are low in calories but high in fiber. It helps to reduce high cholesterol levels, improves immune system, aids weight loss and relief for diabetes too. But all these benefits are applicable only for edible mushrooms. Some mushrooms are poisonous which may lead to coma and several ill effects. Hence we should be careful while choosing and buying mushrooms. It is always better to buy mushrooms from well known brands and well sealed. It should be fresh and white in color. Read on to see the tips to choose and buy good quality mushrooms and how to clean them before cooking. Hope it would be useful.

Do check out this link to know about the different varieties of mushrooms.

How to buy mushrooms

HOW TO CHOOSE MUSHROOM
I have shared some tips for choosing a good quality mushrooms if you are a first time buyer.I got these tips from here and here
  • Look for firm, white mushrooms without any discoloration or bruises.
  • Choose the mushrooms that are free from spots and decay.The whiter the fresher it would be.
  • Button mushrooms have white caps but other mushroom varieties come in varying shades of brown and cream.
  • Choose the ones with with short,clean-cut stems and caps that are either closed around the stems or slightly open ( as shown in the above picture), and with pink or light-tan gills.
  • On the underside of the mushroom, the gills(black part) should be tight.Gills will spread open as mushrooms age.So buy closed ones.
HOW TO STORE MUSHROOM
  • For storage, refrigerate your mushrooms in a paper bag to make them last longer.Keep them covered. 
  • Use within a few days of purchasing.(1-2 days)
  How to clean mushrooms
HOW TO CLEAN MUSHROOMS
Though the cleaning process seems longer, it can be done in minutes. I referred sharmis passions and some more websites for this topic.
Mushroom outer layer peel

Mushroom gills


How to clean mushroom


How to clean mushrooms How to clean mushrooms before cooking
Cuisine: Indian
Category: How to
Serves: --
Prep time: 10 Minutes
Cook time: --
Total time: 10 Minutes


INGREDIENTS

  • Edible Mushrooms - 1 packet
  • Tissue paper
  • Water
METHOD


    • Take a mushroom and wipe it with a clean towel or tissue to remove the mud and dirt.
    How to clean mushrooms
     
    • Then remove the stem part which u can in the middle.When u look into the mushroom,u can c black hair like thing which are called Gills. If u wish, u can remove it using a knife. But this step is optional.
    How to clean mushrooms
     
    • Then peel the outer layer completely till u see the white cap.Mushroom will look white and clean.
    How to clean mushrooms
    • Now wash it under the running water and make sure all the dirt is washed off.Then cut into small pieces and use it as desired.
                     How to clean mushrooms


Button mushroom


Mushrooms are ready for cooking !
Mushrooms after cleaning

Do check out my MUSHROOM BIRYANI recipe if interested !

Continue Reading...


August 20, 2013

SWEET BEEDA RECIPE


beeda picture

I am a big fan of sweet beeda.My lunch in restaurants never completes without a beeda.In some hotels , beeda is not served in thali .So we used to roam(me & my father) around in search of beeda shops..Now after marriage,Sendhil buys beeda specially for me though he don’t like it much..Recently my MIL gave me a box of gulkand.Though there are many yummy gulkand recipes , beeda flashed in my mind ;)..But never thought i could make beeda at home until i saw this video. Thank u so much vidya lakshmi.From now on I can have yummy home made beedas happily Smile 
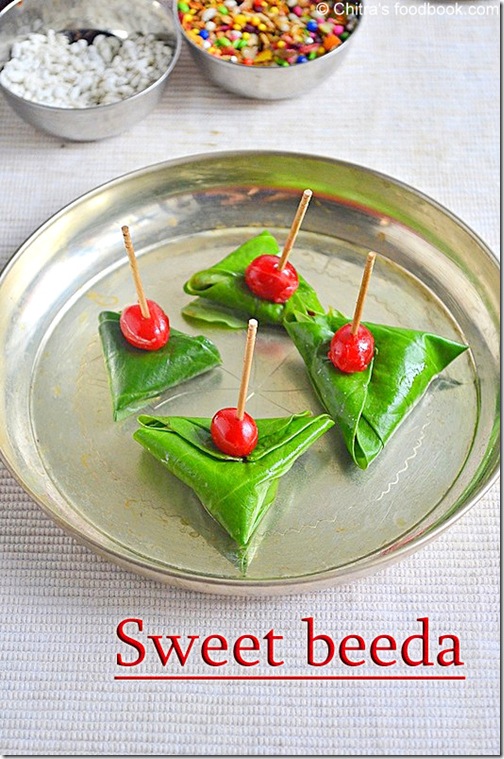
.This beeda is not only tasty,but also helps to digest food easily. Edible calcium paste is helpful for daily dose of calcium needs..So friends , if u have betel leaves in hand ,try this beeda recipe & let me know ur feedback. I hope step by step pictures gives u a clear idea.Surprise ur guests & elders at home with this beeda after a heavy lunch menu.For a simple beeda recipe , please refer “Notes” section..

beeda ingredients


INGREDIENTS
To make one beeda
  • Beetal leaves/ vettrilai /paan leaf – 1 no
  • Sunnaambu /Edible calcium paste – a trace
  • Supari / paakku – 1/4 tsp
  • Paan masala – 1/4 tsp (optional)
  • Sweetened dry ginger or amla – 1 small piece (optional)
  • Colored dessicated coconut strands – few
  • Gulkand – 1/2 tsp
  • Sweet saunf – 1/4 tsp
  • Cloves – 1 no (optional)
  • Cherries – few
  • Plum – 1 no
  • Tooth pick – 1 no

METHOD
  • Wash the beetle leaf , pat dry with a cloth. Fold the leaf & cut it half way through the stalk part(kaambu) ..
beeda tile1
beeda tile2
  • Apply less than a pinch of sunnambu/lime on the back side of leaf. pinch. Adding more burns the tongue , take care..
beeda tile3
  • Now roll one edge of the leaf to cone shape..Roll the other edge similarly & make a cone (pouch shape)to keep all the ingredients inside.
beeda tile4
  • First add the supari , then keep the dessicated coconut ,pan masala , sweet saunf , gulkand. At last keep a clove & cherries . U can also add a pinch of cardamom powder..Close it.
 beeda tile5
beeda tile6
  • Place a plum on top of beeda & insert a tooth pick OR use a clove to seal it..Serve &enjoy !!
beeda tile7

beeda closeup open - beeda


NOTE
  • To make a simple beeda recipe , wash the betel leaf & apply sunnambu on both the sides.Use supari , saunf , sugar , cardamom powder ,little honey and make beeda as mentioned above..Seal the beeda with a clove..

Finish ur lunch with a banana & homemade beeda ! It tastes delicious :)

beeda--plate final copy

Continue Reading...


September 15, 2012

Homemade Ghee - How To Make Ghee From Store Bought Butter | நெய் காய்ச்சும் முறை

ghee3
In this post, I have shared how to make ghee from store bought butter easily at home. I have used unsalted butter here. You can also use salted butter if you like. Procedure is the same. Before my marriage , I was not aware of making ghee at home. My mom used to buy ghee from a milk man who gives us fresh, flavourful ghee. 

When I was young, I used to eat the residued curry leaves/ Drumstick leaves which he brings specially for me. After marriage, I saw my MIL making ghee from store bought unsalted butter. I was amazed ! I learnt from her and now I can confidently make ghee on my own. 

Even beginners can try this ! It tastes & smells equal to the store bought ghee. Recently I found that adding jeera & red chilli gives a flavourful ghee & I tried it too. I usually make ghee very simply without adding them. But adding them sure enhances the flavour of ghee. This ghee won’t taste salty, you can use in sweets. Follow this if you like. Let’s see how to make ghee at home using unsalted butter with stepwise pictures and video!


Homemade-ghee

How to make ghee from unsalted butter


How to make ghee from unsalted butter How to make ghee at home using unsalted butter with stepwise pictures..
Cuisine: Indian
Category: Indian kitchen basics
Serves: 500ml
Prep time: 10 Minutes
Cook time: 10 Minutes
Total time: 20 Minutes


INGREDIENTS

  • Unsalted Butter – 500 gms ( I use Nandini)
  • Buttermilk – 1/8 tsp / a drop
  • Crystal salt – 1/4 tsp
  • Curry leaves / Drumstick leaves – few
  • Methi seeds – 1/4 tsp (optional)
HOW TO MAKE GHEE FROM BUTTER - METHOD

  • Take the butter out and put it in a wide, big vessel .( I normally use an aluminium pan which is almost three times bigger because while melting the froth raises till the rim of the vessel). Switch on the flame and start melting the butter by placing a wooden ladle. Keep the flame high and keep on stirring till the butter melts completely .( by stirring continuously , you’ll get less residue at the end).
how to make ghee 1
  • Now simmer the flame and mix well. It will boil and become frothy by producing big bubbles. It produces a hiss sound.
how to make ghee 2
  • After few minutes, the bubbles will cease and the froth rises. (make sure the flame is low).  Mix well and cook for sometime in low flame. It froths again and foams up. After a few seconds from rising, you’ll see tiny brown spots that appear on the top. As soon as you see a single brown spot, add little buttermilk & mix well. After you add the buttermilk, you’ll get a spluttering noise. Adding buttermilk is optional. Switch off the flame and mix well .U’ll see lot of brown spots. Remove the vessel from the stove.
how to make ghee 3
how to make ghee 4
  • Add few curry leaves/ drumstick leaves & pinch of methi seeds, jeera and red chilli if using.
  • After it cools down, the residue will settle down at the bottom and transfer the ghee alone to the desired bowl by straining it through a metal filter. Keep the bowl open for sometime. Then close it with a lid and use whenever required..
  •   how to make ghee 6
      U  can use the residue by mixing in plain rice or by adding in sambar or pongal. I usually do this.


Note

    • U can add jeera and one whole red chilly while making ghee. It never changes the taste of ghee. It just enhances the aroma. U can use this ghee for making sweets without any doubt. But adding them are optional. I don’t use it often.
    • Crystal salt is used for the residue to settle down easily.
    • Adding methi seeds is optional. If you wish, add along with curry leaves at the end . ie. before switching off the flame.
    • Drumstick leaves can also be added instead of curry leaves.
    • U should be more careful when the brown spots appear. Keep the lights on in your kitchen and keep watching at this stage.I add curd as soon as I see a single brown spot. I mix it and switch off the flame. But my MIL waits for more spots to come. Also she removes the vessel from the stove and keeps it in a plate of water to cool down quickly.
GHEE

 Homemade Ghee in Melted form
ghee2
Continue Reading...