Search Chitra's Food Book

October 26, 2012

VEG LASAGNA RECIPE WITH EASY HOME MADE PASTA SAUCE/ BECHAMEL SAUCE


veg lasagne

Last month I was asking my sister & friends in abroad to suggest me some international recipes. They told me about this famous lasagne and I had no clue about it. To be frank , I did not even know how to pronounce & spell ( it is la-zaa-ne-aa). I asked my hubby regarding the same & he said he had tasted this in US & UK.. I searched for some good recipes.  Most of them were with beef and egg. I wanted a pure veg recipe. 

There are 2 choices for veggies. One with spinach & the other one is with veggies like carrot , aubergine & mushrooms. I finally decided to go with my Microwave oven manual recipe. By referring some videos on youtube , I got the idea of how to arrange it. I bought the lasagne sheets in Nilgiris , Brigade road.. 

Somehow I successfully prepared it yesterday. We loved it. My husband told “This tastes better than the ones served in restaurants”. I felt it had a slight bland taste. But he said it would be more bland with lots of cheese but mine was spicy, flavourful & better. Please make sure u eat it hot , atleast warm.


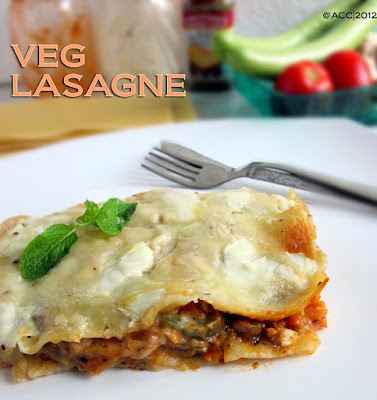
One sad thing is , I had no casserole or lasagne pan .I made with my baking pan .I was not able to make many layers as my pan was broader and lesser in height. Also I prepared less quantity of sauce & vegetable mixture. So I made a single layered lasagna. But I have given the quantity of ingredients to make 3 layers. Soon i’ll update the picture with many layers. Do leave your  suggestions if any changes can be made in this recipe.

About the sauce , I got béchamel sauce recipe from the manual and the pasta sauce from here .. Both are very simple and easy to make. No fancy ingredients..All are easily available in stores..I’ve tried to capture step by step recipe. If you have ready made store bought sauce , this dish can be made in jiffy. Ideal for potluck & parties. 

As I prepared the sauce @home , I felt it time consuming. But the sauces can be prepared well in advance and refrigerated. When I was preparing the sauces , my hubby sniffed , came to kitchen & asked me whether I am making any Italian recipe. It smells awesome. Try this recipe and let me know how it turned out !!
INGREDIENTS FOR PASTA SAUCE
  • Big ripe tomatoes – 6 nos ( blanched & pureed )
  • Big onion – 2 nos ( very finely chopped )
  • Garlic – 6 cloves (minced)
  • Olive oil – 4 - 5 tbsp
  • Black pepper powder – 1 tbsp
  • Parsley ,oregano , thyme and basil mix –1 tbsp ( i used garlic bread seasoning ) OR Oregano – 1/2 tbsp & Basil – 1/2 tbsp
  • Bay leaf – 1 no
  • Sugar – 1 tsp
  • Salt  & water – as needed
  • Cheese – 2 tbsp (optional)
METHOD
In a bowl , boil the tomatoes till it cracks. After it cools down, remove the skin and grind them coarsely to make a puree.
2012-10-24 12.43.502012-10-24 12.52.582012-10-24 14.13.00
In a kadai , add oilve oil and saute the finely chopped onions & garlic cloves. Saute till turns translucent.Now add the tomato puree , salt , bay leaf & 1/4 cup of water..Allow it to boil for few minutes.
2012-10-24 14.58.182012-10-24 15.00.152012-10-24 15.01.30
Then add the seasoning ( crush it lightly with ur hands), black pepper powder & some more water.Allow it to cook uncovered for 10 - 15 mins in low flame. Finally when it turns thick ( sauce consistency) and leaves oil, Switch off the stove..
2012-10-24 15.05.162012-10-24 15.02.182012-10-24 15.02.442012-10-24 15.04.07
U’ll get a nice aroma..Remove the bay leaf & store in a bottle after it cools down .Refrigerate it till use. Its shelf life is around 5 days..The sauce gets a nice color if u use ripe , coloured tomatoes..No need to add canned tomato puree. I dint use.
NOTE:
This sauce can be used for making simple pasta & spaghetti recipes ..Ur kids would love this..
INGREDIENTS FOR BECHAMEL SAUCE / WHITE SAUCE
  • Milk –  1.5 cups
  • Bay leaf – 1 no
  • Pepper corns – 6 nos
  • Big onion – 1 no ( cut into slices)
  • Maida / All purpose flour – 2 tbsp
  • White pepper powder – 1 .5 tsp ( i used black pepper powder)
  • Nutmeg powder – 1/4 tsp
  • Butter – 3 tbsp
  • Salt –1/2 tsp
  • Sugar – 1/2 tsp
  • Water – as needed
METHOD
  • In a  milk pan , boil the milk along with bayleaf , onion and pepper corns.Boil it for 5 mins. Strain the milk and allow it to cool.
2012-10-24 12.46.292012-10-24 13.00.56
  • After the milk cools down , add maida to it and mix well without lumps. Now melt the butter in a pan and add the milk mixture to the pan  with sugar & salt. ( as per the actual recipe , maida has to be roasted well in butter before adding milk , but u may get lumps while roasting. So i added the maida with milk without roasting.) . I kept the milk in a bowl . I added the melted butter to the bowl.I got this step from here..
2012-10-24 12.55.072012-10-24 13.59.522012-10-24 14.00.44
  • Now allow the milk to boil till the raw smell of maida emanates. Keep in low flame. Add more milk if necessary.Finally add the pepper powder & nutmeg powder.Boil for few mins.It will thicken and reaches sauce consistency. Remove & store.Make the sauce slightly thin (ie tomato ketchup consistency)
2012-10-24 14.08.452012-10-24 14.08.402012-10-24 14.09.28
INGREDIENTS FOR VEGETABLE LASAGNA
  • ** Lasagna sheet – 9 nos ( Follow as per the instruction given in the box. Put the sheets in salted hot water for 10 mins , make it soft & then arrange them)
  • Brinjal ( long green variety) – 4 nos
  • Mushroom – 7 nos
  • Carrot – 2 nos (finely chopped)
  • Bell pepper – 1/2 no ((finely chopped )
  • Big onion – 2 nos
  • Garlic cloves – 6 nos (minced)
  • Salt & pepper powder – 1/2 tsp each
  • Lasagna pan (13x9x2) – 1 no
  • Thermal foil – 1 sheet
  • Ricotta cheese – 1 can
  • Grated Mozarella Cheese – 1 cup  ( I used pizza cheese alone )
METHOD
  • Chop the brinjal into round slices & immerse in water till use.
  • Clean & cut the mushroom into small pieces.
  • Finely chop the carrot & capsicum . Boil in water till it is cooked.
  • Heat water in a big vessel , add salt & a drop of oil , allow it to boil. Add the lasagna sheet and keep it for 10 mins in fire-off. This makes the sheet soft. Remove the sheet & proceed..
2012-10-24 15.17.582012-10-24 15.26.28
  • Finely chop the onions & garlic cloves.In a kadai , heat the olive oil and add the onions & garlic cloves .Saute till turns transparent.Add the cooked carrot &capsicum. saute for few seconds. Then add 3/4th of the pasta sauce.Mix well. Add salt & pepper powder.Mix well and switch off the flame. Set aside.

2012-10-24 15.27.092012-10-24 15.40.16

  • Heat olive oil in a separate pan and saute the brinjal & mushroom pieces till it shrinks in size. Add the required salt & set aside.
2012-10-24 15.46.28
  • Now take the lasagna pan or casserole..Brush with oil or butter.I kept a thermal foil at the bottom as my pan is in a bad condition but that is not necessary..
2012-10-24 15.44.35
  • Boil the lasagne sheet in a bowl of water for a minute.Take it out and then place the lasagne sheet in the pan.. Fill the gaps by keeping small pieces of sheet..Spread the white sauce over the sheet ..
2012-10-24 16.09.322012-10-24 16.09.582012-10-24 16.10.47
  • Now spread the carrot mixture with pasta sauce which we kept ready. Spread a layer of sauteed brinjal, mushroom mixture.. Again spread a layer of white sauce and cover with ricotta cheese.
2012-10-24 16.13.042012-10-24 16.14.102012-10-24 16.15.00
  • Place another sheet above this and repeat the same procedure starting & ending with white sauce. Make 2-3 layers as per the quantity of vegetables available..Finally cover the mixture with a lasagne sheet & spread 1 cup of mozzarella cheese over it. Cover it fully without any gap.
2012-10-24 16.17.222012-10-24 16.18.432012-10-24 16.20.302012-10-24 16.22.56
  • Now close the pan with a thermal foil and bake in a preheated oven at 180c in convection mode for 30-40 minutes. Mine took 35 minutes. Please keep an eye after 25 mins.If the color of the sheet turns golden brown on top & cheese melts, stop baking and give a standing time of 10 minutes.
2012-10-24 16.24.24IMG_7445
  • Remove and enjoy eating hot !!
Note :I baked for 30 minutes with thermal foil and it dint get brown. So i uncovered it and baked for another 5 minutes.The point is the outer layer has to be slightly browned. So keep an eye !!


Continue Reading...


October 23, 2012

URAD DAL VADA | ULUNDU VADAI WITH PEPPER


I have never got urad dal vada perfectly until I saw my mom making it . Recently when my parents visited me , I told my mom to make vada . We all know grinding the dal in the grinder yields fluffy,more quantity of batter. Though it is true , we cannot use grinder for small quantities. 

My mom always use mixie to grind the batter. I too use mixie but I add more water, make the batter watery and prepare bondas instead of vada. I asked the correct quantity of water from my mom. For the past two , three times I am getting a good shaped vada. Now I know the knack of making crispy vada even for lesser quantity of dal.. I should also thank my sil for posting a video of how to make vada . 

My mom taught me some alternate methods to bring the vada shape. I’ve tried to give the step by step pics for making vada in different methods. Try whichever is convenient..Please click here if you are interested to watch a video on "HOW TO GRIND VADA BATTER USING MIXIE","HOW TO GRIND BATTER USING GRINDER" and " HOW TO SHAPE VADA USING A SHEET". 

I’ve given some tips to adjust the batter consistency, for correct shape & ingredients for onion vada in the notes section.. As my husband hates onion vada, I always make pepper vada and sometimes vegetable vada.  We make pepper vada for all occasions. Even today for saraswathi pooja , I made this vada along with rice payasam and channa dal sundal. Usually this pepper vada looks white in color. As I want my vada to be golden brown , I fried in high flame for few seconds before removing it. So please dont think why ur vada looks white and mine looks brown here ;) Also for onion vada , if the color of onion changes to golden brown , it indicates the vada is cooked properly.

Don't forget to check out my latest post with video about medhu vadai recipe using grinder


INGREDIENTS
1 cup - 200ml
  • White round urad dal – 1 cup
  • Water – 1/4 cup + 2 tbsp (to grind use ice water) 
  • Salt – as needed.
  • Asafetida / hing – 1/4 tsp
  • Crushed Pepper corns – 1 tbsp
  • Rice flour - 1 (optional, adjust)
  • Curry leaves – Few ( chopped )
  • Oil – to deep fry


METHOD
  • Wash and soak the urad dal for 1 hour inside the refrigerator. Drain all the water completely and use it for grinding the batter. This ice water helps to prevent mixie jar from heating.
  • Take the dal in a bigger size mixie jar. Choose a medium sized jar as the dal gets increased in quantity. Add 1/4 cup of water and the required salt .
  • Grind for some time till the batter turns little coarse. Now stop the mixie and wipe the sides and the lid. Again add a tbsp of water, salt and run the mixie for one more minute. Batter should be fluffy , white and smooth. Add more water till it becomes a smooth paste..
2012-10-18 14.26.022012-10-18 14.26.232012-10-18 14.26.32
  • Take little water in a bowl and put a drop of batter. If the batter floats on top & doesn’t dissolve or settle down , the consistency is correct. Add one more tbsp of water if necessary.
  • Now remove the batter in a bowl and add some water to the mixie jar. Clean the jar with water by running it once. Keep the water and use it for dipping ur hands while making vada.
  • Add the hing and the crushed pepper corns to the batter. Add rice flour if needed. Mix well..
2012-10-18 16.47.11
  • Heat the oil in a kadai. If you put a drop of batter , batter will rise immediately. It is the correct heating point. Adjust the flame to medium high to low and deep fry the vada. Also keep ur hands wet by dipping in the water now & then. Batter should be non-sticky to your hands.
  • Take  a small ball sized batter and place it in a milk cover or polythene sheet greased with water. Place the batter and pat it little thick. Make a hole in the center.. Remove the vada and drop in hot oil. Deep fry both the sides and serve hot..
2012-10-18 16.50.282012-10-18 16.50.392012-10-18 16.51.31
  • The second method is grease ur left hand with little oil & then apply water. Place a ball shaped batter, pat it and make a hole in the center. Transfer the vada to your right hand fingers and drop in oil. Deep fry and serve hot.
2012-10-18 16.55.262012-10-18 16.55.562012-10-18 16.55.56(0)
  • The third method is take a small ball shaped batter in your right hand fingers. Make a hole in the center using ur right hand thumb finger . Invert your hand over oil and drop the vada by slightly tilting your finger OR slide the vada using your thumb finger.
2012-10-18 16.51.312012-10-18 16.58.422012-10-18 16.58.52
  • Deep fry the vada on both the sides till brown and crispy.
Serve hot with chutney !!


vadai

NOTE
  • If you grind the batter in grinder , add the dal little by little while the grinder is running. Add 1/4 cup of water and stand nearby. After few minutes, the batter will raise and turns fluffy. Now wipe the sides and add / sprinkle little more water ( may be 2 tbsp) . Grind for some more time. The batter would be very smooth, fluffy and white. This takes 15-20 mins based on the grinder. The batter quantity will increase. Remove and proceed as mentioned above..
  • If you dont add salt while grinding the dal , you have to add little more water (may be around 2 tbsp )
  • If ur batter is slightly watery , add a tsp of rice flour , mix well and make vada. If you eat immediately , u can add more than a tsp of rice flour too. U’ll get crispier vada but when it cools down , it will become hard..
  • U can also try refrigerating the batter for sometime if it is slightly thin.
  • Vada absorbs oil if the water in the batter is more. If so next time add slightly less water.
  • Do not deep fry the vada in low flame. This makes the vada absorb more oil. Adjust the flame from medium high to low whenever necessary..
  • My MIL soaks a tsp of toor dal along with urad dal to avoid oil absorption. I’ve heard , in hotels they add 2 tsp of rice while soaking urad dal.
  • For making vada with onions : first grind 2-3 green chillies and a piece of ginger along with urad dal. Grind the batter .Then mix the finely chopped small onions, a tsp of hing and finely chopped curry leaves. Remaining the same procedure as mentioned above..For onion vada , add less water while grinding because the onion may leave water and the batter may become watery at the end..
  • The water & urad dal ratio is 1:4 . It may need 2 - 3 tbsp of water extra. Please do not add more than that.
  • Every time dip ur hands in water generously and make the shape so that the vada slides to the oil without sticking to your hands.
  • I recently read a tip from a website to make a proper hole in the center. ie After dropping the vada in the oil , if you feel the hole is small or not even , just put a hole using a chapathi  rolling pin by dipping it in the oil . But be careful while u do this. U may need not do this if your batter is right in consistency..
  • If u r planning to grind in mixie, always prepare the vada just before serving and eat hot. I can’t guarantee the taste if served warm or cold . Serve with ur favourite chutney.
  • For sambar vada or curd vada, dip the hot onion vada in a bowl of warm water, squeeze the water by keeping in between your palm and immediately soak in sambar or curd. 

Don't forget to check out my latest post with video about medhu vadai recipe using grinder

Continue Reading...