Search Chitra's Food Book

January 15, 2014

KOTHAMALLI THOKKU | CORIANDER LEAVES THOKKU RECIPE


Kothamalli thokku
Kothamalli thokku was in my try list for long time.Last month my in-laws were here.We had a nice time together.Whenever my MIL visits my house,i tell her to make  some of her signature recipes like thogayal,pickles etc.One such recipe is this kothamalli thokku.She brought a big bunch of fresh coriander leaves from salem.We made kothamalli thogayal and this thokku.We enjoyed it for a week.It can be mixed with plain rice and also serves as a good side dish for idli,dosa mixed with gingely oil.Whenever i feel lazy to make side dishes for idli,dosa i keep this as accompaniment.Simple and yummy !!
kothamalli thokku picture

Kothamalli thokku


Kothamalli thokku - Kothamalli thokku recipe dry  Coriander leaves thokku/Kothamalli thokku for rice,idli,dosa
Cuisine: Indian
Category: Sides
Serves: Serves 4
Prep time: 10 Minutes
Cook time: 10 Minutes
Total time: 20 Minutes


INGREDIENTS
1 cup - 200ml

  • Coriander leaves - 1 cup (tightly packed)
  • Round Urad dal - 3 tbsp
  • Red chillies – 6-8 nos
  • Tamarind - Medium gooseberry size ( pinch into small pieces)
  • Cooking oil – 1 tbsp
  • Jaggery-1/2 tsp
  • Salt - as needed
METHOD

  • Wash & cut the coriander leaves roughly using scissors.Spread them in a paper overnight or in shade for 6 hours.If u are not able to do this,follow as given in next step.The point is coriander leaves should be dry without water content.
  • In a kadai,heat oil and roast the chillies,urad dal and set aside. U can fry them separately or together.In the same kadai,saute the coriander leaves and tamarind pieces.Saute till it shrinks in quantity.
kothamalli thokku step by step
  • First grind red chillies,salt .Then add the sauteed coriander leaves & tamarind ,jaggery without adding water.Lastly add the roasted urad dal and grind them together coarsely.
kothamalli thokku step by step picture
  • Remove and store in an air tight box after it cools down.
  • Mix with plain rice or serve as a side dish for hot idli,dosa topped with gingely oil.Tastes yummy.
NOTE
  • If u dry the leaves in shade,u don’t have to saute in oil.Just roast the other ingredients and grind everything together. Otherwise sautéing coriander leaves is a must as it should be dry without water content.
  • Pinch the tamarind into small pieces and then saute.It helps to roast it well and also keep the thokku dry with long shelf life.
  • It can be stored in an air tight box and can be had for more than a week without refrigeration.With refrigeration,u can keep it for more than a month too.Use a clean spoon every time.

coriander --thokku 
Technorati Tags: ,,,,,
Continue Reading...


January 11, 2014

THENGAI THOGAYAL | COCONUT THUVAIYAL RECIPE FOR RICE - KAANUM PONGAL RECIPES

thengai thogayal

In Tamil nadu, Thengai thogayal / Coconut thogayal is served with rice. We love to mix this thogayal with rice adding ghee or it can be had with curd rice too. U may wonder why am I posting this recipe for kaanum pongal. My mom told this story and asked me to post this recipe. In Tamil Nadu, kanu is also known as Virgin Pongal/kanni pongal and is celebrated by unmarried girls by playing in the river banks,making pongal and eating it there.It is like resting day after the 3 days of  pongal festivities.People go out along with family and have a nice day of outing.My mom told when she was young, they go for outing carrying this simple coconut thogayal and
pazhang curry(mixture of left over sambar,kootu,poriyal) for lunch and enjoy the whole day in river banks. Nowadays only some people follow this practice. By sitting at home & watching all the special programmes on TV,we too can make our lunch very simple with this thogayal,sunda curry and papadSmile.Hope u'll try this and enjoy your day.. Wish u all a very happy and tasty pongal !!

thengai-thogayal

Thengai thogayal /Coconut thogayal recipe


Coconut thogayal / Thengai thogayal for rice
 Simple and easy thengai thogayal recipe - Coconut thogayal for rice
Cuisine: Indian
Category: Side dish
Serves: Serves 4
Prep time: 5 Minutes
Cook time: 5 Minutes
Total time: 10 Minutes


INGREDIENTS
1 cup - 250ml
To roast & grind
  • Grated coconut - 1/2 cup
  • Red chillies – 5 - 6 nos
  • Hing – 1/4 tsp
  • Tamarind – Gooseberry size
  • Urad dal – 1 tbsp
  • Salt & water - as needed
METHOD

  • In a kadai ,heat 2 tsp of oil. Roast the urad dal,red chillies,hing. Lastly roast coconut along with these ingredients.
  • Grind them coarsely adding salt and tamarind. Grind it thick without adding water. Coconut will be half ground. Now add very little water and make a thick paste. Remove in a serving bowl.

  • Enjoy mixing with plain rice adding sesame oil/gingely oil or have as a side dish for curd rice !
NOTE
  • To get this nice color,use crushed red chilli.Otherwise u may not get the same color.U can find the chilli in the picture background.
  • Adding urad dal is optional. If you add urad dal, you can use this thogayal as side dish for idli,dosa too. Mostly we make this chutney for travel. It stays good for one to two days without refrigeration if you roast coconut well.
  • Adjust the amount of chillies and tamarind according to your tastebuds.
  • U can also roast coconut at the end and add it while grinding which gives a nice flavor.
  • This thogayal can be refrigerated and had for 2-3 days.
coconut thogayal step by step


coconut thogayal recipe

Continue Reading...


January 9, 2014

MIXED VEGETABLE KOOTU | KOOTU RECIPES FOR RICE

mixed vegetable-kootu
Mixed vegetable kootu is very similar to Avial and pongal kootu. Its a South Indian style side dish for rice. Usually my mom makes avial(her signature recipe) for sambar sadam. After marriage, I started loving my mil’s mixed veg kootu which she makes for vatha kuzhambu. Both are very similar in procedure with minor differences. Sometimes we mix this kootu with plain rice topped with few drops of ghee. It tastes delicious. We usually make this vegetable kootu for guests and occasions like pongal, thiruvathirai etc.

Check out my thiruvathirai vegetable kootu here. It is also known as thalagam. 


mixed-veg kootu

Mixed vegetable kootu recipe


MIXED VEGETABBLE KOOTU FOR RICE
Mixed vegetable kootu recipe -yummy rice accompaniment
Cuisine: Indian
Category: Kootu recipe
Serves: 4
Prep time: 20 Minutes
Cook time: 20 Minutes
Total time: 40 Minutes


INGREDIENTS
1 cup - 250ml
To pressure cook
  • **Mixed vegetables - 2.5 cups (refer notes)
  • Moong dal - 2 tbsp
  • Tomato - 1 no
  • Salt & water - as needed
To grind
  • Grated coconut - 1/3 cup
  • Rice flour - 1 tsp
  • Green chillies - 3-4 nos
  • Small onions - 3 nos (skip onions if making for occasions)
  • Jeera - 1/2 tsp
To temper
  • Coconut oil - 1 tbsp
  • Mustard seeds - 1 tsp
  • Urad dal - 1 tsp
  • Curry leaves - few
HOW TO MAKE MIXED VEGETABLE KOOTU - METHOD

  • Wash and chop all the vegetables of uniform size. In a pressure cooker base add the moong dal, chopped vegetables, finely chopped tomato ,salt and water. Add the required water, a pinch of sugar and pressure cook in high flame for one or two whistles.
  • In the mean time grind all the ingredients given under”to grind” to a smooth paste adding water. First grind the coconut, chillies. Lastly add the small onions, rice flour and jeera. Run it twice. Skip onion if making for festivals.
mixed veg kootu step by step picture
  • After the steam is released, mix the vegetables and add the ground paste. Add little water based on the consistency you need.
  • Allow it to boil for few minutes till the raw smell emanates.
  • Lastly temper all the ingredients given under “to temper” in coconut oil. This is the highlight of this recipe. So do not skip this step. Mix well. Serve with rice.
mixed veg kootu step by step picture 1
NOTE
  • **Use any vegetable like carrot, potato ,beans, cabbage, cauliflower, peas, yam, sweet potato, raw banana, colocasia, field beans etc. For the above recipe  I used 2 small carrots, 8-10 beans, 1/2 raw banana, 2 small potatoes, 5-7 broad beans.
  • Omit small onions if you make it for occasions. Still it tastes great.
  • For variations, you can omit tomato and add few pieces of raw mango or a tbsp of curd at the end like we make for avial. Sometimes we make this way too.
  • U can also add little milk at the end to adjust the thickness.
  • Do not forget to use coconut oil for tempering. It adds a nice flavor.


Enjoy with sambar or vathakuzhambu rice.Tastes yum !


mixed veg kootu

Continue Reading...


January 7, 2014

RICE PORRIDGE RECIPE| ARISI KANJI – BABY FOOD RECIPES

rice porridge recipe
Last week Sendhil was down with stomach upset problem. So my MIL made this rice porridge / arisi kanji for his breakfast. We too had the same. It was so filling, healthy and tasty too.We usually make this kanji when we are down with fever or stomach upset. raw rice or boiled rice, moong dal and cumin seeds combination helps for quick digestion, soothes our stomach, tongue and makes this porridge flavourful too. My MIL told the same can be given for 7-8 months babies too. But give it slightly watery if you are giving for first time.We had given this for Raksha when she was young.So I thought of blogging it under health food as well as baby food (two in one post).

rice porridge recipe

Rice porridge recipe


Rice porridge recipe Rice porridge recipe for babies and for people down with fever & stomach upset
Cuisine: Indian
Category: Health food
Serves: Serves 4
Prep time: 5 Minutes
Cook time: 20 Minutes
Total time: 25 Minutes


INGREDIENTS
1 cup - 250ml
To pressure cook
  • Good quality boiled rice (puzhungal arisi)  or raw rice (sona masoori) - 1/2 cup
  • Moong dal - 1.5 tbsp
  • Roasted & powdered cumin seeds - 1 tsp
  • Salt – as needed
  • Water – 4-5 cups
  • Milk – 1/4 cup
  • Ghee – 2 tsp (only for babies)
METHOD
  • In a pressure cooker base, dry roast the moong dal for a minute. Add the washed rice with the required water and salt. Cook in low flame for one or two whistles. After the steam is released, open the lid and mash it well using a whisk.
rice porridge step by step
  • Add water or little milk or coconut milk based on the consistency you need. Check for salt. Roast the cumin seeds in ghee/oil & coarsely powder it .Add on top of porridge. Mix well and serve.
rice porridge step by step
  • For babies,add powdered cumin seeds in lesser quantity. Add more ghee based on the age.


NOTE

  • Replace ghee by oil or use less ghee if making for sick people. Adding more ghee makes the digestion slow.
  • Addition of moong dal is optional. I usually add it for flavour.
  • Give this porridge only for babies above 7 months.
  • To make it instantly, you can roast moong dal and rice. Powder & store in a box. Mix a tsp of this powder in water and make porridge adding salt or sugar.
  • For adults, roast cumin seeds in oil and then powder them.
  • You can replace boiled rice with raw rice. 
I had with small onions as side dish.It was yummy !
rice-porridge
Continue Reading...


December 31, 2013

Chilli Bajji Recipe / Milagai Bajji - Molaga Bajji Recipe

chilli bajji recipe

Chilli bajji/Molaga bajji in Tamil, Mirchi bajji in Hindi is an yummy snack recipe/ street food which most of us have tasted in exhibition, beach. Long chilli is used to make this bajji. It is also called as bajji milagai/ ooty milagai. Nowadays people make bajji with kudai milagai / Green Capscium too. Recently when I visited my in-laws place, my MIL made this milagai bajji for us. We loved it a lot. Last week I tried the same in my kitchen.We all enjoyed this bajji with hot tea ! It tasted great for this cold weather. Do check out my onion bajji recipe if interested.Friends, I am closing this year with this hot chilli bajji/ Milagai bajji post.

I will meet you all in 2014 with some interesting and easy recipes.Wish you all  a very happy new year.May this new year be filled with happiness,joy and prosperity!!!

Milagai bajji recipe

BAJJI CHILLI

Chilli bajji


Chilli bajji Chilli bajji/Milagai bajji recipe-yummy evening snack !
Cuisine: Indian
Category: Snacks
Serves: Serves 4
Prep time: 10 Minutes
Cook time: 10 Minutes
Total time: 20 Minutes

INGREDIENTS
1 cup - 250ml
To make batter
  • Gram flour - 1/2 cup
  • Rice flour - 1/4 cup
  • Red chilli powder - 1/2 tsp
  • Cumin seeds/jeera - 1 tsp
  • Cooking soda / baking soda – 1/8 tsp
  • Kesari color - 1 pinch
  • Salt - as needed
  • Water - 1/2 cup
  • Bajji chilli – 3 - 5 nos
  • Cooking oil - to deep fry
METHOD


  • Wash the chillies and slit it vertically.Remove the seeds and set aside.
Chilli bajji / Milagai bajji
  • In a wide bowl, take the flours,red chilli powder,kesari color,salt , cooking soda and jeera.Mix well.Add the required water and mix well.I used 1/2 cup of water here.Adjust the quantity by keeping this as reference.
Chilli bajji/Milagai bajji stepwise pcitures
  • The consistency of batter should be slightly thicker.It should coat the chillies well.If it is too watery,tails will form in bajji.If it is too thick,bajji will become hard.
  • Heat oil in a kadai and put a drop of batter.If it raises immediately,oil temperature is right.
  • Now coat the chillies in the batter and drop in oil immediately.
Milagai bajji/Chilli bajji stepwise pictures
  • Deep fry both the sides till golden.Remove,drain in a tissue and serve hot.


Note
  • U can use 1/3 cup of rice flour too if u want bajjis to be in softer side.
  • If the chillies are too spicy,deep fry the chillies alone after discarding the seeds and then make bajji as mentioned above.U can also soak the chillies in buttermilk to reduce the spiciness.
  • Adding Kesari color is optional.But it gives a  nice color as we get in bajji shops.
  • U can add little idli,dosa batter instead of cooking soda.

chilli hot bajji

Serve hot with tea and tomato sauce or coconut chutney

Milagai bajji

Continue Reading...


December 30, 2013

Pirandai thuvaiyal / Thogayal Recipe - Adamant Creeper Chutney For Rice

pirandai thuvaiyal

Pirandai thogayal ( Pirandai thuvaiyal) /Adamant creeper chutney, sounds interesting right?.Yes, I too felt the same when my MIL told about this recipe. I have heard about this plant but I din’t know it is edible. After I browsed its health benefits, I was so happy that I got to know a very useful, healthy recipe from my MIL. Thanks a lot aunty. This thuvaiyal tasted more like thengai/coconut thogayal and I loved its taste very much. I haven't tasted it with idli,dosa. I hope it tastes good.

As pirandai has amazing health benefits, I wanted to share it with you all !
  • Cissus Quadrangularis is the biological name of pirandai. It has high vitamin C and calcium.
  • Pirandai is helpful to cure knee problems and its juice mixed with sesame oil is used in the treatment of fracture and sprain.
  • Its is also helpful for ladies with irregular menstrual problems.
  • Pirandai recipes are useful for people with indigestion issues,flatulence,nausea,cough and piles.
  • Never use your hands for washing pirandai.Just show under tap water.
  • Always grease ur hands with sesame oil to avoid your hands from itching.
  • Use tamarind in all pirandai recipes else it will make your tongue itchy.

Name of Adamant creeper in different languages

  • English: Bonesetter, Devil's Backbone, Veldt Grape.
  • Hindi: Hadjod, Hadjor, Asthisrumgala
  • Malayalam: Changalamparanda-ചങ്ങലംപരണ്ട
  • Sanskrit: Vajravalli, Asthisrinkhala, Kulisa, Asthisamharaka.
  • Tamil: Pirandai-பிரண்டை
  • Telugu: Nalleru, Gudametige, Kokkitaya-ralu 


  • Here is the picture of Pirandai which my MIL brought from our house backyard.
    Pirandai  - Adamant creeper 

    Pirandai thogayal

    Pirandai thogayal


     Pirandai thogayal/Adamant creeper chutney for rice
    Cuisine: Indian
    Category: Thogayal
    Serves: Serves 2-3
    Prep time: 10 Minutes
    Cook time: 10 Minutes
    Total time: 20 Minutes


    INGREDIENTS

    • Pirandai/Adamant creeper - 10 sticks
    • Urad dal - 2 tbsp
    • Red chillies – 4 nos ( Use 6 to 7 for spicy taste)
    • Tamarind – Medium gooseberry size
    • Grated coconut - 1 tbsp
    • Salt & water- as needed
    • Oil - 2 tbsp
    HOW TO MAKE PIRANDAI THOGAYAL - METHOD

    • Grease your hands with gingely oil to avoid itching. Wash pirandai under tap water and peel the outer ridge of pirandai like we do for ridge gourd. Remove the top and bottom part. Chop them into small pieces. Soak tamarind in little water.
    pirandai thogayal step by step
    • In a kadai, heat a tbsp of oil & roast the chillies, urad dal. Remove and in the same kadai, add little more oil and saute the pirandai. Saute till it shrinks and changes its color to white or pale green in color. Saute well else it will make your tongue itchy while eating. Remove, let them cool and grind everything together adding tamarind, salt , coconut and water to make a smooth paste.
    pirandai thogayal step by step picture

    Serve with plain rice topped with ghee or gingely oil. Adding ghee is recommended as pirandai has a tendency to increase the body heat. Ghee helps to subside it.


    Try this healthy pirandai thuviayal for rice, mix with rice & ghee and enjoy !
    pirandai chutney

    Continue Reading...


    December 26, 2013

    EASY MAA INJI URUGUAI | EASY MANGO GINGER PICKLE - MAA INJI RECIPES

    maa--inji pickle 
    I love maa inji a lot. Basically I love ginger based recipes like ginger pachadi,Puli inji(kerala style) very much. So this mango ginger is no exception. Actually I wanted to post maa inji thokku, but before that I thought of sharing this simple & easy maa inji pickle, my MIL’s version. I tried two different methods and shared the same.Try whichever u like.Both can be made easily with simple ingredients.Its a great accompaniment for curd rice and dal rice


    Maa inji pickle

    Maa inji/Mango ginger pickle


    Maainji recipes  Easy,instant maa inji pickle for curd rice
    Cuisine: Indian
    Category: Pickles
    Serves: Serves 2
    Prep time: 5 Minutes
    Cook time: 3 Minutes
    Total time: 8 Minutes


    INGREDIENTS
    Version 1
    • Mango ginger/Maa inji - 100 gms ( 5 big finger sized pieces)
    • Lemon juice - 1 tbsp
    • Green chillies - 2-3 nos
    • Hing/Asafetida - A pinch
    • Salt - as needed
    Version 2
    • Maa inji - 100 gms
    • Lemon juice - 1 tbsp
    • Red chilli powder- 1 tsp
    • Hing/Asafetida - A big pinch
    • Dry Roasted & powdered methi seeds-1/4 tsp
    • Salt - as needed
    To temper(for both versions)
    • Gingely oil - 1 tsp
    • Mustard seeds - 1/2 tsp
    • Hing - A pinch
    METHOD

    • Wash and peel the skin of mango ginger.Chop into small roundels(u can also chop it finely).
    • To this add finely chopped green chillies,hing,salt and lemon juice.Mix n serve !
    Version 2
    • Wash and peel the skin of mango ginger.Chop into small roundels.
    • Add the chilli powder,salt,methi powder,lemon juice..
    Maa inji uruguai
    Finally temper for both the versions.Give a standing time of 30 minutes before serving.


    Serve with curd rice and enjoy !
    mango ginger red


    Note
    For variations,u can chop mango ginger finely. Tempering is also optional.

    Continue Reading...


    December 23, 2013

    SIMPLE BIRTHDAY PARTY RECIPES MENU FOR KIDS

    party menu recipes

    In this post, I have shared a simple kids birthday party recipes menu idea. Recently I attended Raksha’s friend’s Birthday party. We moms are also good friends. It was like a fun filled get together for us, more than a birthday party. I loved the way my friend conducted the party. It was so fun and interesting for kids as well as parents. It was not  like a normal cake cutting party. Instead she conducted some events/Indoor games for everybody including parents with some attractive and useful prizes. 

    Kids were so enthusiastic to participate in the events and so were us. Though the games were very simple like ball passing,placing caps etc by playing music, they were very interesting and all the kids thoroughly enjoyed it. Raksha and myself won three prizes. I have shown the picture of prizes in the below picture. In addition to these prizes, birthday caps, face masks and yoyo were given to all the kids.

    party-gifts

    We had our lunch over there and it was a simple menu but filling and attractive to kids and parents. Though the number of items were less, everything were very tasty. Usually I hesitate and scare a lot to conduct party in my home and I have never conducted any parties. Other than family members, I haven’t invited anybody for Raksha’s birthday so far. But after attending this party, I got some ideas and confidence of conducting a party in my home. Hope I‘ll do it for Raksha’s next birthday. I tried the same party menu at home last Sunday.

    As I was so much attracted by that party, I wanted to blog it for my future reference and for some beginners who are looking for simple party menu ideas. Hope you’ll find it useful.

    INGREDIENTS REQUIRED FOR SERVING FOOD

    Disposable serving plates
    • Small  sized cake plate
    • Big snack and food plate
    • Plastic Spoons & fork for cake
    • Plastic Spoon for food
    • Disposable paper cups for juice and water
    • Small disposable bowls for salad
    • Tissue paper/ Napkin paper,
    • Big polythene bags with buckets/cartons for trash. (this is very important, keep in all corners)
    For decorations
    • Colorful ribbons , Happy  birthday banner , Balloons , Birthday knife , Candles, party foam, Chocolates inside a big balloon.
    For kids return gift
    • Party caps, chocolates, face mask, yoyo or small toys, some useful gifts like chess box set, ludo, brain games etc based on the age. Some small storage bowls for adults and gift wrappers for packing gifts.

    In the recipe menu , I have mentioned the order in which the recipes were served to us. As all these recipes can be prepared in advance, you don’t need any helping hand to prepare them. U alone can do everything and take the credits. Here is how my friend conducted the party.

    HOW TO CONDUCT THE BIRTHDAY PARTY
    • As soon as all the friends and guests gathered, store bought aerated drinks like Frooti, Pepsi, Fanta, 7up were served. You can serve  fresh fruit juices which is a healthy option for kids. 
    • She kept some events for kids and parents. U can plan some games like musical chair, passing a ball, placing a cap by playing a music and much more. Everything finished off in 30 minutes. After that cake cutting went on.
    • After cake cutting, she conducted one more event for kids. In the mean time, her family members arranged all the recipes in a plate and kept ready for serving.
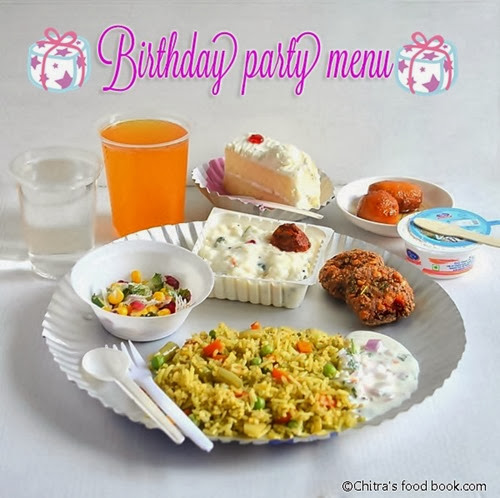
    • In a disposable /Use & throw plate (like the one in the picture), they served a piece of cake, a sweet (I made gulab jamun with ready made mix), mixed veg salad, masala vada, vegetable pulao with raita and potato chips were served with a plastic spoon & fork.
    • After we finished eating, they asked for second serving. Finally they served curd rice and pickle.
    • Last but not the least, the lunch was finished with a small cup of ice cream. You can also serve fresh fruit cream instead of ice cream. Kids love this dessert as well.
    • In the above recipes, pulao, raita, salad, masala vada and curd rice were prepared at home. Remaining were store bought.
    • We parents enjoyed all the recipes but when I noticed most of the kids happily ate salad (as it had corn), cake (particularly cream, pastry cake is more preferred nowadays), pulao, chips and  ofcourse ice cream. Some kids had curd rice instead of pulao as it was mildly spicy. 

    party menu indian vegetarian

    Please find the links for the recipes here
    In addition to the above recipes, you can find
    • Gulab jamun using ready made mix ( Recipe with video)
    • Store bought potato chips (I forgot to keep)
    • A welcome drink ( homemade or store bought juice)
    • Birthday cake piece
    • Ice cream 


    HOW TO PREPARE RECIPES IN ADVANCE
    • In general, Kids love any recipes made with potato, paneer and cauliflower. So you can choose the starter and main course gravies accordingly. 
    • If you are preparing gulab jamun , make it the previous day and store in an air tight box. To me this is the easiest sweet, universally loved by all. U can also plan for other sweets like kaju katliburfi or make carrot halwa and serve as a dessert along with ice creamIf you want to make the job most simple, buy some sweets from  sweet shop like my friend did in the party.
    • Prepare the salad the previous day night and refrigerate by keeping in a box. On the party day, add freshly grated coconut, mix and serve.
    • For veg pulao, chop the vegetables and refrigerate in a tupperware box the previous night. For about 10-12 people, you can make 4-5 cups of rice. As the number of recipes are more, adjust the quantity of rice accordingly. Prepare the rice 30 minutes before the guests arrive so that it would be warm while serving. ( If you make in rice cooker or instant pot, keep in warm mode)
    • For curd rice, make 4 cups of rice. Prepare and refrigerate it in the early morning. As soon as you finish making the pulao, take the curd rice out and do the seasoning. Adjust the consistency and keep it ready. Do check out my curd rice post on how to make it creamy for parties.
    • Prepare masala vada batter and refrigerate the previous day. Make vadas at the end and keep it open till it cools down. Make it slightly thinner to maintain its crispness. If you do not want to have masala vada in your menu, you can try making gobi 65 or simply stop with potato chips. 
    To make a grand lunch, you can include any starter like cheese ballsGobi 65, plain rice, rasam, papad, roti and a paneer gravy. 

    Thanks for visiting this page. Hope you find it useful !

    Continue Reading...