Search Chitra's Food Book

March 8, 2014

SUKHDI RECIPE (GUR PAPDI) | EASY GUJARATI SWEETS RECIPES

In my Gujarati thali post, you would have seen this sweet recipe showcased in the middle of the plate. It is nothing but Sukhdi/Gur papdi. Gur/Gud means jaggery. It is one of the traditional Gujarati sweets recipes. This is the easiest sweet I have ever tried so far. U can try this in microwave too.

As Holi is nearing, you can include this easy sweet in your holi recipes menu. With just 3 ingredients, it tastes awesome! It can be done under 15 minutes. U can try this for your surprise guests too. They will be amazed by its taste. I followed Ezcookbook Ishita’s recipe.

I was totally satisfied with the outcome. I got it perfect in my first attempt. The ratio of wheat flour & ghee is 2:1, which is very important for this sweet. So do not reduce its quantity. How come a sweet with so much of ghee  go wrong?. So anyone can make this sweet easily.  Do try this for your family, they will love it for sure !

This recipe has been featured on Twinkl, as part of their Easy Diwali Sweets recipe blog. Thank you Twinkl !


Sukhdi/Gur Papdi Recipe


Sukhdi/Gud Papdi Recipe Sukhdi/Gur papdi -Traditional, easiest Gujarati sweet recipe.
Cuisine: Indian
Category: Dessert
Serves: 7
Prep time: 5 Minutes
Cook time: 10 Minutes
Total time: 15 Minutes


INGREDIENTS
1 cup - 200ml or 250ml
  • Wheat Flour - 1/2 cup
  • Melted ghee - 1/4 cup
  • Grated jaggery - 1/2 cup
METHOD

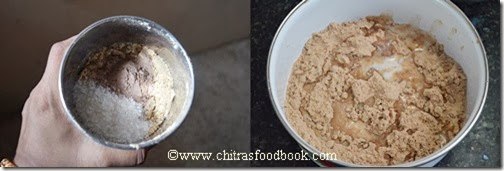
  • Grate jaggery or powder it very finely. *There should not be any single pieces in it.* It is the most important point here. Grease a  plate with ghee and set aside.
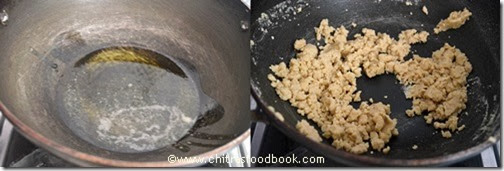
  • In a kadai, heat ghee and roast the wheat flour in medium flame till you get nice aroma. The color of wheat flour will be changed to golden brown. Keep stirring to avoid getting burnt.
sukhdi-step-1
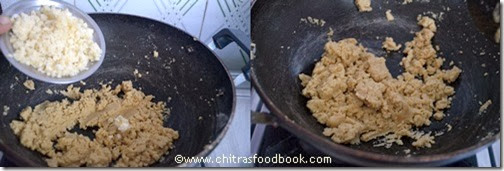
  • Keep the flame low and add grated jaggery to this and mix well. After all the jaggery is combined well with the flour, switch off the flame immediately. It takes a minute only. (Please be careful on keeping the heat in entire process else jaggery will get cooked more and Sukhdi will become chewy & hard.)
sukhdi-step-2
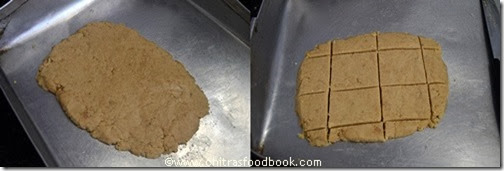
  • After u switch off the flame, stir the mixture for a second till jaggery is melted completely. Put this mixture into the ghee greased plate and level it with the back of spatula or use a polythene sheet. Do it quickly. Else you can’t level it.
  • After 2-3 minutes, mark the shapes using a knife. Leave it aside for 10 minutes.
    Now you can easily remove the sweet from the plate. It tastes good after it is cooled down completely.
sukhdi-step-3
U can sprinkle some poppy seeds for decoration !
Store in a box and enjoy. U can keep it for a week.

Note
  • The color of papdi depends on the color of jaggery. Mine came out light yellow in color.
  • Make sure you roast the wheat flour till you get a nice aroma.
  • Jaggery should be fine without lumps or pieces. It should be melted in the heat of wheat flour.
  • No need to use cardamom. U can use cashew nuts pieces at the end before spreading in the plate to get a crunchy taste while eating.
Melts in mouth. U can’t stop with one !


Very good recipes Tags: , , ,
Continue Reading...


March 7, 2014

NO BAKE CHOCOLATE PINWHEELS RECIPE

I wanted to try a no bake dessert recipe for long time. I tried this recipe on Valentine’s day from Late Mrs.Jayasree’s blog. But I couldn’t post here.Actually I followed two different recipes. One using dessicated coconut & condensed milk and the other one is this simple recipe using milk and butter. I loved both but Sendhil & Raksha din’t like the dessicated coconut flavor. So I am sharing the recipe using butter and milk which was a hit at home. Please see “Notes” for variations.

I cut in small size to make mini pinwheels. Now I wish to try no bake pinwheel cookies too.

No bake chocolate pinwheels recipe


No bake chocolate pinwheels recipe Easy, no bake chocolate pinwheels recipe - yummy dessert recipe forValentine's day !
Cuisine: Indian
Category: Dessert
Serves: 4
Prep time: 10 Minutes
Cook time: 20 Minutes
Total time: 30 Minutes


INGREDIENTS
For chocolate layer
  • Marie biscuit - 10 nos
  • Cocoa powder – 1.5 - 2 tbsp
  • Sugar - 2 tbsp
  • Milk - as needed
For white layer
  • Dessicated coconut - 1/4 cup (optional)
  • Butter - 2 tbsp
  • Sugar - 3 tbsp
HOW TO MAKE CHOCOLATE PINWHEELS RECIPE - METHOD

  • In a mixie jar,take the biscuits. Grind it to a nice powder. Now add cocoa powder,sugar and run till smooth. Make sure there are no pieces. Sieve and set aside.
Choco-pinwheels-step1
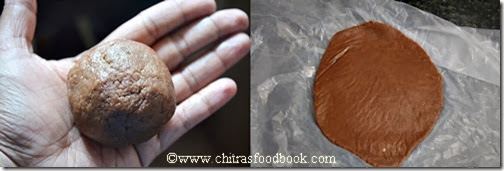
  • Take the ground powder in a bowl and add the required milk to make a smooth, firm dough. I used 2.5 tbsp of milk. Adjust as per your dough.
  • Roll this ball in a polythene sheet using a rolling pin like a thick roti. Chocolate layer is ready.
Choco-pinwheels-step2
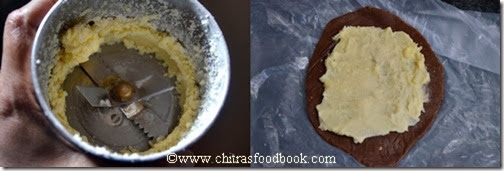
  • In mixer, beat the sugar and butter to make a creamy paste .Remove and add the dessicated coconut if using.
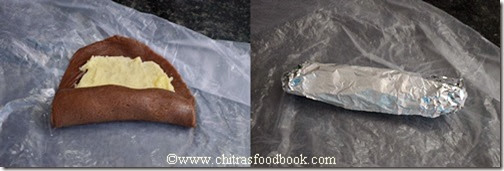
  • Apply this paste over the rolled chocolate layer . Leave some space in the corners and roll it tightly.
Choco-pinwheels-step3
  • Wrap the cylinder in  an aluminium foil or a polythene sheet. Freeze it for 1 hour. After it is set, remove and cut into pieces. It should not stick to the knife. If it is sticky, freeze for more time. Serve chilled !
Choco-pinwheels-step4
Note
  • Adding dessicated coconut is purely optional.U can add condensed milk instead of milk to make the dough. Do not add sugar if u use condensed milk.
  • If using condensed milk , you may need 1/2 cup.
  • Make sure to make the chocolate layer little thicker than the white layer.
Always Serve chilled ! Here is a cute mini pinwheel for u !

Continue Reading...


March 5, 2014

BANANA SMOOTHIE RECIPE–SUMMMER RECIPES

Its almost summer in Bangalore. We feel like having some juices/ drinks in the afternoons. So to start with Summer drinks recipes, I thought of making this easy & simple banana smoothie recipe with milk. I really din’t know the difference between a milkshake and smoothie until I tried this. After googling, I found smoothie is just a blend of fruits, honey and Milk whereas Milkshake is made by pulsing milk, sugar and ice cream with an essence or fruit. Ice cream is very important for Milk shakes.

As I din’t have ice cream in my hand, I tried smoothie.The consistency of smoothie should be thicker than milkshake. So I followed my Sharjah shake recipe to make it thick. It was very tasty and filling. We just loved it. With the smell of bananas and flavour of cinnamon, it was awesome. Do try this simple, easy to make, healthy banana smoothie. U’ll love it !


Banana Smoothie Recipe


Banana Smoothie Recipe Easy,healthy summer drink with the flavour of cinnamon
Cuisine: Indian
Category: Summer Drinks
Serves:3
Prep time: 5 Minutes
Cook time: 5 Minutes
Total time: 10 Minutes


INGREDIENTS

  • Banana -2 nos (long)
  • Milk – 2 cups (frozen)
  • Honey or sugar –2-3 tbsp
  • Cinnamon powder - 2 pinches
  • Vanilla essence - few drops
HOW TO MAKE BANANA SMOOTHIE - METHOD

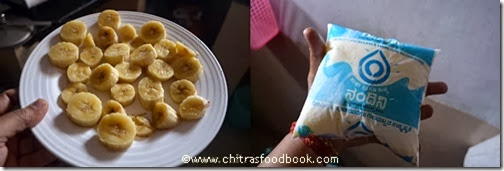
  • Peel the banana and cut into thin slices. Spread in a plate and freeze it for two-three hours. Freeze the milk along with banana. I used unboiled milk. U can use boiled milk too.
Banana-Smoothie-recipe-step1
  • Now in a mixie jar, take the frozen banana slices. Crush the frozen milk and add to the jar.
  • Add honey and essence as per ur taste. Blend it well without adding water.
  • It will become a thick paste. Add little water if necessary to loosen it. Pour in a glass and serve chilled. Sprinkle some cinnamon powder , mix well and drink.
Banana-Smoothie-recipe-step2


Note


  • For variations,use sugar instead of honey.
  • U can also use a tbsp of drinking chocolate powder to get chocolate flavour.
  • If you don’t want to use frozen milk, use ice cubes along with milk while blending.
  • It will be too cold when u drink immediately. So you can make it 30 minutes in advance & keep it too. Chillness would be just right when you drink.
  • Adding cinnamon powder gives a nice flavour to smoothie.so please add.

Enjoy this smoothie along with breakfast. Its very healthy, filling too !


Continue Reading...


March 4, 2014

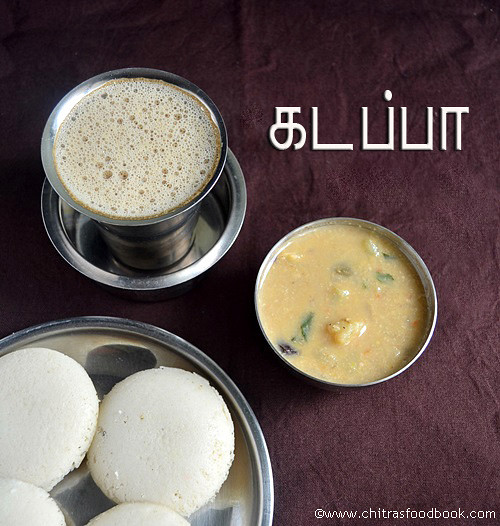
KUMBAKONAM KADAPPA RECIPE/கும்பகோணம் கடப்பா-SIDE DISH FOR IDLI DOSA

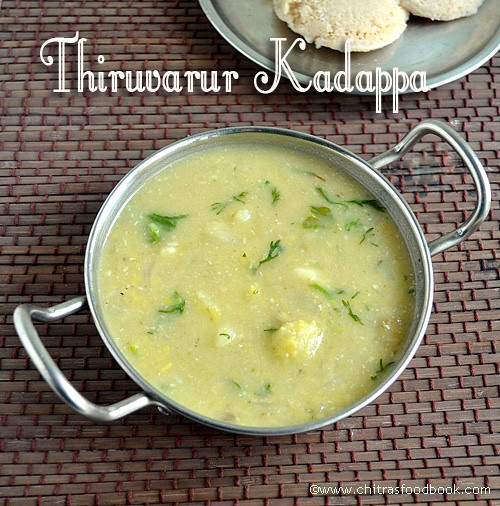
Kumbakonam Kadappa as the title says, it is a very famous side dish recipe for idli, dosa in Kumbakonam, Thiruvarur & Thanjavur district, Tamil nadu. It tastes more like kurma but its consistency is between sambar and kurma. I have tasted this once in Sendhil’s uncle’s house in Kumbakonam.

Long back I tried two versions & posted here too. But this recipe is the authentic, restaurant style one from Chef, Master Ravi of  the famous “Vaasan cafe”, Thiruvarur, Kumbakonam. I took this recipe from Aval vikatan Magazine. Last month I prepared this when my in-laws were here. We all loved it & relished with idli. I have tried this many times after that.

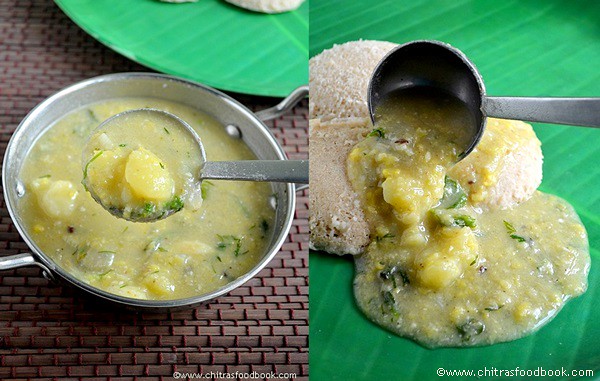
The color of kadappa is usually white. In some hotels/restaurants, they make with or without tomato, carrot. Even the recipe given the book had carrot and tomato. So I tried two versions. Hope U can find the difference in color in pictures. Do try any based on your liking. I am sure you’ll love this mildly spiced, kurma like gravy for idli, dosa. Procedure seems a bit lengthy. But its worthy to try. Lets see how to make restaurant style kumbakonam kadappa recipe with step by step pictures.

Kadappa with tomato & carrot

Kumbakonam/Thanjavur kadappa recipe


Kumbakonam/Thanjavur kadappa recipe Kumbakonam/Thanjavur kadappa recipe - Authentic recipe from a chef. A tasty side dish for idli,dosa!
Cuisine: Indian
Category: Side dish
Serves: Serves 4
Prep time: 20 Minutes
Cook time: 20 Minutes
Total time: 40 Minutes


INGREDIENTS
1 cup - 240ml
To pressure cook
  • Yellow moong dal - 1/4 cup
  • Potato - 1 no
  • Water - as needed
  • Oil - a drop
To powder
  • Cinnamon - 1 inch piece
  • Fennel - 1/2 tsp
  • Garlic cloves - 5 nos
To saute
  • Oil - 1 tsp
  • Green chilli – 4- 5 
  • Fried gram dal /Pottukadalai – 2 tsp
To grind with above
  • Grated coconut - 1/4 cup
  • Khus-Khus/Poppy seeds - 1 tsp
  • Soambu/Fennel seeds - 1 tsp
  • Garlic cloves - 5 nos
  • Ginger - 1 inch piece
To temper & saute
  • Oil - 2 tbsp
  • Cloves - 2 nos
  • Biryani leaf / bay leaf - 1 no
  • Star anise - 1 no
  • Small onion - 10 nos OR Big onion - 1 
  • Garlic cloves - 10 nos
  • Tomato – 1 no (optional)
  • Curry leaves - few
  • Carrot - 1 no (small,optional)
  • Mint, coriander leaves - 2 tbsp
  • Lemon juice - few drops
HOW TO MAKE KADAPPA - METHOD

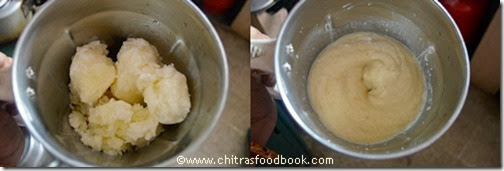
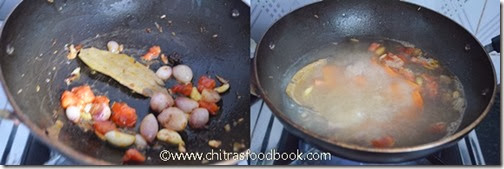
  • Pressure cook moong dal adding required water & a drop of oil. Keep a whole potato inside it. Cook them for one whistle in low flame. Remove, peel the potato skin & cut into cubes. Mash the dal & set aside.
kadappa tile1
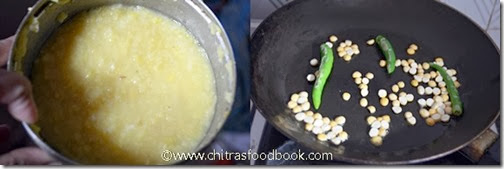
  • In a kadai, heat a tsp of oil & saute the green chillies & fried gram dal. Take this in a mixie jar & add grated coconut, ginger, garlic cloves, poppy seeds & fennel seeds. Grind everything to a smooth paste adding required water. Set aside.
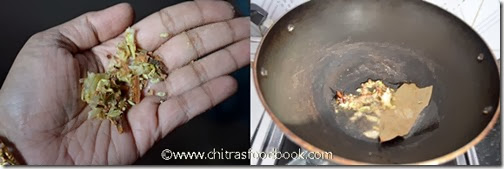
  • Crush the cinnamon, fennel & garlic cloves & set aside. In the same kadai, heat 2 tbsp of oil. Saute cloves,star anise,cardamom and biryani leaf.
kadappa tile2
  • Now add the crushed cinnamon powder. Then add onions, garlic cloves & saute till transparent. Now add tomatoes & saute for a minute. No need to become mushy. Adding tomato & carrot is optional.
  • Add sliced carrots, saute well. Add water to cook the carrots and cover cook for few minutes.
kadappa tile3
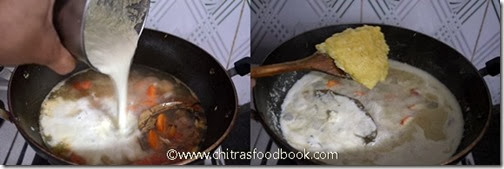
  • After the carrots are cooked well, add the ground coconut paste and cooked moong dal. Boil for sometime. Check for salt. Add the potato cubes, allow the gravy to boil till thickens slightly. 
  • Before removing, add the chopped coriander and mint leaves. Give one boil and switch off the flame.
kadappa tile4
kadappa tile5
  • Add lemon juice and Serve with hot idlies !

I served it with Oats Barely idli !


Note

  • This gravy would thicken after it cools down.So make it slightly watery.
  • Adding tomato & carrots are optional. I have not seen them in the kadappa I tasted in kumbakonam restaurants. But I added as it was mentioned in the recipe.
  • To make it white, omit tomato & carrots. Add more green chillies if you want it more spicy.
Enjoy this Kumbakonam kadappa for idli,dosa with  Kumbakonam degree coffee !


Continue Reading...


March 2, 2014

HOMEMADE GARAM MASALA POWDER RECIPE-PODI RECIPES

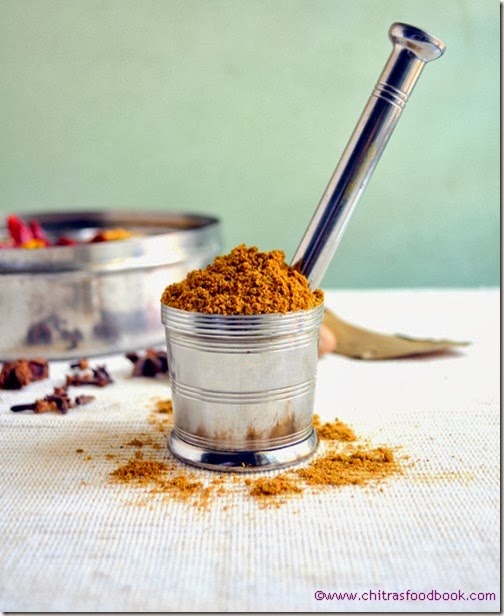
Nowadays Garam masala powder has become an important ingredient in cooking like salt & chilli powder. So I buy it every month along with other groceries without fail. But once I wanted to prepare at home and see the output. I have never thought, homemade Garam Masala Powder tastes and smells sooo good equivalent to store bought ones. Its so easy and comes out with superb flavour.

As you all know, there are many varieties of Garam masala powder. People in Karnataka, Kerala, Punjab and Gujarat have their own style of making. Soon I’ll share those recipes from my friends. This is just a general version of making garam masala powder at home for beginners. I have given only limited quantity of ingredients. 

If you like this recipe, you can make in bulk and store it in an air tight box. Just a tsp of it would be enough to make a flavourful gravy. I tried this recipe after referring some store bought masala packets and my cookbook. I used red chillies in this recipe. So it tastes mildly spicy too. It smells & stays good for months when handled with care. U can also refrigerate but it may not be necessary.

Here is a picture of ingredients I have used in this recipe. Hope you’ll try and like this recipe.


Homemade Garam Masala Powder Recipe


Homemade Garam Masala Powder Recipe How to make Garam masala powder at home - Cooking essentials
Cuisine: Indian
Category: How to's
Serves: 1/3 cup
Prep time: 5 Minutes
Cook time: 5 Minutes
Total time: 10 Minutes


INGREDIENTS

  • Dhania - 2 tbsp
  • Cumin - 1 tbsp
  • Pepper - 1 tbsp
  • Cardamom - 6 nos
  • Cinnamon - 2 long sticks (finger size)
  • Cloves – 8 nos
  • Fennel or aniseed – 1.5 tbsp
  • Bay leaves - 1 no
  • Star anise - 1 no
  • Nutmeg - 1/2 no (Break into small pieces before roasting)
  • Red chillies - 6 nos (adjust)
  • Dry ginger powder - 1/4 tsp
  • Kasuri methi - 1 tsp
  • Caraway seeds ( black jeera) - 1/4 tsp (optional)
  • Turmeric powder - 1 tsp
  • Hing – 1/4 tsp
  • Salt – as needed
HOW TO MAKE GARAM MASALA POWDER - METHOD

  • Break the nutmeg into small pieces. Pinch the red chillies. Dry roast all the ingredients given above in medium flame till you get a nice aroma without changing the color. Take care you don’t burn them. U can also roast them individually.
  • Grind everything to a fine powder adding salt after it cools down. No need to sieve.
  • Store in an air tight box after it cools down completely. Use a clean spoon every time and close the box tightly after use to retain its smell.


Note


  • U can use a small piece of dry ginger if you don’t have its powder in hand. In that case, break the ginger into very small pieces before roasting.
  • Grind only after all the ingredients cools down completely else small lumps may form.
  • For variations,u can omit red chillies. U can also try adding few black stone flowers/Kalpasi and one Marati moggu for more flavor.
Garam-Masala-Powder-Recipe


Continue Reading...


February 28, 2014

PURPLE CABBAGE/RED CABBAGE SALAD RECIPE


This post was lying in my drafts for long time.As i mentioned in my Purple Cabbage Poriyal recipe, i tried poriyal and salad with this cabbage for the first time.I must thank my friend Shalini for telling this simple and easy Indian style salad recipe.It was very nice and we just loved its crunchy taste.The same recipe can be followed for Red Cabbage too.U have to consume this salad immediately to enjoy its Fresh,crunchy taste.As u all know,Purple Cabbage is loaded with Anti oxidants which helps the body to fight against diseases and also makes our skin clear & flexible .I have used Olive oil and pepper powder for salad dressing.U can also try adding Roasted & chopped Almonds or ground nuts to make it more crunchy with nutty flavour.By this way,kids may like it.

Purple Cabbage Salad Recipe


Purple Cabbage Salad Recipe Purple Cabbage Salad – Easy,Colorful,healthy salad recipe !
Cuisine: Indian
Category: Salad
Serves: Serves 2
Prep time: 10 Minutes
Cook time: 5 Minutes
Total time: 15 Minutes


INGREDIENTS

  • Purple Cabbage - 1/2 cup
  • Carrot - 1 no (small)
  • Big onion - 1 no
  • Sweet corn – a handful (optional)
  • Tomato (Deseeded) - 1 no
  • Coriander leaves- a tbsp (optional)
  • Pepper powder - as needed
  • Olive oil – 2tsp
  • Lemon juice – few drops
  • Salt - as reqd
METHOD

  • Wash and chop all the vegetables into thin long strips.
  • In a bowl,take olive oil,salt,Pepper powder and lemon juice.Mix well.
  • Now add all the chopped vegetables.Mix well and serve immediately.
  • Add sweet corn and coriander leaves to make it more colorful and flavourful..


Note


  • I used white pepper powder here.U can use black pepper powder too.
  • Use deseeded tomato.I used Bangalore tomato in this recipe.
Continue Reading...


February 26, 2014

Thandai Recipe - Maha Shivaratri Prasadam Recipes, Holi Recipes


Maha Shivaratri 2024 falls on 8th of March. So I thought of sharing this yummy, healthy Thandai as Shivratri prasad recipe which is famous in North India.We South Indians, usually make Sweet puttu with rice flour and jaggery on this day. This time I tried thandai as well as arisi vella puttu for a change. Please find the updated Sweet puttu recipe here if interested.

For this recipe, I referred  Sanjeev kapoor and Tarla dalal’s site. I just combined both the recipes and tried. It was very tasty. We loved it a lot. I have used Melon seeds and other nuts & spices. If you don’t have them in hand, you can make it very simple by making Thandai powder using almond, Cardamom, fennel seeds and peppecorns. I used Rose essence instead of Dried rose petals. I read bhang is mixed with this drink. But this one is bhang free/ no alcohol drink. 

Do offer this healthy, tasty drink for Maha Shivaratri and get the blessings of Lord Shiva!!


Thandai recipe


Thandai recipe Thandai recipe for Maha shivratri prasadam
Cuisine: Indian
Category: Dessert
Serves: 3
Prep time: 2 Hours
Cook time: 20 Minutes
Total time: 2H20Minutes


INGREDIENTS
To soak in water
  • Almond/Badam - 8 nos
  • Cashews - 4 nos
  • Pistachios - 6 nos
  • Poppy seeds - 1 tbsp
  • Melon seeds - 1 tbsp
  • Water - as needed
To powder
  • Green cardamom - 3 nos
  • Fennel seeds - 1 tsp
  • Peppercorns - 10 nos
To boil
  • Milk - 1/2 liter (500ml)
  • Sugar -1/3 cup
  • Saffron - to garnish
  • Rose essence – few drops Or Dried Rose petals – few 
HOW TO MAKE THANDAI - METHOD

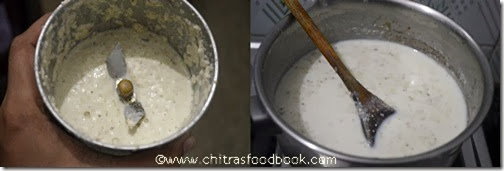
  • Soak all the nuts, poppy seeds, melon seeds in water for two hours. Grind it to a smooth paste adding the required water. Boil milk , add sugar, dissolve and set aside. Add the ground paste to the milk and boil for 3-4 minutes in medium flame.
Thandai-recipe-Step11
  • Now grind the ingredients given under “To powder”. Mix this powder to the milk and boil for a minute. Add few drops of rose essence and mix well.
  • Let it cool down well. After it completely cools down, strain the milk and discard the residue.
Thandai-recipe-Step2
  • Refrigerate for 3-4 hours or overnight and serve chilled !

Note

  • Skip melon seeds if you don’t have. Poppy seeds and badam is more important. Poppy seeds is the best coolant too.
  • Adding rose essence gives a nice flavor. So please add it
  • Pepper corns gave a mild spicy taste to the milk. Do not add more.


Continue Reading...

February 25, 2014

GUJARATI THALI RECIPES- Dal, Sev Tamatar Curry, Kadhi, Green Chilli Pickle

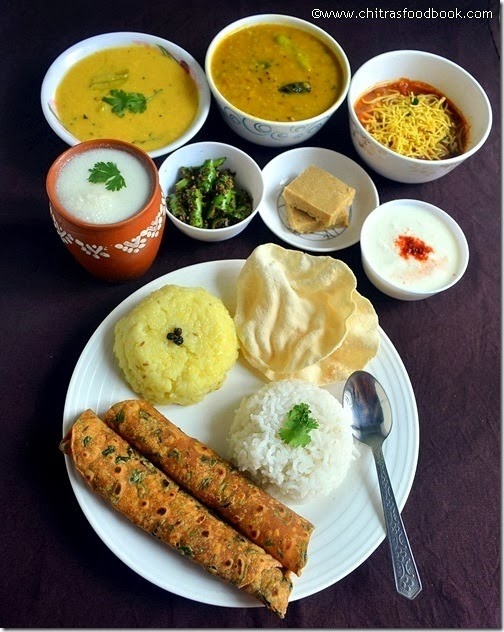
Gujarati-thali-recipes

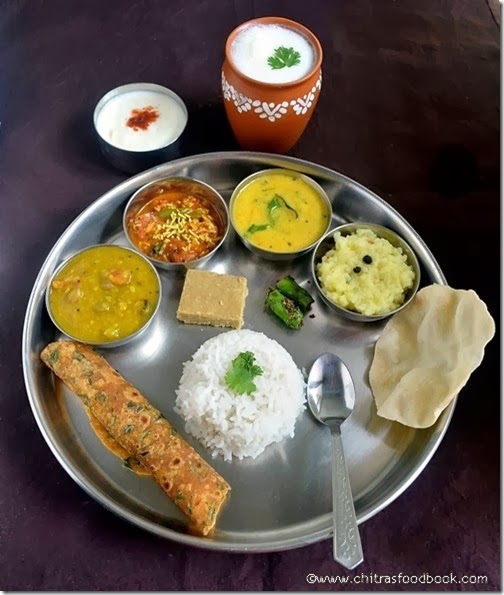
In the above Gujarati thali recipes picture, I have plated Rice, Methi thepla, Moong Dal khichdi, Dahi kadhi, Gujarati Sev Tameta nu Sak / Sev and Tomato Curry, Green chilli pickle, Masala chaas, Oven roasted papad & curd.

Gujarati recipes were in my try list for long time. As I had bookmarked Gujarati Kathiyawadi thali from Ezcookbook, I thought of trying them and share it for their event. 

Last weekend, I prepared all these recipes for the first time and everything came out very well. In this post, I have shared the recipes of few dishes. I have made a separate post for Sukhdi/Gud papdi, Khichdi and Masala chaas recipe

For this Gujarati thali, I chose simple and authentic Gujarati recipes that needs very less chopping, less oil and moreover all these are No onion No garlic No coconut recipes. I took nearly one hour 30 minutes to prepare them. I followed my own recipe for thepla. While cooking, I found Hing and Jaggery are widely used in all their dishes. Most of them are tomato based gravies. Thank you Ishita for these wonderful recipes. We thoroughly enjoyed Gujarati food in my home.

Do check out my other Gujarati recipes


Shakkar para

Gujarati-food

Gujarati thali


Gujarati thali Gujarati recipes - Methi thepla, Dal khichdi, Dahi kadhi, Gujarati Sev Tameta nu Sak / Sev and Tomato Curry, Green chilli pickle, Masala chaas and Oven roasted papad. 
Cuisine: Indian
Category: Lunch
Serves: Serves 2
Prep time: 20 Minutes
Cook time: 70 Minutes
Total time: 90 Minutes

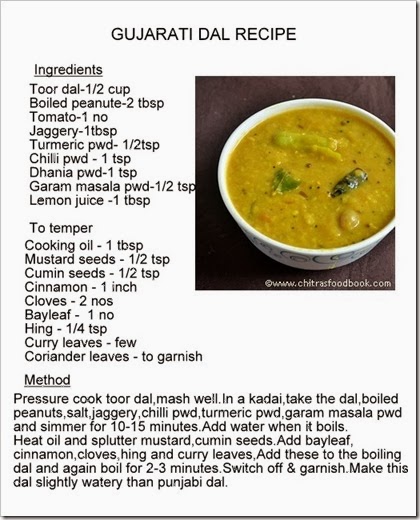
Gujarati dal tasted mildly sweet. I have used peanuts in this recipe which was the highlight. The crunchy peanuts while eating gives a nice taste. So do not avoid Peanuts when you try this recipe. The consistency of dal should be slightly watery than punjabi dal as Ishita mentioned. But I made it thicker to suit my family’s taste. We loved it!

Gujarat-dal-recipe

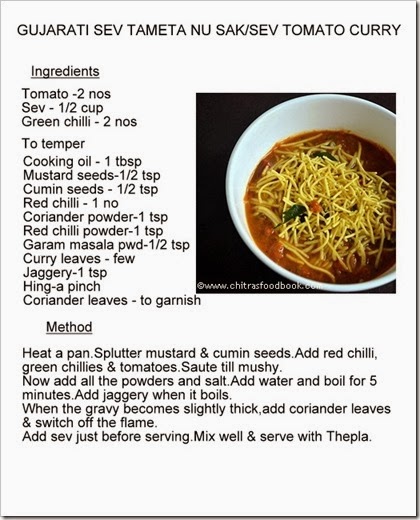
Tamatar sev curry was a nice combo for thepla. It was mildly tangy and addition of sev made it more tasty. I used MTR Sev, store bought ones. It was slightly thicker than the usual sev. We had this curry as an accompaniment for curd rice too..

Tamatar-sev-curry

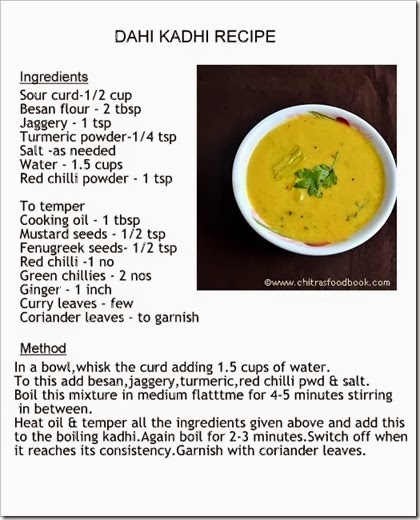
I prepared Kadhi  as an accompaniment for moong dal khichdi. It was very nice. We also had this  mixing with plain rice and roasted papad.

Dahi-kadhi-recipe

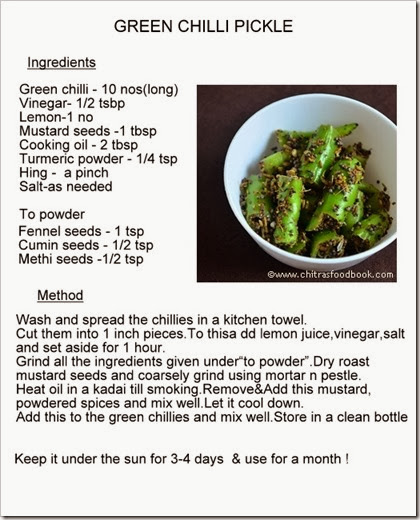
Last but not the least, here comes my dish, Green chilli pickle. I made it specially for me as Sendhil is not fond of pickles. It had a very different taste. As I tasted it instantly, I felt it more spicy. I think it will take another 3-4 days to get soaked and for the flavour to get balanced. I had it with curd rice and thepla. It was yummy.

Green-chilli-pickle


Enjoy making Gujarati thali in your home.U’ll love its taste . 
Gujarati-lunch-menu


Very good recipes Tags: , , , ,
Continue Reading...