Search Chitra's Food Book

May 6, 2014

MOR MILAGAI RECIPE(SUN DRIED CHILLIES)-SUMMER SPECIAL


Mor milagai
Mor milagai is my most favourite side dish for curd rice next to maa vadu pickleSmile.Not just with curd rice,it also tastes great with pazhaya sadam.I never thought i could make my own mor milagai in my kitchen and that too in BangaloreBe right back.Thanks to my MIL for teaching me this yummy vathal recipe.Actually i love to have sun dried chillies(mor milagai) with stalk like we see in store bought ones.When i was young,i started to like mor milagai because of those salty chilli stalks.So i love milagai kaambu very much Smile with tongue out.But my mil told me to remove the stalk and make it as it is her practice.So i followed the same but used few chillies with stalk for myself which u can see in the pictureWinking smile.I used long thin variety chillies(oosi milagai).But my mil said,gundu milagai(Kooda milagai) also tastes great.I have shared two methods below.Use whichever is convenient for u.
Mor milagai recipe
Unfortunately i couldn’t take stepwise pictures Sad smile.But i am sure this recipe is easily understandable without step by step pictures as it is very simple.So lets see how to make mor milagai at home easily.Utilise this hot summer season and try this easy recipe in your home.
Homemade mor milagai recipe

Mor milagai recipe


Mor milagai recipe Home made mor milagai recipe ( sun dried chillies) for curd rice
Cuisine: Indian
Category: Side dish for curd rice
Serves: 18nos
Prep time: 7 days
Cook time: 2 Minutes
Total time: 9days 2 mins


INGREDIENTS

  • Green chillies-100gms(15-20nos)
  • Sour thick curd - 1 cup
  • Water- 3 tbsp 
  • Salt-as needed
METHOD

  • Wash and slit the chillies in the middle slightly till half way along the end.It helps the chillies to absorb buttermilk easily. 
  • Whisk the curd adding water and salt.Add the chillies to it,close the bottle and shake it well. Do not use ur hands at any cost.
  • Keep it closed in your kitchen counter( no need to refrigerate).Everyday morning, open the bottle,check if there is any fungus formation.If not,close the bottle,shake it well and keep aside.U should repeat the same for 5 days.Please do not forget to do this.This step is very important.
  • Suppose if there is any fungus formation,remove the chillies from the bottle.Spread in a tray and keep it under the sun.No need to place the buttermilk under sun.Keep it closed in ur kitchen.Let the chillies dry for a day ( from morning 9 am to evening 4pm).After the chillies are partially dry,again mix the chillies with buttermilk and keep it open overnight.Continue this process for 3-4 days till the chillies become completely dry and it should break.All these steps are necessary only if there is fungus or bacterial formation.
  • If there is no fungus formation for 4 days,buttermilk will be mostly absorbed by the chillies.Now spread the chillies in a tray and pour the remaining buttermilk in a wide bowl.Keep them under the sun for 6-8 hours.All the water in the buttermilk will be evaporated and it becomes a thick paste.
  • Now mix the chillies in the paste and make sure chillies are well coated by the buttermilk paste.Spread in a tray and keep it open in ur kitchen counter overnight.The next day,repeat the same process.Mostly in one or two days,chillies will be completely dry and u can break it easily.
  • Heat some oil and fry them.Check for taste.If salt is less or if the chillies are too spicy,take sour sour buttermilk,mix the chillies in it.Leave it for a day.Again sun dry completely and use it as needed.
  • For deep frying,heat 2 tbsp of oil in a kadai and fry 5 chillies.Keep the flame medium and keep frying the chillies till the color changes to dark brown and becomes crispy.By this way,chillies would be fried uniformly.
Enjoy with curd rice !!


Enjoy !


Note

  • The total process takes 7-8 days and maximum 10 days depending on the chillies u use.
  • As it is summer,chances of fungus formation is very less.I followed the second method as mine did not have fungus.
  • Do not use ur hands for mixing buttermilk and chillies initially.It may lead to bacterial or fungus formation.
  • Do not forget to check the bottle and shake it well for 3-4 days.Its a must and should.
  • Adjust salt as per ur need.

Homemade mor milagai vathal recipe
     Mor milgai tastes great for curd rice.But i personally like to have it with Pazhaya sadam .So here is my summer special breakfast Pazhaya sadam,Mor milagai with chinna vengayam Smile
Mor milagai with pazhaya sadam recipe
Continue Reading...


May 2, 2014

INTRODUCING BLOG EDITOR WITH RECIPE MICRODATA SUPPORT FOR BLOGGER


Dear Blogger friends,

I am very happy to share this online blog editing tool, BLOG EDITOR for blogger platform,designed by my Husband Sendhil kumar. This tool has more features than the standard blogger editor like addition of tables,smileys,post tags (technorati) and the most important Recipe microdata support recommended by popular search engines like Google,Yahoo,Bing etc. As many of my budding blogger friends kept asking me about the blog editing tool i use for my blog,i thought of sharing this useful tool with u all. Please go through the below points for more detailed information. I am sure this tool will be much more useful and u can play with it to design ur blog posts in an attractive way.Please check out my Avocado milkshake recipe post in which i used this tool to publish the post.U'll get some idea.Thanks for visiting this post.Please use this tool and let us know how u liked it smiley..

Use this link to go to the tool : http://blog-editor.blogspot.in/p/blog-editor.html
Check out this post on how to use this tool : http://blog-editor.blogspot.in/2014/04/getting-started-with.html


What is Blog Editor?

Blog Editor is an online blogger blog editing tool with recipe microdata support and better post editing capabilities.

What feature does this blog editor have that official blogger blog editor does not have? Why should I use this blog editor instead of the official blogger blog editor?

  • Recipe microdata
  • Custom templates (Use Template Designer to design your own templates)
  • Post Tags (ex: Technorati tags)
  • Time Duration (Cook Time, Prep Time, Total Time) in recommended format using a UI.
  • Tables
  • Horizontal line
  • Special Characters (Copyright, registered, pound, euro, yen etc.)
  • Smileys
  • Anchor - Link within the page (Ex: You can create anchor links within posts for Go directly to ingredient, Go directly instructions, Go directly nutrition information)
  • Indent / Outdent
  • Nested Lists using indent
  • Find / Replace Text
  • Subscript, Superscript support
  • Insert div container
  • And a few more, try all the toolbar buttons / controls

Thanks :) 

Please go through this FAQ post for more information
 

Technorati Tags: , , ,
Continue Reading...


May 1, 2014

EASY WATERMELON SALAD RECIPE-INDIAN STYLE


Watermelon salad is the most popular street food in India during summer. U can find people selling this salad in carts outside the schools & parks all over India. Its a very simple recipe yet I wanted to blog it. In Tamil nadu, this salad is usually served in a disposable bowl with a tooth pick. In Bangalore, I have seen some vendors serving in a small banana leaf in a more authentic way. Its a very simple but very tasty recipe with two toppings. One with salt and pepper and the other one with Chaat masala.

Recently I tasted this salad in a marriage banquet. Its taste and the simplicity of this recipe tempted me to blog it. U can make this salad for parties and get together too. Its too easy to make and the best body coolant for summer. As I mentioned in my watermelon juice post, it is always good to consume a fruit as it is without losing its fiber. So lets have this easy, Indian style watermelon salad recipe to beat this summer heat!. U can also add few pieces of cucumber to make it colorful & healthy. Sure, U will feel energetic and refreshing in this hot season.


Easy watermelon salad recipe


Easy watermelon salad recipe Easy watermelon salad - Indian style recipe for summer
Cuisine: Indian
Category: Salad
Serves: Serves 2
Prep time: 10 Minutes
Cook time: 3 Minutes
Total time: 13 Minutes


INGREDIENTS

  • Watermelon - 1/2 no
  • Salt - As needed
  • Pepper powder - as needed OR Chaat masala - as needed
HOW TO MAKE WATERMELON SALAD - METHOD

  • Wash and chop the watermelon. Remove the seeds. Cut into small cubes.
  • Sprinkle salt & pepper powder or chaat masala or mix everything as per your taste. Add little lemon juice if you like.
  • Enjoy eating immediately !!

Check out my easy salad recipe for kids birthday parties if interested !!


Yummy,easy salad recipe - Kids would love it too !


Continue Reading...


April 29, 2014

RAGI PUTTU RECIPE-SWEET,SPICY VERSION

 Ragi-puttu-recipe

Ragi is one of the healthiest and easily available millets all over the world. It is called as Finger Millet in English, Kezhvaragu/keppai/aariyam in Tamil, Ragi in Hindi & kannada, Ragulu, Kooralu in Telugu & Panjapulle, Moothari in Malayalam, Madua in Bengali & Nachni in Marathi. It has numerous health benefits and the most important is it is rich in calcium and fiber. 

I love to try varieties of ragi recipes. Recently I posted Ragi idli & dosa, fermentation method. Here comes yet another interesting and very tasty breakfast recipe, Ragi puttu. I learnt this from my MIL. Last time when she came here, she prepared this puttu for us without using a puttu maker. 

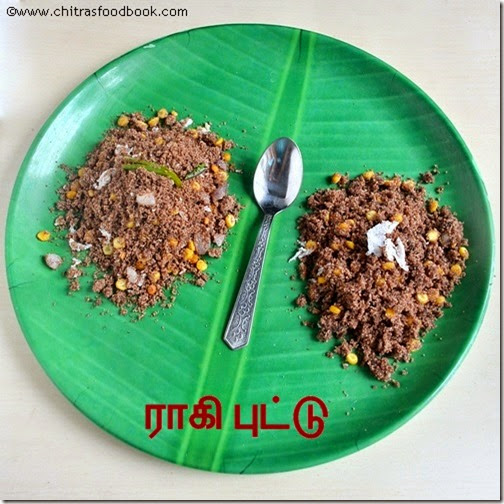
She prepared two versions, sweet puttu with jaggery & spicy version with onions and chillies. It was very nice and soft. She also insisted me to blog this recipe as it will help diabetic people to try a variety of ragi recipe. Procedure is little bit lengthy but its totally worthy to try. Do try this ragi puttu recipe for your breakfast. I am sure your family would love it.

Ragi-sweet-puttu


Spicy-ragi-puttu-recipe

Ragi puttu recipe-Sweet n spicy versions


Ragi puttu recipe-Sweet n spicy versions Soft,healthy and tasty ragi puttu recipe without using a puttu maker !!
 
Cuisine: Indian
Category: Breakfast recipes
Serves: 4
Prep time: 10 Minutes
Cook time: 15 Minutes
Total time: 25 Minutes


INGREDIENTS
For puttu
  • Ragi flour - 2 cups
  • Wheat flour- 2 tsp
  • Gingely oil – 2 tsp
  • Salt -1 tsp
  • Water - as needed
  • chana dal or moong dal - 3 tbsp
For sweet version
  • Puttu flour - 1 cup
  • Grated jaggery - 1/2 cup
  • Cardamom - 2 nos (crushed)
  • Grated coconut - 2 tbsp
For spicy version
  • Puttu flour - 1 cup
  • Salt - as needed

To temper & saute

  • Mustard seeds - 1/2 tsp
  • Urad dal - 1 tsp
  • Big onion - 1 no (finely chopped)
  • Green chillies - 2 nos
  • Curry leaves - few
  • Coconut oil - 2 tsp
  • Crushed Cumin seeds -1 tsp
HOW TO MAKAE RAGI PUTTU - METHOD

  • Take ragi flour & wheat flour,oil in a wide bowl. Mix the required salt and little water in a separate bowl. Sprinkle the salt water on ragi flour and mix well till you are able to make a shape as shown in the picture below.  Now sieve this flour using a puttu sieve(puttu salladai-with big holes) and collect the flour.

ragi-puttu-step1 ragi-puttu-step2

  • Heat water in a idli pot. Keep a small bowl inside the idli pot and put chana dal. Cover it with required water.
  • Grease idli plate with little oil and spread the puttu flour in the plate. Make some holes and Steam it for 15 minutes. By this time, dal will also be blossomed. Remove, discard the excess water in the dal and set aside.

ragi-puttu-step3

  • Remove the flour and divide into two batches.Use one cup of flour for sweet puttu and the remaining one for spicy puttu.
  • For sweet version : Melt jaggery adding little water, strain, add cardamom powder. Add the puttu flour, half of chana dal and grated coconut. Mix well. Serve immediately.

ragi-puttu-step4

  • For spicy version,heat oil in a kadai and temper all the above said ingredients.
  • Saute onions,chillies, ginger bits and add the ragi flour & cooked chana dal. Check for salt and add more if needed.
  • Lastly add grated coconut , mix well and serve hot !

ragi-puttu-step5


Enjoy !


Note

  • For variations,add sugar in place of jaggery syrup. It would be easier but addition of jaggery is healthier than sugar.
  • U can use moong dal instead of chana dal. Keep in mind, dal should not be over cooked. It should just blossom.
  • For spicy version, you can use big onions instead of small onions.

sSpicy-ragi-puttu
Healthy, tasty ragi puttu is ready for breakfast !

Ragi puttu recipe


Continue Reading...


April 28, 2014

PAAL KOZHUKATTAI RECIPE WITH JAGGERY,COCONUT MILK


Paal kozhukattai with jaggery,coconut milk

Last monday we celebrated our 9th wedding anniversaryRed heart.We had a great day with our in-laws.My MIL treated us with this traditional paal kozhukattai recipeParty smile.I had it for the first time and loved it a lot.I usually make paal kozhukattai wih sugar & milk using instant idiyappam flour.I love it so much but Sendhil is not fond of that sweet/dessert as it is with sugar.He likes only his mom’s traditional paal kozhukattai recipe with jaggery & coconut milkSmile with tongue out.On our anniversary,when she prepared this recipe,i found it interesting.While serving,she cut the paal kozhukattai into pieces like halwa and gave us.Sendhil enjoyed it a lot.As i don’t like to have in pieces, i enjoyed eating it as dumplings in a bowl which u can find in the picture.So its purely ur choice of serving.U can serve it as dumplings or as a piece like halwaWinking smile..

Paal kozhukattai with coconut milk

Paal kozhukattai with jaggery and coconut milk


Paal kozhukattai with jaggery and coconut milk Traditional paal kozhukattai recipe - Rice balls cooked in coconut milk and sweetened with jaggery !
 
Cuisine: Indian
Category: Sweet
Serves: Serves 4
Prep time: 2hours 10 minutes
Cook time: 20 Minutes
Total time: 2hours 30Minutes


INGREDIENTS
To soak and grind
  • Idli rice - 1 cup
  • Salt - 1 tsp
  • Water - as required

  • Coconut - 1/2 no (big size)
  • Jaggery - 1 cup
  • Cardamom - 3-4 nos(crushed)
  • Milk or water - as needed
METHOD

  • Wash and soak the rice for two hours and grind into a smooth paste thick paste.I used mixie to grind the batter.As i added more water,my batter became slightly watery.To make it thick,i wrapped the batter in a cotton towel to absorb the excess water.

Paal kozhukattai step 1

  • In the mean time.grate or cut the coconut into strands using the back of a thick ladle or kinfe.Grind it and extract the first milk using 1 cup of warm water.U’ll get around 1.5 cups of thick milk.Again grind the coconut adding 2 cups of water to extract the second milk.Add one cup of water to it and Keep aside.

paal kozhukattai step2

  • Take a thenkuzhal murukku press with three holes and fill the mould with batter.In a wide mouthed bowl,take the second coconut milk and allow it to boil.When it starts to roll boil,simmer the flame and press the dough directly.Stir it well and leave it for 2 minutes.Kozhukattai will be cooked and start to float on top.Again press the dough over it.No need to remove the cooked kozhukattai.Keep pressing the dough over and over.(Don’t worry,all the balls will be cooked properly).

paal kozhukattai step3

  • If u want,u can add some water while the balls are getting cooked.Balls should be well immersed in the coconut milk.So add water accordingly.
  • After all the balls are cooked,add grated jaggery and mix well.Boil for sometime till the raw smell of jaggery emanates completely.Lastly add the first coconut milk,cardamom powder and mix well.If u want to serve in bowl, switch off the flame,remove and serve hot or warm.

paal kozhukattai step4

paal kozhukattai step5

  • To make into pieces,stir the rice balls till all the coconut milk gets absorbed and becomes thick.Pour in a plate and spread it.After it becomes warm,draw the lines and cut into pieces after it cools down.Serve and enjoy !!


Note

  • For variations,u can add sugar in place of jaggery.
  • If u find the batter too hard while pressing,sprinkle some water,make it little loose and press it.While pressing in batches,cover the remaining dough to avoid drying.
  • Pressing in thenkuzhal mould makes the job easy.Else u have make small balls,steam in idli pot and proceed.Soon i will share a recipe with sugar and milk.

Paal kozhukattai recipe with coconut milk

Enjoy this paal kozhukattai as evening snack.It tastes yummm !!

Paal-kozhukattai-with-jaggery


Continue Reading...


April 26, 2014

AVOCADO MILKSHAKE /BUTTER FRUIT JUICE RECIPE

Avocado milkshake recipe
Avocado milkshake recipe was in my try list for a long time. In Indian juice shops, it is mostly mentioned as butter fruit juice. Based on its consistency you can call it as a juice or milkshake. I tasted this milkshake without condensed in a juice shop recently. It was very nice. From then, I wanted to post this recipe in my food book because this is the easiest avocado recipes and it amazing health benefits. As you all know, Avocado recipes tastes the best only when the fruit is ripe else you can't even taste a bit of it and U have to throw the entire dish into the bin. Please be careful while buying an avocado. Check out this link on How to choose n buy Avocado if you are buying it for the first time. When you have a ripe avocado in hand, don't forget to try this healthy, easy n tasty milkshake recipe. U'll love its taste. Do check out my super soft avocado paratha and guacamole dip with its health benefits if you are interested.

Avocado image
How to cut avocado

Avocado Milkshake recipe/Butter fruit juice

Avocado milkshake recipe Healthy Avocado milkshake recipe with just 3 ingredients !
Cuisine: Indian Category: Juices Yields: 2-3 Cups
Prep Time: Cook Time: Total Time:
 

Ingredients
  • Ripe Butter fruit/Avocado - 1/2 no
  • Cold milk - 2 cups
  • Sugar - 1- 2 tbsp
 
Instructions
  1. Wash and cut avocado into two vertically. U'll find a big seed inside.Remove it and discard.Now scoop out the pulp using a ladle.
  2. Grind it in a mixer or juicer adding sugar or honey &  cold milk.Adjust more or less milk based on the desired consistency.

Nutrition Information Per Serving

 
Serving Size The serving size, in terms of the number of volume or mass
Calories 300
Fat (grams) 25
Cholestrol (milligrams) 0
Saturated Fat (grams) 5
Unsaturated Fat (grams) 15
Trans Fat (grams) 0
Carbohydrate (grams) 15
Protein (grams) 0
Fiber (grams) 16
Sodium (milligrams) 0
Source   : http://www.myfitnesspal.com/food/calories/generic-avocado-milkshake-1846452

Note
  • For variations,Use honey in place of sugar.
  • U can also add condensed milk for rich taste.

 Avocado milkshake recipe

Enjoy this healthy,tasty milkshake and stay fit !
Butter fruit juice recipe


Technorati Tags: , , , , ,


Continue Reading...