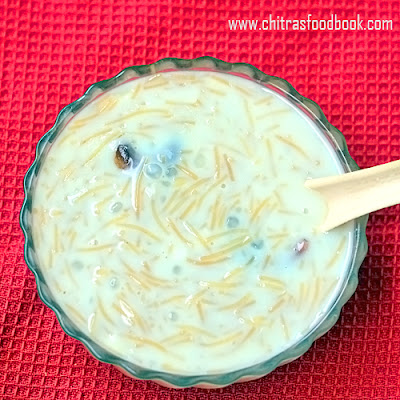
Every Thursday I make this Instant semiya payasam in a pressure cooker easily for my Guru Pooja naivedyam / prasad. It takes just 15 minutes to prepare it. I started making vermicelli kheer in pressure cooker after hearing from my friend Shalini. Once she shared her vermicelli payasam recipe in instant pot. I thought of making the same in our Indian pressure cooker and it was a huge success in my home. But there are few points to be remembered while making this payasam in cooker to avoid curdling. I have shared all of them in this recipe.
I have shared a Kerala style semiya payasam recipe in pressure cooker but this version is much more easy and less time consuming too. For variations, you can add condensed milk / Milkmaid instead of sugar. It tastes even more rich. Ok friends, lets check out this easy semiya payasam recipe in cooker with step by step pictures and video.
Pre Roasted semiya / Roasted Vermicelli - 1/2 cup (I used MTR roasted vermicelli)
Sugar - 1/2 cup
Raw, unboiled milk - 2 cups
Water - 1/2 cup
Cardamom powder - 1/2 tsp
Ghee - 1 tbsp
Cashew nuts, dry grapes – few
Salt – a pinch (optional)
HOW TO MAKE SEMIYA PAYASAM IN PRESSURE COOKER
Wash and clean the pressure cooker, lid and gasket properly. Let it dry.
In the pressure cooker, take the roasted vermicelli, sugar, milk, water and cardamom powder.
Mix well. Pressure cook under low flame for two whistles.
Remove the lid after the steam is released naturally.
Heat ghee in a kadai and roast the cashews till golden in color. Add the raisins and roast till its puffy.
Add to the semiya payasam. Mix well and enjoy !
METHOD - STEP BY STEP PICTURES
Take a medium or big sized pressure cooker. Wash it well. Wash the lid, gasket properly and wipe it dry. This is the first step that helps to avoid curdling of payasam.
In that pressure cooker, take roasted vermicelli, sugar, unboiled milk, a pinch of salt, water and cardamom powder .
( TIP: Addition of both water and milk helps to prevent curdling of payasam). If you have unroasted vermicelli, roast it in a tsp of ghee till golden in color. Then add water, milk, sugar and cardamom powder. Mix well.
If you are using small sized cooker, keep in small sized burner. I used my 2 liters cooker and used my medium sized burner.
Add a small spoon or a plate in the bottom of cooker. It helps to reduce the splashing of milk while the cooker whistles. This step is optional though.
Close the lid and keep the cooker in high flame till steam comes out. lower the flame completely and then put the weight valve. Cook for two whistles in very low flame and switch off the flame. It takes nearly 8 to 10 minutes to whistle.
Let the pressure release naturally. Now open the cooker lid and mix well.
Heat ghee in a kadai and roast the cashews. When it starts to turn golden in color, add the raisins and roast till its puffy. Switch off the flame and add this to the semiya payasam.
Mix well and serve hot or cold by refrigerating it for an hour. Semiya payasam thickens after it cools down completely. To make it drinkable, add some boiled milk before serving, adjust sweetness by adding more sugar, mix well and serve it. Enjoy !
Note
Adjust the quantity of sugar as per your taste.
For variations, you can use condensed milk instead of sugar.
You can add some saffron threads too.
Do not add milk alone. Add some water to prevent curdling.
Do not add ghee along with milk. While cooking, fat separates from the milk and gives a curdled look to the payasam.
If you want to make payasam without pressure cooker, first cook the vermicelli in water. Then add milk, sugar, cardamom powder. Boil and garnish with roasted nuts.
Try this easy, instant semiya payasam in pressure cooker and enjoy !
My aachi and mom makes semiya javvarisi payasam / sago vermicelli kheer adding nylon javvarisi very often. It can be prepared instantly without soaking and it cooks quickly too. She makes this yummy Indian dessert recipe for all the celebrations, occasions, festivals at home and specially for guests. I have never seen them making semiya payasam without javvarisi. My mom says addition of sago in semiya payasam helps to give more yield and also gives an appealing look to see the transparent tapioca pearls swimming with vermicelli in milk. You would have seen this kind of watery payasam in marraige feast and hotels. They serve in a small cup in drinkable consistency. In my house, both aachi and amma use nylon javvarisi (crystal, small sago) which is commonly found in Tamilnadu. But I have never tried kheer in this combination as I don’t get nylon javvarisi here. I can get white, big, pepper sized sago which we call as maavu javvarisi in Tamil. I thought javvarisi semiya payasam can be prepared only with small sized javvarisi.
Recently when I was talking to my mom and MIL, they told me to try semiya javvarisi payasam using this white sago itself. They told me the method and measurements clearly along with some tips. So I prepared it yesterday for my Thursday Guru pooja. Usually I make white, big sago payasam by soaking it at least for 4 to 8 hours or overnight. But yesterday I prepared this payasam by soaking the sago in hot water for just 15 minutes. It came out so well. I was so happy with the end result. Soon I will try to share this payasam recipe in a pressure cooker easily. For variations, you can use condensed milk / milkmaid instead of sugar.
Friends, now you too can make this yummy semiya javvarisi payasam irrespective of the sago variety by following this recipe with step by step pictures. I have also taken a video but iam yet to edit it. I will try to add the video soon.
Semiya javvarisi payasam
Semiya javvarisi payasam / sago vermicelli kheer in Tamilnadu style.
Water – 2 to 2.5 cups ( to cook javvarisi and semiya)
Boiled Milk at room temperature – 2 cups
Sugar – 3/4 cup
Cardamom -3 (crushed)
Cashew nuts - 5 (whole)
Dry grapes - 10
Ghee - 1 tbsp
HOW TO MAKE SEMIYA JAVVARISI PAYASAM
Wash and soak javvarisi in hot water for 15 minutes.
In the mean time, heat 1 tbsp ghee in a kadai.
Roast cashew nuts and dry grapes till golden. Remove in a plate.
Roast semiya for 2 minutes. Remove in a plate.
Roll Boil 2 cups of water in a vessel. Add the soaked javvarisi.
Cook in medium flame for 10 to 15 minutes till its semi transparent.
Add the roasted semiya and cook for another 10 minutes.
Both semiya and javvarisi will be well cooked, soft and transparent.
Add sugar, cardamom powder, roasted nuts. Mix well and boil till sugar melts.
Switch off the flame once payasam becomes thick.
Add boiled milk at room temperature to the hot payasam. Add half the quantity of milk for thick payasam.
Mix well and serve!
METHOD - STEP BY STEP PICTURES
Take a bowl and add the sago (I used white ones). Add hot water till 1 inch above the sago. Soak it for 15 minutes.
In the mean time, heat 1 tbsp ghee in a kadai. Roast cashews till light golden in color. Add the dry grapes and roast till bulgy. Remove cashews and dry grapes in a plate. Set aside.
Add semiya / vermicelli to the remaining ghee. Roast for 2 minutes. If you use unroasted semiya, roast till it turns light golden in color. It takes 5 to 7 minutes in low flame. I used roasted semiya. So I did it for 2 minutes.
Take 2 cups of water in a pan. Let it roll boil. Add the soaked sago pearls. Mix well. Let it cook in low to medium flame for 10 minutes. You can cover and cook it. Stay nearby and keep an eye on it. Stir it twice in the middle to avoid sticking to the bottom of pan. Cook till it becomes semi transparent. You should see less white parts in sago.
Once the sago is 3/4th cooked, add 1/2 cup more water and add the roasted vermicelli. Cover and cook till its done. It takes another 10 minutes in low to medium flame.
After the semiya and javvarisi are well cooked, add sugar and crushed cardamom. Mix and boil till sugar melts. Payasam becomes thick. Now switch off the flame.
Add boiled milk at room temperature to the hot payasam. Add milk according to the consistency you like. Do not boil the payasam after adding milk. It may give a curdled look. For thick, spoonable payasam add 1 cup milk. For thin, drinkable payasam, add 2 cups milk. Lastly add the roasted nuts. Mix well and set aside.
This payasam will remain in the same consistency for few hours. It won't become thick as we are adding milk at room temperature. It will thicken if you add hot milk or less milk. I made in a drinkable consistency like the ones served in marriages and hotels. You can enjoy drinking hot or refrigerate and serve cold as per your wish. Enjoy !
Note
For less sweetness, add 1/2 cup sugar.
Do not add more javvarisi than the mentioned quantity because adding more sago gives a porridge look to the payasam I feel.
While cooking javvarisi, stay nearby and keep checking it else javvarisi dissolves in water.
If you are using nylon variety sago, you have to dry roast it till puffy and white. Then cook it along with semiya because it takes lesser time to cook than the white, big sago.
Do not roll boil the payasam after adding milk. If you want to heat it, do in very low flame.
For variations, you can add a tbsp of badam milk powder at the end.
Try this easy, yummy semiya javvarisi payasam and enjoy !
When I was planning to share some kozhukattai varieties for Ganesh chaturthi, I came across this sugar free, dry fruits kozhukattai recipe using dates and nuts. The stuffing/ pooranam for this kozhukattai is prepared without jaggery and sugar. So this kolukattai recipe would be ideal for people who look for healthy options. Dry fruits pooranam is easy to make too. Just roast and grind, stuffing would be ready in minutes.
In North India, people make dry fruits and nuts modak by shaping it directly using a modak mould instead of stuffing in the kozhukattai dough. Its a no cook version. They call it as Khajoor modak. I made one and shared the picture below. So, you can make this kozhukattai without cooking or by stuffing in the kozhukattai maavu as shown in the description with pictures. Choice is yours.
Ok, lets see how to make easy, healthy dry fruits and nuts kozhukattai for this Vinayagar chaturthi festival with step by step pictures.
Below is the picture of dry fruits and nuts modak without stuffing in rice flour dough. You can eat this as such without steaming / cooking.
Dry fruits kozhukattai / Dates and nuts kozhukattai
Dry fruits kozhukattai without jaggery and sugar for Ganesh chaturthi festival
Store bought Kozhukattai flour or idiyappam flour - 1 cup
Water - as needed
Salt - 1/4 tsp
Gingely oil - 1/2 tsp
HOW TO MAKE DRY FRUITS KOZHUKATTAI
Heat 1 tsp ghee in a kadai. Roast the nuts till golden. Grind coarsely.
Collect in a plate. In the same kadai, roast the dates and cool down.
Grind to a smooth paste without adding water. Add the paste to the ground nuts.
Mix well to make the dry fruits pooranam. Make small balls and set aside.
To make kozhukattai dough, roll boil 2 cups of water adding few drops of gingely oil.
Take the store bought idiyappam / kozhukattai flour in a wide bowl. Add salt and mix well.
Add the water gradually. Mix with a ladle. Cover and rest for 5 minutes to become warm.
Knead it well using greased hands. Make a smooth dough.
Take a ball shaped dough. Shape it using a modak mould.
Keep one dry fruits ball in the center of mould and cover the kozhukattai with the dough.
Remove the kozhukattai gently and steam in a greased idli plate.
Kozhukattai becomes shiny after cooking. Switch off the flame.
Rest for 10 minutes. Remove the modak and serve hot !
METHOD - STEP BY STEP PICTURES
Heat 1 tsp ghee in a kadai. Roast the nuts in medium flame till slight golden in color. Cool down and grind to a coarse powder. Remove in a plate.
In the same kadai, roast the dates. Cool down and grind to a paste without adding water.
Mix the dates paste with powdered nuts. Dry fruits stuffing / pooranam is ready. Make big gooseberry sized balls for stuffing the dough and set aside.
This modak can be prepared in two ways. One is a no cook version. To make this, take a portion of stuffing and press it in the modak mould to shape it. Remove gently and keep in a plate. Follow the same for the remaining stuffing. You don’t have to steam this modak. You can serve and eat as such.
For the second version, make kozhukattai dough with store bought kozhukattai or idiyappam flour. To prepare kozhukattai dough, roll boil 2 cups of water adding 1/2 tsp of gingely oil.
Take the store bought rice flour in a wide bowl. Add little salt and mix well. Add hot water gradually and make a smooth, non-sticky dough. Cover and rest for 5 minutes to become warm. Grease your hands with oil and knead the dough for few minutes.
Cover the dough with a wet cloth to prevent drying. Now take the kozhukattai achu/ modak mould and grease with oil. Take ball shaped dough and press it inside the mould to spread it well. Make a dent in the center and place a dry fruits stuffing ball.
Take a small portion of dough and cover the stuffing. Press it well and open the mould. Remove the kozhukattai gently. Arrange in a greased idli plate.
Make the remaining kozhukattai in the same way and arrange in the plate. Roll boil water in an idli pot. Place the idli plate with kozhukattai and cover with the lid. Steam it for 10 minutes in high flame and switch off the flame.
Do not remove the kozhukattai when hot. It will break. Rest it in the idli plate for 5 minutes and then remove it gently. Offer to God and enjoy !
Note
Sweetness of dates is enough for the stuffing. So I didn’t add jaggery or sugar. You can add it based on your taste.
If you need more yield for the stuffing, add 1/2 cup of grated and roasted coconut to the nuts. In that case, add more dates for adjusting the sweetness.
I have not used cardamom here. You can add if you like.
Try this healthy dry fruits kozhukattai recipe and enjoy !
Ellu pooranam kozhukattai / ellu koulakkati (Sesame seeds modak in English) can be prepared in two ways. One is a no cook stuffing by just dry roasting the sesame seeds and grinding with coconut, jaggery and cardamom. Other one is by cooking the roasted sesame seeds in jaggery syrup to make the stuffing. I have already shared the no cook ellu pooranam last year. But we usually make the second version for Ganesh chaturthi neivedyam.
We also reserve some stuffing balls and offer ellu urundai to God. So today I thought of making a detailed post on our method of making ellu poorana kozhukattai. I always use black sesame seeds as I make it for festival. Also I tried making this ellu kozhukattai in different shapes like round, square, rectangle shapes without using modak mould. Ok, Lets see how to make ellu kolukattai/ sesame seeds modak with step by step pictures.
Powdered jaggery – 3/4 cup (Use 1/2 cup for less sweetness)
Grated coconut - 1/4 cup
Water - 1/4 cup
Cardamom powder – 1/4 tsp (optional)
Salt - a pinch
For kozhukattai dough
Idiyappam flour / Kozhukattai flour - 1 cup
Water - as needed
Cooking oil - a drop
Salt - a pinch
HOW TO MAKE ELLU KOZHUKATTAI
In a kadai, dry roast sesame seeds till it starts to splutter. Remove in a plate.
Melt jaggery adding water. Strain it. Again boil the syrup till frothy.
Add roasted sesame seeds, grated coconut and cardamom powder.
Mix well till the mixture starts to leave the sides of pan.
Remove in a plate. Make balls when warm. Set aside.
To make kozhukattai dough, boil water in a pan adding oil and salt.
Add to the flour and make a smooth dough.
Make shapes using mould or by hand. Stuff in sesame seed ball and shape it.
Boil water in an idli pot. Arrange the kozhukattai in idli pot.
Steam it for 8 to 10 minutes. Switch off and rest the modak for few minutes.
Then remove in a plate. Offer to God and enjoy !
ELLU POORANAM KOLUKATTAI - STEP BY STEP PICTURES
To make ellu pooranam, wash and dry the sesame seeds in a cloth for 30 minutes. But this step is completely optional. I don’t do it.
Heat a kadai and dry roast the sesame seeds till it starts to splutter. Remove in a plate.
In the same kadai, add jaggery and water. Heat and melt the jaggery. Strain the hot syrup using an iron mesh. Wash the kadai and add the strained syrup.
Boil till frothy. Add the roasted sesame seeds, grated coconut, cardamom powder and a pinch of salt. Mix well.
Cook in medium flame till the mixture becomes thick and starts to leave the sides of pan. Remove in a plate and spread it to becomes warm. Use a spoon and divide the mixture into small portions to make balls. This helps to roll balls easily once it becomes warm. So divide the mixture with a spoon when its hot.
Grease your hands with sesame oil and press it to make balls when warm. Reserve 3 balls to offer ellu urundai.
Now lets make the kozhukattai dough. Boil water in a pan adding few drops of oil and a pinch of salt. When the water roll boils, switch off the flame.
Add the hot water to 1 cup of kozhukattai flour gradually. Make a smooth, non-sticky dough. Cover with a wet cloth.
Make golf sized balls and set aside. Cover the remaining dough with wet cloth. Take a ball and make soppu / cup shape. Keep a ball and close the modak. Make all the kozhukattai and arrange in an idli plate.
Boil water in a idli pot. After the water comes to a roll boil, keep the idli plate. Cover and steam it for 10 minutes.
Enjoy !
Note
Adjust the quantity of jaggery as per taste.
Cardamom powder is optional
You can use white sesame seeds instead of black.
Dry roasting sesame seeds in mandatory.
Try this yummy ellu kozhukattai for this Ganesh chaturthi and enjoy !
Last year during Gokulashtami , I bookmarked this aval murkku recipe / Poha murukku to try. But I couldn’t do it. So this year, I started making my Gokulashtami recipes with this easy, instant murukku recipe without butter. I just used store bought rice flour, ground poha, pottukadalai maavu/ roasted gram dal flour, hot oil and spices for flavor. I never thought it comes out so crispy and crunchy. It was a super hit at home. I referred so many YouTube videos, blogs, cookbooks for this recipe.
When I was going through the comments section, I saw many people complained about more oil absorption. So I was also worried about it. But surprisingly, this aval murkku didn’t drink more oil as I thought. Due to the addition of roasted chana dal @ roasted gram dal flour (Pottukadalai maavu), it does absorb oil to some extent but not much. The crispness and flavor of this murukku is really good. For an instant chakli recipe, this is really good and quick to make. In this recipe, I have used thin poha / paper aval. You can use thick poha too.
For this Krishna Janmashtami, if you are planning to try some Instant murukku recipe, then you must try this. I am sure you will love it. Friends, lets see how to make instant aval murukku recipe with step by step pictures and video. Please check the NOTES section for all the details to make perfect murukku.
Poha / Pressed rice / rice flaked / Aval - 1/2 cup ( I used thin rice flakes)
Roasted gram dal / Pottukadalai - 1/4 cup
Hot cooking oil - 1 tbsp
Red chilli powder - 1 tsp
Hing / Asafetida - 1/4 tsp
Ajwain /Carom seeds - 1 tsp (crush in hands and add it)
Salt & water - as needed
Cooking oil – to deep fry ( I used refined oil)
HOW TO MAKE AVAL MURUKKU
In a mixie jar, grind poha and roasted gram dal to a fine powder.
Take a wide bowl. Sieve the ground poha mixture, rice flour.
Add red chilli powder, salt, hing and ajwain seeds crushed in hands.
Mix well. Add hot cooking oil and mix well. Then add water gradually.
Make a smooth, non-sticky dough. Cover with a wet cloth till use.
Take a chakli maker with round or star holes mould. Fill a portion of dough.
Press it in the back of ladle and shape the murukku as you like.
Heat oil and deep fry the murukku in batches. Cook both the sides till bubbles stop completely.
Remove and drain the excess oil in a tissue paper. Store in a box after the murukku cools down.
It stays good for a week. Enjoy !
METHOD - STEP BY STEP PICTURES
Take all the ingredients required to make aval murukku recipe. Grind aval /poha and roasted gram dal together to a fine powder.
In a wide bowl, place a sieve. Add the ground flour, rice flour and sieve well. To this, add red chilli powder, salt, hing and ajwain seeds by crushing in the hands slightly ( It helps to release more flavor). Mix well.
Add 1 tbsp of very hot oil to the flours. Mix using a ladle to handle the hot oil. Then mix it with your hands to spread the oil evenly all over the flour. After mixing, you should be able to hold and make a shape out of it. Refer picture below for better understanding.
Now add water gradually and make a smooth, non-sticky dough. This dough takes more water than usual. I used nearly 1.25 to 1.5 cups of water. Make sure the dough is not too hard with cracks or too soft and sticky. Cover the dough with wet cloth.
Take the murukku press/ chakli maker with round shaped holes or star holes as you wish. I used a 5 holed mould as shown in the picture below. Fill the dough and press to make shapes. Remember to cover the unused dough with a wet cloth always. It helps to prevent the drying.
Press the murukku in the back of ladle. If the murukku gets cut while pressing, you need to add more water to the dough. Heat oil to deep fry. Drop a pinch of dough. If it rises to top immediately, oil temperature is right. Lower the flame to medium and drop one or two murukku per batch based on the size of kadai.
Fry patiently in medium flame, flip and cook both the sides till bubbles stop completely. Do not cook in high flame. Murukku turns brown in color. Remove and drain in a tissue paper. Store in a box after the murukku cools down completely. Stays good and crispy for a week !
Note
You can use store bought plain rice flour for this recipe. No need to use idiyappam or kozhukattai flour.
I did not dry roast the flour.
I used thin poha here. You can use thick ones too.
Do not add more hot oil or more roasted gram. Then murukku absorbs more oil while cooking.
Always cover the murukku dough with a wet cloth while unused.
Murukku becomes hard if you reduce the quantity of hot oil. You can also use melted butter instead of hot oil.
Shaping will not be prefect if the dough is too hard with less moisture. String gets cut while pressing. To avoid this, sprinkle some water to the dough. Mix well and then shape it.
Heat of the oil should be correct for crispy murukku. If its too hot, murukku turns brown at the outside and inside remains soft.
If the oil starts smoking, you can switch off the flame. Bring it to right temperature and then start to fry again. Adjust the flame whenever needed.
Murukku turns soggy or soft if you don’t fry it until bubbles cease. So fry in medium flame patiently till bubbles stop completely.
Murukku turns hard if you add less fat or if the dough is too tight.
Murukku absorbs more oil if the oil temperature is less or if the dough is sticky and wet.
Try this easy, crispy Aval murukku / Poha chakli for this Gokulashtami and enjoy !