Search Chitra's Food Book

Showing posts with label HEALTH FOOD. Show all posts

July 8, 2014

VAZHAIPOO KUZHAMBU RECIPE/BANANA FLOWER GRAVY-VAZHAIPOO RECIPES

Banana-flower-gravy
Vazhaipoo kuzhambu recipe was in my to-do list for years I should say. It is also known as Saiva meen kulambu in Tamil. As we all know cleaning and chopping vazhaipoo/Banana flower is the most time consuming job that tests our patience. But when we see its health benefits, we won’t feel lazy to do. Just watch some movie or megaaaa serial. This job will become much more easy. 

Choosing & buying a proper vazhaipoo is itself an art. Last few times when I bought banana flower, it was too bitter, I couldn’t prepare anything with it and finally I had to throw it out. So I have made a separate post with some tips for buying & cleaning vazhaipoo with stepwise pictures & health benefits. For this gravy, you don’t need to use the entire flower as we need only the tender white part.

Usually I make vazhaipoo usili or poriyal whenever I buy plantain flower. As we are bored of it, I tried Vazhaipoo vadai & this kuzhambu recipe for the first time. Both were awesome in taste. The best part is Sendhil & Raksha ate very well Thumbs up. Its a very easy one pot gravy. There is no chopping or grinding process. Only thing is you have to extract one cup of coconut milk. As I had readymade storebought coconut milk powder in hand, my job became very simple and i made this gravy within 15 minutes.

Vazhaipoo kuzhambu
The picture looks like spicy Parota salna with oil floating on top right ?. But it takes very less oil & medium spicy, only the looks make u feel that.I forgot to tell u the source for this recipe.Its from Prema’s cook book .Thank u so much Prema sundar. I learnt a healthy n yummy gravy from you.
This gravy tastes the best when mixed with plain rice topped with ghee ! Moreover this gravy is very healthy and the tender bud & flower parts are very good for stomach ulcers.The combination of coconut milk makes it more healthy.Just try this gravy once for a change from the usual vazhaipoo recipes.U may love it like us.
Vazhaipoo kuzhambu recipe

Vazhaipoo kuzhambu recipe


Vazhaipoo kuzhambu recipe Banana flower gravy/Vazhaipoo kuzhambu - Banana blossom cooked in coconut milk & spices !
Cuisine: Indian
Category: Lunch
Serves: 3
Prep time: 30 Minutes
Cook time: 15 Minutes
Total time: 45 Minutes


INGREDIENTS

  • Vazhaipoo/Banana flower - 1 no
  • Big onion - 1 no (very big) OR 2 nos (if small)
  • Green chilli -1 no (slit)
  • Red chilli powder – 1/2 - 1 tsp (use 1 tsp for spicy gravy)
  • Coriander powder – 1/2 tsp
  • Jeera powder - 1 tsp
  • Coconut milk - 3/4 cup ( use 4 tbsp coconut milk powder if using)
  • Cumin seeds/Jeera – 1/2 tsp
  • Curry leaves - few
  • Cooking oil - 1.5 tbsp
  • Salt & water - as needed
  • Lemon juice – optional
  • Rice flour – 1 tsp (use only if the gravy is too watery)
HOW TO MAKE VAZHAIPOO KUZHAMBU - METHOD

  • Wash the whole banana flower.Grease your hands with oil or wear gloves to prevent blackening of hands.Take some curd diluted in a cup of water.Spread a newspaper on the floor or table. Peel the outer layers of banana flower. Remove the flower and keep it immersed till u use. If you are not cooking immediately,no need to clean it. Just keep the flower immersed in buttermilk in the refrigerator and you can clean it whenever you find time. It stays fresh.
  • When you keep on peeling the layers, the color of the purple cover will change to a pale white and the flowers will become more tender as you reach the inner part. Collect these tender flowers and keep peeling the layers till whole blossom becomes small enough to hold in your palm.
Vazhaipoo kuzhambu step1
  • Slit the blossom vertically into two. Keep the tender flowers immersed in a bowl of buttermilk till you use. No need to chop them. Mix the coconut milk powder in 3/4 cup of water & make a thick milk OR grate 3/4 cup of coconut and take the extract adding 3/4 cup of warm water. Set aside.
Vazhaipoo kuzhambu step2
Vazhaipoo kuzhambu step5
  • In a pressure cooker base, heat oil and splutter cumin seeds. Add chopped big onions, curry leaves and slitted green chillies. Saute till onion turns transparent.
Vazhaipoo kuzhambu step3
  • Now add all the powders mentioned above and mix well. Lastly add the coconut milk with 1/2 cup of water. When it comes to roll boil, add the tender flowers immersed in buttermilk.
  • Add the required salt and check for spiciness & taste. Pressure cook it in low flame for one whistle. Switch off & after the steam is released,open the cooker. U will see the layer of oil floating on top. Mix well.If the gravy is very watery and very thin, add little rice flour diluted in water, add to the kuzhambu and allow it to boil till it thickens.
Vazhaipoo kuzhambu step4
  • Transfer to a serving bowl and add some lemon juice if its more spicy.
Vazhaipoo kuzhambu step6
Mix with rice topped with few tsp of ghee.Good to taste & Good for health too !
Enjoy !

Note

  • If you don’t have jeera powder, feel free to skip it. Saute jeera seeds instead along with onions. Jeera is good for digestion of coconut milk.
  • I used Aashirvaad chilli powder here. U can use any kashmiri chilli powder to get this awesome color.
  • This gravy looks reddish but when u mix well it turns to pale white as u see in the plate picture
  • Add ghee while eating. It helps to enhance the taste and also increases the medicinal value of this gravy.
Serve this healthy banana flower gravy with any poriyal. I served with easy vendakkai poriyal. 
Vazhaipoo kuzhambu lunch menu

Continue Reading...


July 2, 2014

RAMADAN NOMBU KANJI RECIPE | RAMZAN VEG NOMBU KANJI | IFTAR RECIPES

Muslim nombu kanji

Ramadan nombu kanji recipe in my blog may be surprising to some of you. Being a passionate food blogger, I love to try all unique recipes from all cuisines. This is one such recipe which I was longing to try. As I had tasted this porridge in my childhood days from my Muslim friends, I wanted to try the same on my own.

As Ramadan month has started all our Muslim friends would be under fasting from Dawn to dusk. Generally muslims in Tamilnadu and Kerala break their fasting with this “Nombu kanji/Gruel “ which they get from masgid/Mosque. Ramadan is a time of spiritual reflection, improvement and increased devotion and worship. The act of fasting is said to redirect the heart away from worldly activities & its purpose being to cleanse the soul by freeing it from harmful impurities. Food and drink is served daily, before sunrise and after sunset. Pre-fast meal is called Suhoor and Fast-breaking meal after sunset is known as Iftar. 

For breaking the fast, they begin with dates, continue with salad & main course followed by desserts. Usually this Nombu kanji is served along with vada, bonda or samosa( some deep fried snacks). Source:Wikipedia & allaboutislam

I must thank my friend Halima for sharing this recipe and their customary practices. She told this porridge is the most important Iftar recipe for them & they get this porridge from the mosque everyday to break their fasting. She told it would be much tastier than the ones prepared at home. As Iam a pure vegetarian, she shared her vegetarian version happily and also encouraged me to post in my blog. Its a very easy one pot meal which is very good for our health too.

With the smell of masalas and the flavour of coconut milk, this porridge was awesome. I loved it a lot & I would say this is the best porridge recipe I have ever tasted. U can adjust the consistency based on your wish. Ok , Lets see how to make this tasty, easy Muslim special nombu kanji at home. Before that, I would like to wish all my Muslim friends a very happy Ramadan. 

Ramadan nombu kanji recipe

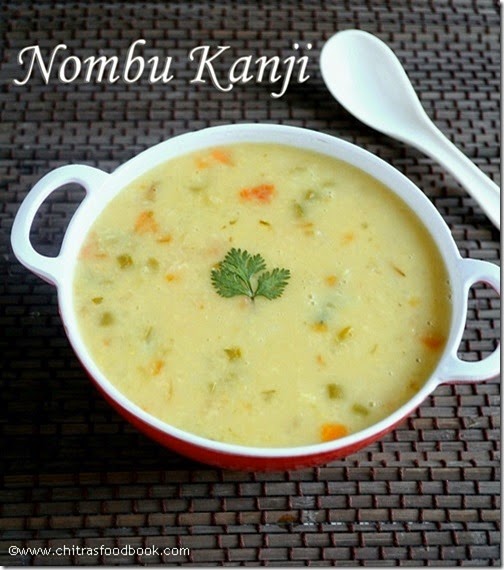
Muslim Ramadan Nombu Kanji recipe


Muslim Nombu Kanji recipe Ramadan nombu kanji recipe for Iftar
Cuisine: Indian
Category: Breakfast
Serves: 3
Prep time: 10 Minutes
Cook time: 20 Minutes
Total time: 30 Minutes


INGREDIENTS
1 cup = 200ml
To pressure cook
  • Raw rice - 1/4 cup
  • Moong dal - 1 tbsp
  • Turmeric powder - 1/8 tsp
  • Water – 3-4 cups
  • Carrot – 1no  (small)
  • Beans – 3-5 nos
  • Peas - 2 tbsp
  • Grated Cabbage - 2 tbsp
  • Tomato – 1no  ( small sized)
  • Green chilli – 1no (slit)
  • Salt - as needed
  • Curry masala powder/Biryani masala powder - 1/2 tsp
  • Coriander leaves - 2 tbsp(chopped)
  • Mint leaves - 1 tbsp
To saute
  • Cooking oil - 1 tbsp
  • Big onion - 1 no
  • Cinnamon - 1 small piece
  • Cloves - 1no
  • Cardamom - 1 no
  • Bayleaf - 1 small
  • Ginger,garlic paste - 1/4 tsp
  • Cumin seeds - 1/4 tsp
Thick coconut milk - 1 cup
HOW TO MAKE RAMADAN NOMBU KANJI - METHOD

  • Wash the rice and dal. Chop all the vegetables finely. Grate one cup of coconut and extract 1 cup of milk from it. Set aside.(if using coconut milk powder, mix 2-3 tbsp of powder in one cup of water to make a thick coconut milk).
  • Take all the ingredients mentioned under “to pressure cook” in a cooker base. Add salt, turmeric powder, masala powder coriander leaves, Mint leaves(if using) and required water. For this quantity, you have to add nearly 4 cups of water to make a thin porridge. Pressure cook in low flame till one whistle. Make sure rice and dal should be well mashed.
  • After the steam is released, open the cooker and mash the rice n dal along with vegetables very well using a whisk/Mathu or beater. Rice should not be visible.
Ramadan nombu kanji recipe step1
  • Now in a kadai, heat oil and saute cinnamon, cloves, cardamom, bayleaf, cumin seeds, finely chopped onions, g&g paste. Saute till raw smell goes off.
  • Add this to the cooked porridge. Add one cup of coconut milk to the porridge and allow it to boil well for 5 minutes in low flame. Add more water if necessary to adjust consistency.
Ramadan nombu kanji recipe step2
  • Switch off the flame and transfer to a serving bowl. Enjoy with vada, bonda, bajji or samosa!

Note
  • Generally Muslims cook the rice and dal separately and vegetables with meat or chicken separately. Mash well and mix them together. If you want to add mutton or broiler pieces, follow this procedure.
  • The thing is all the ingredients should be mashed very well.
  • U can add finely chopped mint leaves along with coriander leaves. But I din’t add here.
  • Adding turmeric powder is optional here. But I used it as per my friend’s recipe.
  • U can make this porrdige thick or thin. My friend told usually this porrdige would be in drinkable consistency and they drink in “Vattal/curved bowl” .
  • If you browse through, you can find many variations for this particular recipe on Google. But Iam sure everything tastes great in its own way.
  • I used readymade coconut milk powder for making thick coconut milk. Even then the taste was good. 

Enjoy this Muslim special Nombu kanji with paruppu vadai /Bonda / Bajji or samosa. It tastes heavenly !
Ramadan nombu kanji recipe

Continue Reading...


June 16, 2014

MANATHAKKALI KEERAI THANNI SAARU RECIPE

manathakkali keerai thanni saaru
Manathakkali keerai/Black night shade is a wonderful green variety which has lots of health benefits. It is also called as Wonder berry. It is called as Kamanchi chettu in Telugu, Makoi in Hindi, Manathakkali in Malayalam, Kakke soppu or Ganike soppu in Kannada and Black night shade in English. 

We usually use sun dried berries in vathakuzhambu. But we make this thanni saaru with manathakkali keerai or agathi keerai whenever we get mouth ulcers, stomach inflammation & pains. Its a very good home remedy for it and you can feel the improvements in a day. The combination of manathakkali, small onions and coconut milk gives a great relief from mouth ulcers. Its very simple to do and tastes good when mixed with rice and ghee. Lets see how to make this manathakkali keerai thanni saaru recipe.
manathakkali keerai

Manathakkali keerai thanni saaru


Manathakkali keerai thanni saaru Manathakkali keerai thanni saaru - A good remedy for mouth ulcer
Cuisine: Indian
Category: Health food
Serves: 2
Prep time: 10 Minutes
Cook time: 10 Minutes
Total time: 20 Minutes


INGREDIENTS

  • Manathakkali keerai - 1 cup (tightly packed)
  • Grated coconut -1/2 cup
  • Cumin seeds - 1/2 tsp
  • Small onion - 10 nos
  • Salt - as needed
  • Sugar – a pinch
  • Milk - little (optional)

HOW TO MAKE THANNI SAARU - METHOD
  • Take out the leaves and discard the stem from manathakkali keerai. OR agathi keerai.  Chop small onions finely.
  • In a pressure cooker base , add water and keep a small vessel, take the keerai leaves and small onions adding 1 cup of water OR arisi kazhani/mandi with a pinch of sugar & salt in the vessel.
  • Cook in low flame till its soft. Keerai will be cooked well in 20 to 30 minutes( PS: This keerai takes more time to cook)
  • In the mean time, grind the grated coconut with 1/2 cup of water and take the extract.
  • After the keerai is cooked well, add coconut milk, salt and mix well. Make sure you don’t boil the keerai after adding coconut milk. Just heat it for few seconds in low flame and let it become warm.
  • Crush cumin seeds and add it to the cooked keerai.
manathakkali thanni saaru tile1
  • Check for taste, strain and drink the water. Consume the leaves with onions as such or by mixing with plain rice adding a tsp of ghee.


Note

U can directly pressure cook the leaves instead of keeping inside a vessel. I usually cook this along with rice or vegetables.. So I keep in a separate vessel.

U can follow the same procedure and make this using agathi keerai .

Healthy manathakkali keerai thanni saaru is ready to drink !
manathakkali-keerai-thanni- saaru

Do check out my Easy Manathakkali vatha kuzhambu if interested.

Continue Reading...


June 11, 2014

NEER NELLIKAI | GOOSEBERRY PICKLE RECIPE–EASY PICKLE RECIPES

Neer nellikai
I learnt this from my MIL. As I mention in all my posts,she is an expert in making pickles. She is my inspiration to try oorugai on my own and that too this neer nellikai is very easy to prepare. Even a beginner who has zero knowledge in making pickles can make it easily. As you all know, gooseberries has innumerable health benefits. So we include it in our food regularly either as pachadi or pickle. Do include gooseberries in any form in your regular diet.It will really do wonders. Lets see how to make this easy nellikai oorugai ..
Neer nellikai

Gooseberry pickle


Gooseberry pickle Gooseberry pickle recipe
Cuisine: Indian
Category: Pickle
Serves: 12nos
Prep time: 10 Minutes
Cook time: 20 Minutes
Total time: 30 Minutes


INGREDIENTS

  • Gooseberry - 12 nos
  • Cooking oil – 1 tbsp
  • Red chillies - 10 nos
  • Asafetida/Hing - 1/4 tsp
  • Turmeric powder - 1/4 tsp
  • Crystal salt - as needed
  • Water - 2.5 cups
Dry roast n grind
  • Fenugreek seeds - 1 tsp
To temper
  • Sesame oil - 2 tsp
  • Mustard seeds - 1/2 tsp
METHOD

  • Dry roast methi seeds till golden brown and remove.In the same pan,heat oil in a pan.Saute gooseberries in oil for 2-3 minutes till it shrinks a bit.It helps the gooseberries to soak faster. 
  • Grind red chillies,methi seeds,salt & turmeric powder coarsely.
  • In a wide bowl, take the sauteed gooseberries.Add water to cover it.Add the ground powder.Mix well.Check for taste.Add more salt & chilli powder if necessary.
  • Temper all the ingredients & add to gooseberry.U can taste it on the same day.It will taste spicy n bitter.U will get the actual taste only after 3-5 days.
U can refrigerate & store for months.It stays fresh & good !


Note

  • Sauting gooseberries are optional but we usually do this for quick soaking.
  • Adjust the quantity of chilli powder as per ur taste buds.
Enjoy n have a healthy side dish for curd rice.
Gooseberry pickle
Continue Reading...


May 13, 2014

RAGI PORRIDGE(SWEET,SPICY VERSION)/RAGI KANJI-RAGI RECIPES


Ragi kanji recipe
Ragi malt aka ragi kanji recipe is a very popular & healthy breakfast recipe in Tamil nadu as well as in Karnataka.In Tamil,we call it as keppai kanji.As my MIL is mildly diabetic,she makes it very often for her breakfast.She also tells us to consume this kanji as it keeps the body cool during summer & it has high calcium content which is much needed for ladies nowadays.Its a very healthy drink to have during fasting  & which keeps us energetic and active the whole day.When Raksha was a baby,i used to give this porridge to her twice a day.I have shared in “Notes” section on how to make this porridge for babies.Here in Bangalore,most of the people consume ragi in the form of porridge or Ragi mudde.So whatever may be the dish,it would be better to include ragi regularly in our diet to stay healthy and fit.In this post,i have shared sweet and spicy porridge which i learnt from my MIL.She makes in two ways.One using ragi flour and the other one with ragi grains by soaking it overnight.I felt porridge made out of ragi grains is more flavourful than the one with flour.Sendhil loves spicy version more than sweet porridge. But my vote is for sweet versionSmile.Sweet version can be made with or without milk too.Friends,Do try this healthy porridge recipe and mail me which one u liked itSmile with tongue out .
Ragi sweet porridge recipe


Spicy ragi porridge

Ragi porridge recipe


Ragi porridge recipe Ragi kanji/Finger millet porridge recipe - Sweet and spicy versions
Cuisine: Indian
Category: Breakfast
Serves: Serves 2
Prep time: 10 Minutes
Cook time: 20 Minutes
Total time: 30 Minutes


INGREDIENTS
For porridge
  • Ragi flour - 1/4 cup
  • Water - 2 cups
For sweet version
  • Ragi Porridge - 1 cup
  • Grated jaggery -1.5-2 tbsp
  • Cardamom - 1 seed(crushed)
  • Water - little
  • Salt- a pinch
  • Boiled Milk - as needed(optional)
  • Chopped nuts(optional)
For spicy version
  • Ragi Porridge - 1 cup
  • Salt - as needed
  • Curd – 2 tbsp
  • Water – 1/4 cup
To temper
  • Oil - 1 tsp
  • Mustard seeds - 1/4 tsp
  • Urad dal -1/4 tsp
  • Curry leaves - few
  • Red chilli – 1/2 no(pinched)
  • Coriander leaves - few(optional)
METHOD

  • In a wide bowl,mix the ragi flour in the mentioned quantity of water.Mix without lumps using a whisk and boil for few minutes till it becomes thick (porridge consistency).Stir whenever needed.
Ragi-porridge-recipe
  • Switch off the flame and divide the porridge in two bowls.
  • For sweet version,add grated jaggery to one bowl and boil for few minutes till jaggery melts and raw smell emanates.Switch off the flame and add cardamom powder,milk.Stir well and serve hot or warm(Remember, this porridge thickens after it cools down.So add more milk or water to adjust the consistency before serving).Add chopped nuts( if using) and serve.Generally ragi takes less jaggery.So use carefully.Do not add more jaggery.If you feel sweetness is more,add more milk or water to adjust it.
Ragi-sweet-porridge-recipe
  • For spicy version,temper all the ingredients given above and add to the porridge.
  • Whisk curd & water.Make thick buttermilk and add to porridge.To this add salt,hing Mix well and serve.Add fresh curry leaves,coriander leaves & serve.Ragi porridge needs lesser salt than usual.So add accordingly.
Spicy-ragi-porridge

Note

  • Color of this porridge may vary based on the quantity of milk & buttermilk u add.
  • To make this porridge more flavourful,soak ragi grains overnight and grind it smooth the next morning adding required water.Dilute it and make porridge as given above.It tastes fresh and more flavourful too.
  • Use fresh curd for spicy version.If using sour curd,use very less quantity else porridge will turn too sour.Generally ragi needs less jaggery & less curd.So adjust as per ur taste buds.
  • For variations,u can add sugar or palm jaggery in sweet version.U can also omit milk and add water to adjust the consistency.
  • Add finely chopped nuts if making for kids.
For babies of 6 months old:
If giving for the first time,take 2-3 tsp of ragi in a bowl,Add 1 cup of water,mix without lumps.Boil till it thickens and becomes shiny.Make sure u stir well else it would be burnt in the bottom.After it thickens,add sugar & cardamom powder OR salt & thick curd.Mix well & serve in spoonable consistency.
If u want to feed in bottle,add some milk & sugar OR  little salt and buttermilk,make it runny and adjust sugar and feed.

Enjoy this healthy porridge for ur breakfast.It tastes yummy and filling too Smile.
Ragi porridge recipe

Continue Reading...


April 29, 2014

RAGI PUTTU RECIPE-SWEET,SPICY VERSION

 Ragi-puttu-recipe

Ragi is one of the healthiest and easily available millets all over the world. It is called as Finger Millet in English, Kezhvaragu/keppai/aariyam in Tamil, Ragi in Hindi & kannada, Ragulu, Kooralu in Telugu & Panjapulle, Moothari in Malayalam, Madua in Bengali & Nachni in Marathi. It has numerous health benefits and the most important is it is rich in calcium and fiber. 

I love to try varieties of ragi recipes. Recently I posted Ragi idli & dosa, fermentation method. Here comes yet another interesting and very tasty breakfast recipe, Ragi puttu. I learnt this from my MIL. Last time when she came here, she prepared this puttu for us without using a puttu maker. 

She prepared two versions, sweet puttu with jaggery & spicy version with onions and chillies. It was very nice and soft. She also insisted me to blog this recipe as it will help diabetic people to try a variety of ragi recipe. Procedure is little bit lengthy but its totally worthy to try. Do try this ragi puttu recipe for your breakfast. I am sure your family would love it.

Ragi-sweet-puttu


Spicy-ragi-puttu-recipe

Ragi puttu recipe-Sweet n spicy versions


Ragi puttu recipe-Sweet n spicy versions Soft,healthy and tasty ragi puttu recipe without using a puttu maker !!
 
Cuisine: Indian
Category: Breakfast recipes
Serves: 4
Prep time: 10 Minutes
Cook time: 15 Minutes
Total time: 25 Minutes


INGREDIENTS
For puttu
  • Ragi flour - 2 cups
  • Wheat flour- 2 tsp
  • Gingely oil – 2 tsp
  • Salt -1 tsp
  • Water - as needed
  • chana dal or moong dal - 3 tbsp
For sweet version
  • Puttu flour - 1 cup
  • Grated jaggery - 1/2 cup
  • Cardamom - 2 nos (crushed)
  • Grated coconut - 2 tbsp
For spicy version
  • Puttu flour - 1 cup
  • Salt - as needed

To temper & saute

  • Mustard seeds - 1/2 tsp
  • Urad dal - 1 tsp
  • Big onion - 1 no (finely chopped)
  • Green chillies - 2 nos
  • Curry leaves - few
  • Coconut oil - 2 tsp
  • Crushed Cumin seeds -1 tsp
HOW TO MAKAE RAGI PUTTU - METHOD

  • Take ragi flour & wheat flour,oil in a wide bowl. Mix the required salt and little water in a separate bowl. Sprinkle the salt water on ragi flour and mix well till you are able to make a shape as shown in the picture below.  Now sieve this flour using a puttu sieve(puttu salladai-with big holes) and collect the flour.

ragi-puttu-step1 ragi-puttu-step2

  • Heat water in a idli pot. Keep a small bowl inside the idli pot and put chana dal. Cover it with required water.
  • Grease idli plate with little oil and spread the puttu flour in the plate. Make some holes and Steam it for 15 minutes. By this time, dal will also be blossomed. Remove, discard the excess water in the dal and set aside.

ragi-puttu-step3

  • Remove the flour and divide into two batches.Use one cup of flour for sweet puttu and the remaining one for spicy puttu.
  • For sweet version : Melt jaggery adding little water, strain, add cardamom powder. Add the puttu flour, half of chana dal and grated coconut. Mix well. Serve immediately.

ragi-puttu-step4

  • For spicy version,heat oil in a kadai and temper all the above said ingredients.
  • Saute onions,chillies, ginger bits and add the ragi flour & cooked chana dal. Check for salt and add more if needed.
  • Lastly add grated coconut , mix well and serve hot !

ragi-puttu-step5


Enjoy !


Note

  • For variations,add sugar in place of jaggery syrup. It would be easier but addition of jaggery is healthier than sugar.
  • U can use moong dal instead of chana dal. Keep in mind, dal should not be over cooked. It should just blossom.
  • For spicy version, you can use big onions instead of small onions.

sSpicy-ragi-puttu
Healthy, tasty ragi puttu is ready for breakfast !

Ragi puttu recipe


Continue Reading...